文章目录
- 19.MyBatis
- 查询单行数据
- `@MapperScan`
- 结果映射
- 配置核心文件
- @Results自定义映射到实体的关系
- 多行数据查询-完整过程
- 插入数据
- 配置mybatis 控制台日志
- 更新数据
- 删除数据
- 小结
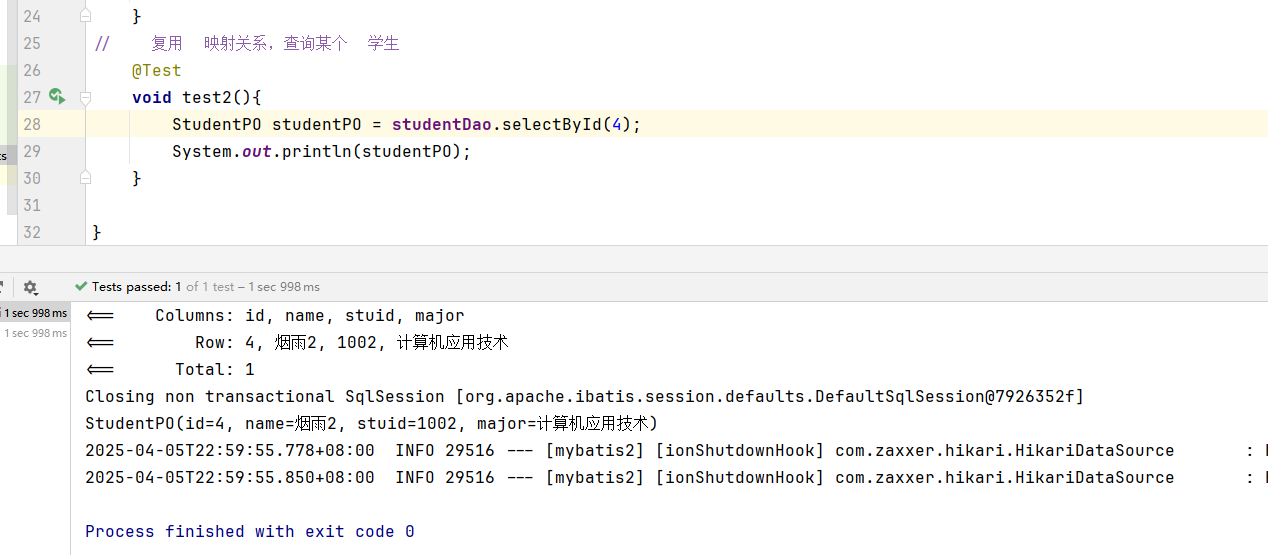
- 通过id复用结果映射模板
- xml处理结果映射
19.MyBatis
数据库访问 MyBatis,MyBatis-Plus 国内很常用,掌握了 MyBatis,MyBatis-Plus 就会了大部分了。MyBatis-Plus
附加的功能需要单独学习。我们以 MyBatis 来自介绍 Spring Boot 集成 ORM 框架。
MyBatis 使用最多的是 mapper xml 文件编写 SQL 语句。本章使用 MyBatis 的注解,JDK 新特性文本块,以
及 Record 完成 java 对象和表数据的处理。
单表CRUD
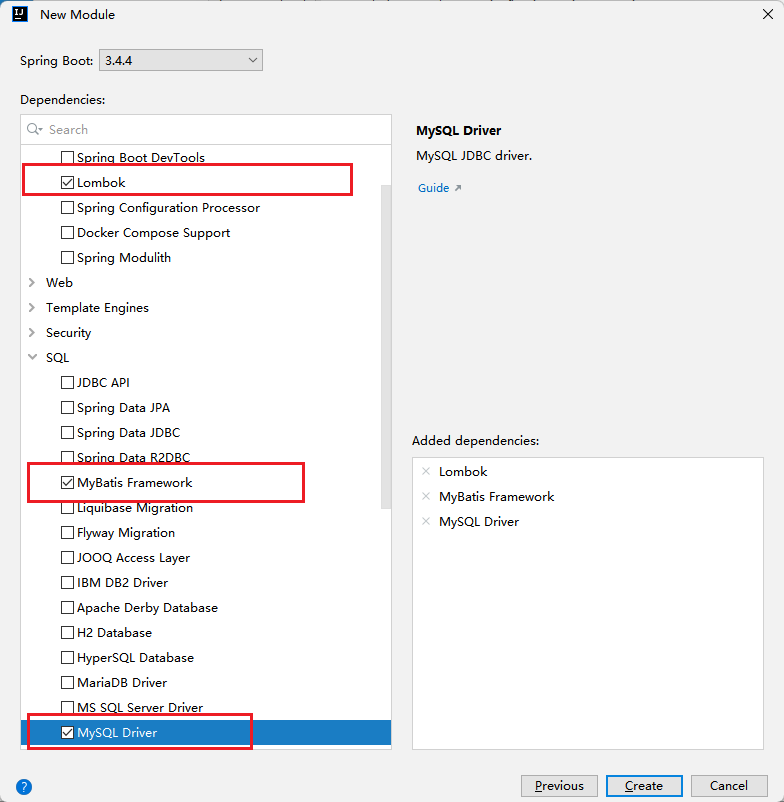
首先向 blog 数据库的 article 表添加新的文章,以及修改,查询文章。在新工程 Lession10-MyBatis 集成 MyBatis 框架。依赖需要 mysql 驱动、mybatis 依赖,Lombok。
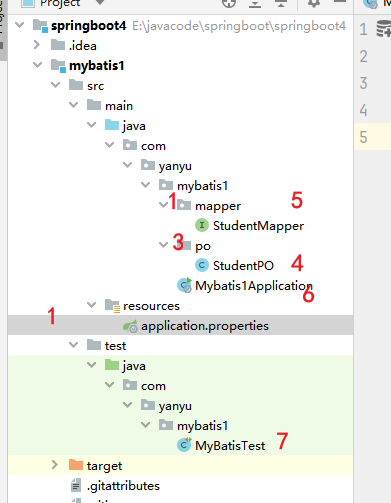
创建工程
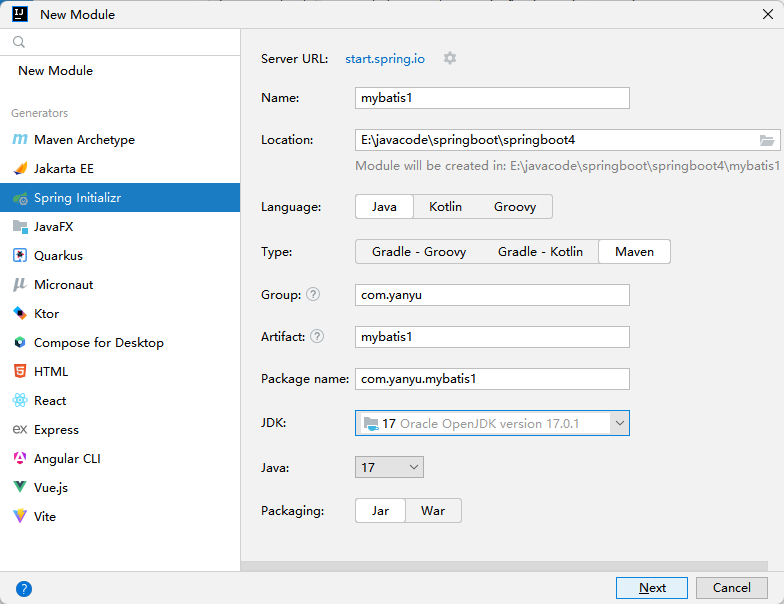
添加依赖
查询单行数据
application.yml
#HikariCP 是一个高性能的 Java 数据库连接池,也是 Spring Boot 的默认数据源实现。
spring.datasource.type=com.zaxxer.hikari.HikariDataSource
#配置数据库的基本属性
spring.datasource.driver-class-name=com.mysql.cj.jdbc.Driver
spring.datasource.url=jdbc:mysql://localhost:3306/school?serverTimezone=Asia/Shanghai&useUnicode=true&characterEncoding=utf8&autoReconnect=true&useSSL=false
spring.datasource.username=root
spring.datasource.password=yanyu666
数据实体
package com.yanyu.mybatis1.po;

import lombok.Data;

/**
 * @Author yanyu666_508200729@qq.com
 * @Date 2025/4/2 22:24
 * @description:
 */
@Data
//  表的字段名字 与实例变量一致,才能映射,或者单独配置,使其支持 驼峰
public class StudentPO {
    private Integer id;
    private String name;
    private String stuid;
    private String major;

}
@MapperScan
@MapperScan 是 MyBatis 和 MyBatis-Spring 提供的一个注解,用于指定 MyBatis 的 Mapper 接口所在的包路径,从而让 Spring 容器能够自动扫描并注册这些 Mapper 接口为 Bean。它通常用于简化 MyBatis 的配置过程。
作用
- 自动扫描 Mapper 接口:
@MapperScan注解可以指定一个或多个包路径,Spring 容器会自动扫描这些包路径下的所有接口,并将这些接口注册为 Spring 的 Bean。 - 简化配置:在传统的 MyBatis 配置中,通常需要手动在 Spring 配置文件中声明每个 Mapper 接口的 Bean。使用
@MapperScan后,可以通过注解的方式自动完成这些操作,减少了配置的工作量。
使用方法
@MapperScan 注解通常放在 Spring 的配置类(如 @Configuration 类)或 Spring Boot 的主应用类(如 @SpringBootApplication 类)上。它可以通过以下方式使用:
单个包路径
java复制
@MapperScan("com.yanyu.mybatis1.mapper")
public class MyApplication {
}
在上面的代码中,@MapperScan 指定了一个包路径 com.yanyu.mybatis1.mapper,Spring 容器会扫描该包路径下的所有接口,并将这些接口注册为 Spring 的 Bean。
启动类:指定扫描的接口
package com.yanyu.mybatis1;

import org.mybatis.spring.annotation.MapperScan;
import org.springframework.boot.SpringApplication;
import org.springframework.boot.autoconfigure.SpringBootApplication;

@SpringBootApplication
@MapperScan("com.yanyu.mybatis1.mapper")
public class Mybatis1Application {

	public static void main(String[] args) {
		SpringApplication.run(Mybatis1Application.class, args);

	}

}
查询接口
package com.yanyu.mybatis1.mapper;

import com.yanyu.mybatis1.po.StudentPO;
import org.apache.ibatis.annotations.Param;

import org.apache.ibatis.annotations.Select;

/**
 * @Author yanyu666_508200729@qq.com
 * @Date 2025/4/2 22:30
 * @description:
 */
//@MapperScan("com.yanyu.mybatis1.mapper")  会自动扫面改接口的资源,并注册到容器
public interface StudentMapper {
//      按主键查询
        @Select("""
            select id,name,stuid,major
            from student where id = #{studentId}
            """)
//        查询
        StudentPO selectById(@Param("studentId") Integer id);


}
单元测试
package com.yanyu.mybatis1;
import com.yanyu.mybatis1.mapper.StudentMapper;
import com.yanyu.mybatis1.po.StudentPO;
import org.junit.jupiter.api.Test;
import org.springframework.beans.factory.annotation.Autowired;
import org.springframework.boot.test.context.SpringBootTest;
/**
* @Author yanyu666_508200729@qq.com
* @Date 2025/4/2 22:57
* @description:
*/
@SpringBootTest
public class MyBatisTest {
@Autowired
StudentMapper studentMapper;
@Test
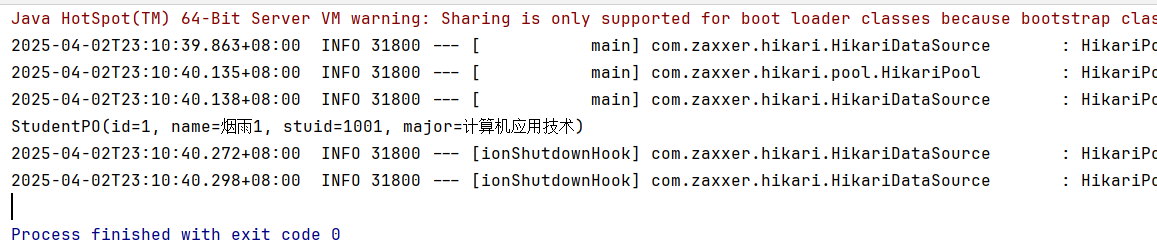
void test1(){
StudentPO studentPO = studentMapper.selectById(1);
System.out.println(studentPO);
}
}
结果映射
配置核心文件
字段名                实体实例变量名
name                   name
user_name              userName
@Results自定义映射到实体的关系
package com.yanyu.mybatis1.mapper;

import com.yanyu.mybatis1.po.StudentPO;
import org.apache.ibatis.annotations.Param;

import org.apache.ibatis.annotations.Result;
import org.apache.ibatis.annotations.Results;
import org.apache.ibatis.annotations.Select;

/**
 * @Author yanyu666_508200729@qq.com
 * @Date 2025/4/2 22:30
 * @description:
 */
//@MapperScan("com.yanyu.mybatis1.mapper")  会自动扫面改接口的资源,并注册到容器
public interface StudentMapper {
//      按主键查询
        @Select("""
            select id,name,stuid,major
            from student where id = #{studentId}
            """)
//        自定义查询结果映射关系
        @Results(id = "zidingyi",value = {
                @Result(id = true,column = "id",property = "id"),
//                id = true 说明字段id 是主键                 与实体一致
                @Result(column = "name",property = "name"),
                @Result(column = "stuid",property = "stuid"),
                @Result(column = "major",property = "major")
//                可以根据实体的名字,进行自定义,来处理字段名与实体不一致问题


        }
        )
        StudentPO selectById(@Param("studentId") Integer id);


}
多行数据查询-完整过程
- 以集合进行处理
<?xml version="1.0" encoding="UTF-8"?>
<project xmlns="http://maven.apache.org/POM/4.0.0" xmlns:xsi="http://www.w3.org/2001/XMLSchema-instance"
         xsi:schemaLocation="http://maven.apache.org/POM/4.0.0 https://maven.apache.org/xsd/maven-4.0.0.xsd">
    <modelVersion>4.0.0</modelVersion>
    <parent>
        <groupId>org.springframework.boot</groupId>
        <artifactId>spring-boot-starter-parent</artifactId>
        <version>3.4.4</version>
        <relativePath/> <!-- lookup parent from repository -->
    </parent>
    <groupId>com.yanyu</groupId>
    <artifactId>mybatis2</artifactId>
    <version>0.0.1-SNAPSHOT</version>
    <name>mybatis2</name>
    <description>mybatis2</description>
    <url/>
    <licenses>
        <license/>
    </licenses>
    <developers>
        <developer/>
    </developers>
    <scm>
        <connection/>
        <developerConnection/>
        <tag/>
        <url/>
    </scm>
    <properties>
        <java.version>17</java.version>
    </properties>
    <dependencies>
<!--        mybatis 添加-->
        <dependency>
            <groupId>org.mybatis.spring.boot</groupId>
            <artifactId>mybatis-spring-boot-starter</artifactId>
            <version>3.0.4</version>
        </dependency>
<!--MySQL  驱动-->
        <dependency>
            <groupId>com.mysql</groupId>
            <artifactId>mysql-connector-j</artifactId>
            <scope>runtime</scope>
        </dependency>
<!--        添加Lombok-->
        <dependency>
            <groupId>org.projectlombok</groupId>
            <artifactId>lombok</artifactId>
            <optional>true</optional>
        </dependency>
        <dependency>
            <groupId>org.springframework.boot</groupId>
            <artifactId>spring-boot-starter-test</artifactId>
            <scope>test</scope>
        </dependency>
        <dependency>
            <groupId>org.mybatis.spring.boot</groupId>
            <artifactId>mybatis-spring-boot-starter-test</artifactId>
            <version>3.0.4</version>
            <scope>test</scope>
        </dependency>
    </dependencies>

    <build>
        <plugins>
            <plugin>
                <groupId>org.apache.maven.plugins</groupId>
                <artifactId>maven-compiler-plugin</artifactId>
                <configuration>
                    <annotationProcessorPaths>
                        <path>
                            <groupId>org.projectlombok</groupId>
                            <artifactId>lombok</artifactId>
                        </path>
                    </annotationProcessorPaths>
                </configuration>
            </plugin>
            <plugin>
                <groupId>org.springframework.boot</groupId>
                <artifactId>spring-boot-maven-plugin</artifactId>
                <configuration>
                    <excludes>
                        <exclude>
                            <groupId>org.projectlombok</groupId>
                            <artifactId>lombok</artifactId>
                        </exclude>
                    </excludes>
                </configuration>
            </plugin>
        </plugins>
    </build>

</project>
- 利用 lombok 编写数据映射实体类
spring.application.name=mybatis2
spring.datasource.type=com.zaxxer.hikari.HikariDataSource
spring.datasource.driver-class-name=com.mysql.cj.jdbc.Driver
spring.datasource.url=jdbc:mysql://127.0.0.1:3306/school
spring.datasource.username=root
spring.datasource.password=yanyu666
#配置日志
mybatis.configuration.log-impl=org.apache.ibatis.logging.stdout.StdOutImpl
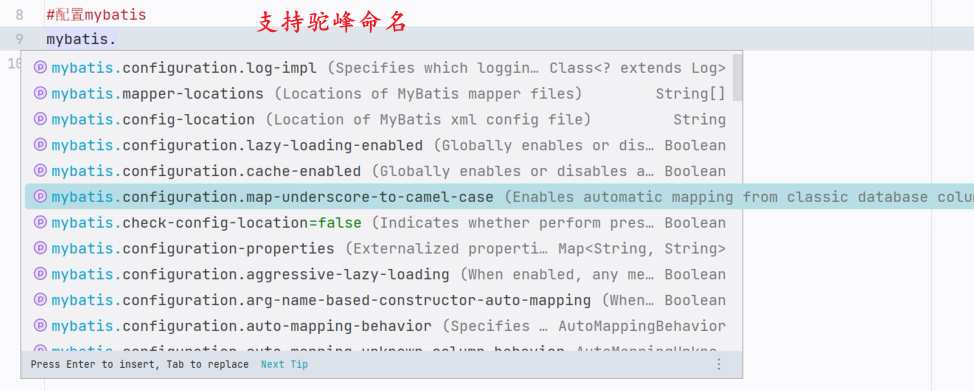
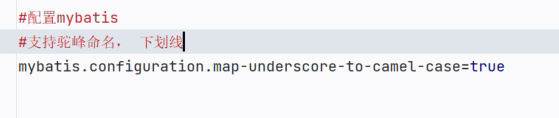
#开启驼峰
mybatis.configuration.map-underscore-to-camel-case=true
# 指定扫描的 xml 目录
mybatis.mapper-locations=classpath:/mappers/**/*.xml
#mappers 下面的任意目录 的 任意 xml
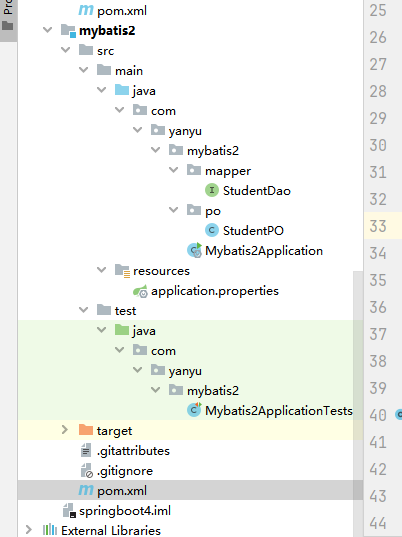
package com.yanyu.mybatis2.po;

import lombok.Data;

/**
 * @Author yanyu666_508200729@qq.com
 * @Date 2025/4/5 22:05
 * @description:
 */
@Data
public class StudentPO {


    private Integer id;
    private String name;
    private String stuid;
    private String major;


}
- 设计数据操作接口
package com.yanyu.mybatis2.mapper;

import com.yanyu.mybatis2.po.StudentPO;
import org.apache.ibatis.annotations.Result;
import org.apache.ibatis.annotations.Results;
import org.apache.ibatis.annotations.Select;

import java.util.List;

/**
 * @Author yanyu666_508200729@qq.com
 * @Date 2025/4/5 22:03
 * @description:
 */
public interface StudentDao {
//    查询所有的学生信息,返回的,应该是 list
    @Select("""
        select * from student
        """)
    @Results(id = "student" ,value ={
            @Result(id = true,column = "id",property = "id"),
            @Result(column = "name",property = "name"),
            @Result(column = "stuid",property = "stuid"),
            @Result(column = "major",property = "major")
    }
    )

    List<StudentPO> selectAll();//   所有的结果依次映射为一个集合


}
- 设定扫描路径,保证接口注入IOC
package com.yanyu.mybatis2;

import org.mybatis.spring.annotation.MapperScan;
import org.springframework.boot.SpringApplication;
import org.springframework.boot.autoconfigure.SpringBootApplication;

@SpringBootApplication
@MapperScan("com.yanyu.mybatis2.mapper")
public class Mybatis2Application {

    public static void main(String[] args) {
        SpringApplication.run(Mybatis2Application.class, args);
    }

}
- 单元测试
package com.yanyu.mybatis2;

import com.yanyu.mybatis2.mapper.StudentDao;
import com.yanyu.mybatis2.po.StudentPO;
import org.junit.jupiter.api.Test;
import org.springframework.beans.factory.annotation.Autowired;
import org.springframework.boot.test.context.SpringBootTest;

import java.util.List;

@SpringBootTest
class Mybatis2ApplicationTests {

    @Test
    void contextLoads() {
    }
    @Autowired
    StudentDao studentDao;
    @Test
    void test1(){
        List<StudentPO> studentPOS = studentDao.selectAll();
        System.out.println(studentPOS);
    }

}
- 结果
[StudentPO(id=1, name=烟雨1, stuid=1001, major=计算机应用技术), StudentPO(id=3, name=烟雨3, stuid=1003, major=计算机应用技术), StudentPO(id=4, name=烟雨2, stuid=1002, major=计算机应用技术), StudentPO(id=5, name=烟雨4, stuid=1004, major=计算机应用技术)]
2025-04-05T22:18:20.704+08:00  INFO 32372 --- [mybatis2] [ionShutdownHook] com.zaxxer.hikari.HikariDataSource       : HikariPool-1 - Shutdown initiated...
2025-04-05T22:18:20.758+08:00  INFO 32372 --- [mybatis2] [ionShutdownHook] com.zaxxer.hikari.HikariDataSource       : HikariPool-1 - Shutdown completed.

Process finished with exit code 0
插入数据
配置mybatis 控制台日志
mybatis.configuration.log-impl=org.apache.ibatis.logging.stdout.StdOutImpl 是 MyBatis 配置中用于指定日志实现的属性。它用于控制 MyBatis 的日志输出方式,通常用于开发阶段,方便开发者查看 SQL 执行的详细信息。
作用
- 日志实现:
log-impl属性用于指定 MyBatis 使用的日志实现类。MyBatis 支持多种日志框架,通过设置该属性,可以指定使用特定的日志实现。 - 调试用途:在开发阶段,将日志输出到控制台(
StdOutImpl)可以帮助开发者快速查看 SQL 执行情况、参数传递、查询结果等信息,从而方便调试和优化代码。
常见的日志实现
MyBatis 提供了多种日志实现,可以通过 log-impl 属性指定。以下是一些常见的日志实现类:
-
org.apache.ibatis.logging.stdout.StdOutImpl-
将日志输出到控制台(标准输出流)。这是最常用的日志实现,适用于开发阶段。
-
示例配置:
properties复制
mybatis.configuration.log-impl=org.apache.ibatis.logging.stdout.StdOutImpl
#配置控制台日志
mybatis.configuration.log-impl=org.apache.ibatis.logging.stdout.StdOutImpl
#开启驼峰与  _
mybatis.configuration.map-underscore-to-camel-case=true
接口定义
-
StudentPO selectById(@Param("studentId") Integer id);
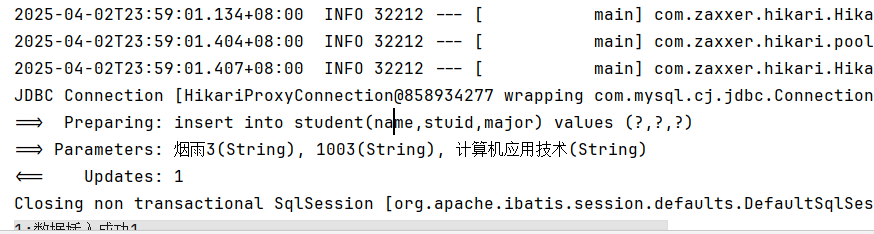
// 添加数据 开启了主键自增,就不需要再写主键
@Insert("""
insert into student(name,stuid,major)
values (#{name},#{stuid},#{major})
""")
int insertStudent(StudentPO studentPO);// 执行后返回结果
/* insert into student(name,stuid,major) 对应 表的字段名字
values (#={name},#={stuid},#={major}) 对应实体的实例变量名字
* */
 @Autowired
    StudentMapper studentMapper;

@Test
    void test2(){
        StudentPO studentPO = new StudentPO();
        studentPO.setName("烟雨3");
        studentPO.setStuid("1003");
        studentPO.setMajor("计算机应用技术");
        int i = studentMapper.insertStudent(studentPO);
        System.out.println("1:数据插入成功" + i);
    }
日志:
更新数据

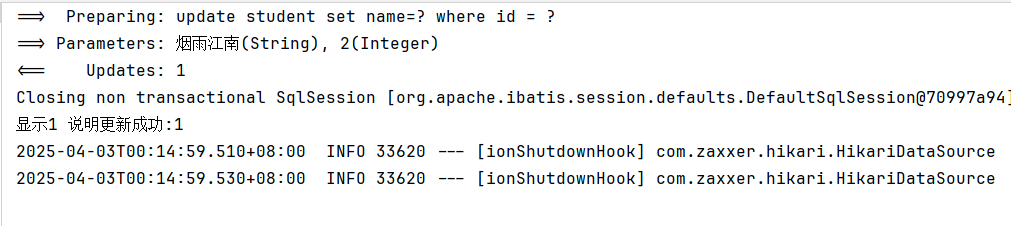
 @Update("""
        update student set name=#{name} where id = #{id}
        """)
        int updateStudentName(Integer id,String name);
 @Autowired
    StudentMapper studentMapper;
@Test
    void test3(){
        int i = studentMapper.updateStudentName(2, "烟雨江南");
        System.out.println("显示1 说明更新成功:" + i);
    }
删除数据
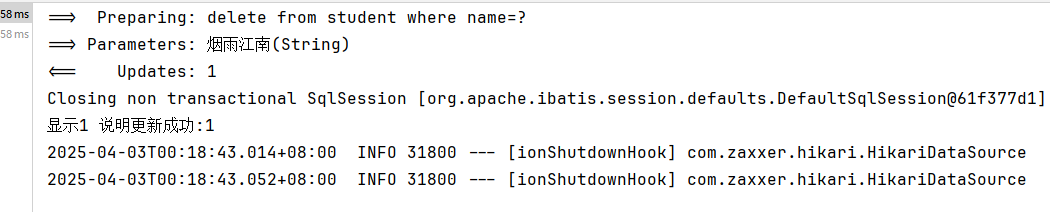
//删除
        @Delete("""
        delete from student where name=#{name}
        """)
        int deleteStudent(String name);
 @Autowired
    StudentMapper studentMapper;
@Test
    void test4(){
        int i = studentMapper.deleteStudent( "烟雨江南");
        System.out.println("显示1 说明更新成功:" + i);
    }
小结
MyBatis注解开发
1.加入mybatis的starter , mysql驱动(8.0.32)
2.创建实体类 XXXPO , XXXEntity , XXXDomain
3.创建Mapper接口, 在接口中定义方法, 在方法的上面使用合适的注解
@Select:查询 ,使用@Results和@Result做结果映射。
@Insert:新增
@Update:更新
@Delete:删除
4.在启动上面,加入@MapperScan
@MapperScan(basePackages = “com.yanyu.mybatis.mapper”)
5.application.properties
1)定义数据库连接
2)mybatis设置
日志
驼峰命名支持
通过id复用结果映射模板
- 以集合进行处理
<?xml version="1.0" encoding="UTF-8"?>
<project xmlns="http://maven.apache.org/POM/4.0.0" xmlns:xsi="http://www.w3.org/2001/XMLSchema-instance"
         xsi:schemaLocation="http://maven.apache.org/POM/4.0.0 https://maven.apache.org/xsd/maven-4.0.0.xsd">
    <modelVersion>4.0.0</modelVersion>
    <parent>
        <groupId>org.springframework.boot</groupId>
        <artifactId>spring-boot-starter-parent</artifactId>
        <version>3.4.4</version>
        <relativePath/> <!-- lookup parent from repository -->
    </parent>
    <groupId>com.yanyu</groupId>
    <artifactId>mybatis2</artifactId>
    <version>0.0.1-SNAPSHOT</version>
    <name>mybatis2</name>
    <description>mybatis2</description>
    <url/>
    <licenses>
        <license/>
    </licenses>
    <developers>
        <developer/>
    </developers>
    <scm>
        <connection/>
        <developerConnection/>
        <tag/>
        <url/>
    </scm>
    <properties>
        <java.version>17</java.version>
    </properties>
    <dependencies>
<!--        mybatis 添加-->
        <dependency>
            <groupId>org.mybatis.spring.boot</groupId>
            <artifactId>mybatis-spring-boot-starter</artifactId>
            <version>3.0.4</version>
        </dependency>
<!--MySQL  驱动-->
        <dependency>
            <groupId>com.mysql</groupId>
            <artifactId>mysql-connector-j</artifactId>
            <scope>runtime</scope>
        </dependency>
<!--        添加Lombok-->
        <dependency>
            <groupId>org.projectlombok</groupId>
            <artifactId>lombok</artifactId>
            <optional>true</optional>
        </dependency>
        <dependency>
            <groupId>org.springframework.boot</groupId>
            <artifactId>spring-boot-starter-test</artifactId>
            <scope>test</scope>
        </dependency>
        <dependency>
            <groupId>org.mybatis.spring.boot</groupId>
            <artifactId>mybatis-spring-boot-starter-test</artifactId>
            <version>3.0.4</version>
            <scope>test</scope>
        </dependency>
    </dependencies>

    <build>
        <plugins>
            <plugin>
                <groupId>org.apache.maven.plugins</groupId>
                <artifactId>maven-compiler-plugin</artifactId>
                <configuration>
                    <annotationProcessorPaths>
                        <path>
                            <groupId>org.projectlombok</groupId>
                            <artifactId>lombok</artifactId>
                        </path>
                    </annotationProcessorPaths>
                </configuration>
            </plugin>
            <plugin>
                <groupId>org.springframework.boot</groupId>
                <artifactId>spring-boot-maven-plugin</artifactId>
                <configuration>
                    <excludes>
                        <exclude>
                            <groupId>org.projectlombok</groupId>
                            <artifactId>lombok</artifactId>
                        </exclude>
                    </excludes>
                </configuration>
            </plugin>
        </plugins>
    </build>

</project>
- 利用 lombok 编写数据映射实体类
spring.application.name=mybatis2
spring.datasource.type=com.zaxxer.hikari.HikariDataSource
spring.datasource.driver-class-name=com.mysql.cj.jdbc.Driver
spring.datasource.url=jdbc:mysql://127.0.0.1:3306/school
spring.datasource.username=root
spring.datasource.password=yanyu666

#配置日志
mybatis.configuration.log-impl=org.apache.ibatis.logging.stdout.StdOutImpl
#开启驼峰
mybatis.configuration.map-underscore-to-camel-case=true

# 指定扫描的  xml  目录
mybatis.mapper-locations=classpath:/mappers/**/*.xml
#mappers 下面的任意目录  的  任意  xml
package com.yanyu.mybatis2.po;

import lombok.Data;

/**
 * @Author yanyu666_508200729@qq.com
 * @Date 2025/4/5 22:05
 * @description:
 */
@Data
public class StudentPO {


    private Integer id;
    private String name;
    private String stuid;
    private String major;


}
- 设计数据操作接口
package com.yanyu.mybatis2.mapper;

import com.yanyu.mybatis2.po.StudentPO;
import org.apache.ibatis.annotations.Result;
import org.apache.ibatis.annotations.Results;
import org.apache.ibatis.annotations.Select;

import java.util.List;

/**
 * @Author yanyu666_508200729@qq.com
 * @Date 2025/4/5 22:03
 * @description:
 */
public interface StudentDao {
//    查询所有的学生信息,返回的,应该是 list
    @Select("""
        select * from student
        """)
    @Results(id = "student" ,value ={
            @Result(id = true,column = "id",property = "id"),
            @Result(column = "name",property = "name"),
            @Result(column = "stuid",property = "stuid"),
            @Result(column = "major",property = "major")
    }
    )

    List<StudentPO> selectAll();//   所有的结果依次映射为一个集合


}
- 设定扫描路径,保证接口注入IOC
package com.yanyu.mybatis2;

import org.mybatis.spring.annotation.MapperScan;
import org.springframework.boot.SpringApplication;
import org.springframework.boot.autoconfigure.SpringBootApplication;

@SpringBootApplication
@MapperScan("com.yanyu.mybatis2.mapper")
public class Mybatis2Application {

    public static void main(String[] args) {
        SpringApplication.run(Mybatis2Application.class, args);
    }

}
- 单元测试
package com.yanyu.mybatis2;

import com.yanyu.mybatis2.mapper.StudentDao;
import com.yanyu.mybatis2.po.StudentPO;
import org.junit.jupiter.api.Test;
import org.springframework.beans.factory.annotation.Autowired;
import org.springframework.boot.test.context.SpringBootTest;

import java.util.List;

@SpringBootTest
class Mybatis2ApplicationTests {

    @Test
    void contextLoads() {
    }
    @Autowired
    StudentDao studentDao;
    @Test
    void test1(){
        List<StudentPO> studentPOS = studentDao.selectAll();
        System.out.println(studentPOS);
    }

}
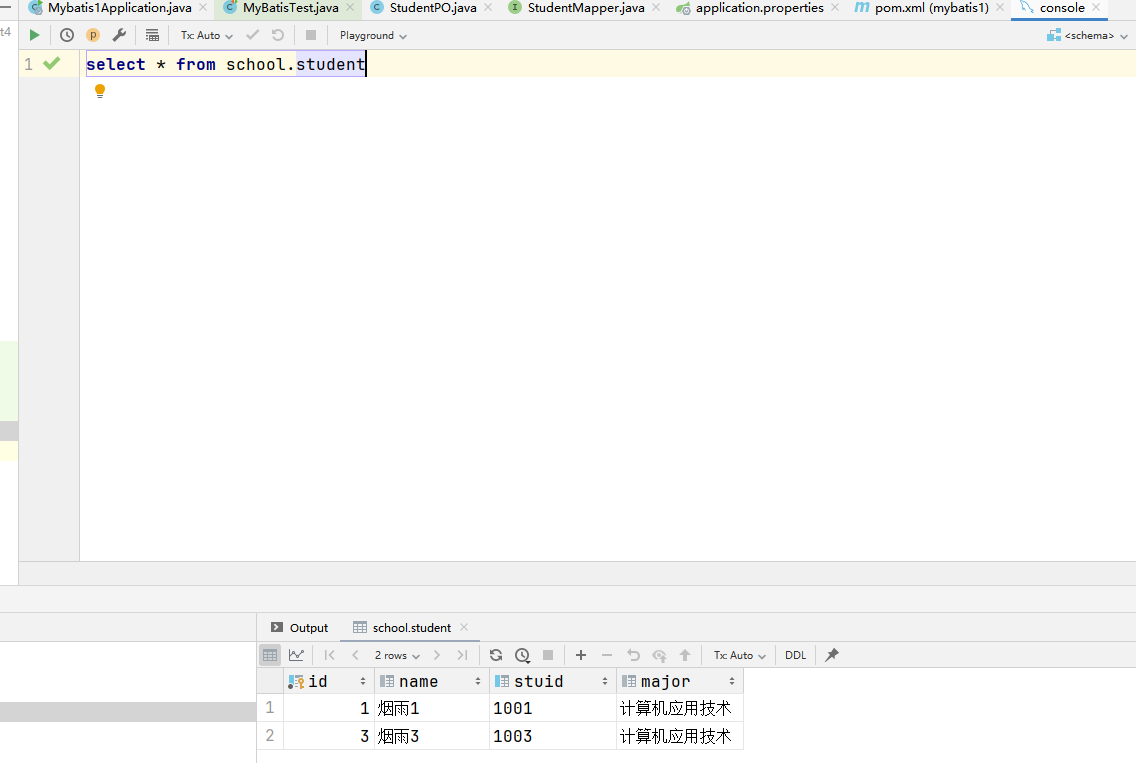
- 结果
[StudentPO(id=1, name=烟雨1, stuid=1001, major=计算机应用技术), StudentPO(id=3, name=烟雨3, stuid=1003, major=计算机应用技术), StudentPO(id=4, name=烟雨2, stuid=1002, major=计算机应用技术), StudentPO(id=5, name=烟雨4, stuid=1004, major=计算机应用技术)]
2025-04-05T22:18:20.704+08:00  INFO 32372 --- [mybatis2] [ionShutdownHook] com.zaxxer.hikari.HikariDataSource       : HikariPool-1 - Shutdown initiated...
2025-04-05T22:18:20.758+08:00  INFO 32372 --- [mybatis2] [ionShutdownHook] com.zaxxer.hikari.HikariDataSource       : HikariPool-1 - Shutdown completed.

Process finished with exit code 0
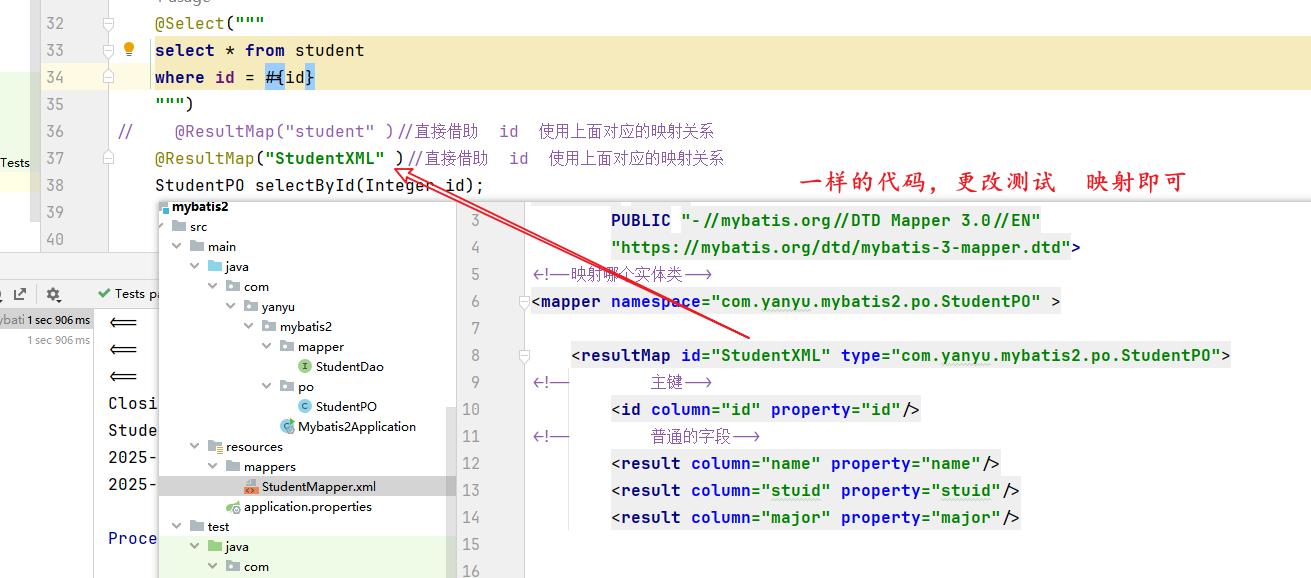
注解中的映射
1)@Results和@Result
2)@ResultMap 可以直接复用以前定义好的 映射模板
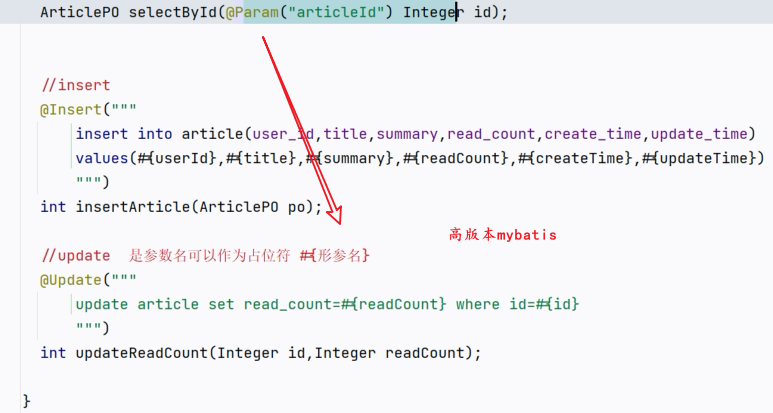
@ResultMap使用方式:
第一种:先通过@Results定义列的映射关系, @ResultMap(value=“@Result的id”)
package com.yanyu.mybatis2.mapper;

import com.yanyu.mybatis2.po.StudentPO;
import org.apache.ibatis.annotations.Result;
import org.apache.ibatis.annotations.ResultMap;
import org.apache.ibatis.annotations.Results;
import org.apache.ibatis.annotations.Select;

import java.util.IdentityHashMap;
import java.util.List;

/**
 * @Author yanyu666_508200729@qq.com
 * @Date 2025/4/5 22:03
 * @description:
 */
public interface StudentDao {
//    查询所有的学生信息,返回的,应该是 list
    @Select("""
        select * from student
        """)
    @Results(id = "student" ,value ={
            @Result(id = true,column = "id",property = "id"),
            @Result(column = "name",property = "name"),
            @Result(column = "stuid",property = "stuid"),
            @Result(column = "major",property = "major")
    }
    )

    List<StudentPO> selectAll();//   所有的结果依次映射为一个集合
//    复用上面的结果映射关系  id
    @Select("""
    select * from student
    where id = #{id}
    """)
    @ResultMap("student" )//直接借助  id  使用上面对应的映射关系
    StudentPO selectById(Integer id);


}
xml处理结果映射
在xml中定义<resultMap id="xxx"> ,在代码中使用@ResultMap(value="xml的id")
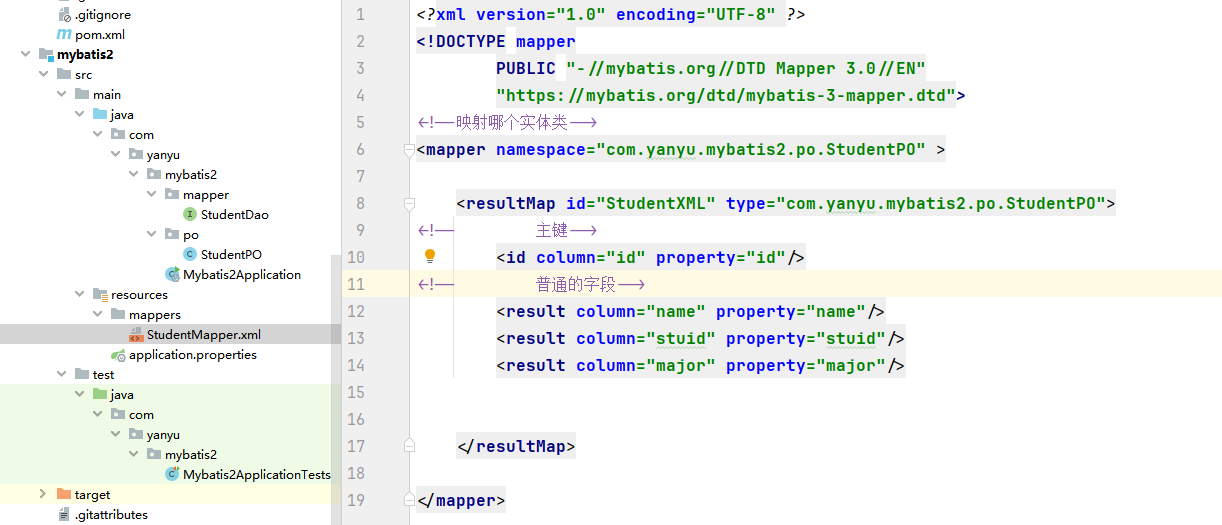
<?xml version="1.0" encoding="UTF-8" ?>
<!DOCTYPE mapper
        PUBLIC "-//mybatis.org//DTD Mapper 3.0//EN"
        "https://mybatis.org/dtd/mybatis-3-mapper.dtd">
<!--映射哪个接口-->
<mapper namespace="com.yanyu.mybatis2.mapper.StudentDao" >
<!--映射实体类-->
    <resultMap id="StudentXML" type="com.yanyu.mybatis2.po.StudentPO">
        <!--        主键-->
        <id column="id" property="id"/>
        <!--        普通的字段-->
        <result column="name" property="name"/>
        <result column="stuid" property="stuid"/>
        <result column="major" property="major"/>


    </resultMap>

</mapper>
spring.application.name=mybatis2
spring.datasource.type=com.zaxxer.hikari.HikariDataSource
spring.datasource.driver-class-name=com.mysql.cj.jdbc.Driver
spring.datasource.url=jdbc:mysql://127.0.0.1:3306/school
spring.datasource.username=root
spring.datasource.password=yanyu666

#配置日志
mybatis.configuration.log-impl=org.apache.ibatis.logging.stdout.StdOutImpl
#开启驼峰
mybatis.configuration.map-underscore-to-camel-case=true

# 指定扫描的  xml  目录
mybatis.mapper-locations=classpath:/mappers/**/*.xml
#mappers 下面的任意目录  的  任意  xml
- 修改xml
<?xml version="1.0" encoding="UTF-8" ?>
<!DOCTYPE mapper
        PUBLIC "-//mybatis.org//DTD Mapper 3.0//EN"
        "https://mybatis.org/dtd/mybatis-3-mapper.dtd">
<!--映射哪个接口-->
<mapper namespace="com.yanyu.mybatis2.mapper.StudentDao" >
<!--映射实体类-->
    <resultMap id="StudentXML" type="com.yanyu.mybatis2.po.StudentPO">
        <!--        主键-->
        <id column="id" property="id"/>
        <!--        普通的字段-->
        <result column="name" property="name"/>
        <result column="stuid" property="stuid"/>
        <result column="major" property="major"/>


    </resultMap>

</mapper>