文章目录
- 1、前言
- 2、进程与线程
- 3、内核线程
- 4、底半步机制
- 4.1、软中断
- 4.2、tasklet
- 4.3、工作队列
- 4.3.1、普通工作项
- 4.3.2、延时工作项
- 4.3.3、工作队列
- 5、中断线程化
- 6、进程
- 6.1、内核进程
- 6.2、用户空间进程
- 7、锁机制
- 7.1、原子操作
- 7.2、自旋锁
- 7.3、信号量
- 7.4、互斥锁
- 7.5、completion
1、前言
- 学习参考书籍以及本文涉及的示例程序:李山文的《Linux驱动开发进阶》
- 本文属于个人学习后的总结,不太具备教学功能。
2、进程与线程
略。
3、内核线程
在linux中,线程和进程实际上是同一个东西,本质就是为了完成任务。因此,linus将这个成为task,即任务。在内核中使用struct task_struct表示,包含了进程的各种信息,如进程ID、父进程指针、进程状态、进程优先级、进程的内存管理信息等。
4、底半步机制
linux内核中,对于硬件中断的处理,将中断服务函数拆分为两个部分,其中需要紧急处理的放在上半部分,主要处理一些与硬件以及关键数据结构相关的事情。将不那么紧急的事情放在下半部分。我们将上半部分称之为顶半部,将下半部分称之为底半部。
4.1、软中断
软中断一般很少直接用于实现下半部。软中断就是软件实现的异步中断,它的优先级比硬中断低,但比普通进程优先级高,同时它和硬中断一样不能休眠。Linux内核中的软中断数组如下所示,用来记录软中断的向量(软中断服务函数):
enum
{
	HI_SOFTIRQ=0,
	TIMER_SOFTIRQ,
	NET_TX_SOFTIRQ,
	NET_RX_SOFTIRQ,
	BLOCK_SOFTIRQ,
	IRQ_POLL_SOFTIRQ,
	TASKLET_SOFTIRQ,
	SCHED_SOFTIRQ,
	HRTIMER_SOFTIRQ,
	RCU_SOFTIRQ,    /* Preferable RCU should always be the last softirq */

	NR_SOFTIRQS
};
4.2、tasklet
tasklet依赖于软中断,内核使用一个链表的方式来管理所有的tasklet任务。tasklet的使用如下:先定义一个struct tasklet_struct结构体,然后使用tasklet_setup函数初始化(可能再比较老的内核版本是用tasklet_init()来初始化),最后使用tasklet_schedule函数来调度。
下面程序举例如何使用tasklet。在按键中断中发起tasklet调用。
#include <linux/module.h>
#include <linux/kernel.h>
#include <linux/fs.h>
#include <linux/init.h>
#include <linux/device.h>
#include <linux/cdev.h>
#include <linux/sysfs.h>
#include <linux/gpio/consumer.h>
#include <linux/gpio.h>
#include <linux/irq.h>
#include <linux/interrupt.h>
#include <linux/wait.h>
#include <linux/poll.h>


#define PIN_NUM    117 // gpio3_PC5

struct gpio_key {
    dev_t          dev_num;
    struct cdev    cdev;
    struct class  *class;
    struct device *dev;
    struct tasklet_struct tasklet;
};

static struct gpio_key *key;

static irqreturn_t key_irq(int irq, void *args)
{
	tasklet_schedule(&key->tasklet);
    return IRQ_HANDLED;
}

static int key_open (struct inode * inode, struct file * file)
{
    return 0;
}

static int key_close(struct inode * inode, struct file * file)
{
    return 0;
}

static struct file_operations key_ops = {
    .owner   = THIS_MODULE,
    .open    = key_open,
    .release = key_close,
};

static void tasklet_handler(unsigned long data)
{
    printk(KERN_INFO "tasklet demo!\n");
}

static int __init async_init(void)
{
    int ret, irq;
	key = kzalloc(sizeof(struct gpio_key), GFP_KERNEL);
    if(key == NULL) {
        printk(KERN_ERR "struct gpio_key alloc failed\n");
        return -ENOMEM;;
    }
    tasklet_init(&key->tasklet, tasklet_handler, 0);
	if (!gpio_is_valid(PIN_NUM)) {
        kfree(key);
        printk(KERN_ERR "gpio is invalid\n");
		return -EPROBE_DEFER;
    }
    ret = gpio_request(PIN_NUM, "key");
    if(ret) {
        kfree(key);
        printk(KERN_ERR "gpio request failed\n");
		return ret;
    }
    irq = gpio_to_irq(PIN_NUM);
    if (irq < 0) {
		printk(KERN_ERR "get gpio irq failed\n");
        goto err;
    }
    ret = request_irq(irq, key_irq, IRQF_TRIGGER_RISING | IRQF_TRIGGER_FALLING | IRQF_ONESHOT, "key", key);
    if(ret) {
        printk(KERN_ERR "request irq failed\n");
        goto err;
    }
    ret = alloc_chrdev_region(&key->dev_num ,0, 1, "key");  //动态申请一个设备号
    if(ret !=0) {
        unregister_chrdev_region(key->dev_num, 1);
        printk(KERN_ERR "alloc_chrdev_region failed!\n");
        return -1;
    }
    key->cdev.owner = THIS_MODULE;
    cdev_init(&key->cdev, &key_ops);
    cdev_add(&key->cdev, key->dev_num, 1);
    key->class = class_create(THIS_MODULE, "key_class");
    if(key->class == NULL) {
        printk(KERN_ERR "key_class failed!\n");
        goto err1;
    }
    key->dev = device_create(key->class, NULL, key->dev_num, NULL, "key");
    if(IS_ERR(key->dev)) {
        printk(KERN_ERR "device_create failed!\n");
        goto err2;
    }
    return ret;
err2:
    class_destroy(key->class);
err1:
    unregister_chrdev_region(key->dev_num, 1);
err:
    gpio_free(PIN_NUM);
    kfree(key);
    return -1;
}

static void __exit async_exit(void)
{
    //停止tasklet任务
    tasklet_disable(&key->tasklet);
    // 清理tasklet相关资源
    tasklet_kill(&key->tasklet);
    gpio_free(PIN_NUM);
    device_destroy(key->class, key->dev_num);
    class_destroy(key->class);
    unregister_chrdev_region(key->dev_num, 1);
    free_irq(gpio_to_irq(PIN_NUM), key);
    kfree(key);
}

module_init(async_init);
module_exit(async_exit);

MODULE_LICENSE("GPL");
MODULE_AUTHOR("1477153217@qq.com");
MODULE_DESCRIPTION("async notify test");

4.3、工作队列
实际tasklet还是适合处理较快的任务,因为tasklet不可被抢占,同时tasklet无法让任务在多个核心上执行。
4.3.1、普通工作项
下面示例程序展示了如何使用工作队列。
#include <linux/module.h>
#include <linux/kernel.h>
#include <linux/fs.h>
#include <linux/init.h>
#include <linux/device.h>
#include <linux/delay.h>
#include <linux/workqueue.h>
#include <linux/kthread.h>

//定义一个任务
struct task_struct *thread_worker;
//定义一个工作项
struct work_struct work;

void work_func(struct work_struct *work)
{
    printk(KERN_INFO "work execute!\n");
}

static int test_thread(void *data)
{
    while(!kthread_should_stop()) {
        schedule_work(&work);
        msleep(1000);
    }
    return 0;
}

static int __init work_init(void)
{
    INIT_WORK(&work, work_func);
    //创建一个线程
    thread_worker = kthread_run(test_thread, NULL, "test_kthread");
    if (IS_ERR(thread_worker)) {
        return PTR_ERR(thread_worker);
    }
    return 0;
}

static void __exit work_exit(void)
{
    kthread_stop(thread_worker);
    cancel_work_sync(&work);
}

module_init(work_init);
module_exit(work_exit);

MODULE_LICENSE("GPL");
MODULE_AUTHOR("1477153217@qq.com");
MODULE_VERSION("0.1");
MODULE_DESCRIPTION("work demo");

4.3.2、延时工作项
即延时一段时间再执行。
#include <linux/module.h>
#include <linux/kernel.h>
#include <linux/fs.h>
#include <linux/init.h>
#include <linux/device.h>
#include <linux/delay.h>
#include <linux/workqueue.h>
#include <linux/kthread.h>

//定义一个任务
struct task_struct *thread_worker;
//定义一个工作项
struct work_struct work;

void work_func(struct work_struct *work)
{
    printk(KERN_INFO "work execute!\n");
}

static int test_thread(void *data)
{
    while(!kthread_should_stop()) {
        schedule_work(&work);
        msleep(1000);
    }
    return 0;
}

static int __init work_init(void)
{
    INIT_WORK(&work, work_func);
    //创建一个线程
    thread_worker = kthread_run(test_thread, NULL, "test_kthread");
    if (IS_ERR(thread_worker)) {
        return PTR_ERR(thread_worker);
    }
    return 0;
}

static void __exit work_exit(void)
{
    kthread_stop(thread_worker);
    cancel_work_sync(&work);
}

module_init(work_init);
module_exit(work_exit);

MODULE_LICENSE("GPL");
MODULE_AUTHOR("1477153217@qq.com");
MODULE_VERSION("0.1");
MODULE_DESCRIPTION("work demo");

4.3.3、工作队列
当有多个工作项时,可以放到工作队列里。
#include <linux/module.h>
#include <linux/kernel.h>
#include <linux/fs.h>
#include <linux/init.h>
#include <linux/device.h>
#include <linux/delay.h>
#include <linux/workqueue.h>
#include <linux/kthread.h>

//定义一个任务队列指针
static struct workqueue_struct *workqueue = NULL;
//定义一个任务
struct task_struct *thread_worker = NULL;
//定义一个工作项1
struct work_struct work1;
//定义一个工作项2
struct work_struct work2;

void work1_func(struct work_struct *work)
{
    printk(KERN_INFO "work1 execute!\n");
}

void work2_func(struct work_struct *work)
{
    printk(KERN_INFO "work2 execute!\n");
}

static int test_thread(void *data)
{
    while(!kthread_should_stop()) {
        //将work1放到工作队列中执行
        queue_work(workqueue,&work1);
        //将work2放到工作队列中执行
        queue_work(workqueue,&work2);
        msleep(1000);
    }
    return 0;
}

static int __init work_init(void)
{
    INIT_WORK(&work1, work1_func);
    INIT_WORK(&work2, work2_func);
    workqueue = create_singlethread_workqueue("wq_test");
    if(workqueue == NULL){
        return -1;
    }
    //创建一个线程
    thread_worker = kthread_run(test_thread, NULL, "test_kthread");
    if (IS_ERR(thread_worker)) {
        destroy_workqueue(workqueue);
        return PTR_ERR(thread_worker);
    }
    return 0;
}

static void __exit work_exit(void)
{
    kthread_stop(thread_worker);
    destroy_workqueue(workqueue);
    cancel_work_sync(&work1);
    cancel_work_sync(&work2);
}

module_init(work_init);
module_exit(work_exit);

MODULE_LICENSE("GPL");
MODULE_AUTHOR("1477153217@qq.com");
MODULE_VERSION("0.1");
MODULE_DESCRIPTION("work queue demo");

5、中断线程化
上面我们介绍了底半部的一些机制,有软中断、tasklet、工作队列。但为了进一步提高系统实时性,又将顶半步进一步拆分为硬件中断处理和线程化中断。(下图来自李山文的《Linux驱动开发进阶》)
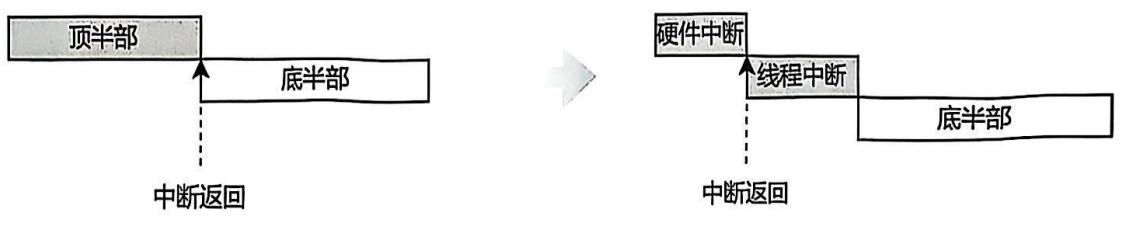
硬件中断处理:仅执行最紧急的任务(如读取硬件寄存器、应答中断)。仍然在中断上下文中执行(不可睡眠,快速完成)。
线程化处理:剩余的顶半部逻辑移至一个专用的内核线程中执行。在进程上下文中运行(可睡眠,可被高优先级任务抢占)。
申请一个线程化中断使用如下函数:
int request_threaded_irq(unsigned int irq, irq_handler_t handler,
			 irq_handler_t thread_fn, unsigned long irqflags,
			 const char *devname, void *dev_id)
下面是一个示例程序:
#include <linux/module.h>
#include <linux/kernel.h>
#include <linux/fs.h>
#include <linux/init.h>
#include <linux/device.h>
#include <linux/cdev.h>
#include <linux/sysfs.h>
#include <linux/gpio/consumer.h>
#include <linux/gpio.h>
#include <linux/irq.h>
#include <linux/interrupt.h>
#include <linux/wait.h>

#define PIN_NUM    117

static int ev_press=0;

static irqreturn_t key_irq(int irq, void *args)
{
    return IRQ_WAKE_THREAD;
}

static irqreturn_t key_irq_thread(int irq, void *args)
{
    ev_press = 1; //按下按键
    printk(KERN_INFO "key press!\n");
    return IRQ_HANDLED;
}

static int __init thread_irq_init(void)
{
    int ret, irq;
	if (!gpio_is_valid(PIN_NUM)) {
        printk(KERN_ERR "gpio is invalid\n");
		return -EPROBE_DEFER;
    }
    ret = gpio_request(PIN_NUM, "key");
    if(ret) {
        printk(KERN_ERR "gpio request failed\n");
		return -1;
    }
    irq = gpio_to_irq(PIN_NUM);
    if (irq < 0) {
        gpio_free(PIN_NUM);
		printk(KERN_ERR "get gpio irq failed\n");
        return -1;
    }
    ret = request_threaded_irq(irq, key_irq, key_irq_thread, IRQF_TRIGGER_RISING | IRQF_TRIGGER_FALLING | IRQF_ONESHOT, "key", &ev_press);
    if(ret) {
        gpio_free(PIN_NUM);
        printk(KERN_ERR "request irq failed\n");
        return -1;
    }
    return 0;
}

static void __exit thread_irq_exit(void)
{
    gpio_free(PIN_NUM);
    free_irq(gpio_to_irq(PIN_NUM), &ev_press);
}

module_init(thread_irq_init);
module_exit(thread_irq_exit);

MODULE_LICENSE("GPL");
MODULE_AUTHOR("1477153217@qq.com");
MODULE_DESCRIPTION("thread irq test");

6、进程
6.1、内核进程
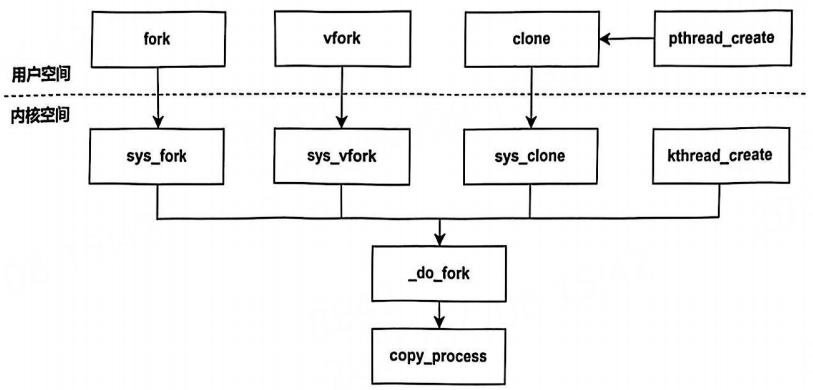
引用书本原话:“Linux内核将所有的线程都当作进程来实现,每个线程都有一个唯一的task_struct(进程控制块),在内核中看起来就像一个普通的进程,只是它与其他进程共享一些资源,如地址空间。所以从内核的角度来看,进程和线程没有本质区别,只是在资源共享上有所不同。用户空间可以使用clone、fork、vfork系统调用来创建进程,其最终调用的都是内核中的_do_fork函数。_do_fork函数调用copy_process函数来创建子进程的task_struct数据结构。”
(下图来自李山文的《Linux驱动开发进阶》)
6.2、用户空间进程
在应用程序创建进程有如下函数:fork、vfork、clone、pthread_create。
在内核(kernel)层面,最终都会被表示为一个 task_struct 数据结构。
7、锁机制
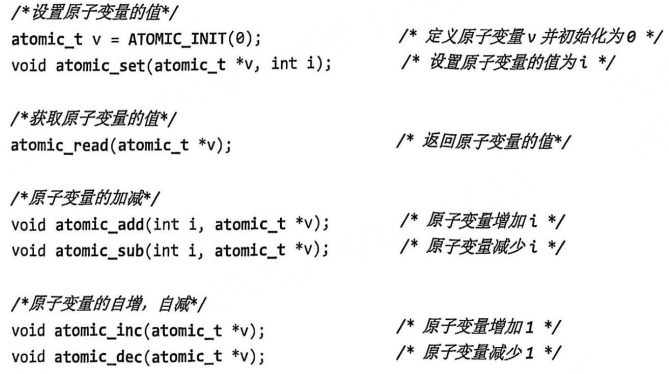
7.1、原子操作
在操作系统中一句C语言代码是非常有可能被打断的,为了防止这种情况发生,我们需要使用原子操作。


7.2、自旋锁
自旋锁就是不停的判断一个锁变量是否可用,如果可用,则继续执行,否则一直等待。因此,自旋锁适合用在一些任务频繁调度的时候。自旋锁还有一个特点是不可能引起睡眠,因此在中断上下文中,必须使用自旋锁来实现临界区的访问。
初始化一个自旋锁:
spinlock_t lock;
spin_lock_init(&lock);
获取锁和释放锁:
spin_lock(&lock);
spin_unlock(&lock);
但使用自旋锁时,如果产生了中断,在中断服务程序中也尝试获取锁,那么就会产生死锁,对于这种情况,应该先关闭中断再获取锁,相关操作函数如下:


7.3、信号量
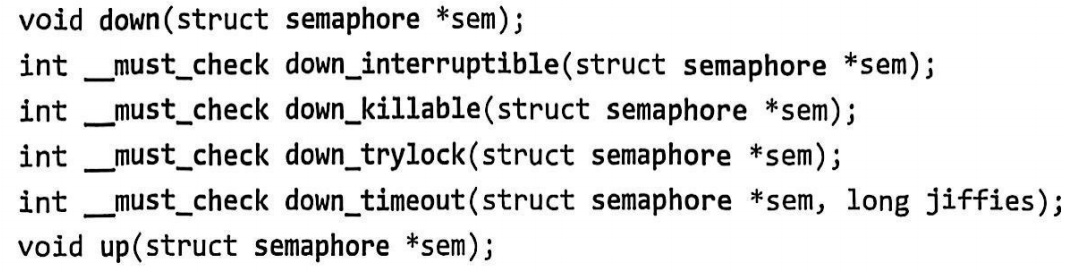
信号量是一个整型变量。P 操作用于申请资源,如果资源不可用(信号量 ≤ 0),则进程阻塞,直到资源可用。V 操作用于释放资源,并唤醒等待的进程(如果有)。信号量是一种会导致进程睡眠的锁机制,对于需要等待很长时间的进程而言,就需要采用信号量。
初始化一个信号量:
struct semaphore semap;
sema_init(&semap, 5);
PV操作相关的函数如下:
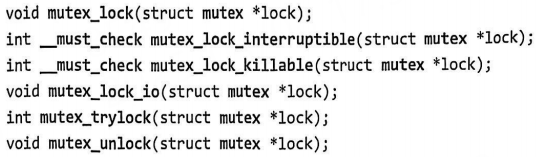
7.4、互斥锁
互斥锁在linux内核中使用较多,大部分情况下,都是对全局变量做保护。
初始化一个互斥锁:
struct mutex tlb_lock;
mutex_init(&tlb_lock);
对互斥锁上锁和解锁:
7.5、completion
当我们需要初始化一些东西,但在另一个线程必须等待这些初始化完成后才能继续执行。为此linux提供了completion机制。
动态定义一个完成量:
struct completion setup_done;
init_completion(&setup_done);
在需要等待的地方调用wait_for_completion即可:
complete(&setup_done);
complete_all(&setup_done);


![[Python] 企业内部应用接入钉钉登录,端内免登录+浏览器授权登录](https://i-blog.csdnimg.cn/direct/640ce48397194d80bae2f77f830f5b55.png)