背景需求:
马上开学了,又要制作校历(删划节假日)。之前我都是用网络的图片,然后在PPT里修改。
存在问题:
网络校历是从周日开始的,但日常我们老师做教案,都是默认从周一到周五(周六周日)
所以这学期,我想用Python模仿网上图片,生成EXCEL的校历图片,同时将“周日”放到最后一列显示,确保“周一”在第一列。
1.0版本——与网络版一样(周日开始)
代码展示
'''
模仿制作2025年2月下学期的校历(只有日期)周日在前)
星火讯飞、阿夏
20250209
'''
import datetime
import openpyxl
from openpyxl.styles import Alignment, PatternFill
import time
path = r'C:\Users\jg2yXRZ\OneDrive\桌面\20250217校历'
title = '2024学年第二学期校历'
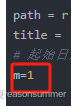
# 起始日期前空几天
m=1
# 创建一个新的Excel工作簿
workbook = openpyxl.Workbook()
sheet = workbook.active
# 设置标题行
title_row = ["周次", "星期日", "星期一", "星期二", "星期三", "星期四", "星期五", "星期六"]
sheet.append(title_row)
# 设置日期范围
start_date = datetime.date(2025, 2, 17)
end_date = datetime.date(2025, 6, 30)
# 生成日期列表并包含标题行和空格行
date_list = [title_row]
for i in range(m):
date_list.append([]) # 添加一个空格行
current_day = start_date
while current_day <= end_date:
date_list.append([current_day])
current_day += datetime.timedelta(days=1)
print(date_list)
# 计算周数和将日期列表写入Excel
current_week = 1
for i in range(1, len(date_list), 7):
# 获取当前周的日期列表
week_dates = date_list[i:i+7]
# 在A列中添加周次
sheet.cell(row=current_week + 1, column=1).value = f"{current_week}"
sheet.cell(row=current_week + 1, column=1).alignment = Alignment(horizontal='center', vertical='center')
# 在正确的单元格中添加日期
for j in range(len(week_dates)):
cell = sheet.cell(row=current_week + 1, column=j + 2)
# 检查日期是否为当月的第一天,如果是则显示“月/1”,否则显示“月/日”
if week_dates[j]: # Check if the list is not empty
if week_dates[j][0].year == 2025 and week_dates[j][0].month == 2 and week_dates[j][0].day == 17:
cell.value = f"{week_dates[j][0].year}/{week_dates[j][0].month}/{week_dates[j][0].day}"
elif week_dates[j][0].day == 1:
cell.value = f"{week_dates[j][0].month}/{week_dates[j][0].day}"
else:
cell.value = f"{week_dates[j][0].day}"
cell.alignment = Alignment(horizontal='center', vertical='center')
# 更新周数并移动到下一周
current_week += 1
# 保存工作簿
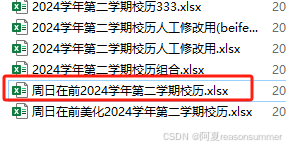
workbook.save(path + fr"\周日在前{title}.xlsx")
time.sleep(2)
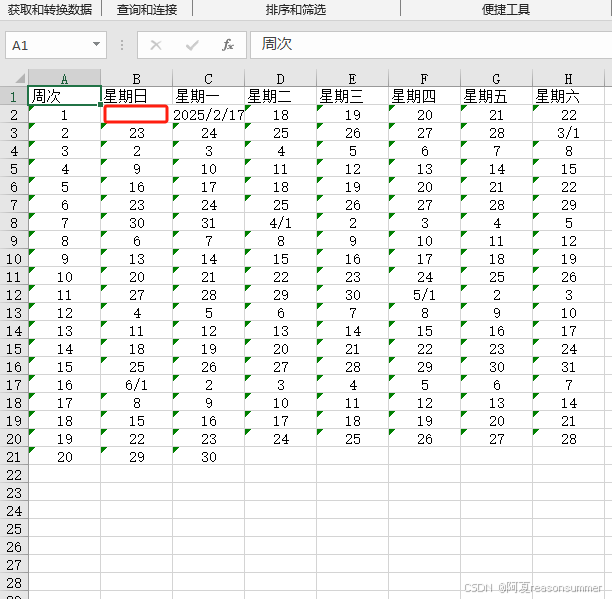
在第一个日期(2025.2.17)前面添加1个空格
原始表就做好了(从周日开始。2.16是周日,空,不写)
继续把表格美化一下,和网络底纹一样
'''
模仿制作2025年2月下学期的校历(只有日期)周日在前,美化
星火讯飞、阿夏
20250209
'''
from openpyxl import Workbook
from openpyxl.styles import PatternFill, Border, Side, Alignment, Font
import datetime
import time
from openpyxl.utils import get_column_letter
path = r'C:\Users\jg2yXRZ\OneDrive\桌面\20250217校历'
title = '2024学年第二学期校历'
# 起始日期前空几天
m=1
# 创建一个新的Excel工作簿
workbook = Workbook()
sheet = workbook.active
# 设置标题行
# title_row = ["周次", "星期一", "星期二", "星期三", "星期四", "星期五", "星期六","星期日",]
# title_row = ["周次", "一", "二", "三", "四", "五", "六","日",]
title_row = ["周次", "日", "一", "二", "三", "四", "五", "六"]
sheet.append(title_row)
# 设置日期范围
start_date = datetime.date(2025, 2, 17)
end_date = datetime.date(2025, 6, 30)
# 生成日期列表并包含标题行和空格行
date_list = [title_row]
for i in range(m):
date_list.append([]) # 添加一个空格行
current_day = start_date
while current_day <= end_date:
date_list.append([current_day])
current_day += datetime.timedelta(days=1)
# 计算周数和将日期列表写入Excel
current_week = 1
for i in range(1, len(date_list), 7):
# 获取当前周的日期列表
week_dates = date_list[i:i+7]
# 在A列中添加周次
sheet.cell(row=current_week + 1, column=1).value = f"{current_week}"
cell = sheet.cell(row=current_week + 1, column=1)
cell.alignment = Alignment(horizontal='center', vertical='center')
# 设置A列单元格边框样式为黑色实线
thin_border = Border(left=Side(style='thin', color='000000'),
right=Side(style='thin', color='000000'),
top=Side(style='thin', color='000000'),
bottom=Side(style='thin', color='000000'))
cell.border = thin_border
cell.font = Font(size=18)
# 在正确的单元格中添加日期
for j in range(len(week_dates)):
cell = sheet.cell(row=current_week + 1, column=j + 2)
# 检查日期是否为当月的第一天,如果是则显示“月/1”,否则显示“月/日”
if week_dates[j]: # Check if the list is not empty
if week_dates[j][0].year == 2025 and week_dates[j][0].month == 2 and week_dates[j][0].day == 17:
cell.value = f"{week_dates[j][0].year}/{week_dates[j][0].month}/{week_dates[j][0].day}"
elif week_dates[j][0].day == 1:
cell.value = f"{week_dates[j][0].month}/{week_dates[j][0].day}"
else:
cell.value = f"{week_dates[j][0].day}"
cell.alignment = Alignment(horizontal='center', vertical='center')
# 根据月份设置单元格底纹颜色
month = week_dates[j][0].month
if month == 2:
cell.fill = PatternFill(start_color="FFFFCC", end_color="FFFFCC", fill_type="solid") # 浅黄色
elif month == 3:
cell.fill = PatternFill(start_color="FFCCCC", end_color="FFCCCC", fill_type="solid") # 浅红色
elif month == 4:
cell.fill = PatternFill(start_color="CCFFCC", end_color="CCFFCC", fill_type="solid") # 浅绿色
elif month == 5:
cell.fill = PatternFill(start_color="CCCCCC", end_color="CCCCCC", fill_type="solid") # 浅灰色
elif month == 6:
cell.fill = PatternFill(start_color="FFCC99", end_color="FFCC99", fill_type="solid") # 浅橘色
# 设置单元格边框样式为黑色实线
thin_border = Border(left=Side(style='thin', color='000000'),
right=Side(style='thin', color='000000'),
top=Side(style='thin', color='000000'),
bottom=Side(style='thin', color='000000'))
cell.border = thin_border
# 设置字体大小为18磅
if week_dates[j][0].year == 2025 and week_dates[j][0].month == 2 and week_dates[j][0].day == 17:
cell.font = Font(size=13)
cell.alignment = Alignment(horizontal='center', vertical='center')
else:
cell.font = Font(size=18)
cell.alignment = Alignment(horizontal='center', vertical='center')
# 更新周数并移动到下一周
current_week += 1
# 确保标题行的所有单元格也居中且有框线,并将第一行标题单元格底色设置为浅蓝色
for col in range(1, len(title_row) + 1):
cell = sheet.cell(row=1, column=col)
cell.alignment = Alignment(horizontal='center', vertical='center')
thin_border = Border(left=Side(style='thin', color='000000'),
right=Side(style='thin', color='000000'),
top=Side(style='thin', color='000000'),
bottom=Side(style='thin', color='000000'))
cell.border = thin_border
if col >= 1 and col <= 8: # Apply blue fill to A1-H1
cell.fill = PatternFill(start_color="ADD8E6", end_color="ADD8E6", fill_type="solid") # 浅蓝色
cell.font = Font(size=18)
# A列第二行开始,单元格的填充底色与B列单元格颜色相同
for row in range(2, sheet.max_row + 1):
for col in range(1, 2): # Apply fill from B column to A-H columns
b_cell = sheet.cell(row=row, column=col + 1)
a_cell = sheet.cell(row=row, column=col)
a_cell.fill = b_cell.fill.copy() # Use copy() to avoid unhashable type error
# 设置所有行的行高和列宽
for row in range(1, sheet.max_row + 1):
sheet.row_dimensions[row].height = 30
for col in range(1, sheet.max_column + 1):
column_letter = get_column_letter(col)
sheet.column_dimensions[column_letter].width = 10 # Set width to a reasonable value for better readability
# 在第一行上方插入一个空行,然后合并A1-H1,写入“第二学期”20磅,居中
sheet.insert_rows(1)
sheet.merge_cells('A1:H1')
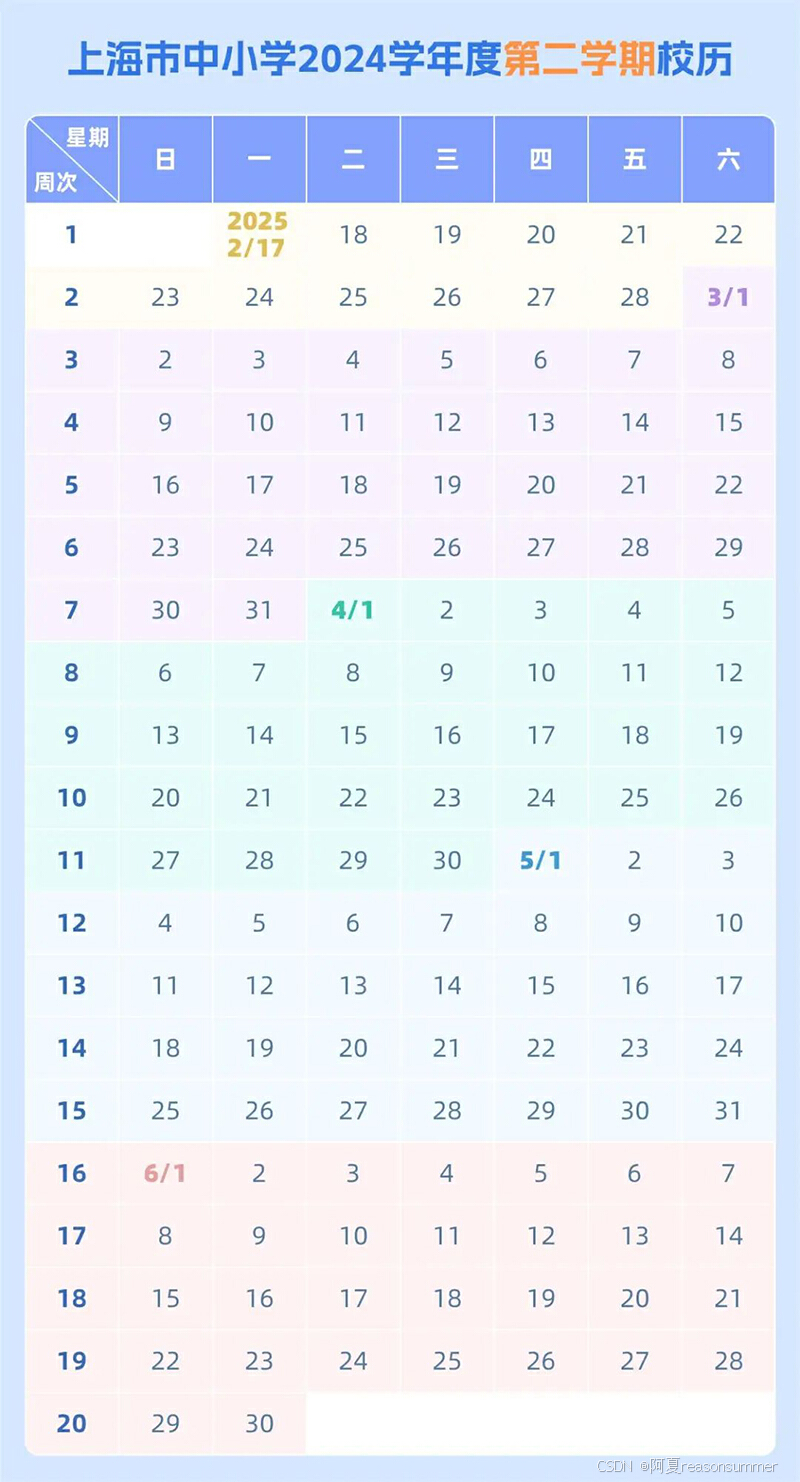
sheet.cell(row=1, column=1).value = "上海市中小学2024学年度第二学期校历(阿夏20250209)"
sheet.cell(row=1, column=1).alignment = Alignment(horizontal='center', vertical='center')
sheet.cell(row=1, column=1).font = Font(size=18)
sheet.cell(row=1, column=1).border = thin_border
sheet.cell(row=1, column=1).fill = PatternFill(start_color="ADD8E6", end_color="ADD8E6", fill_type="solid") # 浅蓝色
# 保存工作簿
workbook.save(path + fr"\周日在前美化{title}.xlsx")
time.sleep(2)
代码展示
'''
模仿制作2025年2月下学期的校历(只有日期)
星火讯飞、阿夏
20250209
'''
from openpyxl import Workbook
from openpyxl.styles import PatternFill, Border, Side, Alignment, Font
import datetime
import time
from openpyxl.utils import get_column_letter

path = r'C:\Users\jg2yXRZ\OneDrive\桌面\20250217校历'
title = '2024学年第二学期校历'
# 起始日期前空几天
m=0

# 创建一个新的Excel工作簿
workbook = Workbook()
sheet = workbook.active

# 设置标题行
# title_row = ["周次",  "星期一", "星期二", "星期三", "星期四", "星期五", "星期六","星期日",]
title_row = ["周次",  "一", "二", "三", "四", "五", "六","日",]
sheet.append(title_row)

# 设置日期范围
start_date = datetime.date(2025, 2, 17)
end_date = datetime.date(2025, 6, 30)

# 生成日期列表并包含标题行和空格行
date_list = [title_row]
for i in range(m):
    date_list.append([])  # 添加一个空格行

current_day = start_date

while current_day <= end_date:
    date_list.append([current_day])
    current_day += datetime.timedelta(days=1)

# 计算周数和将日期列表写入Excel
current_week = 1
for i in range(1, len(date_list), 7):
    # 获取当前周的日期列表
    week_dates = date_list[i:i+7]

    # 在A列中添加周次
    sheet.cell(row=current_week + 1, column=1).value = f"{current_week}"
    cell = sheet.cell(row=current_week + 1, column=1)
    cell.alignment = Alignment(horizontal='center', vertical='center')

    # 设置A列单元格边框样式为黑色实线
    thin_border = Border(left=Side(style='thin', color='000000'),
                         right=Side(style='thin', color='000000'),
                         top=Side(style='thin', color='000000'),
                         bottom=Side(style='thin', color='000000'))
    cell.border = thin_border
    cell.font = Font(size=18)

    # 在正确的单元格中添加日期
    for j in range(len(week_dates)):
        cell = sheet.cell(row=current_week + 1, column=j + 2)

        # 检查日期是否为当月的第一天,如果是则显示“月/1”,否则显示“月/日”
        if week_dates[j]:  # Check if the list is not empty
            if week_dates[j][0].year == 2025 and week_dates[j][0].month == 2 and week_dates[j][0].day == 17:
                cell.value = f"{week_dates[j][0].year}/{week_dates[j][0].month}/{week_dates[j][0].day}"
            elif week_dates[j][0].day == 1:
                cell.value = f"{week_dates[j][0].month}/{week_dates[j][0].day}"
            else:
                cell.value = f"{week_dates[j][0].day}"

        cell.alignment = Alignment(horizontal='center', vertical='center')

        # 根据月份设置单元格底纹颜色
        month = week_dates[j][0].month
        if month == 2:
            cell.fill = PatternFill(start_color="FFFFCC", end_color="FFFFCC", fill_type="solid")  # 浅黄色
        elif month == 3:
            cell.fill = PatternFill(start_color="FFCCCC", end_color="FFCCCC", fill_type="solid")  # 浅红色
        elif month == 4:
            cell.fill = PatternFill(start_color="CCFFCC", end_color="CCFFCC", fill_type="solid")  # 浅绿色
        elif month == 5:
            cell.fill = PatternFill(start_color="CCCCCC", end_color="CCCCCC", fill_type="solid")  # 浅灰色
        elif month == 6:
            cell.fill = PatternFill(start_color="FFCC99", end_color="FFCC99", fill_type="solid")  # 浅橘色

        # 设置单元格边框样式为黑色实线
        thin_border = Border(left=Side(style='thin', color='000000'),
                             right=Side(style='thin', color='000000'),
                             top=Side(style='thin', color='000000'),
                             bottom=Side(style='thin', color='000000'))
        cell.border = thin_border
        # 设置字体大小为18磅
        if week_dates[j][0].year == 2025 and week_dates[j][0].month == 2 and week_dates[j][0].day == 17:
            cell.font = Font(size=13)
            cell.alignment = Alignment(horizontal='center', vertical='center')
        else:
            cell.font = Font(size=18)
            cell.alignment = Alignment(horizontal='center', vertical='center')

    # 更新周数并移动到下一周
    current_week += 1

# 确保标题行的所有单元格也居中且有框线,并将第一行标题单元格底色设置为浅蓝色
for col in range(1, len(title_row) + 1):
    cell = sheet.cell(row=1, column=col)
    cell.alignment = Alignment(horizontal='center', vertical='center')
    thin_border = Border(left=Side(style='thin', color='000000'),
                         right=Side(style='thin', color='000000'),
                         top=Side(style='thin', color='000000'),
                         bottom=Side(style='thin', color='000000'))
    cell.border = thin_border
    if col >= 1 and col <= 8:  # Apply blue fill to A1-H1
        cell.fill = PatternFill(start_color="ADD8E6", end_color="ADD8E6", fill_type="solid")  # 浅蓝色
        cell.font = Font(size=18)


# A列第二行开始,单元格的填充底色与B列单元格颜色相同
for row in range(2, sheet.max_row + 1):
    for col in range(1, 2):  # Apply fill from B column to A-H columns
        b_cell = sheet.cell(row=row, column=col + 1)
        a_cell = sheet.cell(row=row, column=col)
        a_cell.fill = b_cell.fill.copy()  # Use copy() to avoid unhashable type error

# 设置所有行的行高和列宽
for row in range(1, sheet.max_row + 1):
    sheet.row_dimensions[row].height = 30

for col in range(1, sheet.max_column + 1):
    column_letter = get_column_letter(col)
    sheet.column_dimensions[column_letter].width = 10  # Set width to a reasonable value for better readability

#  在第一行上方插入一个空行,然后合并A1-H1,写入“第二学期”20磅,居中
sheet.insert_rows(1)
sheet.merge_cells('A1:H1')
sheet.cell(row=1, column=1).value = "上海市中小学2024学年度第二学期校历(阿夏20250209)"
sheet.cell(row=1, column=1).alignment = Alignment(horizontal='center', vertical='center')
sheet.cell(row=1, column=1).font = Font(size=18)
sheet.cell(row=1, column=1).border = thin_border
sheet.cell(row=1, column=1).fill = PatternFill(start_color="ADD8E6", end_color="ADD8E6", fill_type="solid")  # 浅蓝色


# 保存工作簿
workbook.save(path + fr"\{title}.xlsx")
time.sleep(2)
下一步就是查找不上班的日期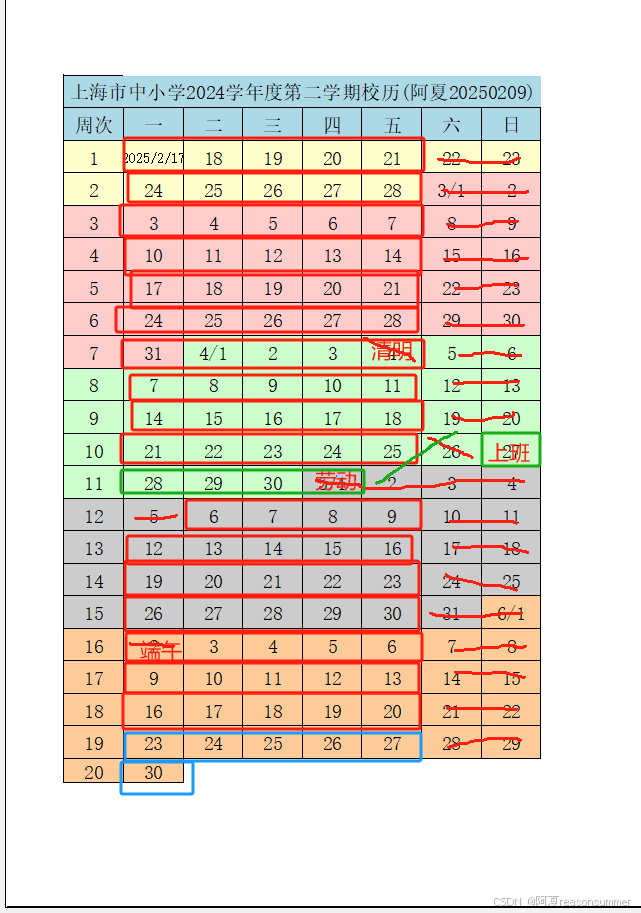
可以看到第10周五天,第10周周日5月27日与第11周的三天上班合并,第19周与第20周(只有1天)合并为6天,一共可以做19周的计划
2.0版本——实际需要的央视(周一开始,双休日、假日空白)
代码展示
'''
模仿制作2025年2月下学期的校历(标注节假日)
星火讯飞、阿夏
202502010
'''
from openpyxl import Workbook
from openpyxl.styles import PatternFill, Border, Side, Alignment, Font
import datetime
import time
from openpyxl.utils import get_column_letter
from openpyxl.worksheet.page import PageMargins
path = r'C:\Users\jg2yXRZ\OneDrive\桌面\20250217校历'
title = '2024学年第二学期校历(阿夏20250209)'
# 起始日期前空几天
m=0
# 创建一个新的Excel工作簿
workbook = Workbook()
sheet = workbook.active
# 设置页边距(单位为英寸)
# 设置页边距(单位为厘米)
left_margin_cm = 1.3
right_margin_cm = 1.3
top_margin_cm = 2
bottom_margin_cm = 2
# 将厘米转换为英寸
left_margin_inch = left_margin_cm * 0.393701
right_margin_inch = right_margin_cm * 0.393701
top_margin_inch = top_margin_cm * 0.393701
bottom_margin_inch = bottom_margin_cm * 0.393701
# 设置页边距(单位为英寸)
margins = PageMargins(left=left_margin_inch, right=right_margin_inch, top=top_margin_inch, bottom=bottom_margin_inch)
# margins = PageMargins(left=3.322, right=3.322, top=5.08, bottom=5.08)
sheet.page_margins = margins
# 设置标题行
# title_row = ["周次", "星期一", "星期二", "星期三", "星期四", "星期五", "星期六","星期日",]
title_row = ["周次", "一", "二", "三", "四", "五", "六","日",]
sheet.append(title_row)
# 设置日期范围
start_date = datetime.date(2025, 2, 17)
end_date = datetime.date(2025, 6, 30)
# 生成日期列表并包含标题行和空格行
date_list = [title_row]
for i in range(m):
date_list.append([]) # 添加一个空格行
current_day = start_date
while current_day <= end_date:
date_list.append([current_day])
current_day += datetime.timedelta(days=1)
# 计算周数和将日期列表写入Excel
current_week = 1
for i in range(1, len(date_list), 7):
# 获取当前周的日期列表
week_dates = date_list[i:i+7]
# 在A列中添加周次
sheet.cell(row=current_week + 1, column=1).value = f"第{current_week}周"
cell = sheet.cell(row=current_week + 1, column=1)
cell.alignment = Alignment(horizontal='center', vertical='center')
# 设置A列单元格边框样式为黑色实线
thin_border = Border(left=Side(style='thin', color='000000'),
right=Side(style='thin', color='000000'),
top=Side(style='thin', color='000000'),
bottom=Side(style='thin', color='000000'))
cell.border = thin_border
cell.font = Font(size=16)
# 在正确的单元格中添加日期
for j in range(len(week_dates)):
cell = sheet.cell(row=current_week + 1, column=j + 2)
# 检查日期是否为当月的第一天,如果是则显示“月/1”,否则显示“月/日”
if week_dates[j]: # Check if the list is not empty
if week_dates[j][0].year == 2025 and week_dates[j][0].month == 2 and week_dates[j][0].day == 17:
cell.value = f"{week_dates[j][0].year}/{week_dates[j][0].month}/{week_dates[j][0].day}"
elif week_dates[j][0].day == 1:
cell.value = f"{week_dates[j][0].month}/{week_dates[j][0].day}"
if week_dates[j][0].year == 2025 and week_dates[j][0].month == 5 and week_dates[j][0].day == 1:
cell.value = f"{week_dates[j][0].month}/{week_dates[j][0].day}劳动"
else:
cell.value = f"{week_dates[j][0].day}"
if week_dates[j][0].year == 2025 and week_dates[j][0].month == 4 and week_dates[j][0].day == 4:
cell.value = f"{week_dates[j][0].day}清明"
elif week_dates[j][0].year == 2025 and week_dates[j][0].month == 5 and week_dates[j][0].day == 31:
cell.value = f"{week_dates[j][0].day}端午"
cell.alignment = Alignment(horizontal='center', vertical='center')
# 根据月份设置单元格底纹颜色
month = week_dates[j][0].month
day = week_dates[j][0].day
if month == 2:
cell.fill = PatternFill(start_color="FFFFCC", end_color="FFFFCC", fill_type="solid") # 浅黄色
elif month == 3:
cell.fill = PatternFill(start_color="FFCCCC", end_color="FFCCCC", fill_type="solid") # 浅红色
elif month == 4:
if day !=4 : # 4月4日清明
cell.fill = PatternFill(start_color="CCFFCC", end_color="CCFFCC", fill_type="solid") # 浅绿色
elif month == 5:
if not (day == 1 or day == 2 or day == 3 or day == 4 or day == 5):
cell.fill = PatternFill(start_color="CCCCCC", end_color="CCCCCC", fill_type="solid") # 浅灰色
elif month == 6:
if not (day == 1 or day == 2 ):
cell.fill = PatternFill(start_color="FFCC99", end_color="FFCC99", fill_type="solid") # 浅橘色
# 设置单元格边框样式为黑色实线
thin_border = Border(left=Side(style='thin', color='000000'),
right=Side(style='thin', color='000000'),
top=Side(style='thin', color='000000'),
bottom=Side(style='thin', color='000000'))
cell.border = thin_border
# 设置字体大小为18磅
if week_dates[j][0].year == 2025 and week_dates[j][0].month == 2 and week_dates[j][0].day == 17:
cell.font = Font(size=13)
cell.alignment = Alignment(horizontal='center', vertical='center')
else:
cell.font = Font(size=16)
cell.alignment = Alignment(horizontal='center', vertical='center')
# 在G2-H2开始的列的单元格都填充为白色
for row in range(2, sheet.max_row + 1):
for col in range(7, 9): # Apply white fill to G2-H2 columns
cell = sheet.cell(row=row, column=col)
cell.fill = PatternFill(start_color="FFFFFF", end_color="FFFFFF", fill_type="solid") # White color
# # 4月27日(周日)换班,4月浅绿色
# if week_dates[j][0].year == 2025 and week_dates[j][0].month == 4 and week_dates[j][0].day == 27:
# print("4月27日已找到")
# # 重新填充一个特定单元格为浅绿色
specific_cell = 'H11'
sheet[specific_cell].fill = PatternFill(start_color="CCFFCC", end_color="CCFFCC", fill_type="solid")
# cell.fill = PatternFill(start_color="CCFFCC", end_color="CCFFCC", fill_type="solid") # 浅绿色
# 更新周数并移动到下一周
current_week += 1
# 确保标题行的所有单元格也居中且有框线,并将第一行标题单元格底色设置为浅蓝色
for col in range(1, len(title_row) + 1):
cell = sheet.cell(row=1, column=col)
cell.alignment = Alignment(horizontal='center', vertical='center')
thin_border = Border(left=Side(style='thin', color='000000'),
right=Side(style='thin', color='000000'),
top=Side(style='thin', color='000000'),
bottom=Side(style='thin', color='000000'))
cell.border = thin_border
if col >= 1 and col <= 8: # Apply blue fill to A1-H1
cell.fill = PatternFill(start_color="ADD8E6", end_color="ADD8E6", fill_type="solid") # 浅蓝色
cell.font = Font(size=16)
# A列第二行开始,单元格的填充底色与B列单元格颜色相同
# for row in range(2, sheet.max_row + 1):
# for col in range(1, 2): # Apply fill from B column to A-H columns
# b_cell = sheet.cell(row=row, column=col + 1)
# a_cell = sheet.cell(row=row, column=col)
# a_cell.fill = b_cell.fill.copy() # Use copy() to avoid unhashable type error
# 设置所有行的行高和列宽
for row in range(1, sheet.max_row + 2):
sheet.row_dimensions[row].height = 30
for col in range(1, sheet.max_column + 1):
column_letter = get_column_letter(col)
sheet.column_dimensions[column_letter].width = 11.5 # Set width to a reasonable value for better readability
# 在第一行上方插入一个空行,然后合并A1-H1,写入“第二学期”20磅,居中
sheet.insert_rows(1)
sheet.merge_cells('A1:H1')
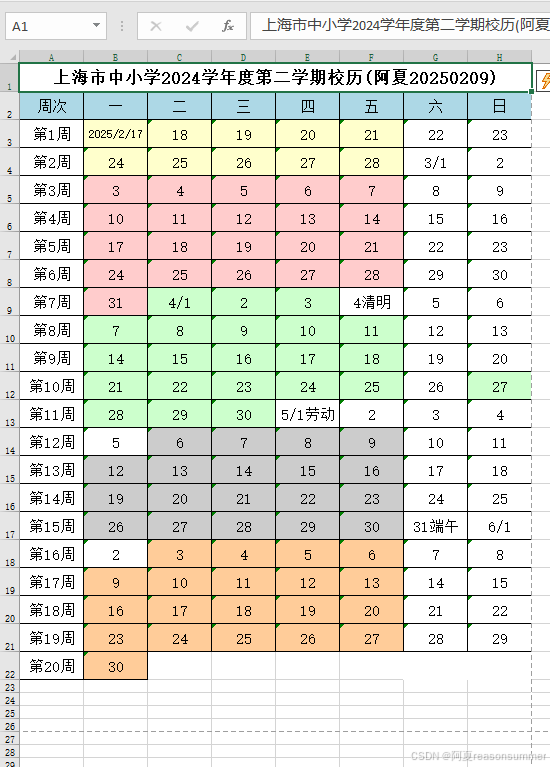
sheet.cell(row=1, column=1).value = "上海市中小学2024学年度第二学期校历(阿夏20250209)"
sheet.cell(row=1, column=1).alignment = Alignment(horizontal='center', vertical='center')
# 字号,加粗
sheet.cell(row=1, column=1).font = Font(size=18, bold=True)
# 框线
# sheet.cell(row=1, column=1).border = thin_border
# 填充白色
sheet.cell(row=1, column=1).fill = PatternFill(start_color="FFFFFF", end_color="FFFFFF", fill_type="solid")
# 保存工作簿
workbook.save(path + fr"\{title}.xlsx")
time.sleep(2)
# import pandas as pd
# from fpdf import FPDF
# # 读取Excel文件
# excel_file = path + fr"\{title}.xlsx"
# df = pd.read_excel(excel_file)
# # 创建PDF对象
# pdf = FPDF()
# pdf.add_page()
# pdf.set_font("Arial", size=12)
# # 添加表格数据到PDF
# for i in range(len(df)):
# line = df.iloc[i].tolist()
# text = ' | '.join([str(x) for x in line])
# pdf.cell(200, 10, txt=text, ln=True)
# # 保存PDF文件
# pdf_file = path + fr"\{title}.pdf"
# pdf.output(pdf_file)
# print(f"PDF file has been created: {pdf_file}")
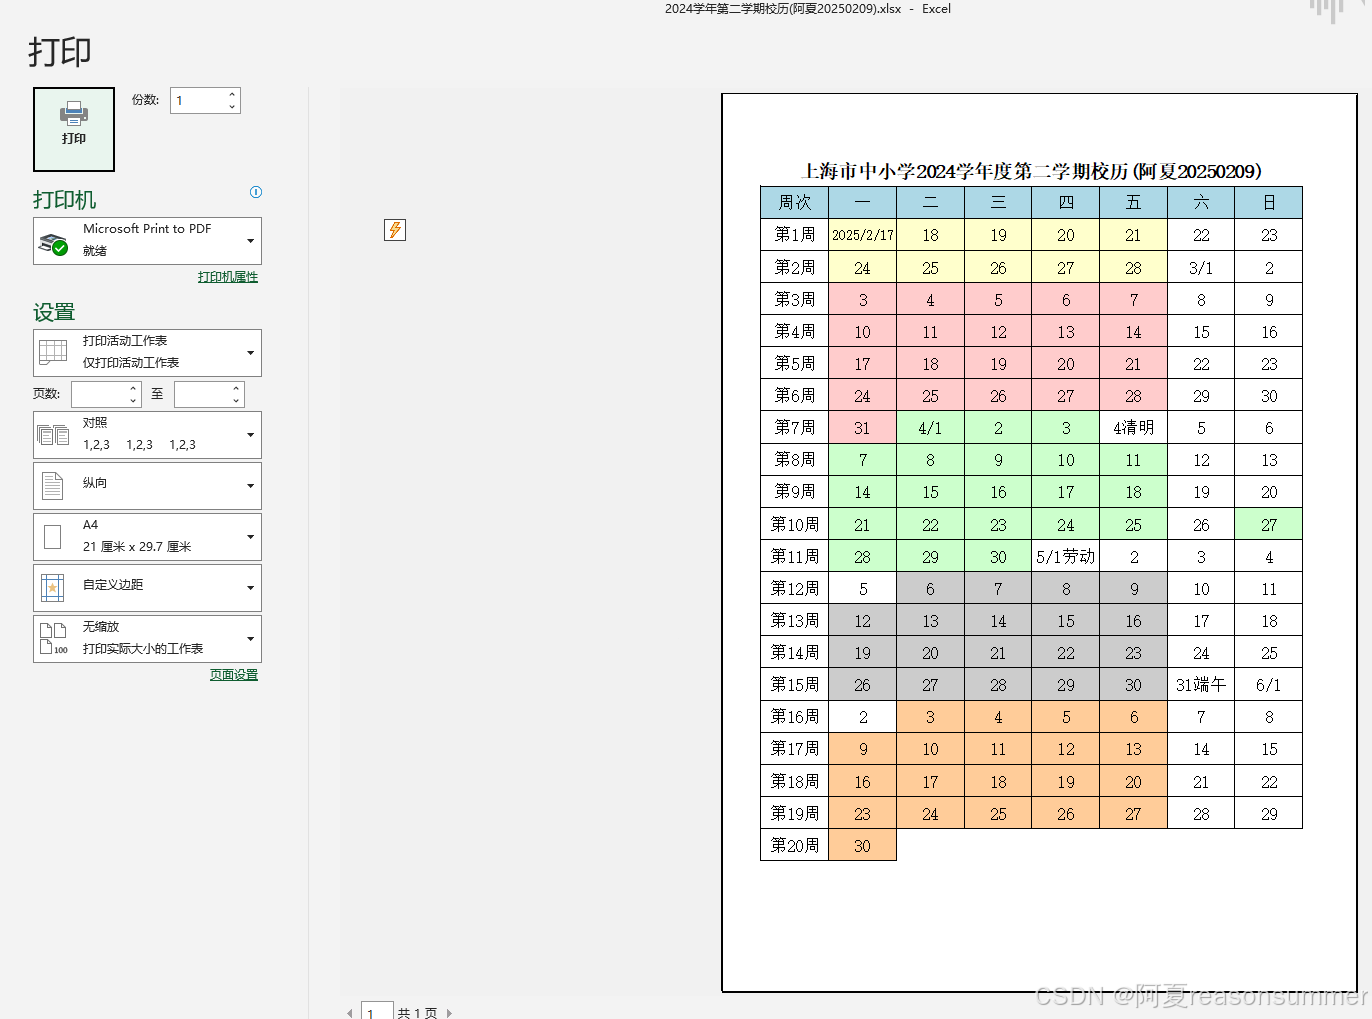
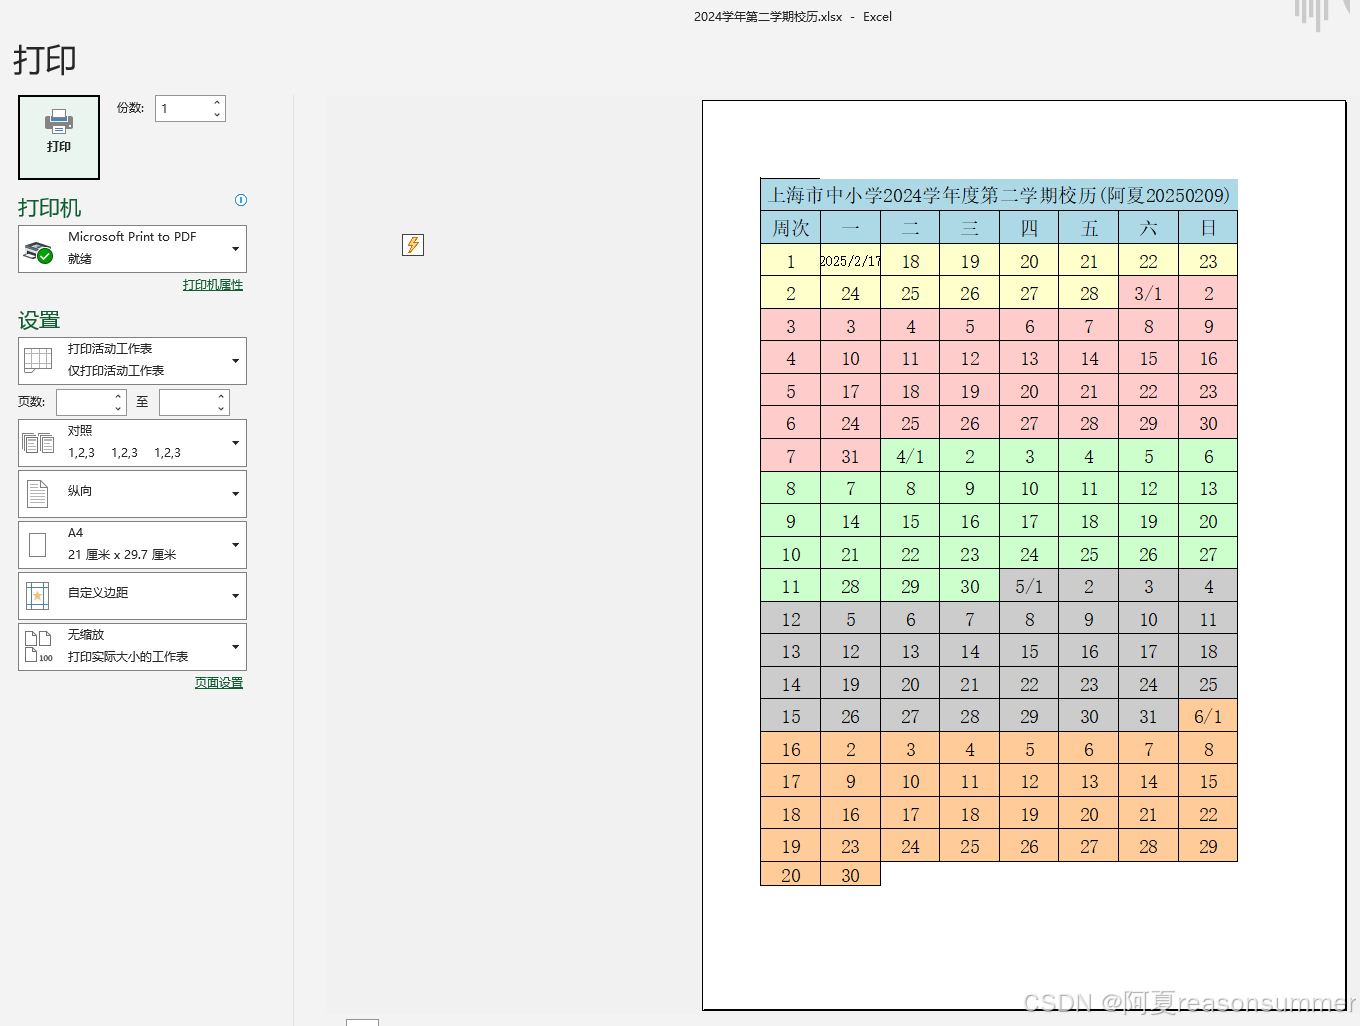
在excel里另存为pdf(python 把excel转PDF有问题)
不同浏览器效果
CAJ
谷歌浏览器
360极速浏览器
火狐浏览器
Adobe Acrobat DC
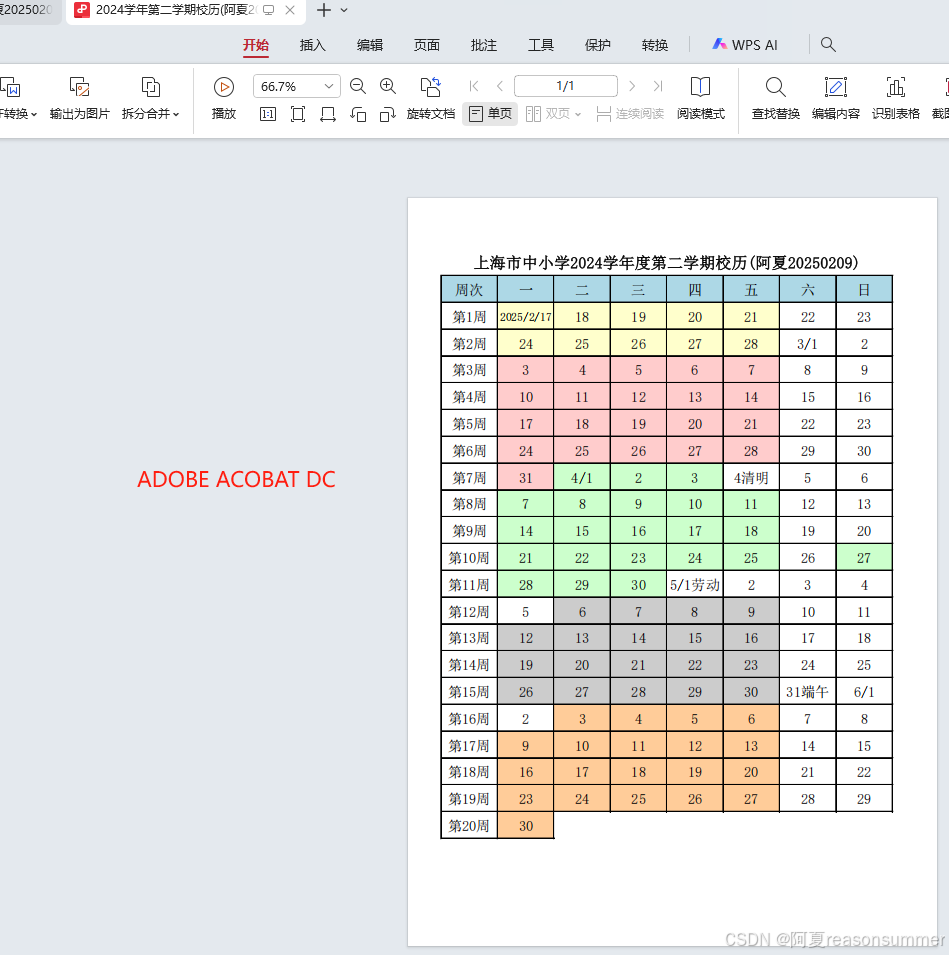
最终效果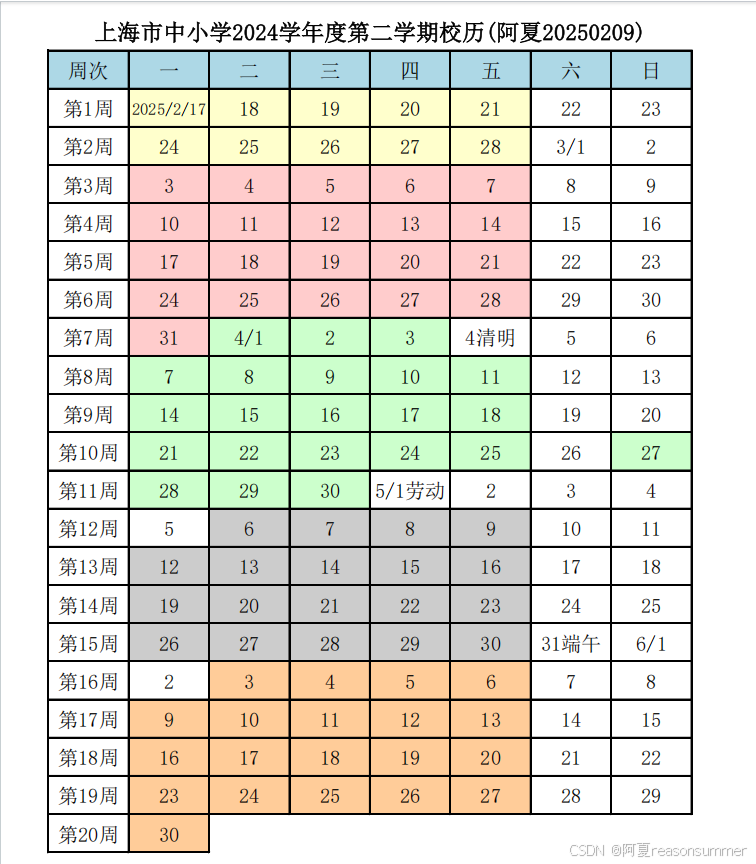
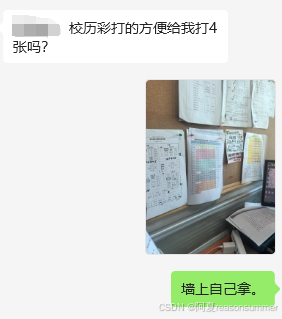
发到学校群里

因为图片里面有彩色的底纹,必须用领导的彩色打印机。
所以我打印了二十份,粘在墙上。需要的人自己来拿