文件服务器
文章目录
- 文件服务器
- 一、FTP Server
- 1.简介
- 2.FTP Server 默认配置
- 3.FTP Clinet
- 4.vsftpd的主动和被动模式
- 二、NFS Server
- 1.简要介绍
- 2.环境配置
- 3.关闭防火墙
- 4.nfs(存储端)
- 5.web1 web2 web3 客户端
- 5.1 安装NFS客户端
- 5.2 开启httpd服务
- 5.3 查看存储端共享
- 5.4 手动挂载
- 5.5 查看挂载
- 5.6 访问web服务器
- 三、SSH Server
- 1.简介
- 2.SSH 服务器练习

一、FTP Server
1.简介
FTP(File Transfer Protocol,文件传输协议)是TCP/IP协议组中的协议之一

作用:
1.提供文件共享服务
2.互联网上多的媒体资源和软件资源,绝大部分都是通过FTP服务器传递。
软件包:vsftpd
控制端口(command) 21/tcp
数据端口(data) 20/tcp
2.FTP Server 默认配置
实验环境:准备两台服务器
| 服务器名称 | IP |
|---|---|
| mysql-master1 | 192.168.200.182 |
| mysql-master2 | 192.168.200.184 |
1、安装vsftp
在mysql-master1服务器上进行配置
[root@mysql-master1 ~]# yum -y install vsftpd
已加载插件:fastestmirror, langpacks
Loading mirror speeds from cached hostfile
 * base: mirrors.aliyun.com
 * extras: mirrors.aliyun.com
 * updates: mirrors.aliyun.com
base                                                                     | 3.6 kB  00:00:00
epel                                                                     | 4.7 kB  00:00:00
extras                                                                   | 2.9 kB  00:00:00
percona-release-noarch                                                   | 1.5 kB  00:00:00
percona-release-x86_64                                                   | 2.9 kB  00:00:00
prel-release-noarch                                                      | 1.5 kB  00:00:00
updates                                                                  | 2.9 kB  00:00:00
zabbix                                                                   | 2.9 kB  00:00:00
zabbix-frontend                                                          | 2.9 kB  00:00:00
zabbix-non-supported                                                     | 2.9 kB  00:00:00
正在解决依赖关系
--> 正在检查事务
---> 软件包 vsftpd.x86_64.0.3.0.2-29.el7_9 将被 安装
--> 解决依赖关系完成

依赖关系解决

================================================================================================
 Package             架构                版本                        源                    大小
================================================================================================
正在安装:
 vsftpd              x86_64              3.0.2-29.el7_9              updates              173 k

事务概要
================================================================================================
安装  1 软件包

总下载量:173 k
安装大小:353 k
Downloading packages:
vsftpd-3.0.2-29.el7_9.x86_64.rpm                                         | 173 kB  00:00:00
Running transaction check
Running transaction test
Transaction test succeeded
Running transaction
  正在安装    : vsftpd-3.0.2-29.el7_9.x86_64                                                1/1
  验证中      : vsftpd-3.0.2-29.el7_9.x86_64                                                1/1

已安装:
  vsftpd.x86_64 0:3.0.2-29.el7_9

完毕!
2、准备分发的文件
[root@mysql-master1 ~]# touch  /var/ftp/guan.txt  //FTP服务的主目录:“/var/ftp/”,是FTP程序分享内容的本机目录
[root@mysql-master1 ~]# vim  /var/ftp/guan.txt
[root@mysql-master1 ~]# cat  /var/ftp/guan.txt
1234567890123456789012345678901234567890123456789012345678901234567890123456789012345678901234567890123456789012345678901234567890123456789012345678901234567890123456789012345678901234567890123456789012345678901
3、启动服务
[root@mysql-master1 ~]# systemctl start vsftpd

[root@mysql-master1 ~]# systemctl enable vsftpd
Created symlink from /etc/systemd/system/multi-user.target.wants/vsftpd.service to /usr/lib/systemd/system/vsftpd.service.
[root@mysql-master1 ~]# systemctl enable vsftpd
Created symlink from /etc/systemd/system/multi-user.target.wants/vsftpd.service to /usr/lib/systemd/system/vsftpd.service.
[root@mysql-master1 ~]# systemctl status vsftpd
● vsftpd.service - Vsftpd ftp daemon
   Loaded: loaded (/usr/lib/systemd/system/vsftpd.service; enabled; vendor preset: disabled)
   Active: active (running) since 日 2022-11-13 23:46:48 CST; 1min 29s ago
 Main PID: 9459 (vsftpd)
   CGroup: /system.slice/vsftpd.service
           └─9459 /usr/sbin/vsftpd /etc/vsftpd/vsftpd.conf

11月 13 23:46:48 mysql-master1 systemd[1]: Starting Vsftpd ftp daemon...
11月 13 23:46:48 mysql-master1 systemd[1]: Started Vsftpd ftp daemon.

[root@mysql-master1 ~]# ss -ntl
State      Recv-Q Send-Q   Local Address:Port                  Peer Address:Port
LISTEN     0      128          127.0.0.1:9000                             *:*
LISTEN     0      128                  *:111                              *:*
LISTEN     0      128                  *:6000                             *:*
LISTEN     0      128                  *:80                               *:*
LISTEN     0      5        192.168.122.1:53                               *:*
LISTEN     0      128                  *:22                               *:*
LISTEN     0      128          127.0.0.1:631                              *:*
LISTEN     0      80                  :::3306                            :::*
LISTEN     0      128                 :::111                             :::*
LISTEN     0      128                 :::6000                            :::*
LISTEN     0      128                 :::80                              :::*
LISTEN     0      32                  :::21                              :::*
LISTEN     0      128                 :::22                              :::*
LISTEN     0      128                ::1:631                             :::*

[root@mysql-master1 ~]# netstat -anpt
Active Internet connections (servers and established)
Proto Recv-Q Send-Q Local Address           Foreign Address         State       PID/Program name
tcp        0      0 127.0.0.1:9000          0.0.0.0:*               LISTEN      7014/php-fpm: maste
tcp        0      0 0.0.0.0:111             0.0.0.0:*               LISTEN      1/systemd
tcp        0      0 0.0.0.0:6000            0.0.0.0:*               LISTEN      7459/X
tcp        0      0 0.0.0.0:80              0.0.0.0:*               LISTEN      7173/nginx: master
tcp        0      0 192.168.122.1:53        0.0.0.0:*               LISTEN      7448/dnsmasq
tcp        0      0 0.0.0.0:22              0.0.0.0:*               LISTEN      7016/sshd
tcp        0      0 127.0.0.1:631           0.0.0.0:*               LISTEN      7017/cupsd
tcp        0      0 192.168.200.182:40306   192.168.200.184:3306    ESTABLISHED 7745/mysqld
tcp6       0      0 :::3306                 :::*                    LISTEN      7745/mysqld
tcp6       0      0 :::111                  :::*                    LISTEN      1/systemd
tcp6       0      0 :::6000                 :::*                    LISTEN      7459/X
tcp6       0      0 :::80                   :::*                    LISTEN      7173/nginx: master
tcp6       0      0 :::21                   :::*                    LISTEN      9459/vsftpd
tcp6       0      0 :::22                   :::*                    LISTEN      7016/sshd
tcp6       0      0 ::1:631                 :::*                    LISTEN      7017/cupsd
[root@mysql-master1 ~]#
4、关闭防火墙
[root@mysql-master1 ~]# systemctl stop firewalld
[root@mysql-master1 ~]# systemctl disable firewalld
[root@mysql-master1 ~]# setenforce 0
setenforce: SELinux is disabled
[root@mysql-master1 ~]# vim /etc/selinux/config   //修改内容:SELINUX=disabled
[root@mysql-master1 ~]# cat /etc/selinux/config

SELINUX=disabled
SELINUXTYPE=targeted
3.FTP Clinet
1、在mysql-master2上进行配置LinuxFTP客户端程序:lftp
安装客户端工具
[root@mysql-master2 ~]# yum -y install lftp
已加载插件:fastestmirror
Loading mirror speeds from cached hostfile
base                                                                     | 3.6 kB  00:00:00
extras                                                                   | 2.9 kB  00:00:00
mysql-connectors-community                                               | 2.6 kB  00:00:00
mysql-tools-community                                                    | 2.6 kB  00:00:00
mysql57-community                                                        | 2.6 kB  00:00:01
updates                                                                  | 2.9 kB  00:00:00
zabbix                                                                   | 2.9 kB  00:00:00
zabbix2                                                                  | 2.9 kB  00:00:00
正在解决依赖关系
--> 正在检查事务
---> 软件包 lftp.x86_64.0.4.4.8-14.el7_9 将被 安装
--> 解决依赖关系完成

依赖关系解决

================================================================================================
 Package           架构                版本                          源                    大小
================================================================================================
正在安装:
 lftp              x86_64              4.4.8-14.el7_9                updates              752 k

事务概要
================================================================================================
安装  1 软件包

总下载量:752 k
安装大小:2.4 M
Downloading packages:
lftp-4.4.8-14.el7_9.x86_64.rpm                                           | 752 kB  00:00:00
Running transaction check
Running transaction test
Transaction test succeeded
Running transaction
  正在安装    : lftp-4.4.8-14.el7_9.x86_64                                                  1/1
  验证中      : lftp-4.4.8-14.el7_9.x86_64                                                  1/1

已安装:
  lftp.x86_64 0:4.4.8-14.el7_9

完毕!
访问服务器
[root@mysql-master2 ~]# lftp 192.168.200.182
lftp 192.168.200.182:~> ls
-rw-r--r--    1 0        0          123451 Nov 13 15:44 guan.txt
drwxr-xr-x    2 0        0               6 Jun 09  2021 pub
lftp 192.168.200.182:/> cat guan.txt
123456789012345678901234567890123456789012345678901234567890123456789012345678901234567890123456
可能会出现报错
[root@mysql-master2 ~]# lftp 'guan':'guan123456'@192.168.200.182
lftp guan@192.168.200.182:~> ls
ls: 登录失败: 530 Permission denied.
进行排错
[root@mysql-master1 ~]#  systemctl status vsftpd  // 在服务端mysql-master查看服务有没有开启
● vsftpd.service - Vsftpd ftp daemon
   Loaded: loaded (/usr/lib/systemd/system/vsftpd.service; enabled; vendor preset: disabled)
   Active: active (running) since 三 2022-11-16 23:34:18 CST; 29min ago
 Main PID: 9952 (vsftpd)
    Tasks: 1
   CGroup: /system.slice/vsftpd.service
           └─9952 /usr/sbin/vsftpd /etc/vsftpd/vsftpd.conf

11月 16 23:34:18 mysql-master1 systemd[1]: Starting Vsftpd ftp daemon...
11月 16 23:34:18 mysql-master1 systemd[1]: Started Vsftpd ftp daemon.
[root@localhost ftp]# firewall-cmd --list-all #看ftp服务添加到策略里没有
[root@mysql-master1 ~]# cd /etc/vsftpd
[root@mysql-master1 vsftpd]# cat ftpusers  // # 查看用户是否在永久黑名单里,发现没有
# Users that are not allowed to login via ftp
root
bin
daemon
adm
lp
sync
shutdown
halt
mail
news
uucp
operator
games
nobody
[root@mysql-master1 vsftpd]# cat user_list  //# 查看用户是否在临时黑名单里,发现root和guan这两个用户在黑名单里,如需从黑名单中去除只需注释掉
# vsftpd userlist
# If userlist_deny=NO, only allow users in this file
# If userlist_deny=YES (default), never allow users in this file, and
# do not even prompt for a password.
# Note that the default vsftpd pam config also checks /etc/vsftpd/ftpusers
# for users that are denied.
#root
bin
daemon
adm
lp
sync
shutdown
halt
mail
news
uucp
operator
games
nobody
#guan
查看并下载
lftp 192.168.200.182:/> exit;
[root@mysql-master2 ~]# ls
anaconda-ks.cfg                                    模板
initial-setup-ks.cfg                               视频

[root@mysql-master2 ~]# lftp 192.168.200.182
lftp 192.168.200.182:~> ls
-rw-r--r--    1 0        0          123451 Nov 13 15:44 guan.txt
drwxr-xr-x    2 0        0               6 Jun 09  2021 pub

lftp 192.168.200.182:/> get guan.txt   //下载文件
123451 bytes transferred
lftp 192.168.200.182:/> exit;
[root@mysql-master2 ~]# ls
anaconda-ks.cfg                                    公共
guan.txt                                           模板

[root@mysql-master2 ~]# lftp 192.168.200.182
lftp 192.168.200.182:~> ls
-rw-r--r--    1 0        0          123451 Nov 13 15:44 guan.txt
drwxr-xr-x    2 0        0               6 Jun 09  2021 pub
lftp 192.168.200.182:/> mirror pub   //下载目录
Total: 1 directory, 0 files, 0 symlinks
lftp 192.168.200.182:/> exit;
[root@mysql-master2 ~]# ls
anaconda-ks.cfg                                    公共
guan.txt                                           模板
pub                                                文档
2、LinuxFTP客户端程序2:wget
[root@mysql-master2 ~]# ls
anaconda-ks.cfg                                    公共
guan.txt                                           模板

[root@mysql-master2 ~]# rm -rf guan.txt
[root@mysql-master2 ~]# wget ftp://192.168.200.182/guan.txt
--2022-11-14 00:36:00--  ftp://192.168.200.182/guan.txt
           => “guan.txt”
正在连接 192.168.200.182:21... 已连接。
正在以 anonymous 登录 ... 登录成功!
==> SYST ... 完成。   ==> PWD ... 完成。
==> TYPE I ... 完成。 ==> 不需要 CWD。
==> SIZE guan.txt ... 123451
==> PASV ... 完成。   ==> RETR guan.txt ... 完成。
长度:123451 (121K) (非正式数据)

100%[======================================================>] 123,451     --.-K/s 用时 0.001s

2022-11-14 00:36:00 (136 MB/s) - “guan.txt” 已保存 [123451]

[root@mysql-master2 ~]# ls
anaconda-ks.cfg                                    公共
guan.txt                                           模板
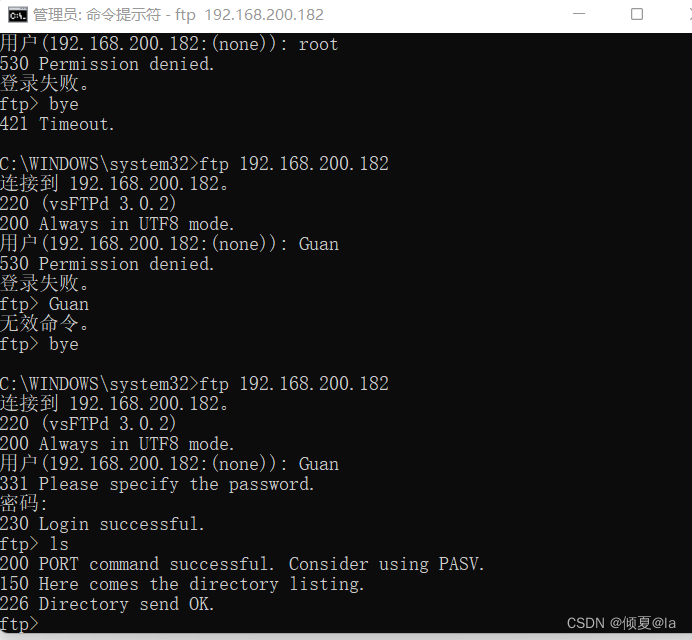
3、任何系统:firefox、IE、资源处理器用ftp:// IP 访问服务器


[root@mysql-master1 ~]# rpm -ql vsftpd
/etc/logrotate.d/vsftpd
/etc/pam.d/vsftpd
/etc/vsftpd  //配置文件的目录
/etc/vsftpd/ftpusers  //访问控制
/etc/vsftpd/user_list  //访问控制
/etc/vsftpd/vsftpd.conf  // 配置文件
/etc/vsftpd/vsftpd_conf_migrate.sh
/usr/lib/systemd/system-generators/vsftpd-generator
/usr/lib/systemd/system/vsftpd.service
/usr/lib/systemd/system/vsftpd.target
/usr/lib/systemd/system/vsftpd@.service
/usr/sbin/vsftpd
/usr/share/doc/vsftpd-3.0.2
/usr/share/doc/vsftpd-3.0.2/AUDIT
/usr/share/doc/vsftpd-3.0.2/BENCHMARKS
/usr/share/doc/vsftpd-3.0.2/BUGS
/usr/share/doc/vsftpd-3.0.2/COPYING
/usr/share/doc/vsftpd-3.0.2/Changelog
/usr/share/doc/vsftpd-3.0.2/EXAMPLE
/usr/share/doc/vsftpd-3.0.2/EXAMPLE/INTERNET_SITE
/usr/share/doc/vsftpd-3.0.2/EXAMPLE/INTERNET_SITE/README
/usr/share/doc/vsftpd-3.0.2/EXAMPLE/INTERNET_SITE/README.configuration
/usr/share/doc/vsftpd-3.0.2/EXAMPLE/INTERNET_SITE/vsftpd.conf
/usr/share/doc/vsftpd-3.0.2/EXAMPLE/INTERNET_SITE/vsftpd.xinetd
/usr/share/doc/vsftpd-3.0.2/EXAMPLE/INTERNET_SITE_NOINETD
/usr/share/doc/vsftpd-3.0.2/EXAMPLE/INTERNET_SITE_NOINETD/README
/usr/share/doc/vsftpd-3.0.2/EXAMPLE/INTERNET_SITE_NOINETD/README.configuration
/usr/share/doc/vsftpd-3.0.2/EXAMPLE/INTERNET_SITE_NOINETD/vsftpd.conf
/usr/share/doc/vsftpd-3.0.2/EXAMPLE/PER_IP_CONFIG
/usr/share/doc/vsftpd-3.0.2/EXAMPLE/PER_IP_CONFIG/README
/usr/share/doc/vsftpd-3.0.2/EXAMPLE/PER_IP_CONFIG/README.configuration
/usr/share/doc/vsftpd-3.0.2/EXAMPLE/PER_IP_CONFIG/hosts.allow
/usr/share/doc/vsftpd-3.0.2/EXAMPLE/README
/usr/share/doc/vsftpd-3.0.2/EXAMPLE/VIRTUAL_HOSTS
/usr/share/doc/vsftpd-3.0.2/EXAMPLE/VIRTUAL_HOSTS/README
/usr/share/doc/vsftpd-3.0.2/EXAMPLE/VIRTUAL_USERS
/usr/share/doc/vsftpd-3.0.2/EXAMPLE/VIRTUAL_USERS/README
/usr/share/doc/vsftpd-3.0.2/EXAMPLE/VIRTUAL_USERS/README.configuration
/usr/share/doc/vsftpd-3.0.2/EXAMPLE/VIRTUAL_USERS/logins.txt
/usr/share/doc/vsftpd-3.0.2/EXAMPLE/VIRTUAL_USERS/vsftpd.conf
/usr/share/doc/vsftpd-3.0.2/EXAMPLE/VIRTUAL_USERS/vsftpd.pam
/usr/share/doc/vsftpd-3.0.2/EXAMPLE/VIRTUAL_USERS_2
/usr/share/doc/vsftpd-3.0.2/EXAMPLE/VIRTUAL_USERS_2/README
/usr/share/doc/vsftpd-3.0.2/FAQ
/usr/share/doc/vsftpd-3.0.2/INSTALL
/usr/share/doc/vsftpd-3.0.2/LICENSE
/usr/share/doc/vsftpd-3.0.2/README
/usr/share/doc/vsftpd-3.0.2/README.security
/usr/share/doc/vsftpd-3.0.2/REWARD
/usr/share/doc/vsftpd-3.0.2/SECURITY
/usr/share/doc/vsftpd-3.0.2/SECURITY/DESIGN
/usr/share/doc/vsftpd-3.0.2/SECURITY/IMPLEMENTATION
/usr/share/doc/vsftpd-3.0.2/SECURITY/OVERVIEW
/usr/share/doc/vsftpd-3.0.2/SECURITY/TRUST
/usr/share/doc/vsftpd-3.0.2/SIZE
/usr/share/doc/vsftpd-3.0.2/SPEED
/usr/share/doc/vsftpd-3.0.2/TODO
/usr/share/doc/vsftpd-3.0.2/TUNING
/usr/share/doc/vsftpd-3.0.2/vsftpd.xinetd
/usr/share/man/man5/vsftpd.conf.5.gz
/usr/share/man/man8/vsftpd.8.gz
/var/ftp  //匿名用户的家目录
/var/ftp/pub  //默认上传下载的目录
配置文件参数详解:
# 首先备份原始配置文件
cp /etc/vsftpd/vsftpd.conf /etc/vsftpd/vsftpd.conf.default

vim /etc/vsftpd/vsftpd.conf
# Example config file /etc/vsftpd/vsftpd.conf
#
# The default compiled in settings are fairly paranoid. This sample file
# loosens things up a bit, to make the ftp daemon more usable.
# Please see vsftpd.conf.5 for all compiled in defaults.
#
# READ THIS: This example file is NOT an exhaustive list of vsftpd options.
# Please read the vsftpd.conf.5 manual page to get a full idea of vsftpd's
# capabilities.
#
# Allow anonymous FTP? (Beware - allowed by default if you comment this out).
anonymous_enable=NO
# 控制是否允许匿名用户登入,YES 为允许匿名登入,NO 为不允许。默认值为YES。
# Uncomment this to allow local users to log in.
# When SELinux is enforcing check for SE bool ftp_home_dir
local_enable=YES
#控制是否允许本地用户登入,YES 为允许本地用户登入,NO为不允许。默认值为YES。
# Uncomment this to enable any form of FTP write command.
write_enable=YES
#是否允许登陆用户有写权限。属于全局设置,默认值为YES。
# Default umask for local users is 077. You may wish to change this to 022,
# if your users expect that (022 is used by most other ftpd's)
local_umask=022
#本地用户新增档案时的umask 值。默认值为077。
# Uncomment this to allow the anonymous FTP user to upload files. This only
# has an effect if the above global write enable is activated. Also, you will
# obviously need to create a directory writable by the FTP user.
# When SELinux is enforcing check for SE bool allow_ftpd_anon_write, allow_ftpd_full_access
#
anon_upload_enable=YES
#如果设为YES,则允许匿名登入者有上传文件(非目录)的权限,只有在write_enable=YES时,此项才有效。
#当然,匿名用户必须要有对上层目录的写入权。默认值为NO。
# Uncomment this if you want the anonymous FTP user to be able to create
# new directories.
#
anon_mkdir_write_enable=YES
#anon_other_write_enable=YES
#
anon_max_rate=0
#设置匿名登入者使用的最大传输速度,单位为B/s,0 表示不限制速度。默认值为0。
local_max_rate=0
#本地用户使用的最大传输速度,单位为B/s,0 表示不限制速度。预设值为0。
#
# Activate directory messages - messages given to remote users when they
# go into a certain directory.
dirmessage_enable=YES
#
# Activate logging of uploads/downloads.
xferlog_enable=YES
#
# Make sure PORT transfer connections originate from port 20 (ftp-data).
connect_from_port_20=YES
#指定FTP使用20端口进行数据传输,默认值为YES。
#
ftp_data_port=20
#设置在PORT方式下,FTP数据连接使用的端口,默认值为20。
#
#pasv_min_port=9001
#在PASV工作模式下,数据连接可以使用的端口范围的最小端口,0 表示任意端口。默认值为0。
#pasv_max_port=9010
#在PASV工作模式下,数据连接可以使用的端口范围的最大端口,0 表示任意端口。默认值为0。
#
pasv_enable=NO
# 关闭被动
#若设置为YES,则使用PASV工作模式;若设置为NO,则使用PORT模式。默认值为YES,即使用PASV工作模式。
pasv_address=192.168.200.182
pasv_addr_resolve=YES
max_clients=0
# 设置vsftpd允许的最大连接数,默认为0,表示不受限制
max_per_ip=0
# 设置每个IP地址允许与FTP服务器同时建立连接的数目。默认为0,不受限制。

#
# If you want, you can arrange for uploaded anonymous files to be owned by
# a different user. Note! Using "root" for uploaded files is not
# recommended!
#chown_uploads=YES
#chown_username=whoever
#
# You may override where the log file goes if you like. The default is shown
# below.
xferlog_file=/var/log/xferlog
#
# If you want, you can have your log file in standard ftpd xferlog format.
# Note that the default log file location is /var/log/xferlog in this case.
xferlog_std_format=YES
#
log_ftp_protocol=YES
#如果启用此选项,所有的FTP请求和响应都会被记录到日志中,默认日志文件在/var/log/vsftpd.log。
#启用此选项时,xferlog_std_format不能被激活。这个选项有助于调试。默认值为NO。
#
# You may change the default value for timing out an idle session.
#idle_session_timeout=600
#
# You may change the default value for timing out a data connection.
#data_connection_timeout=120
#
# It is recommended that you define on your system a unique user which the
# ftp server can use as a totally isolated and unprivileged user.
#nopriv_user=ftpsecure
#
# Enable this and the server will recognise asynchronous ABOR requests. Not
# recommended for security (the code is non-trivial). Not enabling it,
# however, may confuse older FTP clients.
#async_abor_enable=YES
#
# By default the server will pretend to allow ASCII mode but in fact ignore
# the request. Turn on the below options to have the server actually do ASCII
# mangling on files when in ASCII mode. The vsftpd.conf(5) man page explains
# the behaviour when these options are disabled.
# Beware that on some FTP servers, ASCII support allows a denial of service
# attack (DoS) via the command "SIZE /big/file" in ASCII mode. vsftpd
# predicted this attack and has always been safe, reporting the size of the
# raw file.
# ASCII mangling is a horrible feature of the protocol.
#ascii_upload_enable=YES
#ascii_download_enable=YES
#
# You may fully customise the login banner string:
#ftpd_banner=Welcome to blah FTP service.
#
# You may specify a file of disallowed anonymous e-mail addresses. Apparently
# useful for combatting certain DoS attacks.
#deny_email_enable=YES
# (default follows)
#banned_email_file=/etc/vsftpd/banned_emails
#
# You may specify an explicit list of local users to chroot() to their home
# directory. If chroot_local_user is YES, then this list becomes a list of
# users to NOT chroot().
# (Warning! chroot'ing can be very dangerous. If using chroot, make sure that
# the user does not have write access to the top level directory within the
# chroot)
chroot_local_user=YES
allow_writeable_chroot=YES
#chroot_list_enable=YES
# (default follows)
#chroot_list_file=/etc/vsftpd/chroot_list
#
# You may activate the "-R" option to the builtin ls. This is disabled by
# default to avoid remote users being able to cause excessive I/O on large
# sites. However, some broken FTP clients such as "ncftp" and "mirror" assume
# the presence of the "-R" option, so there is a strong case for enabling it.
#ls_recurse_enable=YES
#
# When "listen" directive is enabled, vsftpd runs in standalone mode and
# listens on IPv4 sockets. This directive cannot be used in conjunction
# with the listen_ipv6 directive.
listen=YES
#设置vsftpd服务器是否以standalone模式运行。以standalone模式运行是一种较好的方式,此时listen必须设置为YES,此为默认值。
#建议不要更改,有很多与服务器运行相关的配置命令,需要在此模式下才有效。
#若设置为NO,则vsftpd不是以独立的服务运行,要受到xinetd服务的管控,功能上会受到限制。
#
#
listen_address=192.168.200.182
# 设置在指定的IP地址上侦听用户的FTP请求。若不设置,则对服务器所绑定的所有IP地址进行侦听。只有在以standalone模式运行时才有效。
# 对于只绑定了一个IP地址的服务器,不需要配置该项,默认情况下,配置文件中没有该配置项。
# 若服务器同时绑定了多个IP地址,则应通过该配置项,指定在哪个IP地址上提供FTP服务,即指定FTP服务器所使用的IP地址。
listen_port=21
#设置FTP服务器建立连接所监听的端口,默认值为21。
#
#setproctitle_enable=NO
#设置每个与FTP服务器的连接,是否以不同的进程表现出来。默认值为NO,此时使用ps aux |grep ftp只会有一个vsftpd的进程。
#若设置为YES,则每个连接都会有一个vsftpd的进程。
#
# This directive enables listening on IPv6 sockets. By default, listening
# on the IPv6 "any" address (::) will accept connections from both IPv6
# and IPv4 clients. It is not necessary to listen on *both* IPv4 and IPv6
# sockets. If you want that (perhaps because you want to listen on specific
# addresses) then you must run two copies of vsftpd with two configuration
# files.
# Make sure, that one of the listen options is commented !!
#listen_ipv6=YES

pam_service_name=vsftpd
userlist_enable=YES
#是否启用vsftpd.user_list文件。
userlist_deny=NO
#决定vsftpd.user_list文件中的用户是否能够访问FTP服务器。
#若设置为YES,则vsftpd.user_list文件中的用户不允许访问FTP,若设置为NO,则只有vsftpd.user_list文件中的用户才能访问FTP。
#/etc/vsftpd/ftpusers 文件专门用于定义不允许访问FTP服务器的用户列表:
#注意:如果userlist_enable=YES,userlist_deny=NO,此时如果在vsftpd.user_list和ftpusers中都有某个用户时,那么这个用户是不能够访问FTP的,即ftpusers的优先级要高
userlist_file=/etc/vsftpd/user_list
#控制用户访问FTP的文件,里面写着用户名称。一个用户名称一行。
tcp_wrappers=NO
#设置vsftpd是否与tcp wrapper相结合来进行主机的访问控制。默认值为YES。
#如果启用,则vsftpd服务器会检查/etc/hosts.allow 和/etc/hosts.deny 中的设置,来决定请求连接的主机,是否允许访问该FTP服务器。
#这两个文件可以起到简易的防火墙功能。
#比如:若要仅允许192.168.0.1—192.168.0.254的用户可以连接FTP服务器,则在/etc/hosts.allow文件中添加以下内容:
#vsftpd:192.168.0. :allow
#all:all :deny
去掉注释后的内容
[root@mysql-master1 ~]# egrep -v '^$|^#' /etc/vsftpd/vsftpd.conf
anonymous_enable=YES  //是否允许匿名用户登录ftp
anon_upload_enable=YES  //启动上传文件的能力
anon_mkdir_write_enable=YES  //启动创建目录的能力
local_enable=YES
write_enable=YES
local_umask=022
anon_max_rate=0
local_max_rate=0
dirmessage_enable=YES
xferlog_enable=YES
connect_from_port_20=YES
ftp_data_port=20
pasv_address=192.168.200.182
pasv_addr=resolve=YES
max_clients=0
max_per_ip=0
xferlog_file=/var/log/xferlog
xferlog_std_format=YES
log_ftp_protocol=YES
chroot_local_user=YES
chroot_list_enable=YES
listen=YES
listen_address=192.168.200.182
listen_port=21
pam_service_name=vsftpd
userlist_enable=YES
userlist_deny=NO
userlist_file=/etc/vsftpd/user_list
tcp_wrappers=NO
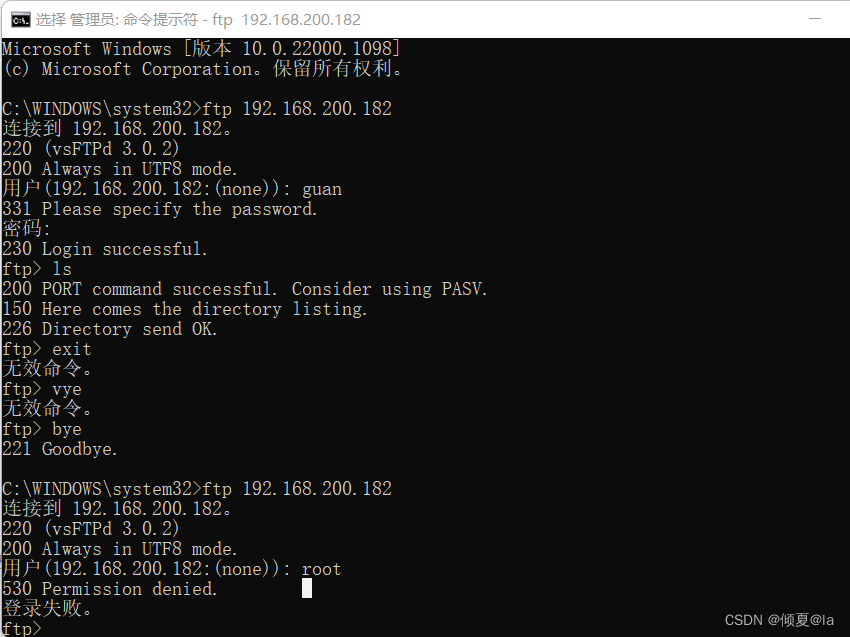
匿名用户默认访问目录为 /var/ftp
anonymous_enable=NO //不允许匿名用户登录ftp
[root@mysql-master1 vsftpd]# ls /var/ftp
guan.txt pub
[root@mysql-master1 vsftpd]# useradd guanguan
[root@mysql-master1 vsftpd]# passwd guanguan
更改用户 guanguan 的密码 。
新的 密码:
重新输入新的 密码:
passwd:所有的身份验证令牌已经成功更新。
[root@mysql-master1 vsftpd]# cat /etc/passwd
guanguan:x:1003:1003::/home/guanguan:/bin/bash
[root@mysql-master1 vsftpd]# ls /home/guanguan
用户身份验证访问的目录为 /home/下的自己的目录
用刚刚增加 guanguan 这个用户进行登录
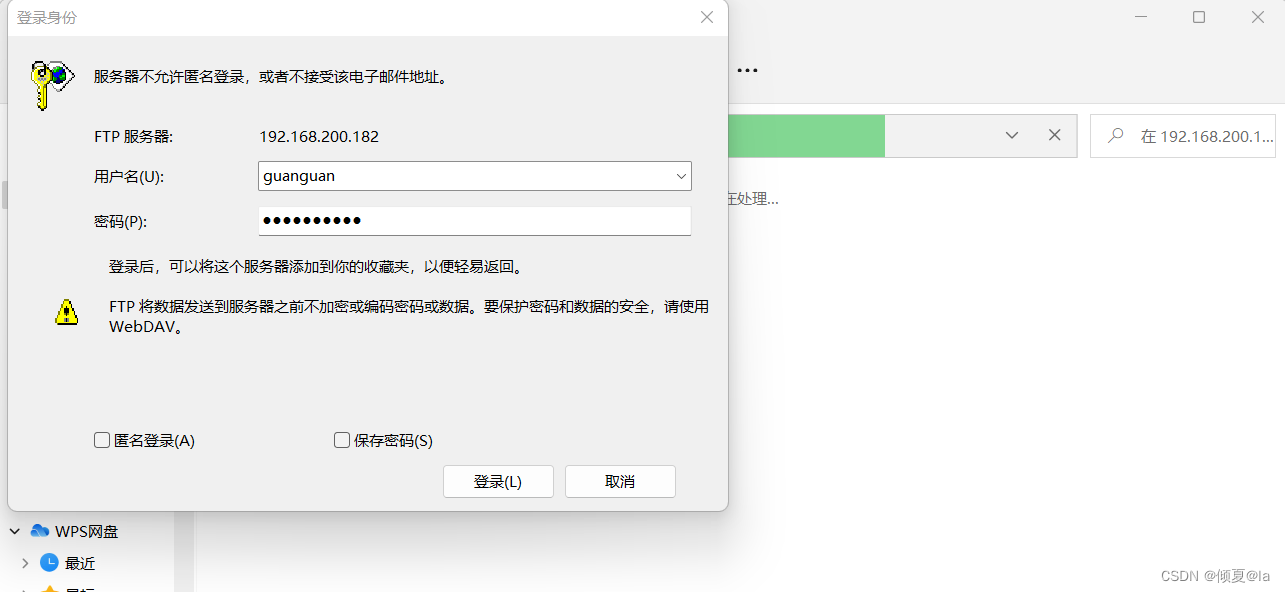
访问 guanguan 这个用户什么也没有,是因为这个用户下的目录什么东西也没有

在guanguan这个用户下的目录下创建一个example.txt 文件
root@mysql-master1 vsftpd]# touch /home/guanguan/exampel.txt
[root@mysql-master1 vsftpd]# vim  /home/guanguan/exampel.txt
通过 guanguan 这个用户 从文件资源管理器可以看到刚刚创建的example.txt 文件

[root@mysql-master1 vsftpd]#vim /etc/vsftpd/vsftpd.conf
anonymous_enable=YES  //允许匿名用户登录ftp
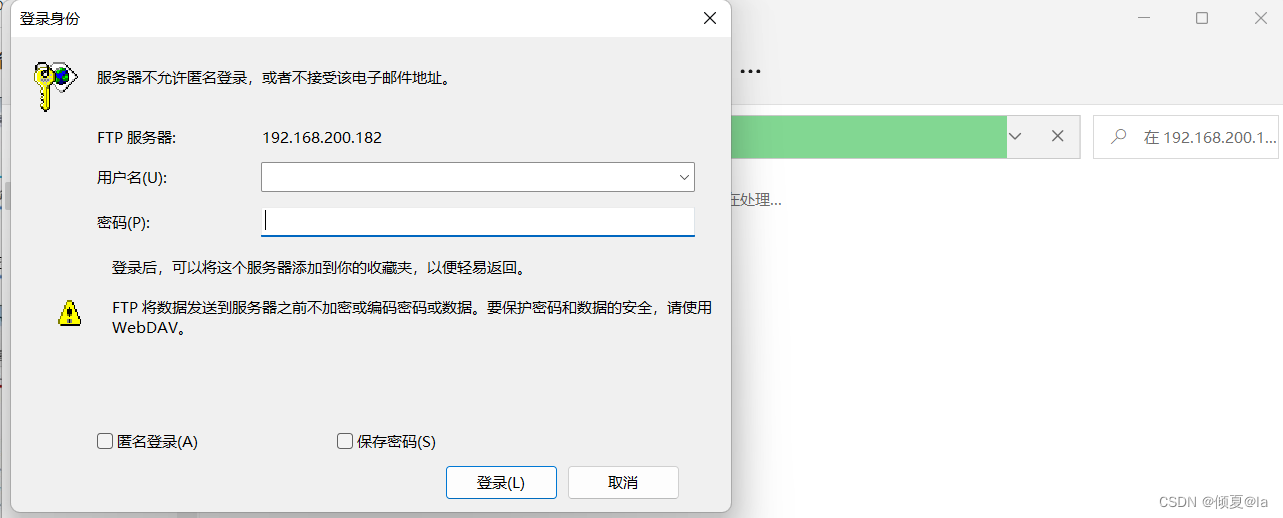
更改配置文件,需要重启vsftpd服务使配置文件生效
[root@mysql-master1 vsftpd]#systemctl restart vsftpd
[root@mysql-master1 vsftpd]# ls /var/ftp  //匿名用户默认访问这个目录
guan.txt  pub

更改配置文件,需要重启vsftpd服务使配置文件生效
[root@mysql-master1 vsftpd]#vim /etc/vsftpd/vsftpd.conf
anon_upload_enable=YES  //启动上传文件的能力
anon_mkdir_write_enable=YES  //启动创建目录的能力
[root@mysql-master1 vsftpd]#systemctl restart vsftpd
在vsftpd服务器上创建一个upload目录
[root@mysql-master1 vsftpd]# mkdir /var/ftp/upload
[root@mysql-master1 vsftpd]# chmod 777  /var/ftp/upload
[root@mysql-master1 vsftpd]# ll  /var/ftp/
总用量 124
-rw-r--r-- 1 root root 123451 11月 13 23:44 guan.txt
drwxr-xr-x 2 root root      6 6月  10 2021 pub
drwxrwxrwx 2 root root      6 11月 20 01:08 upload
登录客户机将test.txt文件上传到 upload/ 这个目录
[root@mysql-master2 ~]# ls
anaconda-ks.cfg   test.txt
[root@mysql-master2 ~]# lftp 192.168.200.182
lftp 192.168.200.182:~> ls
-rw-r--r--    1 0        0          123451 Nov 13 15:44 guan.txt
drwxr-xr-x    2 0        0               6 Jun 09  2021 pub
drwxrwxrwx    2 0        0               6 Nov 19 17:08 upload
lftp 192.168.200.182:/> cd upload/
lftp 192.168.200.182:/upload> put test.txt
lftp 192.168.200.182:/upload> mkdir python
mkdir 成功, 建立 `python'
lftp 192.168.200.182:/upload>
这时在vsftpd 服务器上的/var/ftp/upload/ 目录即可看到刚刚客户机上传的文件
[root@mysql-master1 vsftpd]# ls /var/ftp/upload/
python  test.txt


完成将jdk tar包上传到upload目录下
[root@mysql-master1 vsftpd]# ls /var/ftp/upload/
example.py  jdk-8u351-linux-x64.tar.gz  python  test.txt
[root@mysql-master1 vsftpd]#
启用白名单,在user.list文件里添加本地用户
[root@mysql-master1 ~]# echo guan >> /etc/vsftpd/user_list

[root@mysql-master1 ~]# systemctl restart vsftpd  //重启ftp服务
# 二、使用步骤
## 1.引入库


## 2.读入数据


**删除ftp**

```bash
[root@mysql-master1 ~]# rpm -qa | grep vsftpd
vsftpd-3.0.2-29.el7_9.x86_64
[root@mysql-master1 ~]# yum remove -y vsftpd-3.0.2-29.el7_9.x86_64
已加载插件:fastestmirror, langpacks
正在解决依赖关系
--> 正在检查事务
---> 软件包 vsftpd.x86_64.0.3.0.2-29.el7_9 将被 删除
--> 解决依赖关系完成
base/7/x86_64                                                                 | 3.6 kB  00:00:00
epel/x86_64                                                                   | 4.7 kB  00:00:00
extras/7/x86_64                                                               | 2.9 kB  00:00:00
percona-release-noarch/7                                                      | 1.5 kB  00:00:00
percona-release-x86_64/7                                                      | 2.9 kB  00:00:00
percona-release-x86_64/7/primary_db                                           | 1.3 MB  00:00:03
prel-release-noarch/7                                                         | 1.5 kB  00:00:00
updates/7/x86_64                                                              | 2.9 kB  00:00:00
updates/7/x86_64/primary_db                                                   |  18 MB  00:00:05
zabbix/x86_64                                                                 | 2.9 kB  00:00:00
zabbix-frontend/x86_64                                                        | 2.9 kB  00:00:00
zabbix-non-supported/x86_64                                                   | 2.9 kB  00:00:00

依赖关系解决

=====================================================================================================
 Package              架构                 版本                         源                      大小
=====================================================================================================
正在删除:
 vsftpd               x86_64               3.0.2-29.el7_9               @updates               353 k

事务概要
=====================================================================================================
移除  1 软件包

安装大小:353 k
Downloading packages:
Running transaction check
Running transaction test
Transaction test succeeded
Running transaction
  正在删除    : vsftpd-3.0.2-29.el7_9.x86_64                                                     1/1
警告:/etc/vsftpd/vsftpd.conf 已另存为 /etc/vsftpd/vsftpd.conf.rpmsave
警告:/etc/vsftpd/user_list 已另存为 /etc/vsftpd/user_list.rpmsave
  验证中      : vsftpd-3.0.2-29.el7_9.x86_64                                                     1/1

删除:
  vsftpd.x86_64 0:3.0.2-29.el7_9

完毕!
[root@mysql-master1 ~]# systemctl status vsftpd
● vsftpd.service
   Loaded: not-found (Reason: No such file or directory)
   Active: failed (Result: exit-code) since 三 2022-11-16 23:17:24 CST; 4min 9s ago

11月 16 23:17:24 mysql-master1 systemd[1]: Starting Vsftpd ftp daemon...
11月 16 23:17:24 mysql-master1 vsftpd[7009]: 500 OOPS: run two copies of vsftpd for IPv4 and IPv6
11月 16 23:17:24 mysql-master1 systemd[1]: vsftpd.service: control process exited, code=exited...s=2
11月 16 23:17:24 mysql-master1 systemd[1]: Failed to start Vsftpd ftp daemon.
11月 16 23:17:24 mysql-master1 systemd[1]: Unit vsftpd.service entered failed state.
11月 16 23:17:24 mysql-master1 systemd[1]: vsftpd.service failed.
Hint: Some lines were ellipsized, use -l to show in full.
[root@mysql-master1 ~]# ls /etc/vsftpd/
user_list.rpmsave  vsftpd.conf.rpmsave
[root@mysql-master1 ~]# rm -rf /etc/vsftpd/*
[root@mysql-master1 ~]# ls /etc/vsftpd/
[root@mysql-master1 ~]#
[root@mysql-master1 ~]# which ftp
/usr/bin/which: no ftp in (/usr/local/bin:/usr/local/sbin:/usr/bin:/usr/sbin:/bin:/sbin:/root/bin)
[root@mysql-master1 ~]# find / -name '*vsftpd*'
/etc/vsftpd
/usr/lib/python2.7/site-packages/sos/plugins/vsftpd.py
/usr/lib/python2.7/site-packages/sos/plugins/vsftpd.pyc
/usr/lib/python2.7/site-packages/sos/plugins/vsftpd.pyo
/usr/share/augeas/lenses/dist/vsftpd.aug
[root@mysql-master1 ~]# rm -rf etc/vsftpd
[root@mysql-master1 ~]# rm -rf /usr/lib/python2.7/site-packages/sos/plugins/vsftpd.py
[root@mysql-master1 ~]# rm -rf /usr/lib/python2.7/site-packages/sos/plugins/vsftpd.pyc
[root@mysql-master1 ~]# rm -rf /usr/share/augeas/lenses/dist/vsftpd.aug
[root@mysql-master1 ~]#rm -rf /usr/lib/python2.7/site-packages/sos/plugins/vsftpd.pyo

[root@mysql-master1 ~]# find / -name '*vsftpd*'
开启防火墙端口:

```bash
[root@mysql-master1 ~]# firewall-cmd --zone=public --add-port=20/tcp --permanent
FirewallD is not running
[root@mysql-master1 ~]# firewall-cmd --zone=public --add-port=21/tcp --permanent
FirewallD is not running
[root@mysql-master1 ~]# firewall-cmd --zone=public --add-port=9001-9010/tcp --permanent
FirewallD is not running
[root@mysql-master1 ~]# firewall-cmd --reload
FirewallD is not running
4.vsftpd的主动和被动模式
vsftpd 是"very secure FTP daemon"的缩写,是一个完全免费的、开放源代码的ftp服务器软件。
特点是:非常高的安全性需求、带宽限制、良好的可伸缩性等。
1、工作原理
vsftpd使用ftp协议,该协议属于应用层协议。它是典型的c/s架构,ftp服务端用来存储文件,ftp客户端可以通过ftp协议连接服务端实现上传和下载资源。
2、vsftpd配置被动模式(默认是被动模式)
//被动模式
pasv_enable=YES
//pasv连接模式时的最小端口,可自定义
pasv_min_port=30100
//pasv连接模式时的最大端口,可自定义
pasv_max_port=30200
3、vsftpd配置主动模式
pasv_enable=NO
port_enable=YES
当pasv_enable和port_enable同时为YES时,同时支持主、被动模式。
4、主动模式与被动模式区别
PORT(主动)模式
主动模式,指的是FTP服务器"主动"去连接客户端的数据端口来传输数据,其过程具体来说就是:客户端通过访问服务端的21端口,然后客户端分配一个端口供ftp服务端获取数据,然后服务端通过20端口主动到客户端指定端口获取数据,20为服务器的出向端口。
此模式,防火墙只需要开放21端口的对外访问策略。
PASV(被动)模式
被动模式,指的是FTP服务器“被动”等待客户端来连接自己的数据端口,其过程具体是:客户端通过访问服务端的21端口,然后客户端提交PASV命令,让服务端分配一个用于传输数据的端口,此端口范围为vsftpd.conf配置的pasv_min_port-pasv_max_port,然后客户端通过分配的端口上传数据。(注意此模式下的FTP服务器不需要开启tcp 20端口)
此模式,防火墙需要开放21端口的对外访问策略和pasv_min_port到pasv_max_port端口范围内的访问策略。
ftp客户端,默认使用被动模式连接服务端,若服务端设置的为主动模式上传数据,则需要在ftp客户端命令行执行passive命令切换。
二、NFS Server
1.简要介绍
NFS:Network File System 网络文件系统,Linux/Unix系统之间共享文件的一种协议
NFS 的客户端主要为 Linux
支持多节同时挂载,以及并发写入
2.环境配置
| 服务器名称 | IP |
|---|---|
| nfs | 192.168.200.182 |
| wbe3 | 192.168.200.183 |
| web1 | 192.168.200.184 |
| wbe2 | 192.168.200.185 |
3.关闭防火墙
4.nfs(存储端)
4.1 安装 NFS 服务端
[root@nfs ~]# yum install -y nfs-utils
已加载插件:fastestmirror, langpacks
Loading mirror speeds from cached hostfile
 * base: mirrors.aliyun.com
 * extras: mirrors.aliyun.com
 * updates: mirrors.aliyun.com
base                                                                       | 3.6 kB  00:00:00
epel                                                                       | 4.7 kB  00:00:00
extras                                                                     | 2.9 kB  00:00:00
percona-release-noarch                                                     | 1.5 kB  00:00:00
percona-release-x86_64                                                     | 2.9 kB  00:00:00
prel-release-noarch                                                        | 1.5 kB  00:00:00
updates                                                                    | 2.9 kB  00:00:00
zabbix                                                                     | 2.9 kB  00:00:00
zabbix-frontend                                                            | 2.9 kB  00:00:00
zabbix-non-supported                                                       | 2.9 kB  00:00:00
(1/2): epel/x86_64/updateinfo                                              | 1.0 MB  00:00:00
(2/2): epel/x86_64/primary_db                                              | 7.0 MB  00:00:01
软件包 1:nfs-utils-1.3.0-0.68.el7.2.x86_64 已安装并且是最新版本
无须任何处理
[root@nfs ~]# mkdir /webdata   //创建存储网站代码
[root@nfs ~]# echo "nfs test......" > /webdata/index.html  //模拟 放置测试页面
[root@nfs ~]# cat  /webdata/index.html
nfs test......
[root@nfs ~]#
4.2 配置NFS服务端
[root@nfs ~]# vim /etc/exports
[root@nfs ~]# cat /etc/exports
/webdata  192.168.200.0/24(rw)      //指定发布资源的目录为/webdata
                                    //192.168.200.0/24 允许访问的客户机
                                    //(rw)可读可写
4.3 启动NFS服务器
[root@nfs ~]# systemctl start nfs-server
[root@nfs ~]# systemctl enable nfs-server
Created symlink from /etc/systemd/system/multi-user.target.wants/nfs-server.service to /usr/lib/systemd/system/nfs-server.service.
[root@nfs ~]# systemctl status nfs-server
● nfs-server.service - NFS server and services
   Loaded: loaded (/usr/lib/systemd/system/nfs-server.service; enabled; vendor preset: disabled)
  Drop-In: /run/systemd/generator/nfs-server.service.d
           └─order-with-mounts.conf
   Active: active (exited) since 日 2022-11-20 22:20:21 CST; 19s ago
 Main PID: 9663 (code=exited, status=0/SUCCESS)
   CGroup: /system.slice/nfs-server.service

11月 20 22:20:21 nfs systemd[1]: Starting NFS server and services...
11月 20 22:20:21 nfs systemd[1]: Started NFS server and services.

[root@nfs ~]# cat /var/log/messages   //如果出现报错,可以查看日志进行排错
4.4 检查NFS输出是否正常
[root@nfs ~]# exportfs -v  //检查输出的目录
/webdata      	192.168.200.0/24(sync,wdelay,hide,no_subtree_check,sec=sys,rw,secure,root_squash,no_all_squash)
5.web1 web2 web3 客户端
三台web客户端进行同样的配置
5.1 安装NFS客户端
[root@web1 ~]# yum -y install nfs-utis httpd
已加载插件:fastestmirror
Loading mirror speeds from cached hostfile
base                                                                       | 3.6 kB  00:00:00
extras                                                                     | 2.9 kB  00:00:00
mysql-connectors-community                                                 | 2.6 kB  00:00:00
mysql-tools-community                                                      | 2.6 kB  00:00:00
mysql57-community                                                          | 2.6 kB  00:00:00
updates                                                                    | 2.9 kB  00:00:00
zabbix                                                                     | 2.9 kB  00:00:00
zabbix2                                                                    | 2.9 kB  00:00:00
没有可用软件包 nfs-utis。
正在解决依赖关系
--> 正在检查事务
---> 软件包 httpd.x86_64.0.2.4.6-97.el7.centos.5 将被 安装
--> 解决依赖关系完成

依赖关系解决

==================================================================================================
 Package           架构               版本                              源                   大小
==================================================================================================
正在安装:
 httpd             x86_64             2.4.6-97.el7.centos.5             updates             2.7 M

事务概要
==================================================================================================
安装  1 软件包

总下载量:2.7 M
安装大小:9.4 M
Downloading packages:
httpd-2.4.6-97.el7.centos.5.x86_64.rpm                                     | 2.7 MB  00:00:04
Running transaction check
Running transaction test
Transaction test succeeded
Running transaction
  正在安装    : httpd-2.4.6-97.el7.centos.5.x86_64                                            1/1
  验证中      : httpd-2.4.6-97.el7.centos.5.x86_64                                            1/1

已安装:
  httpd.x86_64 0:2.4.6-97.el7.centos.5

完毕!
5.2 开启httpd服务
[root@web1 ~]# systemctl start httpd
Job for httpd.service failed because the control process exited with error code. See "systemctl status httpd.service" and "journalctl -xe" for details.
[root@web1 ~]# systemctl status httpd.service
● httpd.service - The Apache HTTP Server
   Loaded: loaded (/usr/lib/systemd/system/httpd.service; disabled; vendor preset: disabled)
   Active: failed (Result: exit-code) since 日 2022-11-20 22:41:51 CST; 34s ago
     Docs: man:httpd(8)
           man:apachectl(8)
  Process: 3787 ExecStart=/usr/sbin/httpd $OPTIONS -DFOREGROUND (code=exited, status=1/FAILURE)
 Main PID: 3787 (code=exited, status=1/FAILURE)

11月 20 22:41:50 web1 systemd[1]: Starting The Apache HTTP Server...
11月 20 22:41:51 web1 httpd[3787]: AH00558: httpd: Could not reliably determine the server...sage
11月 20 22:41:51 web1 httpd[3787]: (98)Address already in use: AH00072: make_sock: could n...]:80       //80端口被占用导致httpd服务开启不了
11月 20 22:41:51 web1 httpd[3787]: (98)Address already in use: AH00072: make_sock: could n...0:80       //解决办法:找80端口对应pid,然后kill掉
11月 20 22:41:51 web1 httpd[3787]: no listening sockets available, shutting down
11月 20 22:41:51 web1 httpd[3787]: AH00015: Unable to open logs
11月 20 22:41:51 web1 systemd[1]: httpd.service: main process exited, code=exited, status=...LURE
11月 20 22:41:51 web1 systemd[1]: Failed to start The Apache HTTP Server.
11月 20 22:41:51 web1 systemd[1]: Unit httpd.service entered failed state.
11月 20 22:41:51 web1 systemd[1]: httpd.service failed.
Hint: Some lines were ellipsized, use -l to show in full.

[root@web1 ~]# netstat -lnp|grep 80
tcp        0      0 0.0.0.0:80              0.0.0.0:*               LISTEN      1359/nginx: master
tcp6       0      0 :::80                   :::*                    LISTEN      1359/nginx: master

[root@web1 ~]# kill -9 1359
[root@web1 ~]# systemctl start httpd
[root@web1 ~]# systemctl status httpd
● httpd.service - The Apache HTTP Server
   Loaded: loaded (/usr/lib/systemd/system/httpd.service; disabled; vendor preset: disabled)
   Active: active (running) since 日 2022-11-20 22:48:03 CST; 24s ago
     Docs: man:httpd(8)
           man:apachectl(8)
 Main PID: 3945 (httpd)
   Status: "Total requests: 0; Current requests/sec: 0; Current traffic:   0 B/sec"
    Tasks: 6
   CGroup: /system.slice/httpd.service
           ├─3945 /usr/sbin/httpd -DFOREGROUND
           ├─3946 /usr/sbin/httpd -DFOREGROUND
           ├─3947 /usr/sbin/httpd -DFOREGROUND
           ├─3948 /usr/sbin/httpd -DFOREGROUND
           ├─3950 /usr/sbin/httpd -DFOREGROUND
           └─3951 /usr/sbin/httpd -DFOREGROUND

11月 20 22:48:03 web1 systemd[1]: Starting The Apache HTTP Server...
11月 20 22:48:03 web1 httpd[3945]: AH00558: httpd: Could not reliably determine the server...sage
11月 20 22:48:03 web1 systemd[1]: Started The Apache HTTP Server.
Hint: Some lines were ellipsized, use -l to show in full.
[root@web1 ~]# systemctl enable httpd
Created symlink from /etc/systemd/system/multi-user.target.wants/httpd.service to /usr/lib/systemd/system/httpd.service.

[root@web1 ~]# systemctl enable httpd
Created symlink from /etc/systemd/system/multi-user.target.wants/httpd.service to /usr/lib/systemd/system/httpd.service.
打开三台web客户机的测试页


5.3 查看存储端共享
[root@web1 ~]# ls /var/www/html
[root@web1 ~]# showmount -e 192.168.200.182
Export list for 192.168.200.182:
/webdata 192.168.200.0/24
5.4 手动挂载
[root@web1 ~]# mount -t nfs 192.168.200.182:/webdata   /var/www/html/
[root@web1 ~]# ls   /var/www/html/
index.html
[root@web1 ~]# umount /var/www/html/
[root@web1 ~]# ls   /var/www/html/
[root@web1 ~]# mount -t nfs 192.168.200.182:/webdata   /var/www/html/
[root@web1 ~]# ls   /var/www/html/
index.html
[root@web2 ~]# mount -t nfs 192.168.200.182:/webdata /var/www/html/
[root@web3 ~]# ls /var/www/html
[root@web3 ~]# mount -t nfs 192.168.200.182:/webdata   /var/www/html/
5.5 查看挂载
[root@web1 ~]# df
文件系统                    1K-块    已用     可用 已用% 挂载点
devtmpfs                   914412       0   914412    0% /dev
tmpfs                      931484       0   931484    0% /dev/shm
tmpfs                      931484   10568   920916    2% /run
tmpfs                      931484       0   931484    0% /sys/fs/cgroup
/dev/mapper/centos-root  17811456 8950208  8861248   51% /
/dev/sda1                 1038336  238508   799828   23% /boot
tmpfs                      186300      24   186276    1% /run/user/0
192.168.200.182:/webdata 17811456 7283456 10528000   41% /var/www/html
[root@web1 ~]# ls   /var/www/html/
index.html

5.6 访问web服务器
刷新一下
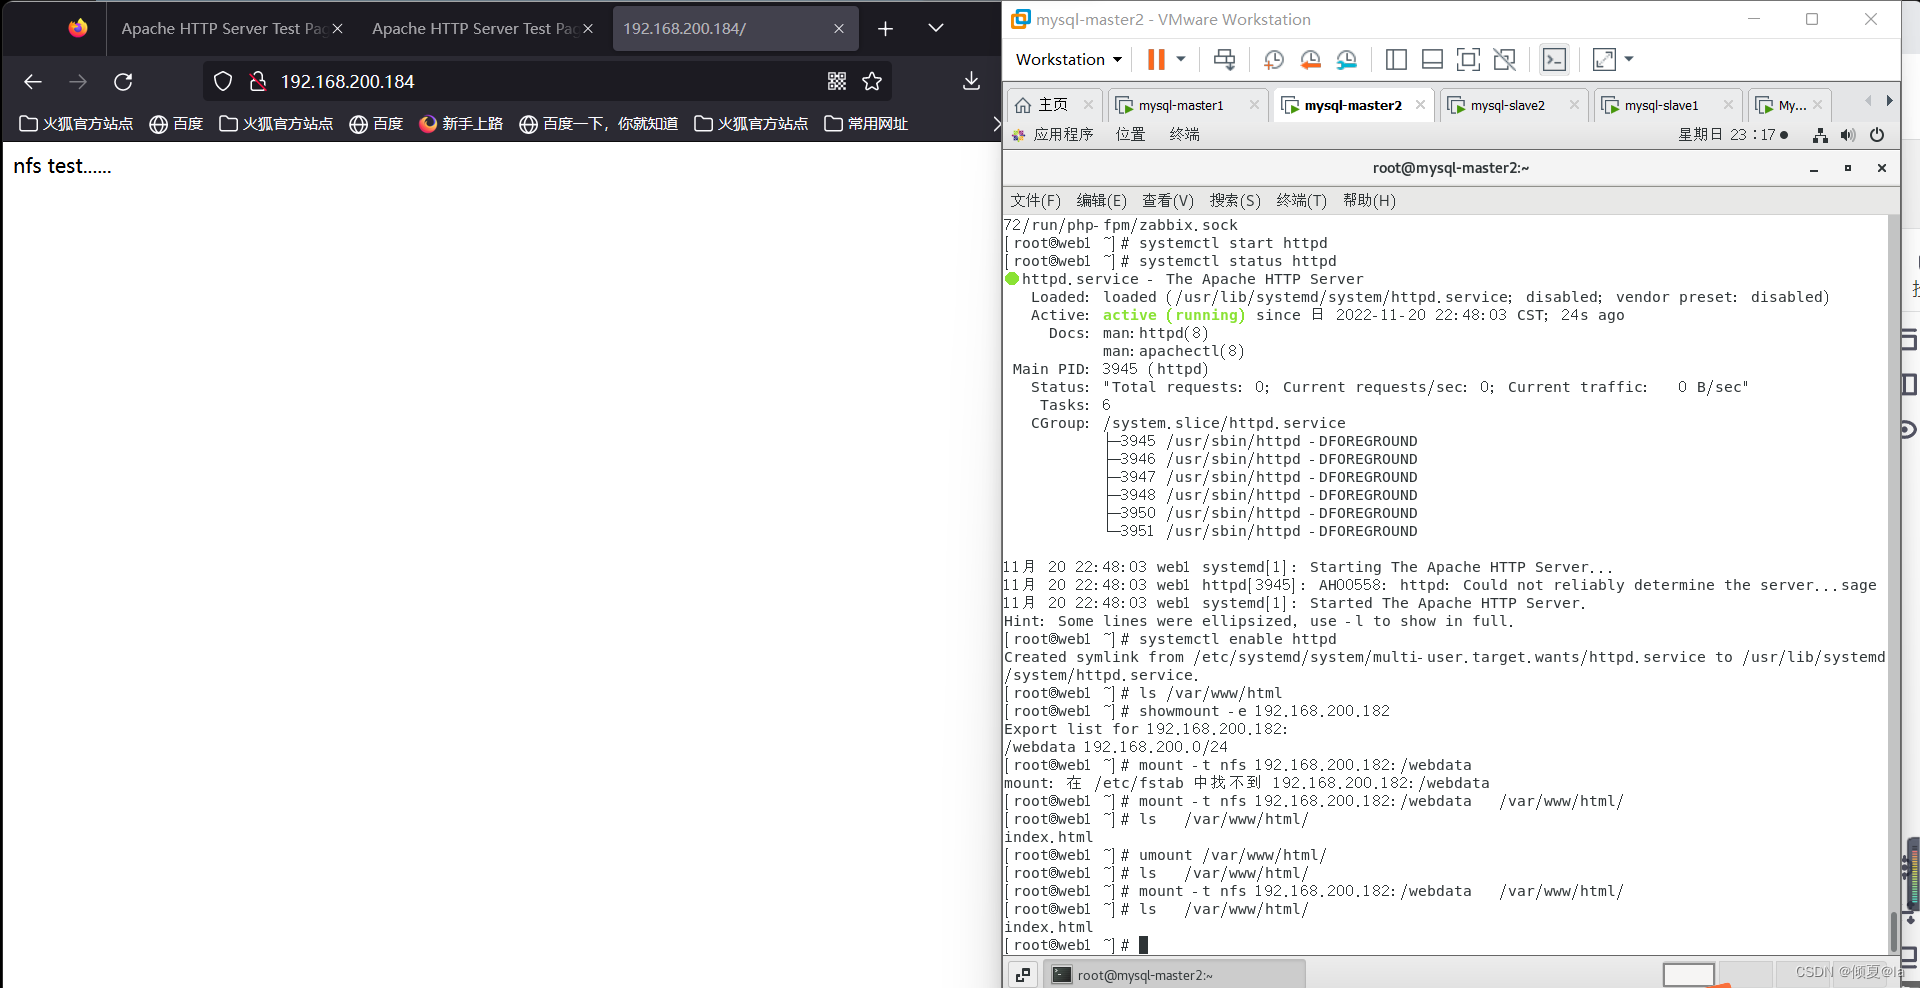
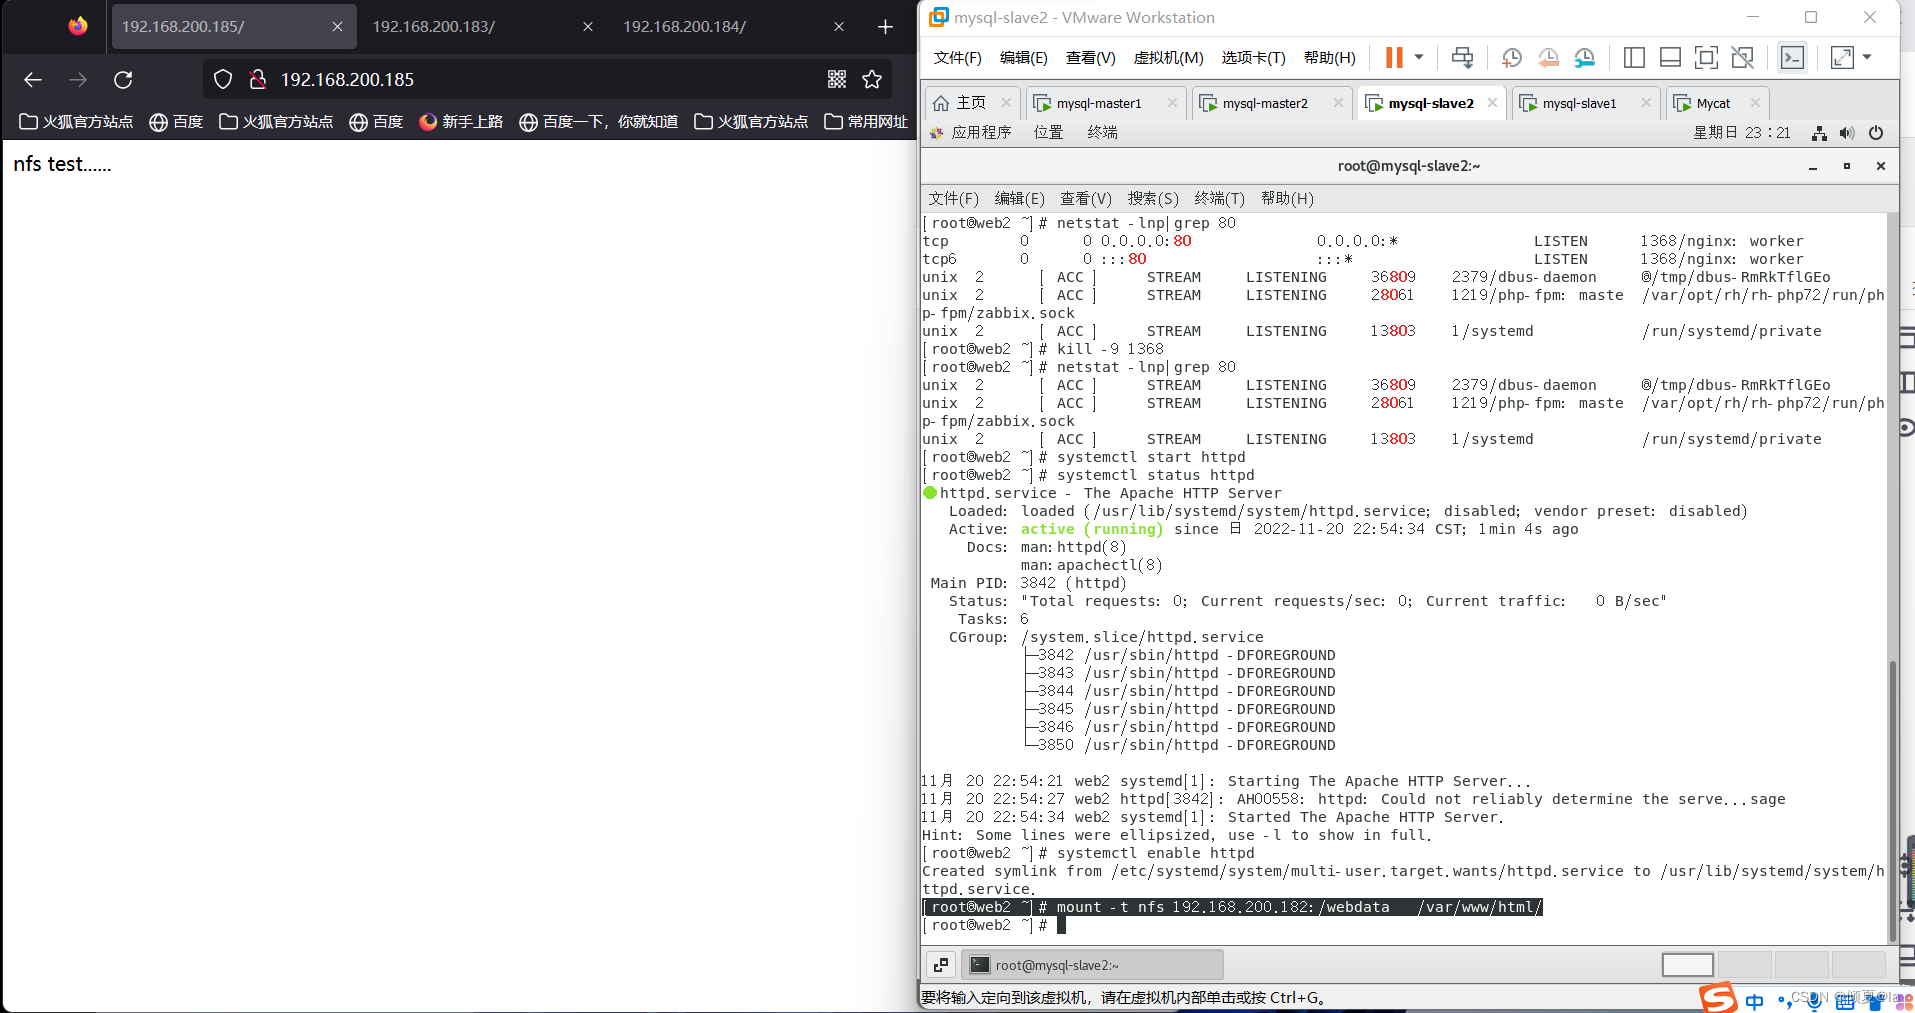
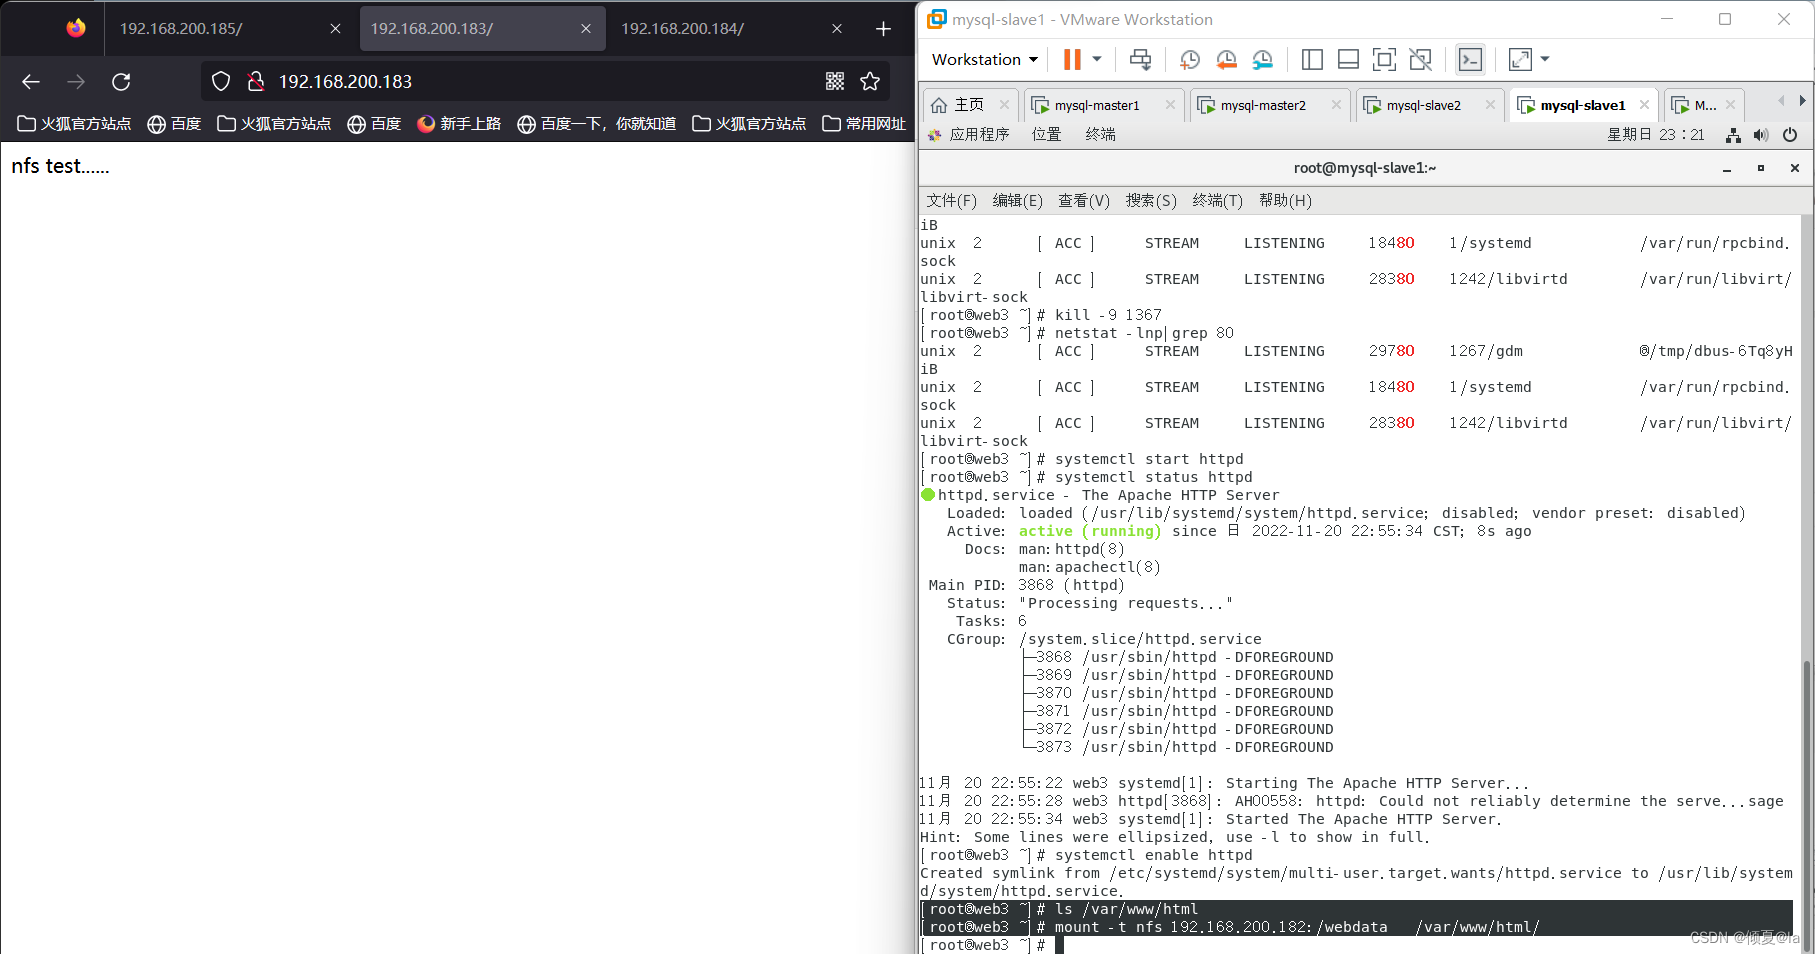
往/webdata/index.html 文件进行增删内容
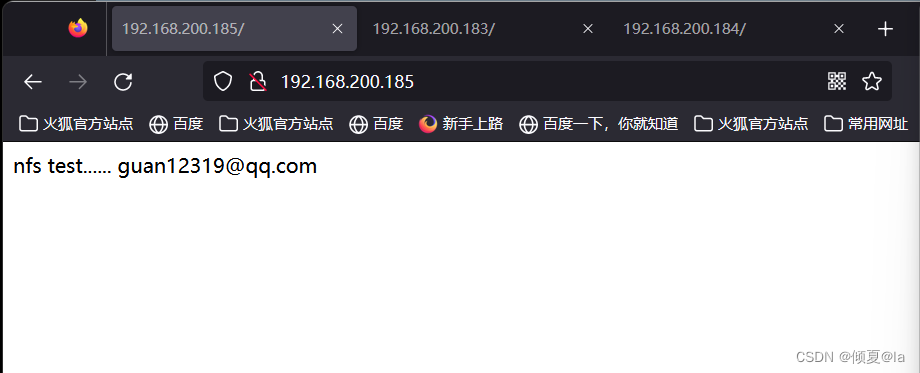
[root@nfs ~]# vim /webdata/index.html
[root@nfs ~]# cat /webdata/index.html
nfs test......

guan12319@qq.com
可以看到三台web客户机均同步了web(nfs)服务器下/webdata/index.html 文件的内容


三、SSH Server
1.简介
2.SSH 服务器练习
1、登录Centos

2、查询SSH是否安装
[root@nfs ~]# rpm -qa |grep ssh
openssh-server-7.4p1-22.el7_9.x86_64
libssh2-1.8.0-4.el7.x86_64
openssh-7.4p1-22.el7_9.x86_64
openssh-clients-7.4p1-22.el7_9.x86_64

[root@nfs ~]# rpm -qa | wc -l
1427

[root@nfs ~]# yum install -y openssh-server  //若没有安装SSH可以执行这条命令进行安装

[root@nfs ~]# netstat -napt | grep sshd     //sshd 占用22号端口
tcp        0      0 0.0.0.0:22              0.0.0.0:*               LISTEN      7016/sshd
tcp6       0      0 :::22                   :::*                    LISTEN      7016/sshd
3、SSH服务管理
[root@nfs ~]# systemctl start sshd  //启动sshd服务
[root@nfs ~]# netstat -napt | grep sshd   //产看端口  22号端口提供SSH服务
tcp        0      0 0.0.0.0:22              0.0.0.0:*               LISTEN      7016/sshd
tcp6       0      0 :::22                   :::*                    LISTEN      7016/sshd
[root@nfs ~]# systemctl enable sshd  //开机自启
4、使用SSH远程管理
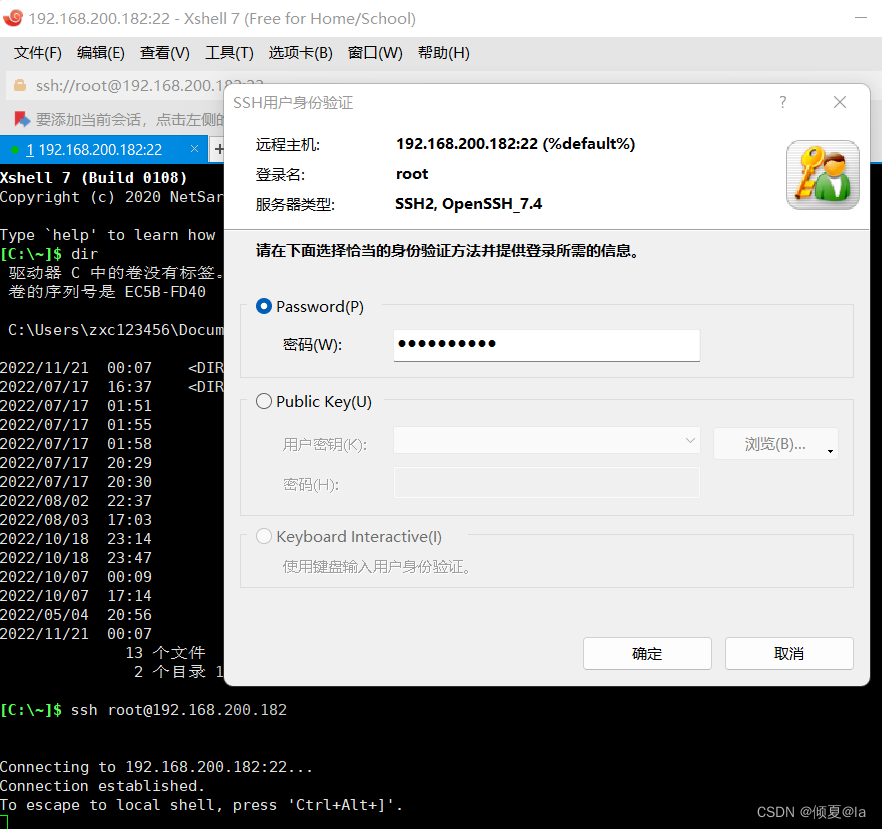
问题:使用Xshell进行连接虚拟机的操作时出现了Disconnected from remote host的错误
解决方法:
1、vim /etc/ssh/sshd_config
2、#UseDNS yes改为UseDNS no
3、重启systemctl restart sshd
5、免密登录
环境
| 服务器名称 | IP |
|---|---|
| nfs | 192.168.200.182 |
| web1 | 192.168.200.184 |
nfs 跳板机
web1 业务服务器 数量非常大
1、使用nfs远程连接web1
[root@nfs ~]# ssh root@192.168.200.184
root@192.168.200.184's password:
2、在nfs生成秘钥传递给web1
生成秘钥(秘钥可多次使用)
[root@nfs ~]# ssh-keygen
Generating public/private rsa key pair.
Enter file in which to save the key (/root/.ssh/id_rsa):
Enter passphrase (empty for no passphrase):
Enter same passphrase again:
Your identification has been saved in /root/.ssh/id_rsa.
Your public key has been saved in /root/.ssh/id_rsa.pub.
The key fingerprint is:
SHA256:W6FCYifsgqSzpVOjwZ7FysxvbUs5zbZ/WR3N9Q4S1/U root@nfs
The key's randomart image is:
+---[RSA 2048]----+
|               .o|
|   .        . . +|
| .  = o   .  o .E|
|+..o =   . .. ..+|
|=.=o. . S .  ..o.|
|=O+o  +. o   . ..|
|=B  .+ +.   o    |
| ....oo .  o     |
|  .........      |
+----[SHA256]-----+

传递秘钥
[root@nfs ~]# ssh-copy-id 192.168.200.184
/usr/bin/ssh-copy-id: INFO: Source of key(s) to be installed: "/root/.ssh/id_rsa.pub"
/usr/bin/ssh-copy-id: INFO: attempting to log in with the new key(s), to filter out any that are already installed
/usr/bin/ssh-copy-id: INFO: 1 key(s) remain to be installed -- if you are prompted now it is to install the new keys
root@192.168.200.184's password:

Number of key(s) added: 1

Now try logging into the machine, with:   "ssh '192.168.200.184'"
and check to make sure that only the key(s) you wanted were added.

[root@nfs ~]#

3、使用nfs远程连接web1 ~ 做免密
[root@nfs ~]# ssh root@192.168.200.184
Last login: Mon Nov 21 00:30:13 2022 from 192.168.200.1
[root@web1 ~]# exit
登出
Connection to 192.168.200.184 closed.
[root@nfs ~]# ip a
1: lo: <LOOPBACK,UP,LOWER_UP> mtu 65536 qdisc noqueue state UNKNOWN group default qlen 1000
    link/loopback 00:00:00:00:00:00 brd 00:00:00:00:00:00
    inet 127.0.0.1/8 scope host lo
       valid_lft forever preferred_lft forever
    inet6 ::1/128 scope host
       valid_lft forever preferred_lft forever
2: ens32: <BROADCAST,MULTICAST,UP,LOWER_UP> mtu 1500 qdisc pfifo_fast state UP group default qlen 1000
    link/ether 00:0c:29:0b:18:39 brd ff:ff:ff:ff:ff:ff
    inet 192.168.200.182/24 brd 192.168.200.255 scope global noprefixroute ens32
       valid_lft forever preferred_lft forever
    inet6 fe80::2e53:1e73:716d:c608/64 scope link noprefixroute
       valid_lft forever preferred_lft forever
    inet6 fe80::8054:e8a7:a00d:e7f5/64 scope link noprefixroute
       valid_lft forever preferred_lft forever
    inet6 fe80::5d99:b781:21b8:139b/64 scope link noprefixroute
       valid_lft forever preferred_lft forever
3: virbr0: <NO-CARRIER,BROADCAST,MULTICAST,UP> mtu 1500 qdisc noqueue state DOWN group default qlen 1000
    link/ether 52:54:00:0c:48:eb brd ff:ff:ff:ff:ff:ff
    inet 192.168.122.1/24 brd 192.168.122.255 scope global virbr0
       valid_lft forever preferred_lft forever
4: virbr0-nic: <BROADCAST,MULTICAST> mtu 1500 qdisc pfifo_fast master virbr0 state DOWN group default qlen 1000
    link/ether 52:54:00:0c:48:eb brd ff:ff:ff:ff:ff:ff
SSH加固


