linux源码安装slurm以及mung和openssl

news2024/12/23 19:54:02

一、源码安装munge

1、编译安装munge

(1)下载munge地址:https://github.com/dun/munge/releases

(2)解压编译安装:

1

2

3

4

5

6

7

8

创建/data目录

复制文件munge-0.5.15.tar.xz 到/data目录下

tar -Jxvf munge-0.5.15.tar.xz

进入源文件目录

cd /data/munge-0.5.15

./bootstrap

./configure --prefix=/usr/local/munge \

--sysconfdir=/usr/local/munge/etc \

--localstatedir=/usr/local/munge/local \

--with-runstatedir=/usr/local/munge/run \

--libdir=/usr/local/munge/lib64

make && make install

2、创建用户并修改权限

1

2

3

4

5

6

7

8

9

useradd -s /sbin/nologin -u 1001 munge

chown -R munge.munge /usr/local/munge/

sudo -u munge mkdir -p /usr/local/munge/run/munge

chmod 700 /usr/local/munge/etc/

chmod 711 /usr/local/munge/local/

chmod 755 /usr/local/munge/run

chmod 711 /usr/local/munge/lib

3、配置文件及服务

(1)创建munge.key文件

执行以下命令完成以后,在/usr/local/munge/etc/munge/下面会生成munge.key,需修改munge.key的权限

1

2

sudo -u munge /usr/local/munge/sbin/mungekey --verbose

chmod 600 /usr/local/munge/etc/munge/munge.key


【注意】:如果有多台服务器,需将服务端的munge.key发给客户端,客户端无需自己生成

(2)生成链接文件并启动服务

1

2

3

4

5

ln -s /usr/local/munge/lib/systemd/system/munge.service /usr/lib/systemd/system/munge.service

(cp /usr/local/munge/lib/systemd/system/munge.service /usr/lib/systemd/system/)

systemctl daemon-reload

systemctl start munge

systemctl status munge

注:若是service服务

1

2

3

4

创建脚本链接(或者直接拷贝文件),通过'service munge start'启动服务,如下图:

ln -fs /usr/local/munge/etc/rc.d/init.d/munge /etc/init.d/munge

创建命令链接(或者直接拷贝文件),通过'munged'启动服务,如下图:

ln -fs /usr/local/munge/sbin/munged /usr/sbin/munged

4、安装中会出现的问题

(1)configure报错


【解决方式】:apt -y install openssl-devel   openssl
这里采用符合GPL许可的Open SSL加密库,如果是源码编译的此库环境,编译时需要通过--with-crypto-lib选择指定
或者源码安装openssl后--with-openssl-prefix=/usr/local/openssl
(2)文件权限和所有者有问题


/usr/local的文件权限和所有者有问题
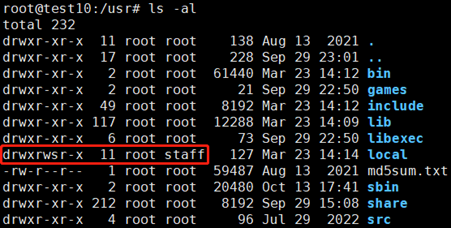


【解决方式】:修改/usr/local的文件权限和所有者

1

2

chown -R root.root /usr/local

chmod -R 755 /usr/local

 二、源码安装slurm

1

apt-get install make hwloc libhwloc-dev libmunge-dev libmunge2 munge mariadb-server libmysalclient-dey -y

1、下载并安装

(1)下载地址:Download Slurm - SchedMD

1

2

3

tar -jxvf slurm-22.05.8.tar.bz2

// find . -name "config.guess"   cp /usr/share/misc/config.* auxdir/

// cp /usr/share/libtool/build-aux/config.* .

(2)编译安装

1

2

3

4

5

6

./configure --prefix=/usr/local/slurm \

--with-munge=/usr/local/munge \

sysconfdir=/usr/local/slurm/etc \

--localstatedir=/usr/local/slurm/local \

--runstatedir=/usr/local/slurm/run \

--libdir=/usr/local/slurm/lib64

查看vim config.log文件是否有错误


如果下面显示no,则需要重新./configure并指定,--with-mysql_config=/usr/bin

1

make -j && make install

2、配置数据库

mysql -u root -p 登录到数据库进行下面操作

1

2

3

4

5

6

7

8

9

10

11

12

13

14

15

// 生成slurm用户,以便该用户操作slurm_acct_db数据库,其密码是123456

create user 'slurm'@'localhost' identified by '123456';

// 生成账户数据库slurm_acct_db

create database slurm_acct_db;

// 赋予slurm从本机localhost采用密码123456登录具备操作slurm_acct_db数据下所有表的全部权限

grant all on slurm_acct_db.* TO 'slurm'@'localhost' identified by '123456' with grant option;

// 赋予slurm从system0采用密码123456登录具备操作slurm_acct_db数据下所有表的全部权限

grant all on slurm_acct_db.* TO 'slurm'@'system0' identified by '123456' with grant option;

// 生成作业信息数据库slurm_jobcomp_db

create database slurm_jobcomp_db;

// 赋予slurm从本机localhost采用密码123456登录具备操作slurm_jobcomp_db数据下所有表的全部权限

// GRANT ALL PRIVILEGES ON slurm_jobcomp_db.* TO 'slurm'@'localhost';

grant all on slurm_jobcomp_db.* TO 'slurm'@'localhost' identified by '123456' with grant option;

// 赋予slurm从system0采用密码123456登录具备操作slurm_jobcomp_db数据下所有表的全部权限

grant all on slurm_jobcomp_db.* TO 'slurm'@'system0' identified by '123456' with grant option;

3、配置slurm文件及服务

(1)编辑配置文件(示例配置文件在源码包中的etc下)

1

2

3

4

5

6

cp slurm.conf.example /usr/local/slurm/etc/slurm.conf

cp slurmdbd.conf.example /usr/local/slurm/etc/ slurmdbd.conf

cp cgroup.conf.example /usr/local/slurm/etc/cgroup.conf

chmod 600 slurmdbd.conf

cd /usr/local/slurm   

mkdir run slurm log

【注意】:客户端只需要把服务端修改好的slurm.conf发过去即可,具体配置内容可在文末参考

(2)配置环境变量

1

2

3

vim /etc/profile.d/slurm.sh

export PATH=$PATH:/usr/local/slurm/bin:/usr/local/slurm/sbin

export LD_LIBRARY_PATH=/usr/local/slurm/lib64:$LD_LIBRARY_PATH

(3)启动服务(服务启动文件在源码包中的etc下)

1

2

3

4

5

// cp etc/slurmctld.service etc/slurmdbd.service etc/slurmd.service /etc/systemd/system/

cp etc/slurmctld.service etc/slurmdbd.service etc/slurmd.service /usr/lib/systemd/system/

systemctl daemon-reload    // 重新加载systemd守护进程配置文件

systemctl start slurmctld slurmd slurmdbd   // 开启服务

systemctl enable slurmctld slurmd slurmdbd  // 开机自启动

【注意】:客户端只需要slurmd
正常情况下显示绿色的active状态;如果失败,则用下面命令查看错误日志

1

slurmctld -Dvvvvv    slurmdbd -Dvvvvv    slurmd -Dvvvvv

启动后如果节点状态是down,可用下面命令启动节点:

1

scontrol update nodename=sw01 state=idle

4、slurm排错

重启slurmctld服务

1

2

3

4

systemctl restart slurmctld

scp -r /usr/local/slurm test10:/usr/local/

scp /etc/profile.d/slurm.sh test10:/etc/profile.d/

scp /etc/systemd/system/slurmd.service test10:/etc/systemd/system/

 (1)错误:mysql_real_connect failed: 2003 Can't connect to MySQL server on 'Intel:3306' (111)


 数据库连接失败
查看3306端口是否开放远程连接


 没有开放3306端口
修改vim /etc/my.cnf,添加port=3306,然后重启mysql;
(2)slurm_load_partitions: Zero Bytes were transmitted or received
客户端sinfo查看时出现x上面错误,一般是时间不一致,可用date查看时间日期。
解决:节点时间未同步,安装NTP后,启动ntpd服务即可。

三、openssl源码安装

1、下载安装openssl

(1)查看openssl版本

1

openssl version

(2)下载相应版本openssl

下载地址:Old Releases | Library

1

2

3

4

tar -zxvf openssl-1.1.1s.tar.gz

./config --prefix=/usr/local/openssl

./config -t

make & make install

2、测试验证

1

/usr/local/openssl/bin/openssl version

如果正确显示版本号,则安装成功。某些版本的操作系统会报下列错误
openssl: symbol lookup error: openssl: undefined symbol: EVP_mdc2, version OPENSSL_1_1_0

1

2

3

4

// 此时需要配置下系统库:

// echo “/usr/local/openssl/lib” >> /etc/ld.so.conf.d/libc.conf && ldconfig

// 最后将/usr/local/openssl/bin/openssl添加到系统路径

// ln -s /usr/local/openssl/bin/openssl /bin/openssl

3、切换openssl版本

1

2

3

4

5

6

7

8

9

10

11

12

13

// mv /usr/bin/openssl /usr/bin/openssl.bak

// mv /usr/include/openssl /usr/include/openssl.bak

// ln -s /usr/local/openssl/bin/openssl /usr/bin/openssl

// ln -s /usr/local/openssl/include/openssl /usr/include/openssl

// echo "/usr/local/openssl/lib" >> /etc/ld.so.conf  ldconfig -v

// ln -s /usr/local/openssl/lib/libssl.so.1.1 /usr/lib64/libssl.so.1.1

// ln -s /usr/local/openssl/lib/libcrypto.so.1.1 /usr/lib64/libcrypto.so.1.1

// 【注意】:不能直接删除软链接

// 如需使用新版本开发,则需替换原来的软链接指向,即替换原动态库,进行版本升级。

// 替换/lib(lib64)和/usr/lib(lib64)和/usr/local/lib(lib64)存在的相应动态库:

// ln -sf /usr/local/openssl/lib/libssl.so.1.1 /usr/lib64/libssl.so

// ln -sf /usr/local/openssl/lib/libcrypto.so.1.1 /usr/lib64/libcrypto.so

4、解决openssl报错

源码安装完OpenSSL后,打开一个新的窗口执行openssl version命令报错(一定要新开窗口执行openssl version)
(i)error while loading shared libraries: libssl.so.1.1: cannot open shared object file: No such file or directory
(ii)error while loading shared libraries: libcrypto.so.1.1: cannot open shared object file: No such file or directory


 (1)方法一:
链接或拷贝/lib(lib64)和/usr/lib(lib64)和/usr/local/lib(lib64)存在的相应动态库

1

2

ln -s /usr/local/openssl/lib/libssl.so.1.1 /usr/lib/libssl.so.1.1

ln -s /usr/local/openssl/lib/libcrypto.so.1.1 /usr/lib/libcrypto.so.1.1

(2)方法二:
不指定安装目录,一般so会存放在/usr/local/lib这个目录底下,去这个目录底下找,果然发现自己所需要的.so文件


所以,在/etc/ld.so.conf中加入/usr/local/lib这一行,保存之后,再运行:/sbin/ldconfig -v更新一下配置即可。

1

2

/sbin/ldconfig -v

ldconfig

其作用是将文件/etc/ld.so.conf列出的路径下的库文件缓存到/etc/ld.so.cache以供使用,因此当安装完一些库文件,或者修改/etc/ld.so.conf增加了库的新搜索路径,需要运行一下ldconfig,使所有的库文件都被缓存到文件/etc/ld.so.cache中,如果没做,可能会找不到刚安装的库。

四、连网yum安装munge

1、配置并安装munge

(1)添加munge用户

1

2

groupadd -g 972 munge

useradd -g 972 -u 972 munge

(2)安装munge

1

apt-get install munge -y

(3)执行以下命令,创建munge.key文件:

1

create-munge-key

2、修改文件权限

执行完以后,在/etc/munge/下面会生成munge.key,需修改munge.key的权限以及所属用户,把所属用户改成munge(/etc和/usr应为root权限)

1

2

chown -R munge: /etc/munge/ /var/log/munge/ /var/lib/munge/ /var/run/munge/

chmod 400 /etc/munge/munge.key

1

2

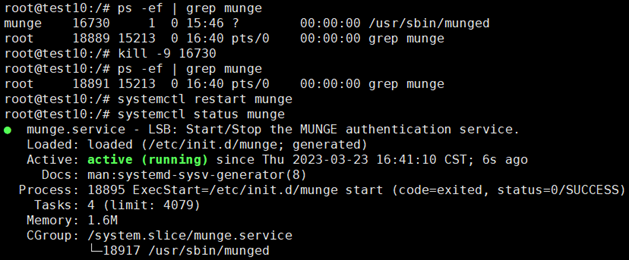
ps -ef | grep munge

kill -9 16730

五、Slurm常用命令以及基本用法

1、查看可用资源sinfo

idle

节点空闲,可接受作业

alloacted

该节点已经分配作业且所有核心用满,在作业释放前不能再被分配作业

mix

使用部分核心,仍可以被分配作业

drain

对应节点已经下线

drng

节点已下线但仍有作业在运行

2、slurm提交作业命令

(1)交互式作业srun

        srun命令属于交互式提交作业,有屏幕输出,但容易受网络波动影响,断网或关闭窗口会导致作业中断。

1

srun -n 4 hostname

1

2

3

4

5

6

7

8

9

10

-N 2 指定使用2个节点;

-n 12 指定运行的任务数为12, 默认情况下一个CPU核一个任务

-p debug 指定提交作业到debug队列;

-w x86[13-16] 指定使用节点x86[13-16];

-x  x86[11-12] 排除x8611、x8612节点;

-o out.log  指定标准输出到out.log文件;

-e err.log  指定重定向错误输出到err.log文件;

-J JOBNAME  指定作业名为JOBNAME;

-t 20 指定作业运行时间限制为20分钟;

--gres=gpu:2 为作业分配2块GPU显卡资源(最大值为8);

(2)批处理作业脚本sbatch

        sbatch一般情况下与srun一起提交作业到后台运行,需要将srun写到脚本中,再用sbatch 提交脚本。这种方式不受本地网络波动影响,提交作业后可以关闭本地电脑。sbatch命令没有屏幕输出,默认输出日志为提交目录下的slurm-xxx.out文件,可以使用tail -f slurm-xxx.out实时查看日志,其中xxx为作业号。
<i、一个简单的Slurm脚本(job_run.sh)如下:

1

2

3

4

5

6

7

8

9

10

11

12

13

14

15

16

17

18

19

20

21

22

23

#!/bin/bash

#SBATCH -J xujb         #指定作业名

#SBATCH -p q_x86        #指定队列

#SBATCH -N 2            #请求节点总数

#SBATCH -n 24           #请求进程总数

#SBATCH -w x86b,x86c    #指定运行作业的节点

#SBATCH -x x86a         #指定不使用x86a运行作业

#SBATCH -o slurm-%j.out #标准输出文件

#SBATCH -e slurm-%j.log #错误输出文件

# 设置运行环境

#module load mpich/4.1.1

export PATH=/usr/local/mpich-4.1.1/bin:$PATH

export LD_LIBRARY_PATH=/usr/local/mpich-4.1.1/lib:$LD_LIBRARY_PATH

echo ${SLURM_JOB_NODELIST} #作业占用节点列表

echo start on $(date)      #开始时间

# 输入要执行的命令

srun ../funs9/main

#mpirun -n ${SLURM_NTASKS} ../funs9/main

echo end on $(date)        #结束时间

<ii、sbatch提交作业

1

sbatch -n 2 ./job.sh

3、查看作业状态squeue

1

2

3

4

5

6

7

# 参数示例

squeue l:以长列表显示更多信息。

squeue -u username:仅显示属于用户username的任务。

squeue -t state:仅显示处于state状态的任务。

squeue -n job name:仅显示名称为job name的作业。

squeue -p partition:仅显示partition分区的任务。

squeue -jobs job id:仅显示作业id为job id的作业。

4、删除作业scancel

1

scancel 17

1

2

3

4

5

# 参数示例

scancel jobid:删除jobid的作业。

scancel -u username:删除username的全部作业。

scancel -s state:删除处于state状态的作业。

scancel -p partition:仅显示partition分区的任务

5、查看任务信息scontrol

1

2

3

4

# 参数示例

scontrol show partition partition_name:详细显示partition name分区的信息。

scontrol show node node_name:详细显示node name节点信息。

scontrol show job job_id:详细显示job id作业的信息。 

(1)scontrol对节点进行控制
scontrol命令可以管理Slurm集群中的节点,例如关机、重启和修改属性等操作。例如,要关闭节点x86b,可以使用以下命令:

1

scontrol update NodeName=x86b State=DOWN

(2)scontrol修改队列属性
scontrol命令可以管理Slurm队列,例如修改队列的最大CPU数、最大内存大小等属性。例如,要将q_x86队列最大CPU数更改为48,可以使用以下命令:

1

scontrol update PartitionName=q_x86 MaxCPUs=48

6、查询包括已完成作业信息sacct

输出内容会包括,作业号,作业名,分区,计费账户,申请的CPU数量,状态,结束代码

1

2

3

4

5

6

7

8

9

10

11

12

# 参数示例

-b,--brief:显示简要信息,主要包含: 作业号jobid、状态status和退出码exitcode。

-c,--completion:显示作业完成信息而非记账信息。

-e,--helpformat:显示当采用 --format指定格式化输出的可用格式。

-E end_time,--endtime-end time:显示在end time时间之前(不限作业状态)的作业。

-i,--nnodes=N:显示在特定节点数上运行的作业。

-j job(step),--jobs=job(.step):限制特定作业号(步)的信息,作业号(步)可以以,分隔.

-l,--long:显示详细信息。

-N node list,--nodelist-node list:显示运行在特定节点的作业记账信息。

-R reason list,-reason=reason list:显示由于XX原因没有被调度的作业记账信息。

-s state_list,-state-state list:显示state list(以,分隔)状态的作业记账信息。

-S,--starttime:显示特定时间之后开始运行的作业记账信息,有效时间格式参见

7、调度配置信息sacctmgr

主要负责管理账号,用户,集群分区等资源

1

2

3

4

5

6

7

8

9

10

11

12

13

14

15

16

17

18

# 管理账户

sacctmgr show account   # 直询账户信息

sacctmgr add account new_account  # 添加账户信息

sacctmgr modify account new_account set Parent=slurmtest01  # 修改账户信息

sacctmgr delete account new_account   # 删除账户信息

#管理QOS

sacctmgr show qos   # 查询QOS

sacctmgr add qos new_qos   # 添加QOS

sacctmgr modify qos new_gos set MaxJobsPerUser=4  # 修改QOS,如用户使用核心数,作业数

sacctmgr delete qos new_qos   # 删除QOS

#用户管理

sacctmgr show user (withassoc)   # 查询用户

sacctmgr add user testslurm   # 添加用户

sacctmgr -i add user test1 account=test  # 增加test1用户属于test账户

sacctmgr update user testslurm set QOS=new_qos  # 修改用户信息

sacctmgr delete user testslurm   # 删除用户信

六、slurm配置文件

(1)slurm.conf配置文件

1

2

3

4

5

6

7

8

9

10

11

12

13

14

15

16

17

18

19

20

21

22

23

24

25

26

27

28

29

30

31

32

33

34

35

36

37

38

39

40

41

42

43

44

45

46

47

48

49

50

51

52

53

54

55

56

57

58

59

60

61

62

63

64

65

66

67

68

69

70

71

72

73

74

75

76

77

78

79

80

81

82

83

84

85

86

87

88

89

90

91

92

93

94

95

96

97

98

99

100

101

102

103

104

105

106

107

108

109

110

111

112

113

114

115

116

117

118

119

120

121

122

123

124

125

126

127

128

129

130

131

132

133

134

135

136

137

138

139

140

141

142

143

144

145

146

147

148

149

150

151

152

153

154

155

156

157

158

159

160

161

162

163

164

165

166

167

168

169

170

171

172

173

174

175

176

177

178

179

180

181

182

183

184

185

186

187

188

189

190

191

192

193

194

195

196

197

198

199

200

201

202

203

204

205

206

207

208

209

210

211

212

213

214

215

216

217

218

219

220

221

222

223

224

225

226

227

228

229

230

231

232

233

234

235

236

237

238

239

240

241

242

243

244

245

246

247

248

249

250

251

252

253

254

255

256

257

258

259

260

261

########################################################

#  Configuration file for Slurm - 2021-08-20T10:27:23  #

########################################################

#

#

#

################################################

#                   CONTROL                    #

################################################

ClusterName=Sunway  # 集群名

SlurmUser=root      # 主节点管理账号

SlurmctldHost=sw01  # 主节点名

#SlurmctldHost=psn2  #备控制器的主机名

SlurmctldPort=6817

SlurmdPort=6818

SlurmdUser=root

#

################################################

#            LOGGING & OTHER PATHS             #

################################################

SlurmctldLogFile=/usr/local/slurm/log/slurmctld.log  # 主节点log文件

SlurmdLogFile=/usr/local/slurm/log/slurmd.log        # 子节点log文件

SlurmdPidFile=/usr/local/slurm/run/slurmd.pid # 子节点进程文件

SlurmdSpoolDir=/usr/local/slurm/slurm/d       # 子节点状态文件夹

#SlurmSchedLogFile=

SlurmctldPidFile=/usr/local/slurm/run/slurmctld.pid  # 主服务进程文件

StateSaveLocation=/usr/local/slurm/slurm/state       # 主节点状态文件夹

#

################################################

#                  ACCOUNTING                  #

################################################

#AccountingStorageBackupHost=psn2    #slurmdbd备机

AccountingStorageEnforce=associations,limits,qos

AccountingStorageHost=sw01     # 主节点

AccountingStoragePort=6819

AccountingStorageType=accounting_storage/slurmdbd

#AccountingStorageUser=

#AccountingStoreJobComment=Yes

AcctGatherEnergyType=acct_gather_energy/none

AcctGatherFilesystemType=acct_gather_filesystem/none

AcctGatherInterconnectType=acct_gather_interconnect/none

AcctGatherNodeFreq=0

#AcctGatherProfileType=acct_gather_profile/none

ExtSensorsType=ext_sensors/none

ExtSensorsFreq=0

JobAcctGatherFrequency=30

JobAcctGatherType=jobacct_gather/linux

#

################################################

#           SCHEDULING & ALLOCATION            #

################################################

PreemptMode=OFF

PreemptType=preempt/none

PreemptExemptTime=00:00:00

PriorityType=priority/basic

#SchedulerParameters=

SchedulerTimeSlice=30

SchedulerType=sched/backfill

#SelectType=select/cons_tres

SelectType=select/linear

#SelectTypeParameters=CR_CPU

SlurmSchedLogLevel=0

#

################################################

#                   TOPOLOGY                   #

################################################

TopologyPlugin=topology/none

#

################################################

#                    TIMERS                    #

################################################

BatchStartTimeout=10

CompleteWait=0

EpilogMsgTime=2000

GetEnvTimeout=2

InactiveLimit=0

KillWait=30

MinJobAge=300

SlurmctldTimeout=60

SlurmdTimeout=60

WaitTime=0

#

################################################

#                    POWER                     #

################################################

#ResumeProgram=

ResumeRate=300

ResumeTimeout=60

#SuspendExcNodes=

#SuspendExcParts=

#SuspendProgram=

SuspendRate=60

SuspendTime=NONE

SuspendTimeout=30

#

################################################

#                    DEBUG                     #

################################################

DebugFlags=NO_CONF_HASH

SlurmctldDebug=info

SlurmdDebug=info

#

################################################

#               EPILOG & PROLOG                #

################################################

#Epilog=/usr/local/etc/epilog

#Prolog=/usr/local/etc/prolog

#SrunEpilog=/usr/local/etc/srun_epilog

#SrunProlog=/usr/local/etc/srun_prolog

#TaskEpilog=/usr/local/etc/task_epilog

#TaskProlog=/usr/local/etc/task_prolog

#

################################################

#               PROCESS TRACKING               #

################################################

ProctrackType=proctrack/pgid

#

################################################

#             RESOURCE CONFINEMENT             #

################################################

#TaskPlugin=task/none

#TaskPlugin=task/affinity

#TaskPlugin=task/cgroup

#TaskPluginParam=

#

################################################

#                    OTHER                     #

################################################

#AccountingStorageExternalHost=

#AccountingStorageParameters=

AccountingStorageTRES=cpu,mem,energy,node,billing,fs/disk,vmem,pages

AllowSpecResourcesUsage=No

#AuthAltTypes=

#AuthAltParameters=

#AuthInfo=

AuthType=auth/munge

#BurstBufferType=

#CliFilterPlugins=

#CommunicationParameters=

CoreSpecPlugin=core_spec/none

#CpuFreqDef=

CpuFreqGovernors=Performance,OnDemand,UserSpace

CredType=cred/munge

#DefMemPerNode=

#DependencyParameters=

DisableRootJobs=No

EioTimeout=60

EnforcePartLimits=NO

#EpilogSlurmctld=

#FederationParameters=

FirstJobId=1

#GresTypes=

GpuFreqDef=high,memory=high

GroupUpdateForce=1

GroupUpdateTime=600

#HealthCheckInterval=0

#HealthCheckNodeState=ANY

#HealthCheckProgram=

InteractiveStepOptions=--interactive

#JobAcctGatherParams=

JobCompHost=localhost

JobCompLoc=/var/log/slurmjobcomp.log

JobCompPort=0

JobCompType=jobcomp/mysql

JobCompUser=slurm

JobCompPass=123456

JobContainerType=job_container/none

#JobCredentialPrivateKey=

#JobCredentialPublicCertificate=

#JobDefaults=

JobFileAppend=0

JobRequeue=1

#JobSubmitPlugins=

#KeepAliveTime=

KillOnBadExit=0

#LaunchParameters=

LaunchType=launch/slurm

#Licenses=

LogTimeFormat=iso8601_ms

#MailDomain=

#MailProg=/bin/mail

MaxArraySize=1001

MaxDBDMsgs=20012

MaxJobCount=10000       #最大的作业数

MaxJobId=67043328

MaxMemPerNode=UNLIMITED

MaxStepCount=40000

MaxTasksPerNode=512

MCSPlugin=mcs/none

#MCSParameters=

MessageTimeout=10

MpiDefault=pmi2    ##启用MPI

#MpiParams=

#NodeFeaturesPlugins=

OverTimeLimit=0

PluginDir=/usr/local/slurm/lib64/slurm

#PlugStackConfig=

#PowerParameters=

#PowerPlugin=

#PrEpParameters=

PrEpPlugins=prep/script

#PriorityParameters=

#PrioritySiteFactorParameters=

#PrioritySiteFactorPlugin=

PrivateData=none

#PrologEpilogTimeout=65534

#PrologSlurmctld=

#PrologFlags=

PropagatePrioProcess=0

PropagateResourceLimits=ALL

#PropagateResourceLimitsExcept=

#RebootProgram=

#ReconfigFlags=

#RequeueExit=

#RequeueExitHold=

#ResumeFailProgram=

#ResvEpilog=

ResvOverRun=0

#ResvProlog=

ReturnToService=0

RoutePlugin=route/default

#SbcastParameters=

#ScronParameters=

#SlurmctldAddr=

#SlurmctldSyslogDebug=

#SlurmctldPrimaryOffProg=

#SlurmctldPrimaryOnProg=

#SlurmctldParameters=

#SlurmdParameters=

#SlurmdSyslogDebug=

#SlurmctldPlugstack=

SrunPortRange=0-0

SwitchType=switch/none

TCPTimeout=2

TmpFS=/tmp

#TopologyParam=

TrackWCKey=No

TreeWidth=50

UsePam=No

#UnkillableStepProgram=

UnkillableStepTimeout=60

VSizeFactor=0

#X11Parameters=

#

################################################

#                    NODES                     #

################################################

#NodeName=Intel Sockets=2 CoresPerSocket=16 ThreadsPerCore=1 RealMemory=480000

#NodeName=Dell Sockets=2 CoresPerSocket=24 ThreadsPerCore=1 RealMemory=100000

#NodeName=swa  CPUS=16 CoresPerSocket=1 ThreadsPerCore=1 Sockets=16  RealMemory=48000 State=UNKNOWN

#NodeName=swb  CPUS=64 CoresPerSocket=32 ThreadsPerCore=1 Sockets=2  RealMemory=100000 State=UNKNOWN

#NodeName=sw5a0[1-3] CPUS=4 Sockets=4 CoresPerSocket=1 ThreadsPerCore=1 RealMemory=1

NodeName=sw01 CPUs=1 Sockets=1 CoresPerSocket=1 ThreadsPerCore=1 State=UNKNOWN

#

################################################

#                  PARTITIONS                  #

################################################

#PartitionName=x86 AllowGroups=all MinNodes=0 Nodes=Dell Default=YES State=UP

#PartitionName=multicore AllowGroups=all MinNodes=0 Nodes=swa,swb,swc,swd State=UP

#PartitionName=manycore Default=YES AllowGroups=all MinNodes=0 Nodes=sw5a0[1-3] State=UP

PartitionName=Manycore AllowGroups=all MinNodes=0 Nodes=sw01 State=UP Default=YES

(2)slurmdbd.conf配置文件

1

2

3

4

5

6

7

8

9

10

11

12

13

14

15

16

17

18

19

20

21

22

23

24

25

26

27

28

29

30

31

32

33

34

35

36

37

38

39

40

41

42

#

# Example slurmdbd.conf file.

#

# See the slurmdbd.conf man page for more information.

#

# Archive info

#ArchiveJobs=yes

#ArchiveDir="/tmp"

#ArchiveSteps=yes

#ArchiveScript=

#JobPurge=12

#StepPurge=1

#

# Authentication info

AuthType=auth/munge

#AuthInfo=/var/run/munge/munge.socket.2

#

# slurmDBD info为启用slurmdbd的管理服务器,与slurm.conf中的AccountingStorageHost一致

DbdHost=sw01

#DbdBackupAddr=172.17.0.2

#DbdBackupHost=mn02

DbdPort=6819

SlurmUser=root

MessageTimeout=30

DebugLevel=7

#DefaultQOS=normal,standby

LogFile=/usr/local/slurm/log/slurmdbd.log

PidFile=/usr/local/slurm/run/slurmdbd.pid

#PluginDir=/usr/lib/slurm

#PrivateData=accounts,users,usage,jobs

PrivateData=jobs

#TrackWCKey=yes

#

# Database info

StorageType=accounting_storage/mysql

StorageHost=localhost

#StorageBackupHost=mn02

StoragePort=3306

StoragePass=123456

StorageUser=slurm

StorageLoc=slurm_acct_db

CommitDelay=1


(2)

1

2

3

4

5

6

7

8

9

10

11

12

13

14

15

16

17

18

19

20

21

22

23

24

25

26

27

28

29

30

31

32

33

34

35

36

37

38

39

40

41

42

43

44

45

46

47

48

49

50

51

52

53

54

55

56

57

58

59

60

61

62

63

64

65

66

67

68

69

70

71

72

73

74

75

76

77

78

79

80

81

82

83

84

85

86

87

88

89

90

91

92

93

94

95

96

97

98

99

100

101

102

103

104

105

106

107

108

109

110

111

112

113

114

115

116

117

118

119

120

121

122

123

124

125

126

127

128

129

130

131

132

133

134

135

136

137

138

139

140

141

142

143

144

145

146

147

148

149

150

151

152

153

154

155

156

157

158

159

160

161

162

163

164

165

166

167

168

169

170

171

172

173

174

175

176

177

178

179

180

181

182

183

184

185

186

187

188

189

190

191

192

193

194

195

196

197

198

199

200

201

202

203

204

205

206

207

208

209

210

211

212

213

214

215

216

217

218

219

220

221

222

223

224

225

226

227

228

229

230

231

232

233

234

235

236

237

238

239

240

241

242

243

244

245

246

247

248

249

250

251

252

253

254

255

256

257

258

259

260

261

262

263

264

265

266

267

268

########################################################

#  Configuration file for Slurm - 2021-08-20T10:27:23  #

########################################################

#

#

#

################################################

#                   CONTROL                    #

################################################

ClusterName=Sunway    #集群名称

SlurmUser=root

SlurmctldHost=Dell    #主控制器的主机名

#SlurmctldHost=Intel  #备控制器的主机名

SlurmctldPort=6817    #slurctld的监听端口

SlurmdPort=6818       #slurmd的通信端口

SlurmdUser=root

#

################################################

#            LOGGING & OTHER PATHS             #

################################################

SlurmctldLogFile=/var/log/slurmctld.log

SlurmdLogFile=/var/log/slurmd.log

SlurmdPidFile=/var/run/slurmd.pid

SlurmdSpoolDir=/var/spool/slurmd

#SlurmSchedLogFile=

SlurmctldPidFile=/var/run/slurmctld.pid

StateSaveLocation=/var/spool/slurmctld  #集群状态文件存放位置(全局文件系统)

#

################################################

#                  ACCOUNTING                  #

################################################

#AccountingStorageBackupHost=Intel  #slurmdbd备机

#AccountingStorageEnforce=none

AccountingStorageEnforce=associations,limits,qos

AccountingStorageHost=Dell  #slurmdbd主机,为数据库管理服务器,即slurmdbd运行的服务器

AccountingStoragePort=6819

AccountingStorageType=accounting_storage/slurmdbd

#AccountingStorageUser=

#AccountingStoreJobComment=Yes

AcctGatherEnergyType=acct_gather_energy/none

AcctGatherFilesystemType=acct_gather_filesystem/none

AcctGatherInterconnectType=acct_gather_interconnect/none

AcctGatherNodeFreq=0

AcctGatherProfileType=acct_gather_profile/none

ExtSensorsType=ext_sensors/none

ExtSensorsFreq=0

JobAcctGatherFrequency=30

JobAcctGatherType=jobacct_gather/linux

#

################################################

#           SCHEDULING & ALLOCATION            #

################################################

PreemptMode=OFF

PreemptType=preempt/none

PreemptExemptTime=00:00:00

PriorityType=priority/basic

#SchedulerParameters=

SchedulerTimeSlice=30

SchedulerType=sched/backfill

SelectType=select/cons_tres

#SelectType=select/linear  #为资源选择类型,参见资源选择说明

SelectTypeParameters=CR_CPU #CR_Core_Memory

SlurmSchedLogLevel=0

#

################################################

#                   TOPOLOGY                   #

################################################

TopologyPlugin=topology/none

#

################################################

#                    TIMERS                    #

################################################

BatchStartTimeout=10

CompleteWait=0

EpilogMsgTime=2000

GetEnvTimeout=2

InactiveLimit=0

KillWait=30

MinJobAge=300

SlurmctldTimeout=60  #控制器通信超时

SlurmdTimeout=60     #slurmd通信超时

WaitTime=0

#

################################################

#                    POWER                     #

################################################

#ResumeProgram=

ResumeRate=300

ResumeTimeout=60

#SuspendExcNodes=

#SuspendExcParts=

#SuspendProgram=

SuspendRate=60

SuspendTime=NONE

SuspendTimeout=30

#

################################################

#                    DEBUG                     #

################################################

DebugFlags=NO_CONF_HASH

SlurmctldDebug=info

SlurmdDebug=info

#

################################################

#               EPILOG & PROLOG                #

################################################

#Epilog=/usr/local/etc/epilog

#Prolog=/usr/local/etc/prolog

#SrunEpilog=/usr/local/etc/srun_epilog

#SrunProlog=/usr/local/etc/srun_prolog

#TaskEpilog=/usr/local/etc/task_epilog

#TaskProlog=/usr/local/etc/task_prolog

#

################################################

#               PROCESS TRACKING               #

################################################

ProctrackType=proctrack/pgid

#

################################################

#             RESOURCE CONFINEMENT             #

################################################

TaskPlugin=task/affinity

#TaskPlugin=task/cgroup

#TaskPluginParam=verbose

#TaskPluginParam=Sched

#

################################################

#                    OTHER                     #

################################################

#AccountingStorageExternalHost=

#AccountingStorageParameters=

AccountingStorageTRES=cpu,mem,energy,node,billing,fs/disk,vmem,pages

AllowSpecResourcesUsage=No

#AuthAltTypes=

#AuthAltParameters=

#AuthInfo=

AuthType=auth/munge

#BurstBufferType=

#CliFilterPlugins=

#CommunicationParameters=

CoreSpecPlugin=core_spec/none

#CpuFreqDef=

CpuFreqGovernors=Performance,OnDemand,UserSpace

CredType=cred/munge

#DefMemPerNode=

#DependencyParameters=

DisableRootJobs=No

EioTimeout=60

EnforcePartLimits=NO

#EpilogSlurmctld=

#FederationParameters=

FirstJobId=1

#GresTypes=

GpuFreqDef=high,memory=high

GroupUpdateForce=1

GroupUpdateTime=600

HealthCheckInterval=0

HealthCheckNodeState=ANY

#HealthCheckProgram=

InteractiveStepOptions=--interactive

#JobAcctGatherParams=

JobCompHost=localhost

JobCompLoc=/var/log/slurm_jobcomp.log

JobCompPort=0

#JobCompType=jobcomp/none

JobCompType=jobcomp/mysql

JobCompUser=slurm

JobCompPass=Nvmetest@123

JobContainerType=job_container/none

#JobCredentialPrivateKey=

#JobCredentialPublicCertificate=

#JobDefaults=

JobFileAppend=0

JobRequeue=1

#JobSubmitPlugins=

#KeepAliveTime=

KillOnBadExit=0

#LaunchParameters=

LaunchType=launch/slurm

#Licenses=

LogTimeFormat=iso8601_ms

#MailDomain=

MailProg=/bin/mail

MaxArraySize=1001

MaxDBDMsgs=20012

MaxJobCount=10000      #最大的作业数

MaxJobId=67043328

MaxMemPerNode=UNLIMITED

MaxStepCount=40000

MaxTasksPerNode=512

MCSPlugin=mcs/none

#MCSParameters=

MessageTimeout=10

MpiDefault=pmi2  ##启用MPI

#MpiParams=

#NodeFeaturesPlugins=

OverTimeLimit=0

PluginDir=/usr/local/lib/slurm

#PlugStackConfig=

#PowerParameters=

#PowerPlugin=

#PrEpParameters=

PrEpPlugins=prep/script

#PriorityParameters=

#PrioritySiteFactorParameters=

#PrioritySiteFactorPlugin=

PrivateData=none

PrologEpilogTimeout=65534

#PrologSlurmctld=

#PrologFlags=

PropagatePrioProcess=0

PropagateResourceLimits=ALL

#PropagateResourceLimitsExcept=

#RebootProgram=

#ReconfigFlags=

#RequeueExit=

#RequeueExitHold=

#ResumeFailProgram=

#ResvEpilog=

ResvOverRun=0

#ResvProlog=

ReturnToService=0

RoutePlugin=route/default

#SbcastParameters=

#ScronParameters=

#SlurmctldAddr=

#SlurmctldSyslogDebug=

#SlurmctldPrimaryOffProg=

#SlurmctldPrimaryOnProg=

#SlurmctldParameters=

#SlurmdParameters=

#SlurmdSyslogDebug=

#SlurmctldPlugstack=

SrunPortRange=0-0

SwitchType=switch/none

TCPTimeout=2

TmpFS=/tmp

#TopologyParam=

TrackWCKey=No

TreeWidth=50

UsePam=No

#UnkillableStepProgram=

UnkillableStepTimeout=60

VSizeFactor=0

#X11Parameters=

#

################################################

#                    NODES                     #

################################################

NodeName=intel CPUs=32 Sockets=2 CoresPerSocket=16 ThreadsPerCore=1 State=UNKNOWN

#NodeName=Dell Sockets=2 CoresPerSocket=24 ThreadsPerCore=1 RealMemory=100000

#NodeName=sw5a0[1-3] CPUS=4 Sockets=4 CoresPerSocket=1 ThreadsPerCore=1 RealMemory=1

NodeName=phytium CPUs=128 SocketsPerBoard=2 CoresPerSocket=64 ThreadsPerCore=1 State=UNKNOWN

NodeName=swa CPUS=16 Sockets=16 CoresPerSocket=1 ThreadsPerCore=1 State=UNKNOWN

NodeName=sw2cpu CPUs=64  Sockets=2 CoresPerSocket=32 ThreadsPerCore=1 State=UNKNOWN

NodeName=mcn[01-02] CPUs=6  Sockets=6 CoresPerSocket=1 ThreadsPerCore=1 State=UNKNOWN

NodeName=x86a,x86b,x86c CPUs=32 Sockets=2 CoresPerSocket=8 ThreadsPerCore=2 State=UNKNOWN

#

################################################

#                  PARTITIONS                  #

################################################

#PartitionName=manycore Default=YES AllowGroups=all MinNodes=0 Nodes=sw5a0[1-3] State=UP

PartitionName=q_Intel AllowGroups=all MinNodes=0 Nodes=intel State=UP

PartitionName=q_Kylin AllowGroups=all MinNodes=0 Nodes=phytium State=UP

PartitionName=q_sw6a AllowGroups=all MinNodes=0 Nodes=swa State=UP

PartitionName=q_sw6b AllowGroups=all MinNodes=0 Nodes=sw2cpu State=UP

PartitionName=q_sw9a AllowGroups=all MinNodes=0 Nodes=mcn[01-02] State=UP DEFAULT=YES

PartitionName=q_x86 AllowGroups=all MinNodes=0 Nodes=x86a,x86b,x86c State=UP


 -

本文来自互联网用户投稿,该文观点仅代表作者本人,不代表本站立场。本站仅提供信息存储空间服务,不拥有所有权,不承担相关法律责任。如若转载,请注明出处:http://www.coloradmin.cn/o/2210327.html

如若内容造成侵权/违法违规/事实不符,请联系多彩编程网进行投诉反馈,一经查实,立即删除!

相关文章

模型 知识诅咒

系列文章 分享 模型&#xff0c;了解更多&#x1f449; 模型_思维模型目录。知者难悟无知惑。 1 知识诅咒案例 1.1 会议室的误解 李经理是一家科技公司的产品经理&#xff0c;他负责领导一个新产品的开发项目。项目团队由不同背景和经验的成员组成&#xff0c;包括新入职的员…

php 生成随机数

记录:随机数抽奖 要求:每次生成3个 1 - 10 之间可重复(或不可重复)的随机数,10次为一轮,每轮要求数字5出现6次、数字4出现3次、…。 提炼需求: 1,可设置最小数、最大数、每次抽奖生成随机数的个数、是否允许重复 2,可设置每轮指定数字的出现次数 3,可设置每轮的抽奖…

(32)噪声信号的时域分析:均值、方差、与功率

文章目录 前言一、生成噪声信号并画图二、计算信号的均值、方差、与功率三、结果分析 前言 本文对叠加了高斯白噪声的一段整周期余弦信号进行时域分析&#xff0c;使用MATLAB进行信号生成&#xff0c;并计算其均值、方差、与功率。最后给出对计算结果的分析&#xff0c;阐明均…

组装首页:其他组件html、css移入JS中再引入首页

组装首页 <!DOCTYPE html> <html lang"zh-CN"><head><meta charset"UTF-8"><meta name"viewport" content"widthdevice-width, initial-scale1.0"><title>组装首页</title><style>* …

Java-Exception与RuntimeException

&#x1f496;简介 &#x1f4d6;Exception Exception 类是所有非致命性异常的基类。这些异常通常是由于编程逻辑问题或外部因素&#xff08;如文件不存在、网络连接失败等&#xff09;导致的&#xff0c;可以通过适当的编程手段来恢复或处理。Exception 可以进一步分为两大类…

分享一些常用的数据库性能监测工具

以下是一些常用的数据库性能监测工具&#xff1a; 一、MySQL MySQL Enterprise Monitor&#xff1a; 由 MySQL 官方推出&#xff0c;提供全面的数据库性能监控、诊断和优化功能。可以监控数据库的各种指标&#xff0c;如查询性能、连接数、缓存命中率等&#xff0c;并提供警报…

目标检测——YOLO11算法解读

作者&#xff1a;Ultralytics公司 代码&#xff1a;https://github.com/ultralytics/ultralytics YOLO系列算法解读&#xff1a; YOLOv1通俗易懂版解读、SSD算法解读、YOLOv2算法解读、YOLOv3算法解读、YOLOv4算法解读、YOLOv5算法解读、YOLOR算法解读、YOLOX算法解读、YOLOv6算…

(南京观海微电子)——HKC_5.0_QP050AS01-1_MIPI_LVDS_RGB原理及代码介绍

1. MIPI 2. LVDS 3. TTL 4.代码 //初始化代码 Generic_Short_Write_1P(0xee,0x01); // ENTER PAGE1 Generic_Short_Write_1P(0xea,0x07); Generic_Short_Write_1P(0xeb,0x12); Generic_Short_Write_1P(0x0a,0x76); // vcom //Generic_Sh…

兆易创新Cortex-M7 GD32H459适配OpenHarmony轻量系统适配教程

笔者利用国庆假期的时间适配了一款Cortex-M7 的国产厂商兆易创新GD32H459&#xff0c;开源地址&#xff1a;https://gitee.com/GD32H759_OpenHarmony OpenHarmony 4.1r 轻量系统移植到GD32H759文档 1.学习本文档的意义 1.学习如何移植OpenHarmony轻量系统4.1r到GD32 m7内核G…

[论文期刊|稳定检索]2024年信号处理与光学工程国际会议(SPOE 2024 )

2024年信号处理与光学工程国际会议 2024 International Conference on Signal Processing and Optical Engineering 【1】大会信息 会议名称&#xff1a;2024年信号处理与光学工程国际会议 会议简称&#xff1a;SPOE 2024 大会时间&#xff1a;请查看官网 大会地点&#xf…

【JS试题】对象键排序问题的神仙试题

前言 题目如下&#xff1a; const obj { a: 0 } obj[1] 0 obj[obj.a] obj.a const values Object.values(obj) obj[values[1]] obj.a console.log(obj);在此之前需要先了解 JS 对象键的排序问题&#xff0c;JS会对对象的属性进行处理&#xff0c;把所有 Number类型 和 数…

AWS S3迁移到阿里云OSS实践

本教程讲解如何将AWS S3中的数据迁移到阿里云对象存储OSS。 如果您需要将AWS S3中的数据通过专线迁移到阿里云对象存储OSS&#xff0c;请参见使用代理迁移。 概述 阿里云在线迁移服务是阿里云提供的存储产品数据通道。使用在线迁移服务&#xff0c;您可以将第三方数据轻松迁…

GaussDB主备版 8 工具学习

1 客户端工具 1.1 gsql 1.1.1 类似plsql 1.1.2 默认只支持从服务器本机连接&#xff0c;如果需要连接到远端的数据库&#xff0c;必须在服务端进行配置 1.1.3 gsql --help 1.1.4 命令参考-https://doc.hcs.huawei.com/db/zh-cn/gaussdb/24.1.30/tg/gaussdb-38-0007.html 1.1.…

Golang | Leetcode Golang题解之第474题一和零

题目&#xff1a; 题解&#xff1a; func findMaxForm(strs []string, m, n int) int {dp : make([][]int, m1)for i : range dp {dp[i] make([]int, n1)}for _, s : range strs {zeros : strings.Count(s, "0")ones : len(s) - zerosfor j : m; j > zeros; j--…

【网络基础知识】网络通信概述与TCPIP、UDP协议

网络基础知识 介绍网络基础知识&#xff0c;譬如网络通信概述、OSI 七层模型、IP 地址、TCP/IP 协议族、TCP 和 UDP 协议等等&#xff0c; 旨在以引导入门、了解为主&#xff0c;其中并不会深入、详细地介绍这些内容&#xff1b; Linux网络编程入门移步&#xff1a;【Linux网络…

使用CSS和HTML实现3D图片环绕效果

使用CSS和HTML实现3D图片环绕效果 在本篇博客中&#xff0c;将介绍如何使用HTML和CSS实现一个3D图片环绕效果。这个效果不仅具有视觉吸引力&#xff0c;而且具有高度的互动性&#xff0c;鼠标悬停时动画会暂停。接下来将一步步讲解这个效果的实现过程。 1. 效果 2. 页面结构与…

Python人脸识别技术进阶篇

在上一篇文章中&#xff0c;我们介绍了如何使用Python进行基本的人脸识别。本文将深入探讨人脸识别技术的高级应用&#xff0c;包括如何优化识别性能、处理复杂环境下的识别挑战以及如何利用深度学习模型来提高识别准确性等话题。 人脸识别的原理回顾 人脸识别流程 人脸识别…

使用 llamafile 以单个文件运行本地大模型

在开发 GenAI 应用时&#xff0c;有一个在本地运行的大模型是非常重要的&#xff0c;可以很方便地进行开发和测试。目前有几个流行的在本地运行大模型的选项&#xff0c;包括 Ollama 和 LM Studio。 这里介绍的是 llamafile。llamafile 是 Mozilla 支持的开源项目。llamafile …

OceanBase + DolphinScheduler,搭建分布式大数据调度平台的实践

本文整理自白鲸开源联合创始人&#xff0c;Apache DolphinScheduler PMC Chair&#xff0c;Apache Foundation Member 代立冬的演讲。主要介绍了DolphinScheduler及其架构、DolphinScheduler与OceanBase 的联合大数据方案。 DolphinScheduler是什么&#xff1f; Apache Dolphi…