目录 专栏导读 PyQt6的介绍 PyQt6的主要特点包括: 使用PyQt6开发应用程序的一般步骤: 库的安装 1、初始化与界面设计 2、设置前景色、背景色功能 完整代码 总结
🌸 欢迎来到Python办公自动化专栏—Python处理办公问题,解放您的双手 🏳️🌈 博客主页:请点击——> 一晌小贪欢的博客主页求关注 👍 该系列文章专栏:请点击——>Python办公自动化专栏求订阅 🕷 此外还有爬虫专栏:请点击——>Python爬虫基础专栏求订阅 📕 此外还有python基础专栏:请点击——>Python基础学习专栏求订阅 文章作者技术和水平有限,如果文中出现错误,希望大家能指正🙏 ❤️ 欢迎各位佬关注! ❤️
PyQt6是一个创建图形用户界面应用程序的工具包,它是Qt6的Python绑定。Qt是一个跨平台的C++图形用户界面应用程序开发框架,广泛用于开发GUI程序,也可用于开发非GUI程序,比如控制台工具和服务器。PyQt6使得Python程序员能够利用Qt的强大功能,轻松创建具有丰富功能和美观界面的应用程序。 跨平台:可以在Windows、Linux、macOS等操作系统上运行。 丰富的控件:提供了大量的控件(如按钮、标签、文本框等),方便开发者使用。 强大的布局管理:提供了多种布局管理器,可以方便地对控件进行布局。 事件处理:支持各种事件处理,如鼠标点击、键盘输入等。 丰富的API:提供了大量的API,可以方便地进行各种开发操作。 与Qt6的紧密集成:作为Qt6的Python绑定,PyQt6可以访问Qt6的所有功能。 安装PyQt6:可以通过pip安装PyQt6。 导入必要的模块:从PyQt6.QtWidgets模块中导入应用程序、窗口等类。 创建应用程序和窗口:创建一个QApplication对象和一个窗口对象。 设置窗口:设置窗口的标题、大小等属性。 添加控件:在窗口中添加各种控件,如按钮、文本框等。 设置布局:使用布局管理器对控件进行布局。 显示窗口:调用窗口的show()方法显示窗口。 运行应用程序:调用QApplication对象的exec()方法运行应用程序。 pip install PyQt6 - i https: // pypi. tuna. tsinghua. edu. cn/ simple/
pip install pillow - i https: // pypi. tuna. tsinghua. edu. cn/ simple/
pip install qrcode - i https: // pypi. tuna. tsinghua. edu. cn/ simple/
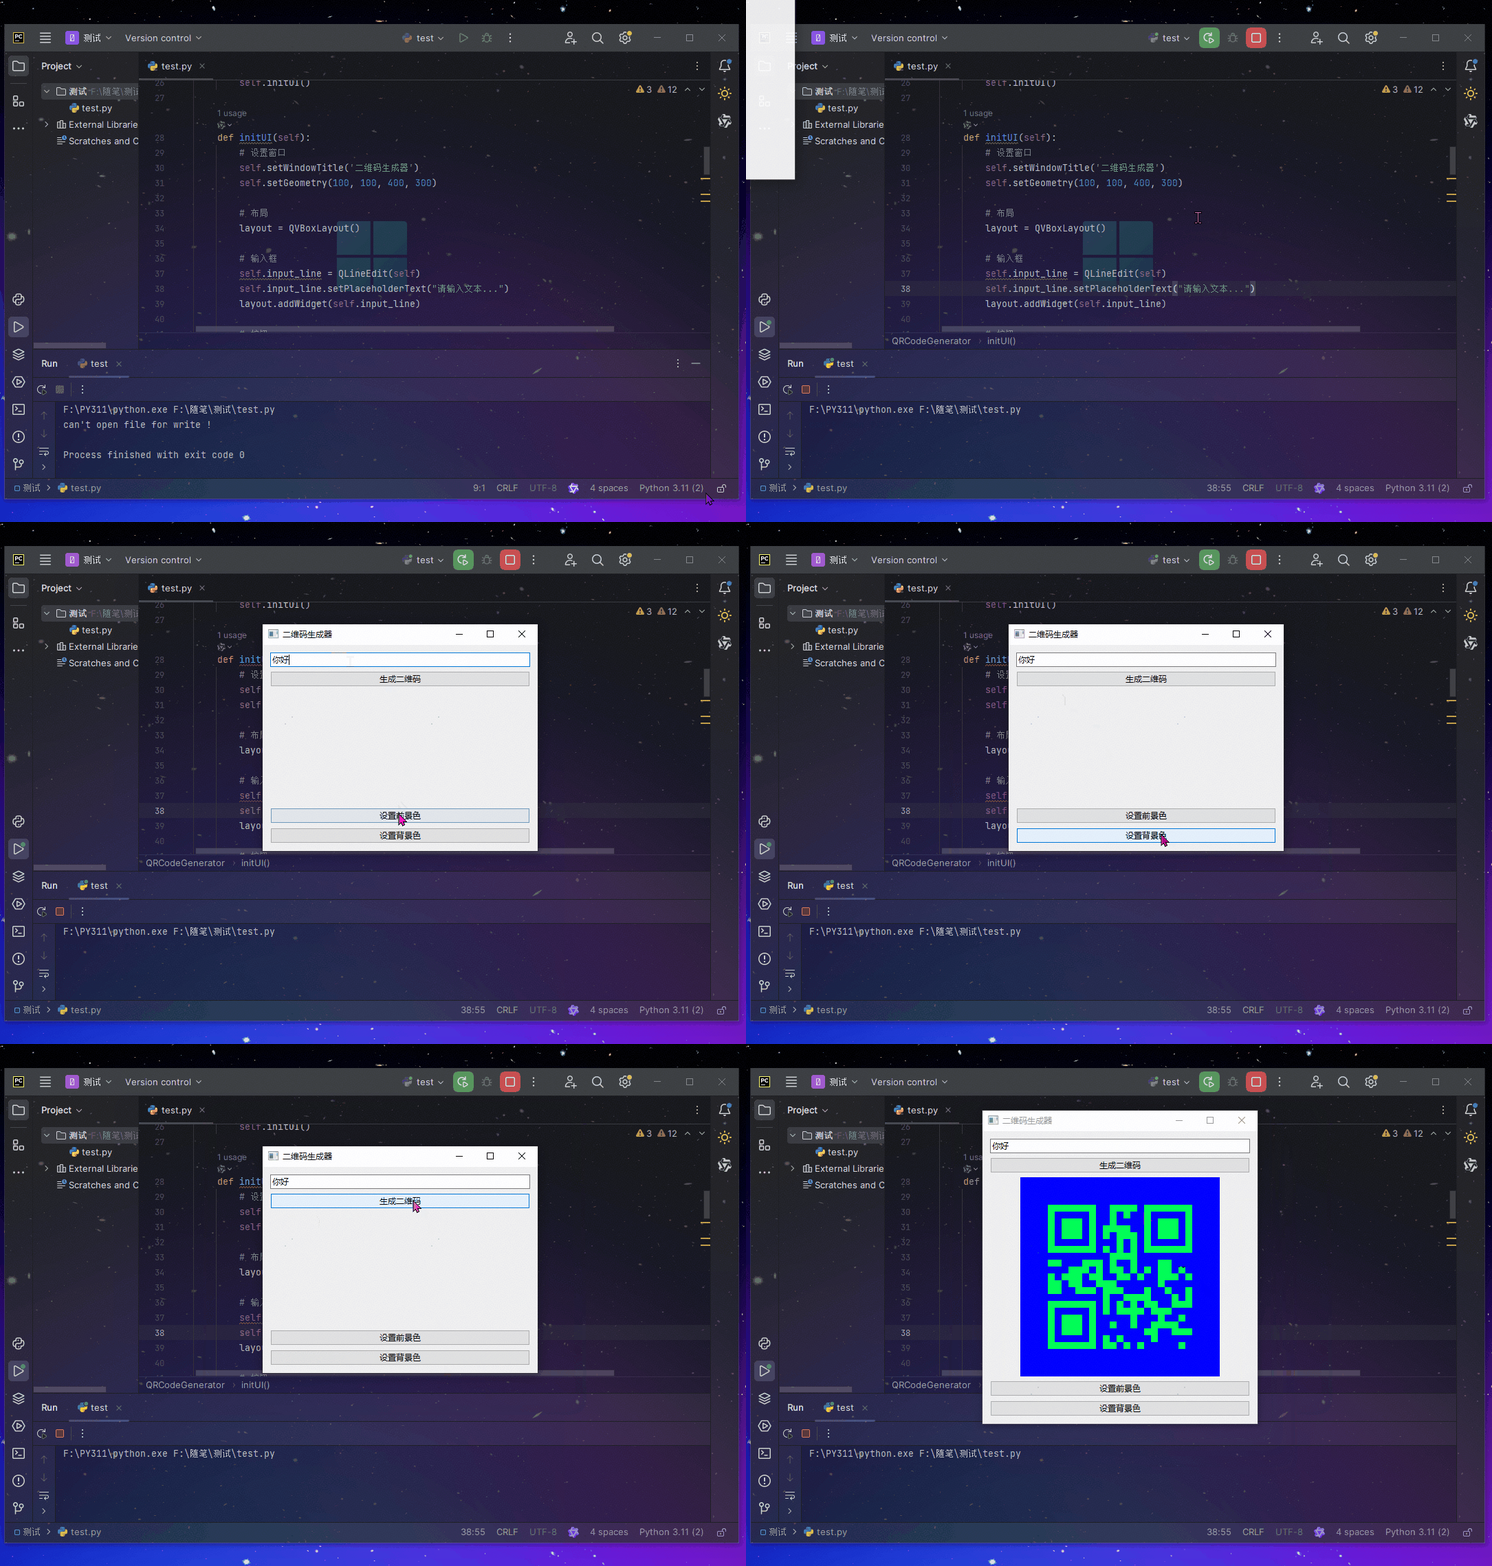
定义了一个名为QRCodeGenerator的类,它是一个用于生成二维码的GUI应用程序。以下是各个部分的简要说明: 构造函数 (__init__): 初始化窗口组件,设置默认的颜色值,并调用initUI来构建用户界面。 initUI 方法: 构建用户界面: 设置窗口标题和位置大小。 创建一个垂直布局layout。 添加一个输入框input_line让用户输入要转换成二维码的文本。 添加一个按钮generate_button,点击时触发generate_qr方法以生成二维码。 添加一个标签qr_label用来显示生成的二维码图像。 添加两个按钮分别用于设置二维码的前景色和背景色。 将所有这些控件添加到布局中,并将该布局设置为窗口的主要布局。
打开颜色选择对话框以设置前景色。 如果用户选择了有效颜色,则更新 `self.foreground_color`。 使用颜色对话框获取用户选择的前景色 color = QColorDialog.getColor(self.foreground_color, self, "选择前景色") 检查颜色是否有效 if color.isValid(): 更新前景色 self.foreground_color = color
'''
@Project :测试
@File :test.py
@IDE :PyCharm
@Author :一晌小贪欢
@Date :2024/8/7 14:06
'''
import sys
import qrcode
from PyQt6. QtWidgets import QApplication, QWidget, QVBoxLayout, QLineEdit, QPushButton, QLabel, QColorDialog
from PyQt6. QtGui import QPixmap, QColor
from PyQt6. QtCore import Qt
from PIL import Image, ImageDraw
import io
class QRCodeGenerator ( QWidget) :
def __init__ ( self) :
super ( ) . __init__( )
self. foreground_color = QColor( 0 , 0 , 0 )
self. background_color = QColor( 255 , 255 , 255 )
self. initUI( )
def initUI ( self) :
self. setWindowTitle( '二维码生成器' )
self. setGeometry( 100 , 100 , 400 , 300 )
layout = QVBoxLayout( )
self. input_line = QLineEdit( self)
self. input_line. setPlaceholderText( "请输入文本..." )
layout. addWidget( self. input_line)
self. generate_button = QPushButton( '生成二维码' , self)
self. generate_button. clicked. connect( self. generate_qr)
layout. addWidget( self. generate_button)
self. qr_label = QLabel( self)
self. qr_label. setAlignment( Qt. AlignmentFlag. AlignCenter)
layout. addWidget( self. qr_label)
self. set_foreground_button = QPushButton( '设置前景色' , self)
self. set_foreground_button. clicked. connect( self. set_foreground_color)
layout. addWidget( self. set_foreground_button)
self. set_background_button = QPushButton( '设置背景色' , self)
self. set_background_button. clicked. connect( self. set_background_color)
layout. addWidget( self. set_background_button)
self. setLayout( layout)
def set_foreground_color ( self) :
color = QColorDialog. getColor( self. foreground_color, self, "选择前景色" )
if color. isValid( ) :
self. foreground_color = color
def set_background_color ( self) :
color = QColorDialog. getColor( self. background_color, self, "选择背景色" )
if color. isValid( ) :
self. background_color = color
def generate_qr ( self) :
text = self. input_line. text( )
qr = qrcode. QRCode(
version= 1 ,
error_correction= qrcode. constants. ERROR_CORRECT_L,
box_size= 10 ,
border= 4 ,
)
qr. add_data( text)
qr. make( fit= True )
img = qr. make_image( fill_color= "black" , back_color= "white" )
byte_array = io. BytesIO( )
img. save( byte_array, 'PNG' )
byte_array. seek( 0 )
img_pil = Image. open ( io. BytesIO( byte_array. getvalue( ) ) )
new_img = Image. new( 'RGB' , img_pil. size, color= self. background_color. rgb( ) )
draw = ImageDraw. Draw( new_img)
for row in range ( img_pil. size[ 1 ] ) :
for col in range ( img_pil. size[ 0 ] ) :
if img_pil. getpixel( ( col, row) ) != 0 :
draw. point( ( col, row) , fill= self. foreground_color. rgb( ) )
byte_arr = io. BytesIO( )
new_img. save( byte_arr, format = 'PNG' )
byte_arr. seek( 0 )
pixmap = QPixmap( )
pixmap. loadFromData( byte_arr. read( ) )
self. qr_label. setPixmap( pixmap)
if __name__ == '__main__' :
app = QApplication( sys. argv)
ex = QRCodeGenerator( )
ex. show( )
sys. exit( app. exec ( ) )
希望对初学者有帮助 致力于办公自动化的小小程序员一枚 希望能得到大家的【一个免费关注】!感谢 求个 🤞 关注 🤞 此外还有办公自动化专栏,欢迎大家订阅:Python办公自动化专栏 求个 ❤️ 喜欢 ❤️ 此外还有爬虫专栏,欢迎大家订阅:Python爬虫基础专栏 求个 👍 收藏 👍 此外还有Python基础专栏,欢迎大家订阅:Python基础学习专栏


