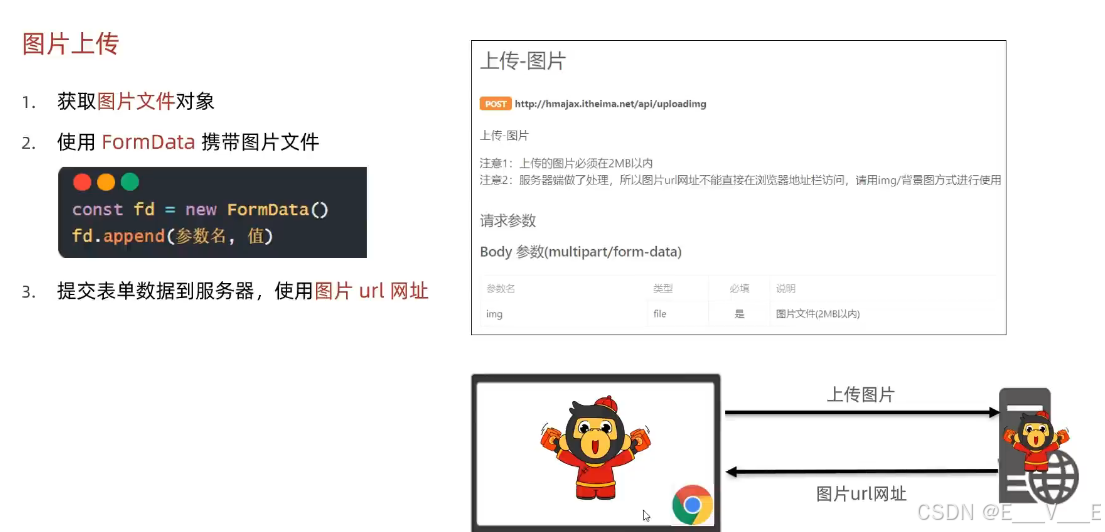
图片上传
<!DOCTYPE html>
<lang="en">

    <head>
        cmeta charset="UTF-8''>
        <meta http-equiv="X-UA-Compatible'b content=" IE=edge">
        <meta name="viewportR content=" wiclth=devic6-widths initial-scale=l. 0">
        图片上传
    </head>

    <body>
        <!--文件选择元素 -->
        <input type="file" class="upload">
        <script src="https://cdn・jsdelivr.A@t/npm/axios/dist/axios・Min.js"></script>
        <script>
            /* 目标:图片上传,显东到网页上
            ■ 1.获前图片文件
            ♦ 2.使用FormData携带图片文件
            ■ 3.提交到股务器,获取图片url网址使用*/
            //文件选择元素->change改变事件
            document.querySelector('.upload').addEventListener('change', e => {
                //1.获取图片文件
                console.log(e.target.files[0])
                // 2.使用 FormData 携带图片文件
                const fd = new FormData()
                fd.append('img', e.target.files[0])
                // 3.提交到服务器,获取图片url网址使用
                axios({
                    url: 'http:/hmajax.itheima.net/api/uploadimg',
                    method: 'POST',
                    data: fd
                }).then(result => {
                    console.log(result)
                    // 取出图片url网址,用img标签加载显示
                    const imgUrl = result.data.data.url
                    document.querySelector('.my-img').src = imgUrl
                })
            })
        </script>
    </body>
一个新用法,如何更换背景
for:关联对象的ID
document.querySelector('.bg-ipt').addEventListener('change', e => {
    //1.选择图片上传,设置body背景
    console.log(e.target.files[0])
    const fd = new FormData()
    fd.append('img', e.target.files[0])
    axios({
        url: 'http://hmajax.itheima.net/api/uploadimg',
        method: 'POST',
        data: fd

    }).then(result => {
        const imgUrl = result.data.data.url
        document.body.style.backgroundImage = `url(${imgUrl})`
        //2,上传成功时,"保存"图片url网址
        localStorage.setItem('bgImg', imgUrl)
    })
})
// 3.网页运行后,"获取"url网址使用
const bgUrl = localStorage.getItem('bgImg')
console.log(bgUrl)
//本地有背景图地址才设置
bgUrl && (document.body.style.backgroundImage = `url(${bgUrl})`)
个人信息设置信息渲染
data的data有用户数据
//1.1获取用户的数据
axios({
    url: 'http:/hmajax.itheima.net/api/settings',
    params: {
        creator: '播仔'
    }
}).then(result => {
    const userObj = result.data.data
    //1.2回显数据到标签上
    Object.keys(userObj).forEach(key => {
        if (key == 'avatar') {
            //赋予默认头像
            document.querySelector('.prew').src = userObj[key]
        } else if (key == 'gender') {
            //赋予默认性别
            //获取性别单选框:[男radio元素,女radio元素]
            const gRadioList = document.querySelectorAll('.gender')
            //获取性别数字:0男,1女
            const gNum = userObj[key]
            //通过性别数字,作为下标,找到对应性别单选框,设置选中状态
            gRadioList[gNum].checked = true
        } else {
            //赋予默认内容
            document.querySelector(`.${key}`).value = userObj[key]
        }
    })
})
头像修改
获取图像对象,准备数据,上传到服务器,将返回的URL网址渲染到页面上
form-data表单数据
服务器报错,可以检查一下fd的属性名是不是和要求的data属性名相同
/**
* 目标2:修改头像
    * 2.1获取头像文件
        * 2.2提交服务器并更新头像
            ** */
// 文件选择元素 -> change事件
document.querySelector('.upload').addEventListener('change', e => {
    //2.1获取头像文件
    console.log(e.target.files[0])
    const fd = new FormData()
    fd.append('avatar', e.target.files[0])
    fd.append('creator', creator)
    // 2.2提交服务器并更新头像
    axios({
        url: 'http: //hmajax.itheima.net/api/avatar',
        method: 'PUT',
        data: fd
    }).then(result => {
        const imgUrl = result.data.data.avatar
        //把新的头像回显到页面上
        document.querySelector('.prew').src = imgUrl

    })
})
信息修改
这段思路很好,axios自带生成json文件和解析JSON文件,请求的时候参数是对象类型,但是提交给服务器axios会自动转换为JSON类型,响应返回的时候相反,自动解析JSON类型

其实都是按照后端提供的接口要求编写,因为userobj不是数组而是对象
关于那个展开的,我的理解是当时那个展开没有将对象一次给完,这里能一次给完所有的值
展开或对象 都行 演示给你看 怕到公司看不懂别人写的
上次展开运算符是还有一个数据单独写了  这次数据都完全在userObj里直接给data就行了
/**
    * 目标3:提交表单
        * 3.1收集表单信息
            * 3.2提交到服务器保存
                **/
//保存修改 -> 点击
document.querySelector('.submit').addEventListener('click', () => {
    // 3.1收集表单信息
    const userForm = document.queryselector('.user-form')
    const userObj = serialize(userForm, { hash: true, empty: true })
    userObj.creator = creator
    //性别数字字符串,转成数字类型
    userObj.gender = +userObj.gender
    console.log(userObj)
    // 3.2提交到服务器保存
    axios({
        url: 'http:〃hmajax.itheima.net/api/setti/gs',
        method: 'PUT',
        data: userObj
    })
})
提示框
<div class="toast" data-bs-delay ="1500">
    提示框内容
</div>
const toastDom = document, queryselector ('css 选择器')
const toast = new bootstrap.Toast(toastDom)
//
toast.show()使用modal其实就是一个大一点的提示框,但是对于提示信息不需要这么大
<script>
    /*4.2调用show方法->显示提示框
    */
    //保存修改->点击
    document.querySelector('.submit').addEventListener('click', () => {
        //3.1收集表单信息
        const userForm = document.querySelector('.user-form')
        const userObj = serialize(userForm, { hash: true, empty: true })
        userObj.creator = creator
        //性别数字字符串,转成数字类型
        userObj.gender = +userObj.gender
        console.log(userObj)
        //3.2提交到服务器保存
        axios({
            url: 'http://hmajax.itheima.net/api/settings',
            method: 'PUT',
            data: userObj
        }).then(result => {
            //4.1 创建toast对象
            const toastDom = document.querySelector('.my-toast')
            const toast = new bootstrap.Toast(toastDom)
            //4.2调用show方法->显示提示框
            toast.show()
        })
    })
</script>


