文章目录
- redis实现分布式锁
- 环境搭建
- redis手写分布式锁
- redisson 分布式锁分析
- springboot 整合 redisson
- redisson原理分析
- redisson源码分析
- 加锁逻辑
- 锁续命逻辑
- redisson获取不到锁自旋逻辑
- 解锁逻辑
redis实现分布式锁
环境搭建
搭建nginx 模拟分布式情况
upstream redissonlock{
     server 192.168.101.6:8888 weight=1;
     server 192.168.101.6:8090 weight=1;
    }

    server {
        listen 8081; #监听端口
        server_name localhost;
  location / {
    proxy_pass http://redissonlock;
    proxy_redirect default;
   }
 }
项目依赖
 <dependency>
			<groupId>org.springframework.boot</groupId>
			<artifactId>spring-boot-starter-data-redis</artifactId>
		</dependency>

        <dependency>
			<groupId>org.redisson</groupId>
			<artifactId>redisson</artifactId>
			<version>3.6.5</version>
		</dependency>

		<dependency>
			<groupId>redis.clients</groupId>
			<artifactId>jedis</artifactId>
			<version>2.9.0</version>
		</dependency>
还要用到jmeter 模拟高并发场景

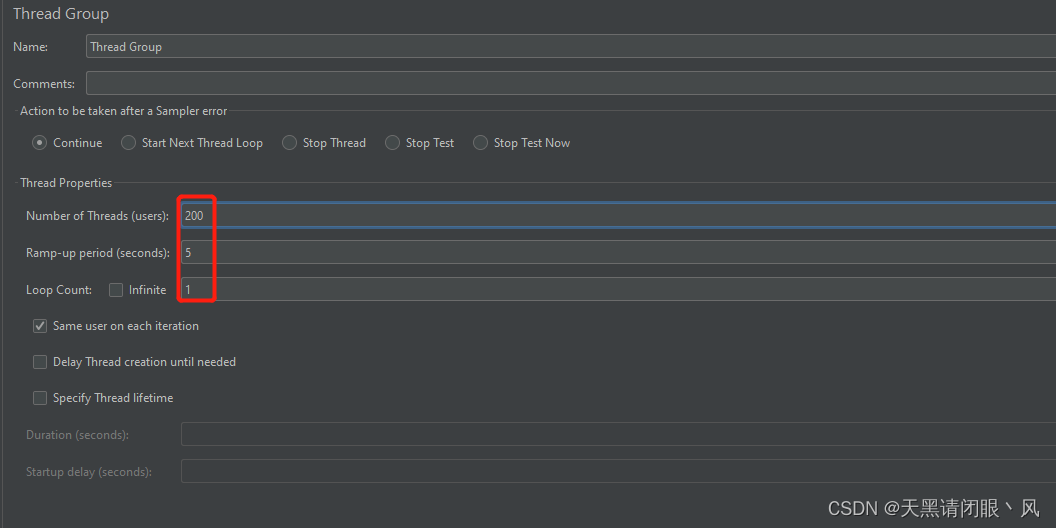
200个线程 五秒内完成请求发送
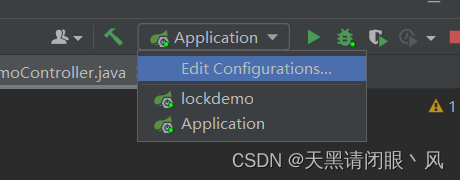
通过idea 模拟分布式情景
redis手写分布式锁
市面上有很多分布式锁的方案,但是通过手写分布式锁,可以更好了解分布式锁的原理,以及分布式锁逻辑流程
案例代码:
@RestController
@RequestMapping(value = "/redis/demo/",method = RequestMethod.GET)
public class DemoController {
	@Autowired
	private StringRedisTemplate redisTemplate;

	@RequestMapping("/demoLock1")
	public String demoLock1(){
		synchronized (this) {
			int stock = Integer.parseInt(redisTemplate.opsForValue().get("stock"));
			if (stock > 0) {
				int realStock = stock - 1;
				redisTemplate.opsForValue().set("stock", realStock + ""); // jedis.set(key,value)
				System.out.println("扣减成功,剩余库存:" + realStock);
			} else {
				System.out.println("扣减失败,库存不足");
			}
		}
		return "end";
	}
}
上述代码在单机情况下通过synchronized能保证并发安全性,但是在分布式场景 无法保证并发安全性。那么接下来就是对上述代码加上分布式锁
实现最简单的分布式锁

redis中设置商品数量为300
上述代码修改为最简单的分布式锁
public String demoLock1() {
		String lockkey = "lock:key_1001";
		//加锁
		final Boolean result = redisTemplate.opsForValue().setIfAbsent(lockkey, "test");
		if (!result) {
			return "未获取锁,不能扣减库存";
		}
		int stock = Integer.parseInt(redisTemplate.opsForValue().get("stock"));
		if (stock > 0) {
			int realStock = stock - 1;
			redisTemplate.opsForValue().set("stock", realStock + ""); // jedis.set(key,value)
			System.out.println("扣减成功,剩余库存:" + realStock);
		} else {
			System.out.println("扣减失败,库存不足");
		}
		//删除锁
		redisTemplate.delete(lockkey);
		return "end";
	}
上诉分布式锁能够解决分布式并发的问题,但是也存在其他的问题。下面来一一解决可能出现的问题
问题一:抛异常或者宕机导致无法删除锁,导致死锁
增加过期时间,并且在final 中删除锁
public String demoLock1() {
		String lockkey = "lock:key_1001";
		//加锁
		final Boolean result = redisTemplate.opsForValue().setIfAbsent(lockkey, "test", Duration.ofSeconds(10));
		if (!result) {
			System.out.println("未获取锁,不能扣减库存");
			return "未获取锁,不能扣减库存";
		}
		try {
			int stock = Integer.parseInt(redisTemplate.opsForValue().get("stock"));
			if (stock > 0) {
				int realStock = stock - 1;
				redisTemplate.opsForValue().set("stock", realStock + ""); // jedis.set(key,value)
				System.out.println("扣减成功,剩余库存:" + realStock);
			} else {
				System.out.println("扣减失败,库存不足");
			}
		} catch (NumberFormatException e) {
			e.printStackTrace();
		} finally {
			//删除锁
			redisTemplate.delete(lockkey);
		}
		return "end";
	}
上述代码在并发不过情况下获取可以,但是在高并发下就有严重bug。比如说线程1业务流程执行时间超过了锁的过期时间,导致锁失效,此时其他线程继续设置锁,然后线程1执行删除锁操作的时候,把其他线程的锁给删除了,那么就会导致一些列的锁失效的问题
问题二:业务执行时间超过锁过期时间,以及删除锁时删除不是自己设置的锁,导致锁失效
核心问题就是删除不是自己设置的锁,主要就是来解决这个问题。至于业务时间过长导致锁过期,可以增加过期时间,但是这样治标不治本,有一种方式叫做锁续命,就是说业务未执行完时,不断的给锁增加过期时间。这种方案要实现并不容易,也没有必要重复造轮子
public String demoLock1() {
		String lockkey = "lock:key_1001";
		String uuid = UUID.randomUUID().toString();
		//加锁
		final Boolean result = redisTemplate.opsForValue().setIfAbsent(lockkey, uuid, Duration.ofSeconds(10));
		if (!result) {
			System.out.println("未获取锁,不能扣减库存");
			return "未获取锁,不能扣减库存";
		}
		try {
			int stock = Integer.parseInt(redisTemplate.opsForValue().get("stock"));
			if (stock > 0) {
				int realStock = stock - 1;
				redisTemplate.opsForValue().set("stock", realStock + ""); // jedis.set(key,value)
				System.out.println("扣减成功,剩余库存:" + realStock);
			} else {
				System.out.println("扣减失败,库存不足");
			}
		} catch (NumberFormatException e) {
			e.printStackTrace();
		} finally {
			//是自己设置的锁才删除
			if (uuid.equals(redisTemplate.opsForValue().get(lockkey))){
				redisTemplate.delete(lockkey);
			}
		}
		return "end";
	}
这里增加了一个uuid用来判断是否是当前线程设置的锁,如果是才能删除。当时上述代码任然有问题
if (uuid.equals(redisTemplate.opsForValue().get(lockkey))){
				redisTemplate.delete(lockkey);
			}
这部分代码不是原子性,如果判断成功后,系统卡顿,正好此时锁过期了,其他线程设置了锁,然后卡顿恢复在执行删除代码,任然会删除其他线程设置的锁
问题三:判断锁的逻辑和删除锁不是原子性,任然有可能删除其他线程的锁
采用lua脚本实现原子性,关于lua脚本后面的redisson 源码分析的过程中会分析
redisson 分布式锁分析
springboot 整合 redisson
增加一个bean
@Bean
    public Redisson redisson() {
        // 此为单机模式
        Config config = new Config();
        config.useSingleServer().setAddress("redis://192.168.101.106:6379").setDatabase(0);
        //集群模式
//        final ClusterServersConfig clusterServersConfig = config.useClusterServers();
//        clusterServersConfig.addNodeAddress("redis://192.168.101.106:6379","redis://192.168.101.107:6379");
//        clusterServersConfig.setPassword("aaaa");
        return (Redisson) Redisson.create(config);
    }
获取redisson
@Autowired
private Redisson redisson;
实例代码
public String demoRedisson() {
		String lockkey = "lock:key_1001";
		//获取分布式锁
		final RLock lock = redisson.getLock(lockkey);
		//加锁
		lock.lock();
		try {
			int stock = Integer.parseInt(redisTemplate.opsForValue().get("stock"));
			if (stock > 0) {
				int realStock = stock - 1;
				redisTemplate.opsForValue().set("stock", realStock + ""); // jedis.set(key,value)
				System.out.println("扣减成功,剩余库存:" + realStock);
			} else {
				System.out.println("扣减失败,库存不足");
			}
		} catch (NumberFormatException e) {
			e.printStackTrace();
		} finally {
			lock.unlock();
		}
		return "end";
	}
redisson原理分析
redisson流程图
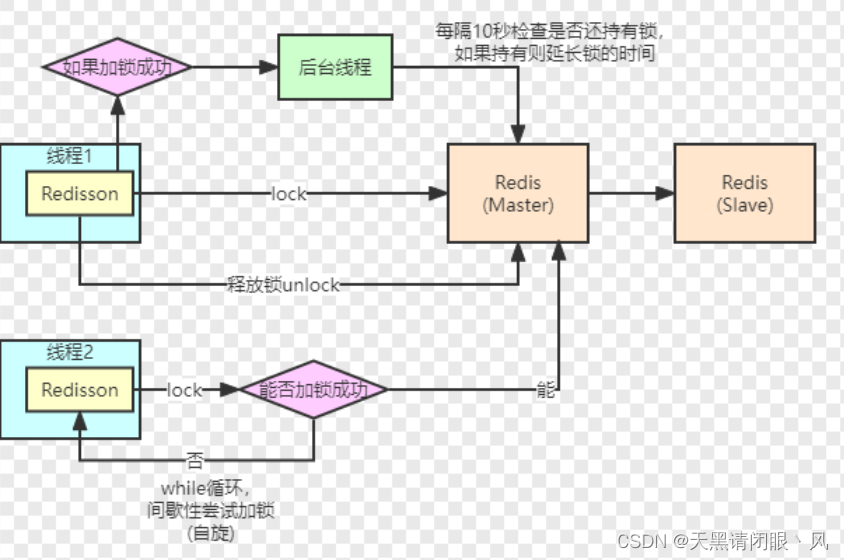
首先线程1向redis获取锁 类似执行 SETNX 命令,获取锁
线层2向redis获取锁,获取失败 进行间歇性while自选
线程1获取锁成功,后台线程每隔10秒检查是否还持有锁,如果持有延长锁的过期时间
直到线程1释放锁,线程2开始获取锁
redisson源码分析
加锁逻辑
		//获取分布式锁
		final RLock lock = redisson.getLock(lockkey);
		//加锁
		lock.lock();
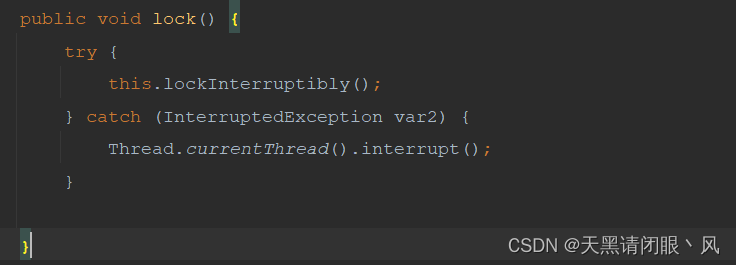

注意这两个参数 一个是-1 一个是null
public void lockInterruptibly(long leaseTime, TimeUnit unit) throws InterruptedException {
        //获取当前线程
        long threadId = Thread.currentThread().getId();
        //核心加锁逻辑
        Long ttl = this.tryAcquire(leaseTime, unit, threadId);
        if (ttl != null) {
            RFuture<RedissonLockEntry> future = this.subscribe(threadId);
            this.commandExecutor.syncSubscription(future);
            try {
                while(true) {
                    ttl = this.tryAcquire(leaseTime, unit, threadId);
                    if (ttl == null) {
                        return;
                    }

                    if (ttl >= 0L) {
                        this.getEntry(threadId).getLatch().tryAcquire(ttl, TimeUnit.MILLISECONDS);
                    } else {
                        this.getEntry(threadId).getLatch().acquire();
                    }
                }
            } finally {
                this.unsubscribe(future, threadId);
            }
        }
    }
Long ttl = this.tryAcquire(leaseTime, unit, threadId);

 private <T> RFuture<Long> tryAcquireAsync(long leaseTime, TimeUnit unit, final long threadId) {
        if (leaseTime != -1L) {
            return this.tryLockInnerAsync(leaseTime, unit, threadId, RedisCommands.EVAL_LONG);
        } else {
        	//具体加锁逻辑
            RFuture<Long> ttlRemainingFuture = this.tryLockInnerAsync(this.commandExecutor.getConnectionManager().getCfg().getLockWatchdogTimeout(), TimeUnit.MILLISECONDS, threadId, RedisCommands.EVAL_LONG);
            //加锁成功调用这个方法
            ttlRemainingFuture.addListener(new FutureListener<Long>() {
                public void operationComplete(Future<Long> future) throws Exception {
                    if (future.isSuccess()) {
                    	//拿到RFuture的返回值
                        Long ttlRemaining = (Long)future.getNow();
                       //等于null表示加锁成功
                        if (ttlRemaining == null) {
                        	//锁续命逻辑
                            RedissonLock.this.scheduleExpirationRenewal(threadId);
                        }

                    }
                }
            });
            return ttlRemainingFuture;
        }
    }
先来看具体的加锁逻辑
<T> RFuture<T> tryLockInnerAsync(long leaseTime, TimeUnit unit, long threadId, RedisStrictCommand<T> command) {
        this.internalLockLeaseTime = unit.toMillis(leaseTime);
        return this.commandExecutor.evalWriteAsync(this.getName(), LongCodec.INSTANCE, command, "if (redis.call('exists', KEYS[1]) == 0) then redis.call('hset', KEYS[1], ARGV[2], 1); redis.call('pexpire', KEYS[1], ARGV[1]); return nil; end; "
        +"if (redis.call('hexists', KEYS[1], ARGV[2]) == 1) then redis.call('hincrby', KEYS[1], ARGV[2], 1); redis.call('pexpire', KEYS[1], ARGV[1]); return nil; end; "
        +"return redis.call('pttl', KEYS[1]);", Collections.singletonList(this.getName()), new Object[]{this.internalLockLeaseTime, this.getLockName(threadId)});
    }
主要就是执行lua脚本,这里解释一下,其中KEYS[1] 相当于一个占位符 表示Collections.singletonList(this.getName())的第一个值,如果是KEYS[2] 那么就是Collections.singletonList(this.getName())的第二个值,以此类推。
ARGV[1] 也是占位符 表示 new Object[]{this.internalLockLeaseTime, this.getLockName(threadId)} 的第一个值
ARGV[2] 同理
KEYS[1] 具体是什么呢,看看this.getName()代码
//这个name是什么时候赋值的呢
  private final String name;
 public String getName() {
        return this.name;
    }
// 在final RLock lock = redisson.getLock(lockkey); 获取锁的时候  通过构造方法 把参数穿到name里面
因此KEYS[1] 就是 锁的key 在上述案例中就是lock:key_1001
同理再看ARGV的值 internalLockLeaseTime 和 getLockName(threadId)
protected long internalLockLeaseTime;
final UUID id;
public RedissonLock(CommandAsyncExecutor commandExecutor, String name) {
        super(commandExecutor, name);
        this.commandExecutor = commandExecutor;
        this.id = commandExecutor.getConnectionManager().getId();
       	//默认30秒
        this.internalLockLeaseTime = commandExecutor.getConnectionManager().getCfg().getLockWatchdogTimeout();
    }
String getLockName(long threadId) {
        return this.id + ":" + threadId;
    }
ARGV[1] 就是默认的过期时间30秒 ARGV[2] 是当前uuid + 当前线程id。
那么上述lua脚本 的一个if 的意思是执行了hset KEYS[1] ARGV[2] 1 然后设置过期时间。成功以后返回nil 等价于 null
到此加锁逻辑结束了
锁续命逻辑
锁续命逻辑在这个方法里面 RedissonLock.this.scheduleExpirationRenewal(threadId); 里面
private void scheduleExpirationRenewal(final long threadId) {
        if (!expirationRenewalMap.containsKey(this.getEntryName())) {
        	//定时调度器类似于定时线程池
            Timeout task = this.commandExecutor.getConnectionManager().newTimeout(new TimerTask() {
                public void run(Timeout timeout) throws Exception {
                   //锁时长的修改的逻辑 就是执行了对应的lua脚本
                    RFuture<Boolean> future = RedissonLock.this.commandExecutor.evalWriteAsync(RedissonLock.this.getName(), LongCodec.INSTANCE, RedisCommands.EVAL_BOOLEAN, "if (redis.call('hexists', KEYS[1], ARGV[2]) == 1) then redis.call('pexpire', KEYS[1], ARGV[1]); return 1; end; return 0;", Collections.singletonList(RedissonLock.this.getName()), new Object[]{RedissonLock.this.internalLockLeaseTime, RedissonLock.this.getLockName(threadId)});
                    //锁时长修改成功后调用
                    future.addListener(new FutureListener<Boolean>() {
                        public void operationComplete(Future<Boolean> future) throws Exception {
                            RedissonLock.expirationRenewalMap.remove(RedissonLock.this.getEntryName());
                            if (!future.isSuccess()) {
                                RedissonLock.log.error("Can't update lock " + RedissonLock.this.getName() + " expiration", future.cause());
                            } else {
                            	//上面lua脚本成功后返回1 对应java就是true
                                if ((Boolean)future.getNow()) {
                                   	//递归调用
                                    RedissonLock.this.scheduleExpirationRenewal(threadId);
                                }

                            }
                        }
                    });
                }
                //this.internalLockLeaseTime / 3L 上面方法的时间间隔
                //默认internalLockLeaseTime = 30 秒 那么就是 10 秒执行一次
            }, this.internalLockLeaseTime / 3L, TimeUnit.MILLISECONDS);

            if (expirationRenewalMap.putIfAbsent(this.getEntryName(), task) != null) {
                task.cancel();
            }

        }
    }
上述源码流程就是 10 秒后执行一次 task 任务,这个任务执行了lua脚本
"if (redis.call('hexists', KEYS[1], ARGV[2]) == 1) then redis.call('pexpire', KEYS[1], ARGV[1]); return 1; end; return 0;"
先判断锁存不存在,然后重新设置过期时间
最后递归调用 相当于循环 达到每10秒 续命一次的过程
redisson获取不到锁自旋逻辑
回顾之前的加锁lua脚本
"if (redis.call('exists', KEYS[1]) == 0) then redis.call('hset', KEYS[1], ARGV[2], 1); redis.call('pexpire', KEYS[1], ARGV[1]); return nil; end; "
        +"if (redis.call('hexists', KEYS[1], ARGV[2]) == 1) then redis.call('hincrby', KEYS[1], ARGV[2], 1); redis.call('pexpire', KEYS[1], ARGV[1]); return nil; end; "
        +"return redis.call('pttl', KEYS[1]);",
第一个if就是设置锁 如果成功 返回nil 就是java的null
第二个if 是锁重入的逻辑 如果成功 返回nil
如果上面两个if都没有成功,就是获取锁失败了 那么返回 锁的剩余过期时间
```java
public void lockInterruptibly(long leaseTime, TimeUnit unit) throws InterruptedException {
        //获取当前线程
        long threadId = Thread.currentThread().getId();
        //核心加锁逻辑 加锁成功后返回null  失败返回剩余锁的过期时间
        Long ttl = this.tryAcquire(leaseTime, unit, threadId);
        if (ttl != null) {
        	//获取锁失败的线程  订阅加锁成功的线程
            RFuture<RedissonLockEntry> future = this.subscribe(threadId);
            this.commandExecutor.syncSubscription(future);
            try {
            	//获取锁失败的自旋逻辑
                while(true) {
                	//再一次获取锁 得到锁的过期时间
                    ttl = this.tryAcquire(leaseTime, unit, threadId);
                    if (ttl == null) {
                        //返回null 说明获取锁成功 退出自旋
                        return;
                    }
                    //如果过期时间 >= 0 就是阻塞 ttl的时间
                    if (ttl >= 0L) {
                    	//getLatch() 得到的其实是 java的 信号量
                        this.getEntry(threadId).getLatch().tryAcquire(ttl, TimeUnit.MILLISECONDS);
                    } else {
                    	//如果过期时间-1 表示永不过期 只能等待锁删除后 唤醒
                        this.getEntry(threadId).getLatch().acquire();
                    }
                }
            } finally {
                this.unsubscribe(future, threadId);
            }
        }
    }
private final Semaphore latch = new Semaphore(0);
public Semaphore getLatch() {
        return this.latch;
    }
解锁逻辑
 protected RFuture<Boolean> unlockInnerAsync(long threadId) {
        return this.commandExecutor.evalWriteAsync(this.getName(), LongCodec.INSTANCE, RedisCommands.EVAL_BOOLEAN,
        "if (redis.call('exists', KEYS[1]) == 0) then redis.call('publish', KEYS[2], ARGV[1]); return 1; end;"
        +"if (redis.call('hexists', KEYS[1], ARGV[3]) == 0) then return nil;end; local counter = redis.call('hincrby', KEYS[1], ARGV[3], -1); "
        +"if (counter > 0) then redis.call('pexpire', KEYS[1], ARGV[2]); return 0; else redis.call('del', KEYS[1]); redis.call('publish', KEYS[2], ARGV[1]); return 1; end; return nil;",
        Arrays.asList(this.getName(), this.getChannelName()), new Object[]{LockPubSub.unlockMessage, this.internalLockLeaseTime, this.getLockName(threadId)});
    }
还是执行lua脚本
第一个if 判断 是否存在锁 == 0 就是不存在 不存在的话 调用publish 发布一个解锁消息
第二个if 判断 锁存在的清苦下 这个锁是不是自己的 如果不是自己的就返回nil 如果是的话 调用hincrby 减一
第三个if 判断 减一以后这个锁的value 是不是等于0 因为锁重入的情况下 锁的value会累加
如果等于0 就删除这个锁 然后发布 解锁的消息
当其他线程通过订阅发布功能 接收到解锁的消息后会执行一个onMessage
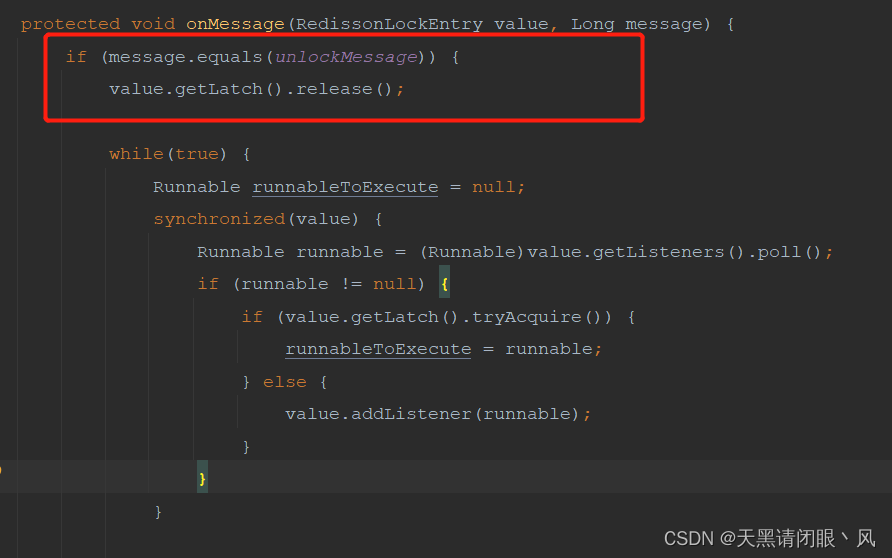
就会唤醒 阻塞的线程。到此获取锁失败 阻塞 等待唤醒 就形成了一个闭环
那么到此redisson核心逻辑就结束了


](https://img-blog.csdnimg.cn/9712415c3add452f943c523eadc6605a.png)


