进来闲来无事,看到x6 2.x版本也更新了有几个月了,便想着熟悉下2.x版本
一、首先搭建项目基础框架。
// yarn 方式
yarn create @vitejs/app v3-ts --template vue-ts
cd v3-ts
yarn
yarn dev

// npm
npm init @vitejs/app v3-ts --template vue-ts
cd v3-ts
npm install
npm run dev
二、下载antv/x6以及对应所需要的插件包
package.json
{
  "@antv/x6": "^2.0.0",
  "@antv/x6-plugin-clipboard": "^2.0.0", // 如果使用剪切板功能,需要安装此包
  "@antv/x6-plugin-history": "^2.0.0", // 如果使用撤销重做功能,需要安装此包
  "@antv/x6-plugin-keyboard": "^2.0.0", // 如果使用快捷键功能,需要安装此包
  "@antv/x6-plugin-minimap": "^2.0.0", // 如果使用小地图功能,需要安装此包
  "@antv/x6-plugin-scroller": "^2.0.0", // 如果使用滚动画布功能,需要安装此包
  "@antv/x6-plugin-selection": "^2.0.0", // 如果使用框选功能,需要安装此包
  "@antv/x6-plugin-snapline": "^2.0.0", // 如果使用对齐线功能,需要安装此包
  "@antv/x6-plugin-dnd": "^2.0.0", // 如果使用 dnd 功能,需要安装此包
  "@antv/x6-plugin-stencil": "^2.0.0", // 如果使用 stencil 功能,需要安装此包
  "@antv/x6-plugin-transform": "^2.0.0", // 如果使用图形变换功能,需要安装此包
  "@antv/x6-plugin-export": "^2.0.0", // 如果使用图片导出功能,需要安装此包
  "@antv/x6-react-components": "^2.0.0", // 如果使用配套 UI 组件,需要安装此包
  "@antv/x6-react-shape": "^2.0.0", // 如果使用 react 渲染功能,需要安装此包
  "@antv/x6-vue-shape": "^2.0.0" // 如果使用 vue 渲染功能,需要安装此包
}
三、新建graph文件夹。并创建index.ts文件用来封装画布、侧边栏stencil组件、插件、快捷键与事件。
graph/index.ts
import { Graph, Shape} from "@antv/x6";

export default class FlowGraph {
  public static graph: Graph;

  public static init() {
    this.graph = new Graph({
      container: document.getElementById("graph-container")!,
      background: {
        color: "#fff",
      },
      grid: true,
      mousewheel: {
        enabled: true,
        zoomAtMousePosition: true,
        modifiers: "ctrl",
        minScale: 0.5,
        maxScale: 3,
      },
      connecting: {
        router: {
          name: "manhattan",
          args: {
            padding: 1,
          },
        },
        connector: {
          name: "rounded",
          args: {
            radius: 8,
          },
        },
        anchor: "center",
        connectionPoint: "anchor",
        allowBlank: false,
        snap: {
          radius: 20,
        },
        createEdge() {
          return new Shape.Edge({
            attrs: {
              line: {
                stroke: "#A2B1C3",
                strokeWidth: 2,
                targetMarker: {
                  name: "block",
                  width: 12,
                  height: 8,
                },
              },
            },
            zIndex: 0,
          });
        },
        validateConnection({ targetMagnet }) {
          return !!targetMagnet;
        },
      },
      highlighting: {
        magnetAdsorbed: {
          name: "stroke",
          args: {
            attrs: {
              fill: "#5F95FF",
              stroke: "#5F95FF",
            },
          },
        },
      },
    });
    return this.graph;
  }
}
四、页面进行基础布局,并初始化画布。
App.vue
<script setup lang="ts">
import { onMounted, reactive } from "vue";
import FlowGraph from "./graph";

interface DataType {
  isReady: boolean;
}

const data = reactive<DataType>({
  isReady: false,
});

const getContainerSize = () => {
  return {
    width: (document.body.offsetWidth / 100) * 85,
    height: document.body.offsetHeight - 38,
  };
};

onMounted(() => {
  const graph = FlowGraph.init();

  graph.addNode({
    x: 200,
    y: 40,
    width: 120,
    height: 60,
    label: "rect",
    attrs: {
      body: {
        fill: "#efdbff",
        stroke: "#9254de",
      },
    },
  });

  data.isReady = true;
  const resizeFn = () => {
    const { width, height } = getContainerSize();
    graph.resize(width, height);
  };
  resizeFn();
  window.addEventListener("resize", resizeFn);
  return () => {
    window.removeEventListener("resize", resizeFn);
  };
});
</script>

<template>
  <div class="content">
    <div class="leftBox">
      <div class="storeTitle">
        <p>节点库</p>
      </div>
      <!-- 侧边栏stencil组件 -->
      <div id="stencil" />
    </div>
    <div class="panel">
      <!-- Toolbar 工具栏 -->
      <div class="toolbar">
        <!-- <Toolbar v-if="data.isReady" /> -->
      </div>
      <!-- 画布 -->
      <div id="graph-container" />
    </div>
    <!-- 属性配置 -->
    <div class="rightBox">
      <div class="rightTop">属性</div>
      <div class="rightPanel">
        <div class="config">
          <!-- <ConfigPanel v-if="data.isReady" /> -->
        </div>
      </div>
    </div>
  </div>
</template>

<style lang="less">
* {
  margin: 0;
  padding: 0;
}

html,
body,
#app {
  width: 100vw;
  height: 100vh;
  font-size: 14px;
}
.content {
  width: 100%;
  height: 100%;
  display: flex;
  overflow: hidden;

  .leftBox {
    width: 15vw;

    .storeTitle {
      height: 38px;
      line-height: 38px;
      display: flex;
      padding: 0 0.26vw;
      justify-content: space-between;
      background-color: #ededed;
      // background-color: #304053;
      p {
        // color: #fff;
        padding-left: 6px;
      }
    }

    #stencil {
      position: relative;
      width: 100%;
      height: calc(100% - 38px);
    }
  }
  .panel {
    width: 85vw;
    height: 100%;

    .toolbar {
      display: flex;
      align-items: center;
      height: 38px;
      border-bottom: 1px solid #ededed;
      // border-bottom: 1px solid #4b4343;
      position: relative;
      background-color: #ededed;
      // background-color: #304053;
      box-sizing: border-box;
      border-left: 2px solid #ededed;
      // border-left: 2px solid #040b22;
    }
  }

  .rightBox {
    width: 0;
  }
}
</style>
- 此时画布创建成功,效果如下图:

- 接下来来完善侧边栏stencil组件
五、初始化侧边栏stencil组件
graph/index.ts
import { Graph, Shape } from "@antv/x6";
import { Stencil } from "@antv/x6-plugin-stencil";

export default class FlowGraph {
    public static graph: Graph;
    public static stencil: Stencil;

  public static init() {
    this.graph = new Graph({
      container: document.getElementById("graph-container")!,
      background: {
        color: "#fff",
      },
      grid: true,
      mousewheel: {
        enabled: true,
        zoomAtMousePosition: true,
        modifiers: "ctrl",
        minScale: 0.5,
        maxScale: 3,
      },
      connecting: {
        router: {
          name: "manhattan",
          args: {
            padding: 1,
          },
        },
        connector: {
          name: "rounded",
          args: {
            radius: 8,
          },
        },
        anchor: "center",
        connectionPoint: "anchor",
        allowBlank: false,
        snap: {
          radius: 20,
        },
        createEdge() {
          return new Shape.Edge({
            attrs: {
              line: {
                stroke: "#A2B1C3",
                strokeWidth: 2,
                targetMarker: {
                  name: "block",
                  width: 12,
                  height: 8,
                },
              },
            },
            zIndex: 0,
          });
        },
        validateConnection({ targetMagnet }) {
          return !!targetMagnet;
        },
      },
      highlighting: {
        magnetAdsorbed: {
          name: "stroke",
          args: {
            attrs: {
              fill: "#5F95FF",
              stroke: "#5F95FF",
            },
          },
        },
      },
    });
    this.initStencil();
    return this.graph;
    }

    public static initStencil() {
        this.stencil = new Stencil({
          title: "流程图",
          target: this.graph,
          search(cell, keyword) {
            return (cell as any).label.indexOf(keyword) !== -1;
          },
          placeholder: "Search by shape name",
          notFoundText: "Not Found",
          stencilGraphWidth: 280,
          stencilGraphHeight: 180,
          collapsable: true,
          groups: [
            {
              title: "基础流程图",
              name: "group1",
            },
            {
              title: "系统设计图",
              name: "group2",
              graphHeight: 250,
              layoutOptions: {
                rowHeight: 70,
              },
            },
          ],
          layoutOptions: {
            columns: 3,
            columnWidth: 80,
            rowHeight: 55,
          },
        });
        document.getElementById("stencil")!.appendChild(this.stencil.container);
    }
}
六、此时可以在graph目录下新建shape.ts来注册更多不同类型的节点
graph/shape.ts
import { Graph } from "@antv/x6";

const ports = {
  groups: {
    top: {
      position: "top",
      attrs: {
        circle: {
          r: 4,
          magnet: true,
          stroke: "#5F95FF",
          strokeWidth: 1,
          fill: "#fff",
          style: {
            visibility: "hidden",
          },
        },
      },
    },
    right: {
      position: "right",
      attrs: {
        circle: {
          r: 4,
          magnet: true,
          stroke: "#5F95FF",
          strokeWidth: 1,
          fill: "#fff",
          style: {
            visibility: "hidden",
          },
        },
      },
    },
    bottom: {
      position: "bottom",
      attrs: {
        circle: {
          r: 4,
          magnet: true,
          stroke: "#5F95FF",
          strokeWidth: 1,
          fill: "#fff",
          style: {
            visibility: "hidden",
          },
        },
      },
    },
    left: {
      position: "left",
      attrs: {
        circle: {
          r: 4,
          magnet: true,
          stroke: "#5F95FF",
          strokeWidth: 1,
          fill: "#fff",
          style: {
            visibility: "hidden",
          },
        },
      },
    },
  },
  items: [
    {
      group: "top",
    },
    {
      group: "right",
    },
    {
      group: "bottom",
    },
    {
      group: "left",
    },
  ],
};
Graph.registerNode(
  "custom-rect",
  {
    inherit: "rect",
    width: 66,
    height: 36,
    attrs: {
      body: {
        strokeWidth: 1,
        stroke: "#5F95FF",
        fill: "#EFF4FF",
      },
      text: {
        fontSize: 12,
        fill: "#262626",
      },
    },
    ports: { ...ports },
  },
  true
);

Graph.registerNode(
  "custom-polygon",
  {
    inherit: "polygon",
    width: 66,
    height: 36,
    attrs: {
      body: {
        strokeWidth: 1,
        stroke: "#5F95FF",
        fill: "#EFF4FF",
      },
      text: {
        fontSize: 12,
        fill: "#262626",
      },
    },
    ports: {
      ...ports,
      items: [
        {
          group: "top",
        },
        {
          group: "bottom",
        },
      ],
    },
  },
  true
);

Graph.registerNode(
  "custom-circle",
  {
    inherit: "circle",
    width: 45,
    height: 45,
    attrs: {
      body: {
        strokeWidth: 1,
        stroke: "#5F95FF",
        fill: "#EFF4FF",
      },
      text: {
        fontSize: 12,
        fill: "#262626",
      },
    },
    ports: { ...ports },
  },
  true
);

Graph.registerNode(
  "custom-image",
  {
    inherit: "rect",
    width: 52,
    height: 52,
    markup: [
      {
        tagName: "rect",
        selector: "body",
      },
      {
        tagName: "image",
      },
      {
        tagName: "text",
        selector: "label",
      },
    ],
    attrs: {
      body: {
        stroke: "#5F95FF",
        fill: "#5F95FF",
      },
      image: {
        width: 26,
        height: 26,
        refX: 13,
        refY: 16,
      },
      label: {
        refX: 3,
        refY: 2,
        textAnchor: "left",
        textVerticalAnchor: "top",
        fontSize: 12,
        fill: "#fff",
      },
    },
    ports: { ...ports },
  },
  true
);
七、初始化侧边栏stencil组件内的节点。
graph/index.ts
import { Graph, Shape } from "@antv/x6";
import { Stencil } from "@antv/x6-plugin-stencil";
import './shape'

export default class FlowGraph {
  public static graph: Graph;
  public static stencil: Stencil;

  // 初始化画布
  public static init() {
    this.graph = new Graph({
      container: document.getElementById("graph-container")!,
      background: {
        color: "#fff",
      },
      grid: true,
      mousewheel: {
        enabled: true,
        zoomAtMousePosition: true,
        modifiers: "ctrl",
        minScale: 0.5,
        maxScale: 3,
      },
      connecting: {
        router: {
          name: "manhattan",
          args: {
            padding: 1,
          },
        },
        connector: {
          name: "rounded",
          args: {
            radius: 8,
          },
        },
        anchor: "center",
        connectionPoint: "anchor",
        allowBlank: false,
        snap: {
          radius: 20,
        },
        createEdge() {
          return new Shape.Edge({
            attrs: {
              line: {
                stroke: "#A2B1C3",
                strokeWidth: 2,
                targetMarker: {
                  name: "block",
                  width: 12,
                  height: 8,
                },
              },
            },
            zIndex: 0,
          });
        },
        validateConnection({ targetMagnet }) {
          return !!targetMagnet;
        },
      },
      highlighting: {
        magnetAdsorbed: {
          name: "stroke",
          args: {
            attrs: {
              fill: "#5F95FF",
              stroke: "#5F95FF",
            },
          },
        },
      },
    });
      this.initStencil();
      this.initShape()
    return this.graph;
  }

  // 初始化侧边栏stencil组件
  public static initStencil() {
    this.stencil = new Stencil({
      title: "流程图",
      target: this.graph,
      search(cell, keyword) {
        return (cell as any).label.indexOf(keyword) !== -1;
      },
      placeholder: "Search by shape name",
      notFoundText: "Not Found",
      stencilGraphWidth: 280,
      stencilGraphHeight: 180,
      collapsable: true,
      groups: [
        {
          title: "基础流程图",
          name: "group1",
        },
        {
          title: "系统设计图",
          name: "group2",
          graphHeight: 250,
          layoutOptions: {
            rowHeight: 70,
          },
        },
      ],
      layoutOptions: {
        columns: 3,
        columnWidth: 80,
        rowHeight: 55,
      },
    });
    document.getElementById("stencil")!.appendChild(this.stencil.container);
  }

  // 初始化stencil组件内的节点
  public static initShape() {
    const { graph } = this;
    const r1 = graph.createNode({
      shape: "custom-rect",
      label: "开始",
      attrs: {
        body: {
          rx: 20,
          ry: 26,
        },
      },
    });
    const r2 = graph.createNode({
      shape: "custom-rect",
      label: "过程",
    });
    const r3 = graph.createNode({
      shape: "custom-rect",
      attrs: {
        body: {
          rx: 6,
          ry: 6,
        },
      },
      label: "可选过程",
    });
    const r4 = graph.createNode({
      shape: "custom-polygon",
      attrs: {
        body: {
          refPoints: "0,10 10,0 20,10 10,20",
        },
      },
      label: "决策",
    });
    const r5 = graph.createNode({
      shape: "custom-polygon",
      attrs: {
        body: {
          refPoints: "10,0 40,0 30,20 0,20",
        },
      },
      label: "数据",
    });
    const r6 = graph.createNode({
      shape: "custom-circle",
      label: "连接",
    });
    this.stencil.load([r1, r2, r3, r4, r5, r6], "group1");

    const imageShapes = [
      {
        label: "Client",
        image:
          "https://gw.alipayobjects.com/zos/bmw-prod/687b6cb9-4b97-42a6-96d0-34b3099133ac.svg",
      },
      {
        label: "Http",
        image:
          "https://gw.alipayobjects.com/zos/bmw-prod/dc1ced06-417d-466f-927b-b4a4d3265791.svg",
      },
      {
        label: "Api",
        image:
          "https://gw.alipayobjects.com/zos/bmw-prod/c55d7ae1-8d20-4585-bd8f-ca23653a4489.svg",
      },
      {
        label: "Sql",
        image:
          "https://gw.alipayobjects.com/zos/bmw-prod/6eb71764-18ed-4149-b868-53ad1542c405.svg",
      },
      {
        label: "Clound",
        image:
          "https://gw.alipayobjects.com/zos/bmw-prod/c36fe7cb-dc24-4854-aeb5-88d8dc36d52e.svg",
      },
      {
        label: "Mq",
        image:
          "https://gw.alipayobjects.com/zos/bmw-prod/2010ac9f-40e7-49d4-8c4a-4fcf2f83033b.svg",
      },
    ];
    const imageNodes = imageShapes.map((item) =>
      graph.createNode({
        shape: "custom-image",
        label: item.label,
        attrs: {
          image: {
            "xlink:href": item.image,
          },
        },
      })
    );
    this.stencil.load(imageNodes, "group2");
  }
}
- 此时页面效果如下:
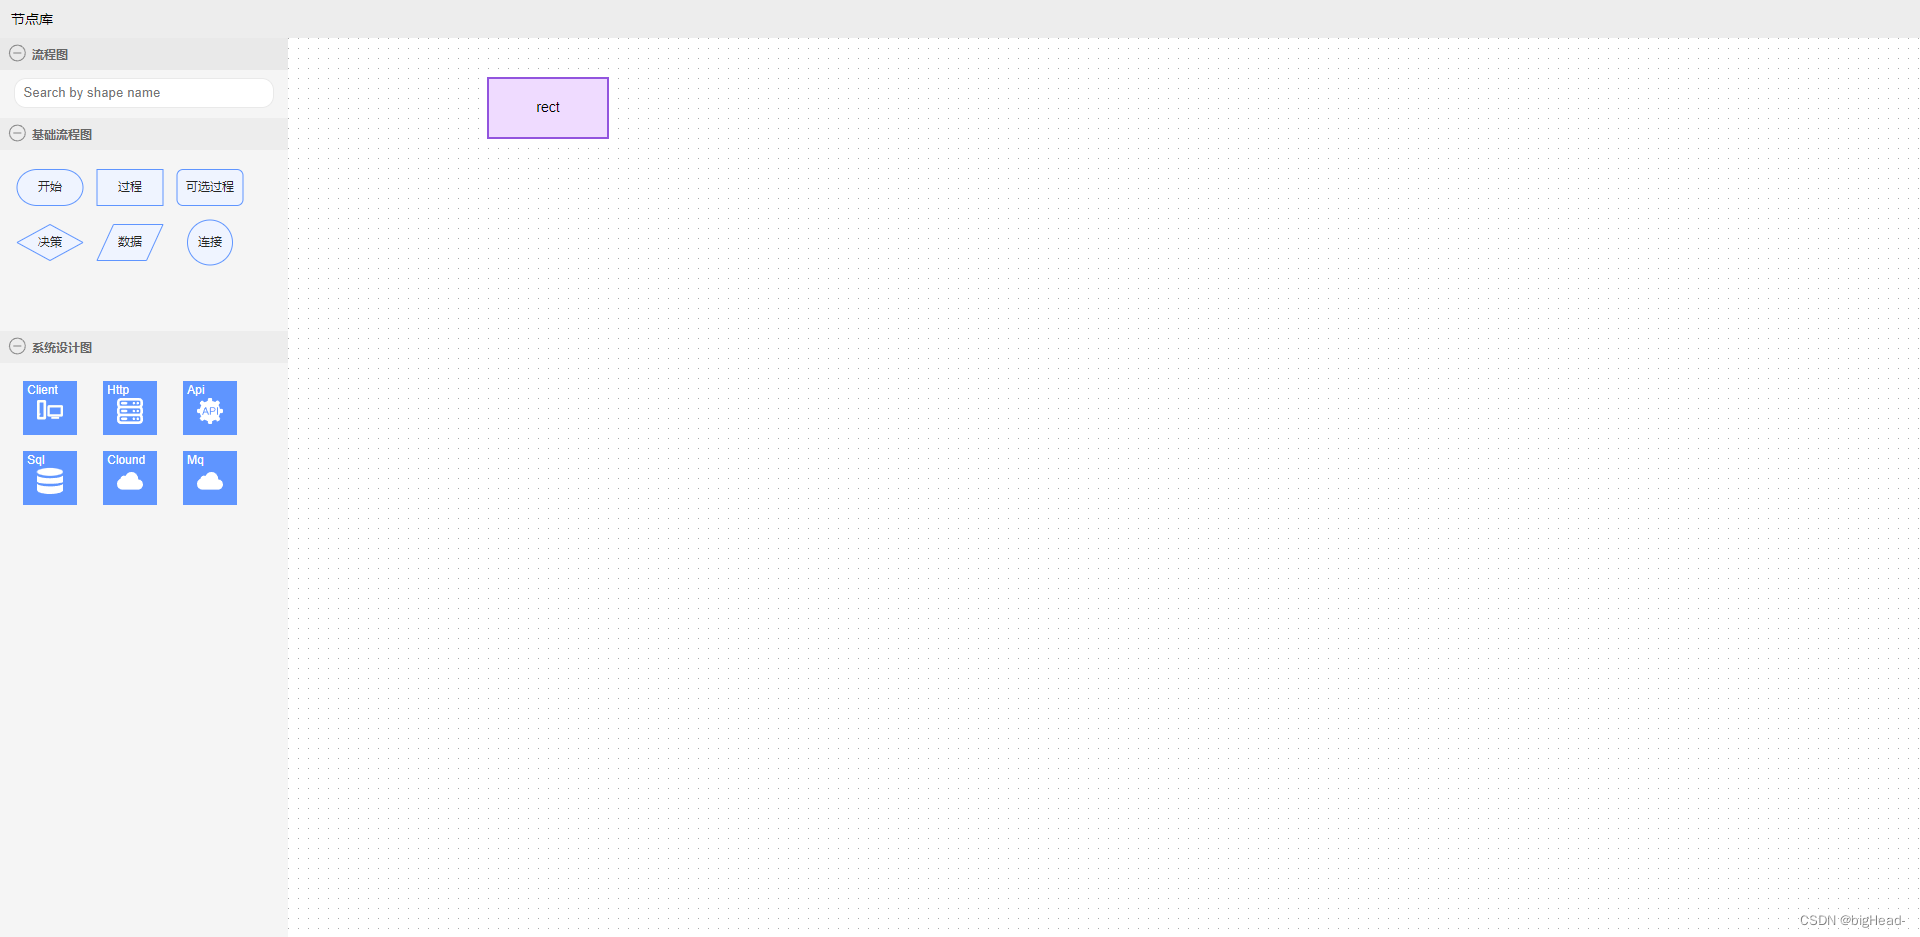
接下来需要完善 快捷键与事件、Toolbar 工具栏、以及节点属性配置。具体看下篇文章。


