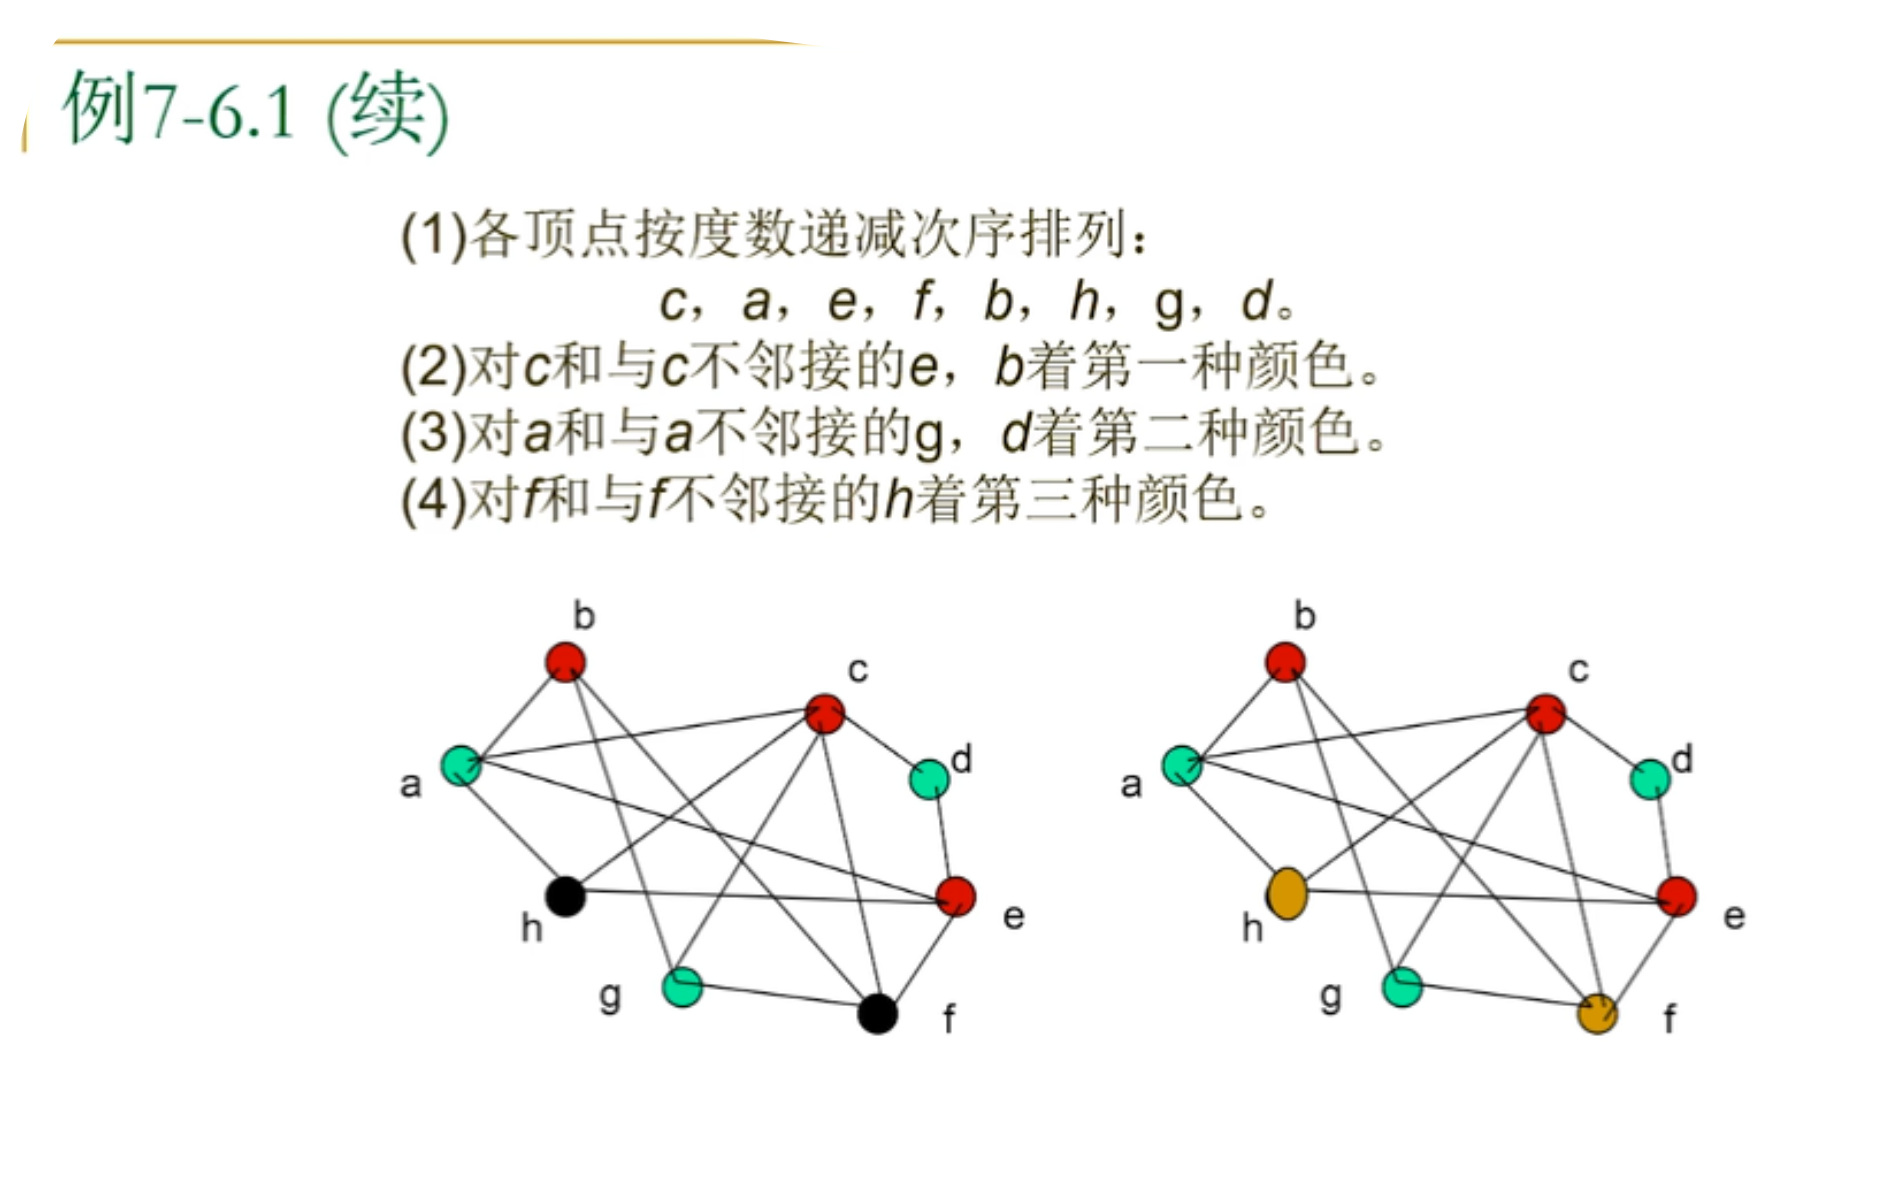
VS2019+CMake+Vtk9.3.0+Qt5.14.2 配置环境
第一步 下载
基本配置
-
系统环境:windows11 x64
-
Qt:5.14.2
这是最后最新的LTS qt离线版本,后续版本都需要在线安装,同时使用qt5.14也避免版权问题。
- Qt 5.14:大部分模块基于LGPL v3许可,允许以动态链接的方式使用而不公开源码,适合开发闭源、商业软件。
- Qt 6:虽然也提供LGPL v3和GPL许可,但部分模块在GPL下提供,可能会有更严格的开源要求。此外,Qt 6的早期版本中缺少了一些模块,如图表、数据可视化和WebEngine,这可能会影响某些应用的开发
-
VTK:9.3.0
VTK 9.3.0 发布于 2023 年 11 月 9 日
-
CMake:3.29
CMake 3.29发布于 2024 年 3 月 26 日
-
VS2019
因为qt5.14 默认使用msvc2017,也就是VS2019的编译器,虽说通过一些设置也可以在VS2022跑起来,不过图省事,还是使用VS2019了。
下载链接

链接:https://pan.baidu.com/s/1lbwPTIx-FKuVxX54AbzXGw?pwd=3cyi
提取码:3cyi
安装Qt
运行qt-opensource-windows-x86-5.14.2.exe , 注意安装路径下不要用中文,也不要有空格!
设置好路径,一路next,只有这里需要稍微注意下

安装CMake
略
安装VS2019
运行vs_community__2019.exe
安装c++桌面开发即可
第二步 编译VTK
过程相当痛苦,所以我才写这个攻略 orz
配置CMake
1.初步Configure

qt配置
检查qt的配置项,注意标红的几点,如果没有Qt附带的拿下Dir,设置好Qt5_Dir后再Configure一次,应该都会刷新出来。
另外如果你安装了anaconda,你的qt里面可能会是anaconda里的qt路径,需要更新正确。

安装位置
自定义一个安装位置,这是后续编译好的库文件和头文件的存放位置。

2.Generate
点击generate, 会在build文件夹下生成VTK.sln,使用VS2019打开该解决方案。

3.进入VS生成
编译时选择【生成->批生成】
先生成Debug和Release的库

编译时间视个人配置各不相同。几十分钟到几小时不等。
生成好后再进行批安装。

一切顺利的话,安装结果如下:


如果实在嫌麻烦也可以使用我已经编译好的库,下载链接里也有。
FAQ:
1. FilterReduction报错重编译的解决方法
https://blog.csdn.net/martian665/article/details/139340218
加上/force(注意空格)

不过/force 只是强制link,可能会导致别的问题。
2. 获取当前目录下lib的名称
将下面的代码写入文件,修改后缀名bat。运行即可得。
@echo off
dir /b *.lib > lib_files.txt
echo "All *.lib file names have been written to lib_files.txt"
第三部 配置
配置环境变量(否则运行时有问题)
环境变量->Path里加上如下bin的路径,具体需要根据你自己的安装位置做适配
- D:\Program Files\CMake\bin
- D:\Dev\VTK\bin
- D:\Qt5\Qt5.14.2\5.14.2\msvc2017_64\bin
- D:\Qt5\Qt5.14.2\5.14.2\msvc2017\bin
第四部 测试demo
demo1简单图形

CMakelists
cmake_minimum_required(VERSION 3.12 FATAL_ERROR)

project(Tutorial_Step1)

find_package(VTK COMPONENTS
  CommonColor
  CommonCore
  FiltersSources
  InteractionStyle
  RenderingContextOpenGL2
  RenderingCore
  RenderingFreeType
  RenderingGL2PSOpenGL2
  RenderingOpenGL2
)

if (NOT VTK_FOUND)
  message(FATAL_ERROR "Tutorial_Step1: Unable to find the VTK build folder.")
endif()

# Prevent a "command line is too long" failure in Windows.
set(CMAKE_NINJA_FORCE_RESPONSE_FILE "ON" CACHE BOOL "Force Ninja to use response files.")
add_executable(Tutorial_Step1 MACOSX_BUNDLE Tutorial_Step1.cpp )
  target_link_libraries(Tutorial_Step1 PRIVATE ${VTK_LIBRARIES}
)
# vtk_module_autoinit is needed
vtk_module_autoinit(
  TARGETS Tutorial_Step1
  MODULES ${VTK_LIBRARIES}
)
Tutorial_Step1.cpp
#include"vtkSmartPointer.h"
#include"vtkPolyData.h"
#include "vtkType.h"
#include "vtkPoints.h"
#include "vtkCellArray.h"
#include "vtkFloatArray.h"
#include "vtkPolyData.h"
#include "vtkPointData.h"
#include "vtkPolyDataMapper.h"
#include "vtkActor.h"
#include "vtkProperty.h"
#include "vtkRenderer.h"
#include "vtkRenderWindow.h"
#include "vtkRenderWindowInteractor.h"
#ifndef M_PI
#define M_PI (3.14159265358979323846)
#endif
#define CIR_CUT (100.0)
namespace Data
{
	//存放点集
	using Point = std::vector<double>;
	using Pointlist = std::vector<Point>;
	//绘制面的索引
	using Triangular = std::vector<vtkIdType>;
	using TriangularList = std::vector<Triangular>;
}
int main()
{

	//设置内环,外环半径
	double Rinner = 20.0;
	double Rexcir = 40.0;

	Data::Pointlist mPointlist;
	Data::TriangularList mTriangularList;
	//
	std::vector<double> angles;
	angles.reserve(CIR_CUT + 1);
	double angleInterval = (2 * M_PI) / CIR_CUT;
	for (auto i = 0; i <= CIR_CUT; i++)
		angles.push_back(i * angleInterval);
	//生成点集和三角面
	for (auto index = 0; index < CIR_CUT; index++)
	{
		__int64 lastsize = mPointlist.size();
		Data::Point p1 = { Rinner * cos(angles[index]), Rinner * sin(angles[index]), 0.0 };
		Data::Point p2 = { Rinner * cos(angles[index + 1]), Rinner * sin(angles[index + 1]), 0.0 };
		Data::Point p3 = { Rexcir * cos(angles[index + 1]), Rexcir * sin(angles[index + 1]), 0.0 };
		Data::Point p4 = { Rexcir * cos(angles[index]), Rexcir * sin(angles[index]), 0.0 };
		Data::Triangular f1 = { 0 + lastsize, 1 + lastsize, 2 + lastsize };
		Data::Triangular f2 = { 2 + lastsize, 3 + lastsize, 0 + lastsize };
		mPointlist.push_back(p1);
		mPointlist.push_back(p2);
		mPointlist.push_back(p3);
		mPointlist.push_back(p4);
		mTriangularList.push_back(f1);
		mTriangularList.push_back(f2);
	}

	//可视化流程
	//source源,绘制图形的基本数据
	vtkSmartPointer<vtkPoints> cirpoints = vtkSmartPointer<vtkPoints>::New();
	vtkSmartPointer<vtkCellArray> cellarray = vtkSmartPointer<vtkCellArray>::New();
	vtkSmartPointer<vtkFloatArray> calaes = vtkSmartPointer<vtkFloatArray>::New();
	for (__int64 index = 0; index < mPointlist.size(); index++)
	{
		cirpoints->InsertPoint(index, mPointlist[index].data());
		calaes->InsertTuple1(index, index);
	}
	for (auto&& i : mTriangularList)
		cellarray->InsertNextCell(vtkIdType(i.size()), i.data());

	vtkSmartPointer<vtkPolyData> polydata = vtkSmartPointer<vtkPolyData>::New();
	polydata->SetPoints(cirpoints);
	polydata->SetPolys(cellarray);
	polydata->GetPointData()->SetScalars(calaes);
	//过滤器--这里没有使用,可以跳过

	//映射器通过将数据表现为有形的几何图形
	vtkSmartPointer<vtkPolyDataMapper> mapper = vtkSmartPointer<vtkPolyDataMapper>::New();
	mapper->SetInputData(polydata);
	mapper->SetScalarRange(polydata->GetScalarRange());
	//关闭根据标量设置颜色
	mapper->ScalarVisibilityOff();

	//表演者 调整可见的属性
	vtkSmartPointer<vtkActor> actor = vtkSmartPointer<vtkActor>::New();
	actor->SetMapper(mapper);
	actor->GetProperty()->SetColor(1.0, 0.5, 1.0);
	//渲染器
	vtkSmartPointer<vtkRenderer> render = vtkSmartPointer<vtkRenderer>::New();
	render->AddActor(actor);
	//渲染窗口
	vtkSmartPointer<vtkRenderWindow> rw = vtkSmartPointer<vtkRenderWindow>::New();
	rw->AddRenderer(render);
	//渲染窗口交互器
	vtkSmartPointer<vtkRenderWindowInteractor> ri = vtkSmartPointer<vtkRenderWindowInteractor>::New();
	ri->SetRenderWindow(rw);
	actor->GetProperty()->SetRepresentationToWireframe();//显示边框
	rw->Render();
	ri->Start();
	return 0;
}
demo2 MinimalQtVTKApp
VTK+Qt
CMakelists
cmake_minimum_required(VERSION 3.12 FATAL_ERROR)

if(POLICY CMP0020)
  cmake_policy(SET CMP0020 NEW)
  cmake_policy(SET CMP0071 NEW)
endif()

PROJECT(MinimalQtVTKApp)

find_package(VTK COMPONENTS
  CommonCore
  CommonDataModel
  FiltersSources
  GUISupportQt
  InteractionStyle
  RenderingContextOpenGL2
  RenderingCore
  RenderingFreeType
  RenderingGL2PSOpenGL2
  RenderingOpenGL2
  GUISupportQt
  RenderingQt
)

if(NOT VTK_FOUND)
  message(FATAL_ERROR "MinimalQtVTKApp: Unable to find the VTK build folder.")
endif()

if(NOT(TARGET VTK::GUISupportQt))
  message(FATAL_ERROR "MinimalQtVTKApp: VTK not built with Qt support.")
endif()

if(NOT DEFINED VTK_QT_VERSION)
  set(VTK_QT_VERSION 5)
endif()

set(qt_components Core Gui Widgets)
if(${VTK_QT_VERSION} VERSION_GREATER_EQUAL 6)
  list(APPEND qt_components OpenGLWidgets)
endif()
list(SORT qt_components)
# We have ui files, so this will also bring in the macro:
#   qt5_wrap_ui or qt_wrap_ui from Widgets.
find_package(Qt${VTK_QT_VERSION} QUIET
  REQUIRED COMPONENTS ${qt_components}
)

foreach(_qt_comp IN LISTS qt_components)
  list(APPEND qt_modules "Qt${VTK_QT_VERSION}::${_qt_comp}")
endforeach()

message (STATUS "VTK_VERSION: ${VTK_VERSION}, Qt Version: ${Qt${VTK_QT_VERSION}Widgets_VERSION}")

# Instruct CMake to run moc and uic automatically when needed.
set(CMAKE_AUTOMOC ON)
set(CMAKE_AUTOUIC ON)

include_directories(${CMAKE_CURRENT_SOURCE_DIR} ${CMAKE_CURRENT_BINARY_DIR})

file(GLOB UI_FILES *.ui)
file(GLOB QT_WRAP *.h)
file(GLOB CXX_FILES *.cxx)

# For VTK versions greater than or equal to 8.90.0:
#  CMAKE_AUTOUIC is ON so we handle uic automatically for Qt targets.
#  CMAKE_AUTOMOC is ON so we handle moc automatically for Qt targets.

# Prevent a "command line is too long" failure in Windows.
set(CMAKE_NINJA_FORCE_RESPONSE_FILE "ON" CACHE BOOL "Force Ninja to use response files.")
# CMAKE_AUTOMOC in ON so the MOC headers will be automatically wrapped.
add_executable(MinimalQtVTKApp MACOSX_BUNDLE
  ${CXX_FILES} ${UISrcs} ${QT_WRAP}
)
if (Qt${VTK_QT_VERSION}Widgets_VERSION VERSION_LESS "5.11.0")
  qt5_use_modules(MinimalQtVTKApp ${qt_components})
else()
  target_link_libraries(MinimalQtVTKApp ${qt_modules})
endif()
target_link_libraries(MinimalQtVTKApp ${VTK_LIBRARIES})
# vtk_module_autoinit is needed
vtk_module_autoinit(
  TARGETS MinimalQtVTKApp
  MODULES ${VTK_LIBRARIES}
)
MinimalQtVTKApp.cpp
#include <QVTKOpenGLNativeWidget.h>
#include <vtkActor.h>
#include <vtkDataSetMapper.h>
#include <vtkDoubleArray.h>
#include <vtkGenericOpenGLRenderWindow.h>
#include <vtkPointData.h>
#include <vtkProperty.h>
#include <vtkRenderer.h>
#include <vtkSphereSource.h>

#include <QApplication>
#include <QDockWidget>
#include <QGridLayout>
#include <QLabel>
#include <QMainWindow>
#include <QPointer>
#include <QPushButton>
#include <QVBoxLayout>

#include <cmath>
#include <cstdlib>
#include <random>

namespace {
/**
 * Deform the sphere source using a random amplitude and modes and render it in
 * the window
 *
 * @param sphere the original sphere source
 * @param mapper the mapper for the scene
 * @param window the window to render to
 * @param randEng the random number generator engine
 */
void Randomize(vtkSphereSource* sphere, vtkMapper* mapper,
               vtkGenericOpenGLRenderWindow* window, std::mt19937& randEng);
} // namespace

int main(int argc, char* argv[])
{
  QSurfaceFormat::setDefaultFormat(QVTKOpenGLNativeWidget::defaultFormat());

  QApplication app(argc, argv);

  // Main window.
  QMainWindow mainWindow;
  mainWindow.resize(1200, 900);

  // Control area.
  QDockWidget controlDock;
  mainWindow.addDockWidget(Qt::LeftDockWidgetArea, &controlDock);

  QLabel controlDockTitle("Control Dock");
  controlDockTitle.setMargin(20);
  controlDock.setTitleBarWidget(&controlDockTitle);

  QPointer<QVBoxLayout> dockLayout = new QVBoxLayout();
  QWidget layoutContainer;
  layoutContainer.setLayout(dockLayout);
  controlDock.setWidget(&layoutContainer);

  QPushButton randomizeButton;
  randomizeButton.setText("Randomize");
  dockLayout->addWidget(&randomizeButton);

  // Render area.
  QPointer<QVTKOpenGLNativeWidget> vtkRenderWidget =
      new QVTKOpenGLNativeWidget();
  mainWindow.setCentralWidget(vtkRenderWidget);

  // VTK part.
  vtkNew<vtkGenericOpenGLRenderWindow> window;
  vtkRenderWidget->setRenderWindow(window.Get());

  vtkNew<vtkSphereSource> sphere;
  sphere->SetRadius(1.0);
  sphere->SetThetaResolution(100);
  sphere->SetPhiResolution(100);

  vtkNew<vtkDataSetMapper> mapper;
  mapper->SetInputConnection(sphere->GetOutputPort());

  vtkNew<vtkActor> actor;
  actor->SetMapper(mapper);
  actor->GetProperty()->SetEdgeVisibility(true);
  actor->GetProperty()->SetRepresentationToSurface();

  vtkNew<vtkRenderer> renderer;
  renderer->AddActor(actor);

  window->AddRenderer(renderer);

  // Setup initial status.
  std::mt19937 randEng(0);
  ::Randomize(sphere, mapper, window, randEng);

  // connect the buttons
  QObject::connect(&randomizeButton, &QPushButton::released,
                   [&]() { ::Randomize(sphere, mapper, window, randEng); });

  mainWindow.show();

  return app.exec();
}

namespace {
void Randomize(vtkSphereSource* sphere, vtkMapper* mapper,
               vtkGenericOpenGLRenderWindow* window, std::mt19937& randEng)
{
  // Generate randomness.
  double randAmp = 0.2 + ((randEng() % 1000) / 1000.0) * 0.2;
  double randThetaFreq = 1.0 + (randEng() % 9);
  double randPhiFreq = 1.0 + (randEng() % 9);

  // Extract and prepare data.
  sphere->Update();
  vtkSmartPointer<vtkPolyData> newSphere;
  newSphere.TakeReference(sphere->GetOutput()->NewInstance());
  newSphere->DeepCopy(sphere->GetOutput());
  vtkNew<vtkDoubleArray> height;
  height->SetName("Height");
  height->SetNumberOfComponents(1);
  height->SetNumberOfTuples(newSphere->GetNumberOfPoints());
  newSphere->GetPointData()->AddArray(height);

  // Deform the sphere.
  for (int iP = 0; iP < newSphere->GetNumberOfPoints(); iP++)
  {
    double pt[3] = {0.0};
    newSphere->GetPoint(iP, pt);
    double theta = std::atan2(pt[1], pt[0]);
    double phi =
        std::atan2(pt[2], std::sqrt(std::pow(pt[0], 2) + std::pow(pt[1], 2)));
    double thisAmp =
        randAmp * std::cos(randThetaFreq * theta) * std::sin(randPhiFreq * phi);
    height->SetValue(iP, thisAmp);
    pt[0] += thisAmp * std::cos(theta) * std::cos(phi);
    pt[1] += thisAmp * std::sin(theta) * std::cos(phi);
    pt[2] += thisAmp * std::sin(phi);
    newSphere->GetPoints()->SetPoint(iP, pt);
  }
  newSphere->GetPointData()->SetScalars(height);

  // Reconfigure the pipeline to take the new deformed sphere.
  mapper->SetInputDataObject(newSphere);
  mapper->SetScalarModeToUsePointData();
  mapper->ColorByArrayComponent("Height", 0);
  window->Render();
}
} // namespace
成功结果
点击 Randomize 可以切换渲染模型


![[PM]产品运营](https://img-blog.csdnimg.cn/img_convert/26a271d8cd6be477e599b603fac09760.png)