前言
本篇教程是针对WSL下的Ubuntu操作系统的配置教程,它和一般的Linux环境下的配置有所不同,并且和Windows环境下的也有所不同。
本篇博客编写参考了 官方文档(Tex) 和 插件官方(Texlive Workshop) 文档等内容。
顺序
在继续之前,首先要求已经安装完毕VsCode,并且已经能够成功连接WSL。
选择Linux系统的原因是,似乎在Linux下编译会更快?(
下面,本文将安装以下步骤介绍:
(1)安装 Texlive linux版本
(2)安装 Texlive Workshop插件
(3)配置 Texlive Workshop插件 包含解释与基础操作
(4)中文化支持 - CTex
(5)格式化支持和配置
安装Texlive和Texlive Workshop插件
安装texlive
Reference: https://tug.org/texlive/quickinstall.html
使用两种方式下载:
wget https://mirror.ctan.org/systems/texlive/tlnet/install-tl-unx.tar.gz
或者使用这种方式下载:
curl -L -o install-tl-unx.tar.gz https://mirror.ctan.org/systems/texlive/tlnet/install-tl-unx.tar.gz
下载完成后,执行以下的步骤,zcat可以用于显示压缩包的内容。
zcat < install-tl-unx.tar.gz | tar xf -
cd install-tl-*
perl ./install-tl --no-interaction
如果安装过程中遇到问题,请检查文件权限,例如可以使用chmod来修改。
在安装的过程中,可以自定义一些配置,小熊自己是选择全部安装的,占8个GB左右大小,所以就不在安装这里进行配置讲解。
(Reference:https://github.com/James-Yu/LaTeX-Workshop/wiki/Install)
安装完毕后,现在开始配置PATH环境变量。
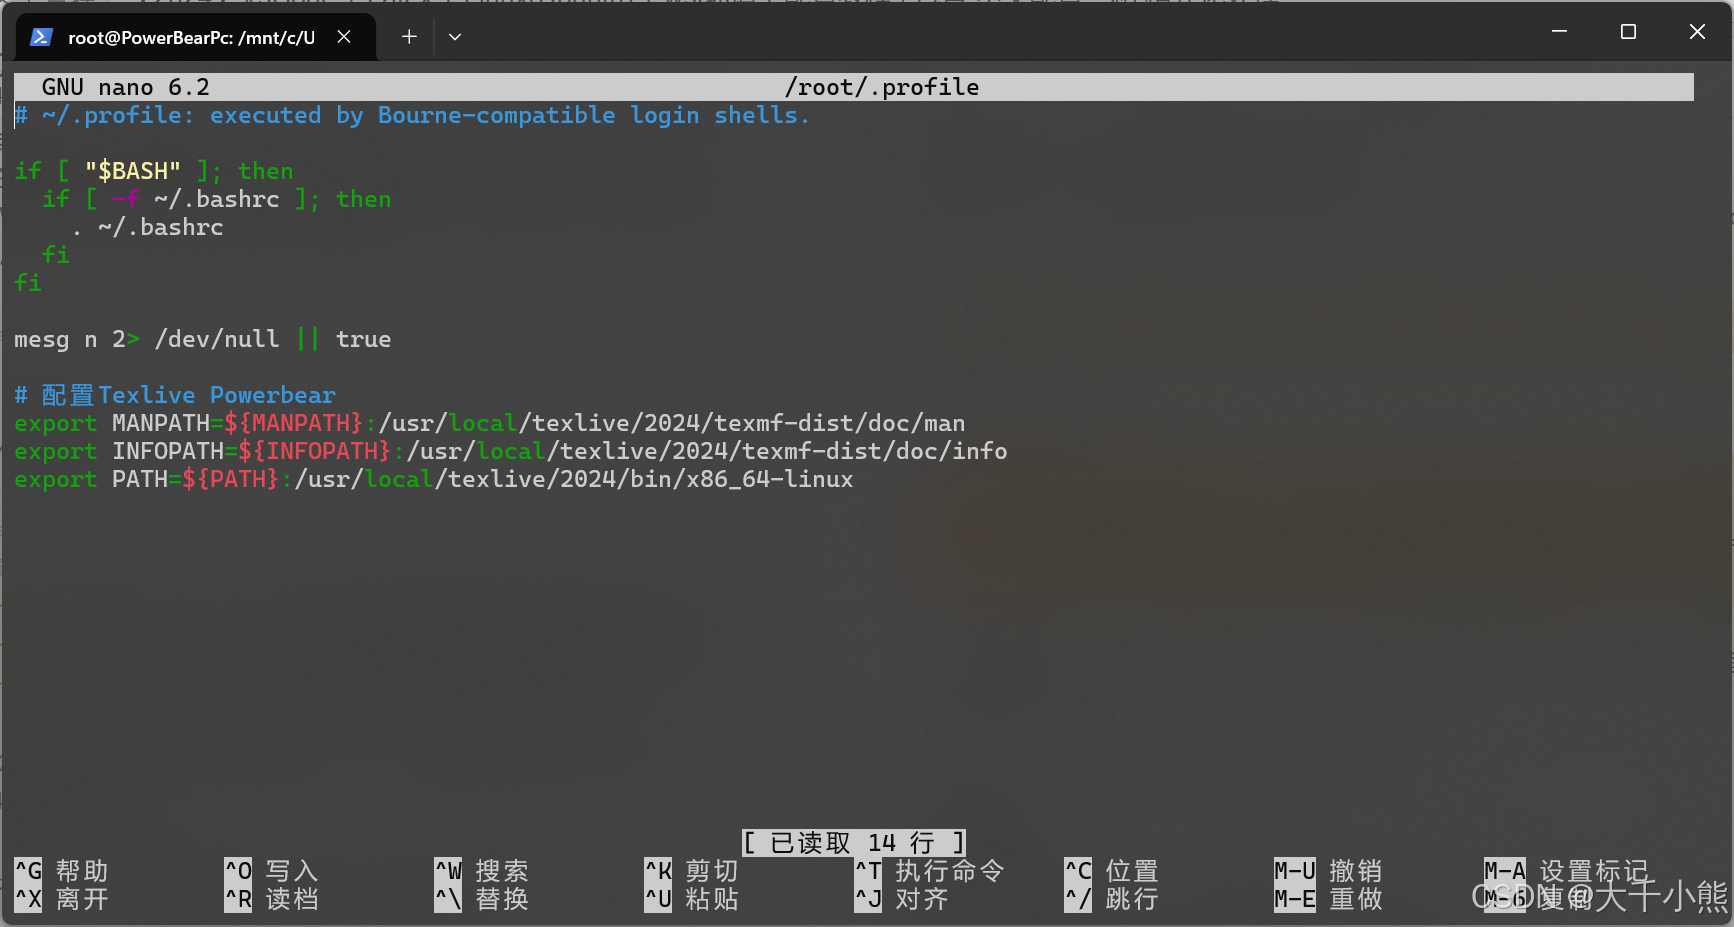
对于WSL而言,不要使用.bashrc来配置PATH,而是使用.profile或者.bash_profile文件。
nano ~/.profile # 你也可以使用自己喜欢的文本编辑器来修改文件,使用GUI也行
在文件末尾修改:
# 配置Texlive Powerbear
export MANPATH=${MANPATH}:/usr/local/texlive/2024/texmf-dist/doc/man
export INFOPATH=${INFOPATH}:/usr/local/texlive/2024/texmf-dist/doc/info
export PATH=${PATH}:/usr/local/texlive/2024/bin/x86_64-linux
如果您是后来者,当前已经是2025年了,而且安装的是2025的版本,请将上面的2024修改为2025。

如果是nano,最后按住Ctrl+X来离开,和写入文件。
之后使用:
source ~/.profile
或者在powershell / windows终端 里面,利用重启WSL的方式来更新。
wsl --shutdown
插件安装
✔️确保已经在Linux系统下安装完毕texlive前提下,继续。
✔️确保已经安装VsCode和了解基础操作的前提下,继续。
有两种方法以供参考:
(1)在Vscode插件市场搜索“Texlive Workshop”,然后点击“安装”按钮。
(2)按住Ctrl + P,然后输入ext install latex-workshop。

插件配置
当插件安装完成后,还不能直接运行,还有几个步骤需要配置。当配置完毕这些操作后,便可以方便的进行一些操作了。
Compiler & Recipes
在继续之前,先来了解此项配置的相关含义和包含关系。编译器配置是用于TEX文件编译时的相关操作,而Recipe是方案,它能包含多个编译器配置,在Tex插件面板上(左侧最后的TEX按钮)可以通过GUI的方式来调用Recipe。
所以,现在我们开始配置编译相关操作,和Recipe设置。打开VsCode的Settings.json文件(通过 文件 -> 首选项 -> 设置 ,或者 Ctrl+shift+p 打开命令面板,搜索“> 设置 json” 或者 在打开的文件夹下 .vscode 下新建settings.json)。
本文章配置在 设置WSL(JSON) 下 。
如果不想麻烦,直接参考这个小节的最后部分,那个地方给出了一份配置参考文件。可以在其上进行一些自定义的修改。
✔️确保已经打开Settings.json的前提下,继续。
- 配置TEX编译器相关操作:
在Ubuntu下,打开终端。
-
再次配置Recipe的相关设置:
-
Settings.json文件参考
不想看上文的直接参考这个地方的内容。
{
    // Latex 文件处理
    "latex-workshop.latex.tools": [
        {
            "name": "latexmk",
            "command": "latexmk",
            "args": [
                "--shell-escape",
                "-synctex=1",
                "-interaction=nonstopmode",
                "-file-line-error",
                "-pdf",
                "-outdir=%OUTDIR%",
                "%DOC%"
            ],
            "env": {}
        },
        {
            "name": "xelatex",
            "command": "xelatex",
            "args": [
                "--shell-escape",
                "-synctex=1",
                "-interaction=nonstopmode",
                "-file-line-error",
                "%DOC%"
            ]
        },
        {
            "name": "pdflatex",
            "command": "pdflatex",
            "args": [
                "--shell-escape",
                "-synctex=1",
                "-interaction=nonstopmode",
                "-file-line-error",
                "%DOC%"
            ],
            "env": {}
        },
        {
            "name": "bibtex",
            "command": "bibtex",
            "args": [
                "--shell-escape",
                "%DOCFILE%"
            ],
            "env": {}
        }
    ],
    "latex-workshop.latex.autoBuild.cleanAndRetry.enabled": true,
    // Recipes : 食谱,在这里配置命令方案
    "latex-workshop.latex.recipes": [
        {
            "name": "xelatex (中文支持)",
            "tools": [
                "xelatex"
            ]
        },
        {
            "name": "latexmk",
            "tools": [
                "latexmk"
            ]
        },
        {
            "name": "pdflatex -> bibtex -> pdflatex*2",
            "tools": [
                "pdflatex",
                "bibtex",
                "pdflatex",
                "pdflatex"
            ]
        }
    ],
    "latex-workshop.latexindent.path": "/usr/local/texlive/2024/bin/x86_64-linux/latexindent",
    "latex-preview.command": "latexmk",
    "editor.tabSize": 4,
    "latex-workshop.view.pdf.viewer": "tab",
    "latex-workshop.showContextMenu": true,
    "ltex.enabled": true,
    "ltex.language": "en-US",
}
配置完成后,在编辑器的界面应该是如下图所示:

到这一步,现在应该已经能够支持latex的编译与预览了。
使用这些来测试一下效果吧!
\documentclass{article}
\begin{document}
Hello latex.
\end{document}
完成后,点击左侧的 配方xelatex试一试
中文化支持配置
在经过上一小节的配置后,实际上默认的是xelatex。
然后使用
\usepackage{ctex}
把上文的Hello latex改为中文字符试一试吧。
格式化支持和配置
当以前没有配置过Perl的时候,尝试进行格式化操作时候会出现以下提示信息:
[20:20:12.751][Event] STRUCTURE_UPDATED
[20:20:14.083][Format][TeX] Start formatting with latexindent.
[20:20:14.084][Format][TeX] Formatting LaTeX. The command is /usr/local/texlive/2024/bin/x86_64-linux/latexindent:["-c","%WS1%/","%WS1%/__latexindent_temp_main_2.tex","-y=defaultIndent: '    '"].
[20:20:14.131][Format][TeX] Formatting failed with exit code 2
[20:20:14.132][Format][TeX] stderr: Can't locate YAML/Tiny.pm in @INC (you may need to install the YAML::Tiny module)(@INC contains: /usr/local/texlive/2024/texmf-dist/scripts/latexindent /etc/perl /usr/local/lib/x86_64-linux-gnu/perl/5.34.0 /usr/local/share/perl/5.34.0 /usr/lib/x86_64-linux-gnu/perl5/5.34 /usr/share/perl5 /usr/lib/x86_64-linux-gnu/perl-base /usr/lib/x86_64-linux-gnu/perl/5.34 /usr/share/perl/5.34 /usr/local/lib/site_perl) at /usr/local/texlive/2024/texmf-dist/scripts/latexindent/LatexIndent/GetYamlSettings.pm line 24.
BEGIN failed--compilation aborted at /usr/local/texlive/2024/texmf-dist/scripts/latexindent/LatexIndent/GetYamlSettings.pm line 24.
Compilation failed in require at /usr/local/texlive/2024/texmf-dist/scripts/latexindent/LatexIndent/Verbatim.pm line 23.
BEGIN failed--compilation aborted at /usr/local/texlive/2024/texmf-dist/scripts/latexindent/LatexIndent/Verbatim.pm line 23.
Compilation failed in require at /usr/local/texlive/2024/texmf-dist/scripts/latexindent/LatexIndent/Lines.pm line 23.
BEGIN failed--compilation aborted at /usr/local/texlive/2024/texmf-dist/scripts/latexindent/LatexIndent/Lines.pm line 23.
Compilation failed in require at /usr/local/texlive/2024/texmf-dist/scripts/latexindent/LatexIndent/Document.pm line 31.
BEGIN failed--compilation aborted at /usr/local/texlive/2024/texmf-dist/scripts/latexindent/LatexIndent/Document.pm line 31.
Compilation failed in require at /usr/local/texlive/2024/bin/x86_64-linux/latexindent line 28.
BEGIN failed--compilation aborted at /usr/local/texlive/2024/bin/x86_64-linux/latexindent line 28.

[20:20:22.200][Event] STRUCTURE_UPDATED
解决方法:利用cpan安装缺少的模块。
Reference: https://github.com/James-Yu/LaTeX-Workshop/issues/699
可能需要多次使用cpan命令安装缺少的模块。
cpan YAML::Tiny
cpan File::HomeDir
之后,再次执行Format时候,就能成功格式化文档了。
接下来
下面,读者应该去了解更多有关latex的使用方法,语法和其他操作姿势。
例如:如何优美的插入代码和公式?如何去绘制三线图表?等。
若觉得此文对您有帮助,请予以一个赞以示鼓励!
如果阅读完毕尚有疑问,建议,直接在评论区开喷即可!
PowerBear 大千小熊 2024年


