背景:
我需要解决一个bug,需要我从xml中读取数据到QDomDocument,然后获取到我想要的目标信息,然后修改该信息。
---------------------------------------------------------------------------------------------------------
Qt QDomComment读写Xml文件(含示例源码)_qt qdomdocument 操做xml-CSDN博客
QDomDocument类可以方便地读取和操作XML文件。优点:易于使用XML文档,缺点是相对较慢。
---------------------------------------------------------------------------------------------------
示例Xml文档
XML 教程 | 菜鸟教程 (runoob.com)
<class>
	<student sex="男" age="18">
		<id>01</id>
		<name>张三</name>
	</student>
	<student sex="女" age="28">
		<id>02</id>
		<name>李四</name>
	</student>
</class>
标签
标签内包含了要传递的信息
它必须成对出现,有开始标签就需要有结束标签。
Xml文件必须包含根元素,它是所有其它元素的父元素
XML文档由元素构成,每个元素包含开始标签,结束标签和元素内容。
例如:<id>02</id>
读取Xml文件的信息
        //XML文件路径
        QString path = QCoreApplication::applicationDirPath()+"/xxx.xml";
        qDebug()<<path;
        //打开XML文件
        QFile file(path);
        if(!file.open(QIODevice::ReadOnly))
        {
            qDebug()<<"File open faild!";
            return-1;
        }
        //创建QDomDocument对象,用于解析XML
        QDomDocument doc;
        //通过QFile对象设置QDomDocument的内容
        if(!doc.setContent(&file))
        {
            file.close();
            return -1;
        }
        //关闭文件
        file.close();

        //解析XML
        //获取XML根结点
        QDomElement root = doc.documentElement();
        //遍历每个student结点
        //通过标签名获取结点列表
        QDomNodeList studentList = root.elementsByTagName("student");
        int listSize = studentList.size();
        for(int i = 0; i < listSize; ++i)
        {
            //通过索引获取QDomElement对象
            QDomElement student = studentList.at(i).toElement();
            //获取sex属性值
            QString sex = student.attribute("sex");
            //获取age属性值
            QString age = student.attribute("age");

            /*
             *函数原型为
             *QDomElement firstChildElement(const QString &tagName = QString()) const;
             *解析:参数tagName是可选的,表示要查询的子元素结点的标签名。如果指定了tagName,则返回
             *第一个匹配标签的子元素结点;如果没有指定tagName,则返回第一个子元素结点。
             **/
            QString studentID = student.firstChildElement("id").text();       //获取id元素节点的文本内容
            QString studentName = student.firstChildElement("name").text();   //获取name元素节点的文本内容

            qDebug()<<"student:";
            qDebug()<<"sex:"<<sex;
            qDebug()<<"age:"<<age;
            qDebug()<<"studentID:"<<studentID;
            qDebug()<<"studentName:"<<studentName;
        }
这里我继续使用Qt的.ui文件作为示例(它是以Xml文件的形式进行存储的)
<?xml version="1.0" encoding="UTF-8"?>
<ui version="4.0">
 <class>MainWindow</class>
 <widget class="QMainWindow" name="MainWindow">
  <property name="geometry">
   <rect>
    <x>0</x>
    <y>0</y>
    <width>731</width>
    <height>460</height>
   </rect>
  </property>
  <property name="windowTitle">
   <string>Graphics  View绘图</string>
  </property>
  <widget class="QWidget" name="centralWidget">
   <widget class="QWGraphicsView" name="View">
    <property name="geometry">
     <rect>
      <x>10</x>
      <y>10</y>
      <width>600</width>
      <height>400</height>
     </rect>
    </property>
    <property name="renderHints">
     <set>QPainter::Antialiasing|QPainter::TextAntialiasing</set>
    </property>
    <property name="dragMode">
     <enum>QGraphicsView::RubberBandDrag</enum>
    </property>
   </widget>
  </widget>
  <widget class="QMenuBar" name="menuBar">
   <property name="geometry">
    <rect>
     <x>0</x>
     <y>0</y>
     <width>731</width>
     <height>30</height>
    </rect>
   </property>
  </widget>
  <widget class="QToolBar" name="mainToolBar">
   <property name="iconSize">
    <size>
     <width>16</width>
     <height>16</height>
    </size>
   </property>
   <property name="toolButtonStyle">
    <enum>Qt::ToolButtonTextUnderIcon</enum>
   </property>
   <attribute name="toolBarArea">
    <enum>TopToolBarArea</enum>
   </attribute>
   <attribute name="toolBarBreak">
    <bool>false</bool>
   </attribute>
   <addaction name="actZoomIn"/>
   <addaction name="actZoomOut"/>
   <addaction name="actRestore"/>
   <addaction name="separator"/>
   <addaction name="actRotateLeft"/>
   <addaction name="actRotateRight"/>
   <addaction name="actEdit_Front"/>
   <addaction name="actEdit_Back"/>
   <addaction name="actGroup"/>
   <addaction name="actGroupBreak"/>
   <addaction name="separator"/>
   <addaction name="actEdit_Delete"/>
   <addaction name="separator"/>
   <addaction name="actQuit"/>
  </widget>
  <widget class="QStatusBar" name="statusBar"/>
  <widget class="QToolBar" name="toolBar">
   <property name="windowTitle">
    <string>toolBar</string>
   </property>
   <property name="allowedAreas">
    <set>Qt::LeftToolBarArea</set>
   </property>
   <property name="iconSize">
    <size>
     <width>16</width>
     <height>16</height>
    </size>
   </property>
   <property name="toolButtonStyle">
    <enum>Qt::ToolButtonTextUnderIcon</enum>
   </property>
   <attribute name="toolBarArea">
    <enum>LeftToolBarArea</enum>
   </attribute>
   <attribute name="toolBarBreak">
    <bool>false</bool>
   </attribute>
   <addaction name="actItem_Rect"/>
   <addaction name="actItem_Ellipse"/>
   <addaction name="actItem_Circle"/>
   <addaction name="actItem_Triangle"/>
   <addaction name="actItem_Polygon"/>
   <addaction name="actItem_Line"/>
   <addaction name="actItem_Text"/>
  </widget>
  <action name="actItem_Rect">
   <property name="icon">
    <iconset resource="res.qrc">
     <normaloff>:/images/images/RECTANGL.BMP</normaloff>:/images/images/RECTANGL.BMP</iconset>
   </property>
   <property name="text">
    <string>矩形</string>
   </property>
   <property name="toolTip">
    <string>添加矩形</string>
   </property>
  </action>
  <action name="actItem_Ellipse">
   <property name="icon">
    <iconset resource="res.qrc">
     <normaloff>:/images/images/ELLIPSE.BMP</normaloff>:/images/images/ELLIPSE.BMP</iconset>
   </property>
   <property name="text">
    <string>椭圆</string>
   </property>
   <property name="toolTip">
    <string>添加椭圆型</string>
   </property>
  </action>
  <action name="actItem_Line">
   <property name="icon">
    <iconset resource="res.qrc">
     <normaloff>:/images/images/LINE.BMP</normaloff>:/images/images/LINE.BMP</iconset>
   </property>
   <property name="text">
    <string>直线</string>
   </property>
   <property name="toolTip">
    <string>添加直线</string>
   </property>
  </action>
  <action name="actEdit_Delete">
   <property name="icon">
    <iconset resource="res.qrc">
     <normaloff>:/images/images/108.bmp</normaloff>:/images/images/108.bmp</iconset>
   </property>
   <property name="text">
    <string>删除</string>
   </property>
   <property name="toolTip">
    <string>删除选中的图元</string>
   </property>
  </action>
  <action name="actQuit">
   <property name="icon">
    <iconset resource="res.qrc">
     <normaloff>:/images/images/132.bmp</normaloff>:/images/images/132.bmp</iconset>
   </property>
   <property name="text">
    <string>退出</string>
   </property>
   <property name="toolTip">
    <string>退出本系统</string>
   </property>
  </action>
  <action name="actItem_Text">
   <property name="icon">
    <iconset resource="res.qrc">
     <normaloff>:/images/images/800.bmp</normaloff>:/images/images/800.bmp</iconset>
   </property>
   <property name="text">
    <string>文字</string>
   </property>
   <property name="toolTip">
    <string>添加文字</string>
   </property>
  </action>
  <action name="actEdit_Front">
   <property name="icon">
    <iconset resource="res.qrc">
     <normaloff>:/images/images/528.bmp</normaloff>:/images/images/528.bmp</iconset>
   </property>
   <property name="text">
    <string>前置</string>
   </property>
   <property name="toolTip">
    <string>居于最前面</string>
   </property>
  </action>
  <action name="actEdit_Back">
   <property name="icon">
    <iconset resource="res.qrc">
     <normaloff>:/images/images/526.bmp</normaloff>:/images/images/526.bmp</iconset>
   </property>
   <property name="text">
    <string>后置</string>
   </property>
   <property name="toolTip">
    <string>居于最后面</string>
   </property>
  </action>
  <action name="actItem_Polygon">
   <property name="icon">
    <iconset resource="res.qrc">
     <normaloff>:/images/images/FREEFORM.BMP</normaloff>:/images/images/FREEFORM.BMP</iconset>
   </property>
   <property name="text">
    <string>梯形</string>
   </property>
   <property name="toolTip">
    <string>添加梯形</string>
   </property>
  </action>
  <action name="actZoomIn">
   <property name="icon">
    <iconset resource="res.qrc">
     <normaloff>:/images/images/zoomin.png</normaloff>:/images/images/zoomin.png</iconset>
   </property>
   <property name="text">
    <string>放大</string>
   </property>
   <property name="toolTip">
    <string>放大</string>
   </property>
  </action>
  <action name="actZoomOut">
   <property name="icon">
    <iconset resource="res.qrc">
     <normaloff>:/images/images/zoomout.png</normaloff>:/images/images/zoomout.png</iconset>
   </property>
   <property name="text">
    <string>缩小</string>
   </property>
   <property name="toolTip">
    <string>缩小</string>
   </property>
  </action>
  <action name="actRotateLeft">
   <property name="icon">
    <iconset resource="res.qrc">
     <normaloff>:/images/images/rotateleft.png</normaloff>:/images/images/rotateleft.png</iconset>
   </property>
   <property name="text">
    <string>左旋转</string>
   </property>
   <property name="toolTip">
    <string>左旋转</string>
   </property>
  </action>
  <action name="actRotateRight">
   <property name="icon">
    <iconset resource="res.qrc">
     <normaloff>:/images/images/rotateright.png</normaloff>:/images/images/rotateright.png</iconset>
   </property>
   <property name="text">
    <string>右旋转</string>
   </property>
   <property name="toolTip">
    <string>右旋转</string>
   </property>
  </action>
  <action name="actRestore">
   <property name="icon">
    <iconset resource="res.qrc">
     <normaloff>:/images/images/420.bmp</normaloff>:/images/images/420.bmp</iconset>
   </property>
   <property name="text">
    <string>恢复</string>
   </property>
   <property name="toolTip">
    <string>恢复大小</string>
   </property>
  </action>
  <action name="actGroup">
   <property name="icon">
    <iconset resource="res.qrc">
     <normaloff>:/images/images/UNGROUP.BMP</normaloff>:/images/images/UNGROUP.BMP</iconset>
   </property>
   <property name="text">
    <string>组合</string>
   </property>
   <property name="toolTip">
    <string>组合</string>
   </property>
  </action>
  <action name="actGroupBreak">
   <property name="icon">
    <iconset resource="res.qrc">
     <normaloff>:/images/images/128.bmp</normaloff>:/images/images/128.bmp</iconset>
   </property>
   <property name="text">
    <string>打散</string>
   </property>
   <property name="toolTip">
    <string>取消组合</string>
   </property>
  </action>
  <action name="actItem_Circle">
   <property name="icon">
    <iconset resource="res.qrc">
     <normaloff>:/images/images/08.JPG</normaloff>:/images/images/08.JPG</iconset>
   </property>
   <property name="text">
    <string>圆形</string>
   </property>
   <property name="toolTip">
    <string>圆形</string>
   </property>
  </action>
  <action name="actItem_Triangle">
   <property name="icon">
    <iconset resource="res.qrc">
     <normaloff>:/images/images/Icon1242.ico</normaloff>:/images/images/Icon1242.ico</iconset>
   </property>
   <property name="text">
    <string>三角形</string>
   </property>
   <property name="toolTip">
    <string>三角形</string>
   </property>
  </action>
 </widget>
 <layoutdefault spacing="6" margin="11"/>
 <customwidgets>
  <customwidget>
   <class>QWGraphicsView</class>
   <extends>QGraphicsView</extends>
   <header location="global">qwgraphicsview.h</header>
  </customwidget>
 </customwidgets>
 <resources>
  <include location="res.qrc"/>
 </resources>
 <connections>
  <connection>
   <sender>actQuit</sender>
   <signal>triggered()</signal>
   <receiver>MainWindow</receiver>
   <slot>close()</slot>
   <hints>
    <hint type="sourcelabel">
     <x>-1</x>
     <y>-1</y>
    </hint>
    <hint type="destinationlabel">
     <x>302</x>
     <y>153</y>
    </hint>
   </hints>
  </connection>
 </connections>
</ui>
还是有难度的。
最外层是标签ui
内部是
class
widget
layoutdefault
customwidgets
resources
connections
------------------------------------------------
widget内包含
property
widget
action
--------------------------------------------------------
我读取一下:
  <property name="geometry">
   <rect>
    <x>0</x>
    <y>0</y>
    <width>731</width>
    <height>460</height>
   </rect>
  </property>
  <property name="windowTitle">
   <string>Graphics  View绘图</string>
  </property>
这一段信息吧
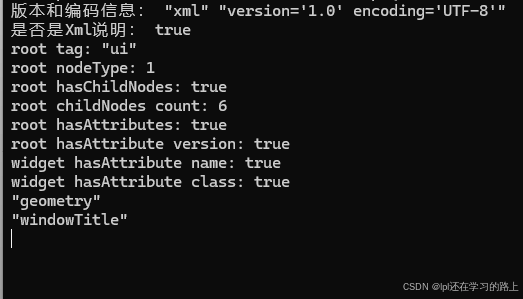
读取.ui文件的代码
        //解析XML
        QDomNode firstNode = doc.firstChild();
        qDebug()<<"版本和编码信息:"<<firstNode.nodeName()<<firstNode.nodeValue(); // "xml" "version='1.0' encoding='UTF-8'"
        qDebug()<<"是否是Xml说明:"<<firstNode.isProcessingInstruction();
        QDomElement ui = doc.documentElement();
        qDebug()<<"root tag:"<<ui.tagName();
        qDebug()<<"root nodeType:"<<ui.nodeType();    //QDomNode::ElementNode	1
        qDebug()<<"root hasChildNodes:"<<ui.hasChildNodes();    //true
        qDebug()<<"root childNodes count:"<<ui.childNodes().count();    //6
        qDebug()<<"root hasAttributes:"<<ui.hasAttributes();    //true
        qDebug()<<"root hasAttribute version:"<<ui.hasAttribute("version"); //true

        QDomElement xWidget = ui.firstChildElement("widget");
        qDebug()<<"widget hasAttribute name:"<<xWidget.hasAttribute("name");    //true
        qDebug()<<"widget hasAttribute class:"<<xWidget.hasAttribute("class");  //true

        QDomElement xProperty = xWidget.firstChildElement("property");
        while(!xProperty.isNull())
        {
            qDebug()<<xProperty.attribute("name");
            xProperty = xProperty.nextSiblingElement("property");
        }