文章目录
- 一、使用interface构建NLP应用
- 1.1 构建文本摘要应用
- 1.1.1 设置API密钥
- 1.1.2 调用文本摘要API
- 1.1.3 运行本地模型获取响应
- 1.1.4 使用interface构建应用
- 1.2 构建命名实体识别应用
- 1.2.1 调用NER任务API
- 1.2.2 使用interface构建应用
- 1.2.3 加入额外函数,合并tokens
- 二、构建图像标注应用
- 2.1 设置API密钥,定义图像标注函数
- 2.2 使用Interface构建应用
- 三、构建文生图应用
- 3.1 设置API密钥,定义文生图函数
- 3.2 使用Interface构建文生图应用
- 3.3 为文生图函数添加更多的控制参数
- 3.4 使用Blocks构建更复杂的用户界面
- 四、创建图像接龙游戏
- 4.1 设置API密钥,定义主函数和辅助函数
- 4.2 使用Blocks构建应用
- 五、构建LLM聊天机器人
- 5.1 设置API密钥
- 5.2 构建LLM聊天机器人
- 5.3 格式化聊天记录
- 5.4 构建流式输出机器人
传送门:
- 《Gradio官方教程一:Gradio生态系统、主要组件及Interface class简介》
- 《Gradio 4.37.1官方教程二:Blocks》
- 《Gradio 4.37.1官方教程三:Chatbot》
- 《Gradio 教程四:Building Generative AI Applications with Gradio》
deeplearning.ai课程主页、gradio官方教程
一、使用interface构建NLP应用
本章将使用gr.interface构建文本摘要和命名实体识别两个NLP任务的应用程序。
1.1 构建文本摘要应用
1.1.1 设置API密钥
本课程将通过API调用Hugging Face上运行的模型获取响应,所以需要先设置API密钥用于请求响应时的授权。
Hugging Face的"API keys" 称为“用户访问令牌”(User Access Tokens)。首先,访问 Access Tokens 页面创建自己的用户访问令牌。接下来,为了在本地机器上安全地保存访问令牌,可以将将访问令牌保存到环境变量中。
- 在项目的根目录中创建一个
.env文件 - 打开
.env文件,添加以下内容:HF_API_KEY="your API keys"后保存 - 为了能够在Jupyter Notebook中加载和使用这个 .env 文件,需要安装
python-dotenv库 - 在代码中,可以使用
python-dotenv库加载环境变量
from dotenv import load_dotenv, find_dotenv
_ = load_dotenv(find_dotenv()) # read local .env file
hf_api_key = os.environ['HF_API_KEY']
有关如何获取自己的访问令牌的更多信息,请访问User access tokens。
1.1.2 调用文本摘要API
import os
import io
from IPython.display import Image, display, HTML
from PIL import Image
import base64
import requests, json

#Summarization endpoint
def get_completion(inputs, parameters=None,ENDPOINT_URL=os.environ['HF_API_SUMMARY_BASE']):
    headers = {
      "Authorization": f"Bearer {hf_api_key}",
      "Content-Type": "application/json"
    }
    data = { "inputs": inputs }
    if parameters is not None:
        data.update({"parameters": parameters})
    response = requests.request("POST",
                                ENDPOINT_URL, headers=headers,
                                data=json.dumps(data)
                               )
    return json.loads(response.content.decode("utf-8"))
此函数将的作用是通过HTTP请求将输入文本发送到Hugging Face 上的API端点(ENDPOINT_URL),服务器端的摘要模型处理文本并返回摘要结果。下面是详细解析:
- 函数定义:
inputs: 要进行摘要的文本。parameters: 可选参数,用于调整摘要生成的细节。ENDPOINT_URL: API的URL地址,通过环境变量HF_API_SUMMARY_BASE获取。Hugging Face 上进行文本摘要任务时,默认使用DistillBartCNN模型。该模型是通过蒸馏FaceBook训练的的BartLargeCNN得到的,是专门为文本摘要设计的前沿模型。
- 请求头和请求数据
headers包含两个部分:Authorization: 使用hf_api_key进行授权;Content-Type: 指定请求内容的类型为JSON格式。data是发送给API的请求数据,包含输入文本inputs。如果有额外的参数parameters,也会包含在data中
- 发送请求:
- 使用
requests库发送一个POST请求到ENDPOINT_URL。 - 请求头
headers和请求数据data作为参数传递。后者 使用json.dumps函数转换为JSON格式。
- 使用
- 处理响应
response.content包含API返回的响应内容。decode("utf-8")将响应内容解码为字符串。json.loads将字符串转换为Python字典格式并返回。
在deeplearning.ai课程中,左侧有完整的jupyter代码,其中的环境变量中已经写入了
HF_API_SUMMARY_BASE。在本地跑的时候,直接将ENDPOINT_URL的值设为DistillBartCNN模型的网站就行。
1.1.3 运行本地模型获取响应
你也可以在本地运行摘要模型来获取摘要结果:
from transformers import pipeline

get_completion = pipeline("summarization", model="shleifer/distilbart-cnn-12-6")

def summarize(input):
    output = get_completion(input)
    return output[0]['summary_text']
text = ('''The tower is 324 metres (1,063 ft) tall, about the same height
        as an 81-storey building, and the tallest structure in Paris.
        Its base is square, measuring 125 metres (410 ft) on each side.
        During its construction, the Eiffel Tower surpassed the Washington
        Monument to become the tallest man-made structure in the world,
        a title it held for 41 years until the Chrysler Building
        in New York City was finished in 1930. It was the first structure
        to reach a height of 300 metres. Due to the addition of a broadcasting
        aerial at the top of the tower in 1957, it is now taller than the
        Chrysler Building by 5.2 metres (17 ft). Excluding transmitters, the
        Eiffel Tower is the second tallest free-standing structure in France
        after the Millau Viaduct.''')

get_completion(text)
1.1.4 使用interface构建应用
import gradio as gr
def summarize(input):
    output = get_completion(input)
    return output[0]['summary_text']

gr.close_all()
demo = gr.Interface(fn=summarize, inputs="text", outputs="text")
demo.launch()
#demo.launch(share=True, server_port=int(os.environ['PORT1']))

接下来,你可以输入任何文本到输入框,点击提交按钮,输出框就会出现总结性文本了。
上述代码中,"text"表示默认格式的文本框组件,即gr.Textbox()。你可以设置其参数,来进行组件的自定义,比如使用title 设置界面的标题,使用description 设置界面的描述,在gr.Textbox组件中设置文本框标签和显示的行数。
import gradio as gr

def summarize(input):
    output = get_completion(input)
    return output[0]['summary_text']

gr.close_all()
demo = gr.Interface(fn=summarize,
                    inputs=[gr.Textbox(label="Text to summarize", lines=6)],
                    outputs=[gr.Textbox(label="Result", lines=3)],
                    title="Text summarization with distilbart-cnn",
                    description="Summarize any text using the `shleifer/distilbart-cnn-12-6` model under the hood!"
                   )
demo.launch(share=True, server_port=int(os.environ['PORT2']))

server_port=int(os.environ['PORT2'])表示使用PORT2环境变量指定的端口号来启动服务器。
1.2 构建命名实体识别应用
1.2.1 调用NER任务API
PI_URL = os.environ['HF_API_NER_BASE'] #NER endpoint
text = "My name is Andrew, I'm building DeepLearningAI and I live in California"
get_completion(text, parameters=None, ENDPOINT_URL= API_URL)
[{'entity': 'B-PER',
  'score': 0.9990625,
  'index': 4,
  'word': 'Andrew',
  'start': 11,
  'end': 17},
 {'entity': 'B-ORG',
  'score': 0.9927856,
  'index': 10,
  'word': 'Deep',
  'start': 32,
  'end': 36},
 {'entity': 'I-ORG',
  'score': 0.99677867,
  'index': 11,
  'word': '##L',
  'start': 36,
  'end': 37},
 {'entity': 'I-ORG',
  'score': 0.9954496,
  'index': 12,
  'word': '##ear',
  'start': 37,
  'end': 40},
 {'entity': 'I-ORG',
  'score': 0.9959293,
  'index': 13,
  'word': '##ning',
  'start': 40,
  'end': 44},
 {'entity': 'I-ORG',
  'score': 0.8917463,
  'index': 14,
  'word': '##A',
  'start': 44,
  'end': 45},
 {'entity': 'I-ORG',
  'score': 0.5036118,
  'index': 15,
  'word': '##I',
  'start': 45,
  'end': 46},
 {'entity': 'B-LOC',
  'score': 0.99969244,
  'index': 20,
  'word': 'California',
  'start': 61,
  'end': 71}]
我们切换了新的API端点PI_URL来完成NER任务,这会调用dslim/bert-base-NER模型来获取响应。你也可以在本地运行模型来获取结果:
from transformers import pipeline

get_completion = pipeline("ner", model="dslim/bert-base-NER")

def ner(input):
    output = get_completion(input)
    return {"text": input, "entities": output}
1.2.2 使用interface构建应用
上一步我们通过我们通过get_completion函数获取了完整的NER结果,但是这个显示方式不太友好。我们使用Gradio将其进行演示,可读性会强很多。
在下面的代码中,我们使用了gr.HighlightedText组件,它会根据 ner 函数返回的结果自动高亮显示 entities 部分。entities 列表应该包含每个实体的详细信息,例如实体本身、起始位置、结束位置和标签。另外我们还使用examples参数,在界面下方添加示例,方便用户快速测试。
#gr.close_all()   # 关闭所有的Gradio演示
demo = gr.Interface(fn=ner,
                    inputs=[gr.Textbox(label="Text to find entities", lines=2)],
                    outputs=[gr.HighlightedText(label="Text with entities")],
                    title="NER with dslim/bert-base-NER",
                    description="Find entities using the `dslim/bert-base-NER` model under the hood!",
                    allow_flagging="never",
                    #Here we introduce a new tag, examples, easy to use examples for your application
                    examples=["My name is Andrew and I live in California", "My name is Poli and work at HuggingFace"])
demo.launch(share=True, server_port=int(os.environ['PORT3']))

可以看到,一些实体单词被分割成多个tokens,实体标签以字母 B 开头,表示开始标记(beginning token),I 表示中间标记(intermediate token)。为了得到一个更友好的显示界面,可以构造一个合并函数将分割的tokens合并为一个完整的实体单词。
1.2.3 加入额外函数,合并tokens
def merge_tokens(tokens):
    merged_tokens = []												# 初始化一个空列表,用于存储合并后的标记
    for token in tokens:											# 遍历输入的所有标记
        if merged_tokens and token['entity'].startswith('I-') and merged_tokens[-1]['entity'].endswith(token['entity'][2:]):  # 判断是否合并
            # If current token continues the entity of the last one, merge them
            last_token = merged_tokens[-1]
            last_token['word'] += token['word'].replace('##', '')  # 去掉当前token的前缀# ,添加到上一个token后面
            last_token['end'] = token['end']					   # 更新合并后标记的结束位置
            last_token['score'] = (last_token['score'] + token['score']) / 2
        else:
            # 如果当前标记不能与上一个合并后的标记合并,将其直接添加到 merged_tokens 列表中
            merged_tokens.append(token)

    return merged_tokens

def ner(input):
    output = get_completion(input, parameters=None, ENDPOINT_URL=API_URL)
    merged_tokens = merge_tokens(output)
    return {"text": input, "entities": merged_tokens}

gr.close_all()
demo = gr.Interface(fn=ner,
                    inputs=[gr.Textbox(label="Text to find entities", lines=2)],
                    outputs=[gr.HighlightedText(label="Text with entities")],
                    title="NER with dslim/bert-base-NER",
                    description="Find entities using the `dslim/bert-base-NER` model under the hood!",
                    allow_flagging="never",
                    examples=["My name is Andrew, I'm building DeeplearningAI and I live in California", "My name is Poli, I live in Vienna and work at HuggingFace"])

demo.launch(share=True, server_port=int(os.environ['PORT4']))

二、构建图像标注应用
2.1 设置API密钥,定义图像标注函数
import os
import io
import IPython.display
from PIL import Image
import base64
from dotenv import load_dotenv, find_dotenv
_ = load_dotenv(find_dotenv()) # read local .env file
hf_api_key = os.environ['HF_API_KEY']
import requests, json

#Image-to-text endpoint
def get_completion(inputs, parameters=None, ENDPOINT_URL=os.environ['HF_API_ITT_BASE']):
    headers = {
      "Authorization": f"Bearer {hf_api_key}",
      "Content-Type": "application/json"
    }
    data = { "inputs": inputs }
    if parameters is not None:
        data.update({"parameters": parameters})
    response = requests.request("POST",
                                ENDPOINT_URL,
                                headers=headers,
                                data=json.dumps(data))
    return json.loads(response.content.decode("utf-8"))
此处的ENDPOINT_URL会调用Salesforce/blip-image-captioning-base模型,当输入一张图片后,会返回这张图片对应的文本描述。 https://free-images.com上有很多免费的图片,比如输入以下图片,模型生成的描述是“戴着圣诞帽和围巾的狗”。
image_url = "https://free-images.com/sm/9596/dog_animal_greyhound_983023.jpg"
display(IPython.display.Image(url=image_url))
get_completion(image_url)
2.2 使用Interface构建应用
import gradio as gr

def image_to_base64_str(pil_image):
    byte_arr = io.BytesIO()
    pil_image.save(byte_arr, format='PNG')
    byte_arr = byte_arr.getvalue()
    return str(base64.b64encode(byte_arr).decode('utf-8'))

def captioner(image):
    base64_image = image_to_base64_str(image)
    result = get_completion(base64_image)
    return result[0]['generated_text']

gr.close_all()
demo = gr.Interface(fn=captioner,
                    inputs=[gr.Image(label="Upload image", type="pil")],
                    outputs=[gr.Textbox(label="Caption")],
                    title="Image Captioning with BLIP",
                    description="Caption any image using the BLIP model",
                    allow_flagging="never",
                    examples=["christmas_dog.jpeg", "bird_flight.jpeg", "cow.jpeg"])

demo.launch(share=True, server_port=int(os.environ['PORT1']))
imageToBase64函数:将图像转换为Base64格式,这是API所需的格式;captioner函数:接收图像并生成标注结果。

三、构建文生图应用
3.1 设置API密钥,定义文生图函数
import os
import io
import IPython.display
from PIL import Image
import base64
from dotenv import load_dotenv, find_dotenv
_ = load_dotenv(find_dotenv()) # read local .env file
hf_api_key = os.environ['HF_API_KEY']
# Helper function
import requests, json

#Text-to-image endpoint
def get_completion(inputs, parameters=None, ENDPOINT_URL=os.environ['HF_API_TTI_BASE']):
    headers = {
      "Authorization": f"Bearer {hf_api_key}",
      "Content-Type": "application/json"
    }
    data = { "inputs": inputs }
    if parameters is not None:
        data.update({"parameters": parameters})
    response = requests.request("POST",
                                ENDPOINT_URL,
                                headers=headers,
                                data=json.dumps(data))
    return json.loads(response.content.decode("utf-8"))
上述代码会调用diffusers库的runwayml/stable-diffusion-v1-5模型,我们可以测试一下这个模型的效果:
prompt = "a dog in a park"

result = get_completion(prompt)
IPython.display.HTML(f'<img src="data:image/png;base64,{result}" />')
3.2 使用Interface构建文生图应用
import gradio as gr

#定义一个辅助函数,将PIL image转为API需要的base64格式
def base64_to_pil(img_base64):
    base64_decoded = base64.b64decode(img_base64)
    byte_stream = io.BytesIO(base64_decoded)
    pil_image = Image.open(byte_stream)
    return pil_image

def generate(prompt):
    output = get_completion(prompt)
    result_image = base64_to_pil(output)
    return result_image

gr.close_all()
demo = gr.Interface(fn=generate,
                    inputs=[gr.Textbox(label="Your prompt")],
                    outputs=[gr.Image(label="Result")],
                    title="Image Generation with Stable Diffusion",
                    description="Generate any image with Stable Diffusion",
                    allow_flagging="never",
                    examples=["the spirit of a tamagotchi wandering in the city of Vienna","a mecha robot in a favela"])

demo.launch(share=True, server_port=int(os.environ['PORT1']))

3.3 为文生图函数添加更多的控制参数
我们可以在generate函数中添加更多的控制参数,例如添加负面提示、采样步数、提示词的控制程度(值越高,生成的图片越符合提示词;越低,生成的图片越多样化)、图像宽度和高度等选项。
import gradio as gr

#定义一个辅助函数,将PIL image转为API需要的base64格式
def base64_to_pil(img_base64):
    base64_decoded = base64.b64decode(img_base64)
    byte_stream = io.BytesIO(base64_decoded)
    pil_image = Image.open(byte_stream)
    return pil_image

def generate(prompt, negative_prompt, steps, guidance, width, height):
    params = {
        "negative_prompt": negative_prompt,
        "num_inference_steps": steps,
        "guidance_scale": guidance,
        "width": width,
        "height": height
    }

    output = get_completion(prompt, params)
    pil_image = base64_to_pil(output)
    return pil_image
下面采用滑块组件gr.Slider,这样可以更方便地调整这些参数的数值。
gr.close_all()
demo = gr.Interface(fn=generate,
                    inputs=[
                        gr.Textbox(label="Your prompt"),
                        gr.Textbox(label="Negative prompt"),
                        gr.Slider(label="Inference Steps", minimum=1, maximum=100, value=25,
                                 info="In how many steps will the denoiser denoise the image?"),
                        gr.Slider(label="Guidance Scale", minimum=1, maximum=20, value=7,
                                  info="Controls how much the text prompt influences the result"),
                        gr.Slider(label="Width", minimum=64, maximum=512, step=64, value=512),
                        gr.Slider(label="Height", minimum=64, maximum=512, step=64, value=512),
                    ],
                    outputs=[gr.Image(label="Result")],
                    title="Image Generation with Stable Diffusion",
                    description="Generate any image with Stable Diffusion",
                    allow_flagging="never"
                    )

demo.launch(share=True, server_port=int(os.environ['PORT2']))
从gr.Interface的参数可以看到,inputs是一个输入组件的列表,每个组件和generate函数的参数一一对应。

3.4 使用Blocks构建更复杂的用户界面
gr.Interface()在构建应用界面时则提供了简单的自动化配置,而Gradle Blocks有更大的灵活性,比如自定义界面的布局、自定义事件监听器、处理更复杂的数据流(比如顺序执行多个组件,一个组件的输出可以作为下一个组件的输入)等等,Automatic1111的stable diffusion Web UI就是用Gradio的Blocks构建的。
在默认情况下,Block 中的组件是垂直排列的,我们可以使用with语句定义多个gr.Row()和gr.Column()对组件进行重新排列。另外在使用gr.Interface()时, 'Clear'和 'Submit'按钮会自动添加,无需手动定义;使用gr.Blocks()时,你需要显式地定义'Submit'按钮(gr.Button())。
with gr.Blocks() as demo:
    gr.Markdown("# Image Generation with Stable Diffusion")
    prompt = gr.Textbox(label="Your prompt")
    with gr.Row():
        with gr.Column():
            negative_prompt = gr.Textbox(label="Negative prompt")
            steps = gr.Slider(label="Inference Steps", minimum=1, maximum=100, value=25,
                      info="In many steps will the denoiser denoise the image?")
            guidance = gr.Slider(label="Guidance Scale", minimum=1, maximum=20, value=7,
                      info="Controls how much the text prompt influences the result")
            width = gr.Slider(label="Width", minimum=64, maximum=512, step=64, value=512)
            height = gr.Slider(label="Height", minimum=64, maximum=512, step=64, value=512)
            btn = gr.Button("Submit")
        with gr.Column():
            output = gr.Image(label="Result")

    btn.click(fn=generate, inputs=[prompt,negative_prompt,steps,guidance,width,height], outputs=[output])
gr.close_all()
demo.launch(share=True, server_port=int(os.environ['PORT3']))
with gr.Blocks() as demo:使用with语句创建了一个名为demo的Blocks应用程序,所有组件和事件都将在这个上下文中被定义。with gr.Column():通过此语句,将界面分为了两列,每一列的内容都可以自定义。btn.click():定义按钮点击事件。click()是事件监听器,定义了应用程序中的数据流。
在上面的示例中,当按钮被点击时,数据流被触发——调用generate函数,左侧组件中的内容内容作为输入,函数返回的结果会显示在右侧output文本框中。与Interface类似,事件监听器可以接受多个输入或输出。
另外还有两个常用的控制参数:
scale:设置列的相对宽度。gr.Column()的scale参数可以设置列的相对宽度(默认为1),比如有两列,scale值分别为4和1,那么第一列占4/5的宽度。gr.Accordion():折叠面板,可以显示/隐藏应用程序的选项。通过设置open参数可以设置折叠组件的默认状态(open=True默认显示,open=False默认折叠)
with gr.Blocks() as demo:
    gr.Markdown("# Image Generation with Stable Diffusion")
    with gr.Row():
        with gr.Column(scale=4):
            prompt = gr.Textbox(label="Your prompt") #Give prompt some real estate
        with gr.Column(scale=1, min_width=50):
            btn = gr.Button("Submit") #Submit button side by side!
    with gr.Accordion("Advanced options", open=False): #Let's hide the advanced options!
            negative_prompt = gr.Textbox(label="Negative prompt")
            with gr.Row():
                with gr.Column():
                    steps = gr.Slider(label="Inference Steps", minimum=1, maximum=100, value=25,
                      info="In many steps will the denoiser denoise the image?")
                    guidance = gr.Slider(label="Guidance Scale", minimum=1, maximum=20, value=7,
                      info="Controls how much the text prompt influences the result")
                with gr.Column():
                    width = gr.Slider(label="Width", minimum=64, maximum=512, step=64, value=512)
                    height = gr.Slider(label="Height", minimum=64, maximum=512, step=64, value=512)
    output = gr.Image(label="Result") #Move the output up too

    btn.click(fn=generate, inputs=[prompt,negative_prompt,steps,guidance,width,height], outputs=[output])

gr.close_all()
demo.launch(share=True, server_port=int(os.environ['PORT4']))

所有可选的滑块都被折叠隐藏,点击箭头就可以打开显示。
四、创建图像接龙游戏
在前面的课程中,我们学到了如何使用Gradio来构建NLP应用、图像标注应用和文生成图应用,现在,将这些知识结合起来,创建一个有趣的图像接龙游戏——上传一张图像,生成其描述,再用这个描述生成一张新图像。
4.1 设置API密钥,定义主函数和辅助函数
import os
import io
from IPython.display import Image, display, HTML
from PIL import Image
import base64

from dotenv import load_dotenv, find_dotenv
_ = load_dotenv(find_dotenv()) # read local .env file
hf_api_key = os.environ['HF_API_KEY']
#### Helper function
import requests, json

#Here we are going to call multiple endpoints!
def get_completion(inputs, parameters=None, ENDPOINT_URL=""):
    headers = {
      "Authorization": f"Bearer {hf_api_key}",
      "Content-Type": "application/json"
    }
    data = { "inputs": inputs }
    if parameters is not None:
        data.update({"parameters": parameters})
    response = requests.request("POST",
                                ENDPOINT_URL,
                                headers=headers,
                                data=json.dumps(data))
    return json.loads(response.content.decode("utf-8"))
#Bringing the functions from lessons 3 and 4!
def image_to_base64_str(pil_image):
    byte_arr = io.BytesIO()
    pil_image.save(byte_arr, format='PNG')
    byte_arr = byte_arr.getvalue()
    return str(base64.b64encode(byte_arr).decode('utf-8'))

def base64_to_pil(img_base64):
    base64_decoded = base64.b64decode(img_base64)
    byte_stream = io.BytesIO(base64_decoded)
    pil_image = Image.open(byte_stream)
    return pil_image

def captioner(image):
    base64_image = image_to_base64_str(image)
    result = get_completion(base64_image, None, ITT_ENDPOINT)
    return result[0]['generated_text']

def generate(prompt):
    output = get_completion(prompt, None, TTI_ENDPOINT)
    result_image = base64_to_pil(output)
    return result_image
4.2 使用Blocks构建应用
先进行图像标注,再进行文生图。
#text-to-image
TTI_ENDPOINT = os.environ['HF_API_TTI_BASE']
#image-to-text
ITT_ENDPOINT = os.environ['HF_API_ITT_BASE']
import gradio as gr
with gr.Blocks() as demo:
    gr.Markdown("# Describe-and-Generate game 🖍️")
    image_upload = gr.Image(label="Your first image",type="pil")
    btn_caption = gr.Button("Generate caption")
    caption = gr.Textbox(label="Generated caption")

    btn_caption.click(fn=captioner, inputs=[image_upload], outputs=[caption])

gr.close_all()
demo.launch(share=True, server_port=int(os.environ['PORT1']))
with gr.Blocks() as demo:
    gr.Markdown("# Describe-and-Generate game 🖍️")
    image_upload = gr.Image(label="Your first image",type="pil")
    btn_caption = gr.Button("Generate caption")
    caption = gr.Textbox(label="Generated caption")
    btn_image = gr.Button("Generate image")
    image_output = gr.Image(label="Generated Image")
    btn_caption.click(fn=captioner, inputs=[image_upload], outputs=[caption])
    btn_image.click(fn=generate, inputs=[caption], outputs=[image_output])

gr.close_all()
demo.launch(share=True, server_port=int(os.environ['PORT2']))
也可以一次性完成这个任务:
def caption_and_generate(image):
    caption = captioner(image)
    image = generate(caption)
    return [caption, image]

with gr.Blocks() as demo:
    gr.Markdown("# Describe-and-Generate game 🖍️")
    image_upload = gr.Image(label="Your first image",type="pil")
    btn_all = gr.Button("Caption and generate")
    caption = gr.Textbox(label="Generated caption")
    image_output = gr.Image(label="Generated Image")

    btn_all.click(fn=caption_and_generate, inputs=[image_upload], outputs=[caption, image_output])

gr.close_all()
demo.launch(share=True, server_port=int(os.environ['PORT3']))

你以进行多次循环,将生成的图像再次输入生成新的描述和图像,观察结果是否一致或主题是否保持。
另外,这段代码使用一个按钮完成两个过程,点击按钮即可同时生成描述和图像。也可以考虑在一个界面中使用两个按钮分别生成描述和图像,这样用户可以在中间检查描述。
五、构建LLM聊天机器人
5.1 设置API密钥
import os
import io
import IPython.display
from PIL import Image
import base64
import requests
requests.adapters.DEFAULT_TIMEOUT = 60

from dotenv import load_dotenv, find_dotenv
_ = load_dotenv(find_dotenv()) # read local .env file
hf_api_key = os.environ['HF_API_KEY']
# Helper function
import requests, json
from text_generation import Client

#FalcomLM-instruct endpoint on the text_generation library
client = Client(os.environ['HF_API_FALCOM_BASE'], headers={"Authorization": f"Basic {hf_api_key}"}, timeout=120)
prompt = "Has math been invented or discovered?"
client.generate(prompt, max_new_tokens=256).generated_text
'\nMath has been both invented and discovered. It is a human invention in the sense that it is a system of rules and concepts that we have created to help us understand the world around us. However, it is also a discovery in the sense that it is a fundamental aspect of the universe that we have uncovered through our observations and experiments.'
这里使用了falcon-40b-instruct模型进行测试。
5.2 构建LLM聊天机器人
在第一章中,我们学习了使用Interface构建应用界面:
#Back to Lesson 2, time flies!
import gradio as gr
def generate(input, slider):
    output = client.generate(input, max_new_tokens=slider).generated_text
    return output

demo = gr.Interface(fn=generate,
                    inputs=[gr.Textbox(label="Prompt"),
                            gr.Slider(label="Max new tokens",
                                      value=20,
                                      maximum=1024,
                                      minimum=1)],
                    outputs=[gr.Textbox(label="Completion")])

gr.close_all()
demo.launch(share=True, server_port=int(os.environ['PORT1']))

gr.Chatbot()允许您保存用户与LLM之间的聊天记录,并在应用程序中显示对话。
-
定义一个函数,该函数接受一个
gr.Chatbot()对象作为输入。 -
在这个函数中,将用户消息和LLM的响应作为一个元组(或列表)附加到
gr.Chatbot()对象中。例如,使用chatbot_object.append((user_message, llm_message))。 -
将
gr.Chatbot()对象包括在应用程序的输入和输出中,也就是更新对话框
import random

def respond(message, chat_history):
        #No LLM here, just respond with a random pre-made message
        bot_message = random.choice(["Tell me more about it",
                                     "Cool, but I'm not interested",
                                     "Hmmmm, ok then"])
        chat_history.append((message, bot_message))
        return "", chat_history

with gr.Blocks() as demo:
    chatbot = gr.Chatbot(height=240) #just to fit the notebook
    msg = gr.Textbox(label="Prompt")
    btn = gr.Button("Submit")
    clear = gr.ClearButton(components=[msg, chatbot], value="Clear console")

    btn.click(respond, inputs=[msg, chatbot], outputs=[msg, chatbot])
    msg.submit(respond, inputs=[msg, chatbot], outputs=[msg, chatbot]) #Press enter to submit

gr.close_all()
demo.launch(share=True, server_port=int(os.environ['PORT2']))

5.3 格式化聊天记录
遍历gr.Chatbot()对象中的聊天记录,并将每一条记录格式化输出:
- 迭代遍历: 使用for循环遍历chatbot对象(即聊天记录)。
- 拆解元组: 每一条记录是一个包含用户消息和LLM响应的元组,您可以通过元组解包来分别获取用户消息和LLM的响应,例如:
for turn in chat_history:
    user_msg, bot_msg = turn
    ...
下面是具体的代码:
def format_chat_prompt(message, chat_history):
    prompt = ""
    for turn in chat_history:						# 遍历聊天记录
        user_message, bot_message = turn			# 提取用户信息和机器人回复
        # 将每条记录格式化为字符串 "User: {user_message}\nAssistant: {bot_message}",并附加到 prompt 中
        prompt = f"{prompt}\nUser: {user_message}\nAssistant: {bot_message}"
    # 在循环结束后,将当前用户输入的消息 message 添加到 prompt 中,并以 Assistant: 结尾,为生成新的助手回复提供上下文。
    prompt = f"{prompt}\nUser: {message}\nAssistant:"
    return prompt

def respond(message, chat_history):
        formatted_prompt = format_chat_prompt(message, chat_history)
        bot_message = client.generate(formatted_prompt,
                                     max_new_tokens=1024,
                                     stop_sequences=["\nUser:", "<|endoftext|>"]).generated_text
        chat_history.append((message, bot_message))
        return "", chat_history

with gr.Blocks() as demo:
    chatbot = gr.Chatbot(height=240) #just to fit the notebook
    msg = gr.Textbox(label="Prompt")
    btn = gr.Button("Submit")
    clear = gr.ClearButton(components=[msg, chatbot], value="Clear console")

    btn.click(respond, inputs=[msg, chatbot], outputs=[msg, chatbot])
    msg.submit(respond, inputs=[msg, chatbot], outputs=[msg, chatbot]) #Press enter to submit

gr.close_all()
demo.launch(share=True, server_port=int(os.environ['PORT3']))
format_chat_prompt 函数将当前对话上下文整理为一个格式化的文本块,这个文本块可以作为提示输入到LLM中,以生成上下文相关的回复。通过包含之前的聊天记录,确保LLM能够理解整个对话的背景,从而生成更相关和连贯的回复。
5.4 构建流式输出机器人
def format_chat_prompt(message, chat_history, instruction):
    prompt = f"System:{instruction}"
    for turn in chat_history:
        user_message, bot_message = turn
        prompt = f"{prompt}\nUser: {user_message}\nAssistant: {bot_message}"
    prompt = f"{prompt}\nUser: {message}\nAssistant:"
    return prompt
def respond(message, chat_history, instruction, temperature=0.7):
    prompt = format_chat_prompt(message, chat_history, instruction)
    chat_history = chat_history + [[message, ""]]
    stream = client.generate_stream(prompt,
                                      max_new_tokens=1024,
                                      stop_sequences=["\nUser:", "<|endoftext|>"],
                                      temperature=temperature)
                                      #stop_sequences to not generate the user answer
    acc_text = ""
    #Streaming the tokens
    for idx, response in enumerate(stream):
            text_token = response.token.text

            if response.details:
                return

            if idx == 0 and text_token.startswith(" "):
                text_token = text_token[1:]

            acc_text += text_token
            last_turn = list(chat_history.pop(-1))
            last_turn[-1] += acc_text
            chat_history = chat_history + [last_turn]
            yield "", chat_history
            acc_text = ""
with gr.Blocks() as demo:
chatbot = gr.Chatbot(height=24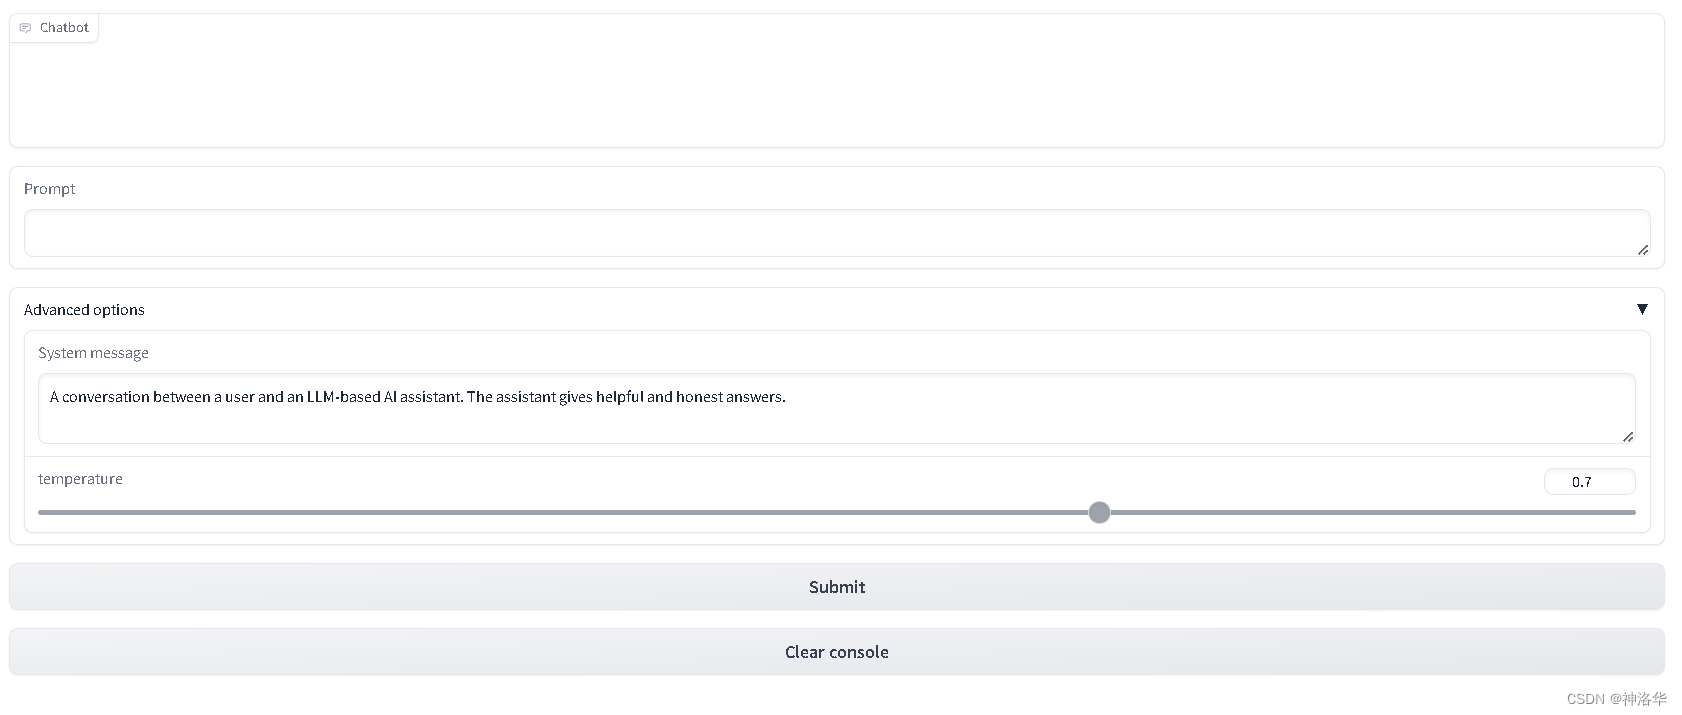
0) #just to fit the notebook
msg = gr.Textbox(label="Prompt")
with gr.Accordion(label="Advanced options",open=False):
system = gr.Textbox(label="System message", lines=2, value="A conversation between a user and an LLM-based AI assistant. The assistant gives helpful and honest answers.")
temperature = gr.Slider(label="temperature", minimum=0.1, maximum=1, value=0.7, step=0.1)
btn = gr.Button("Submit")
clear = gr.ClearButton(components=[msg, chatbot], value="Clear console")
btn.click(respond, inputs=[msg, chatbot, system], outputs=[msg, chatbot])
msg.submit(respond, inputs=[msg, chatbot, system], outputs=[msg, chatbot]) #Press enter to submit
gr.close_all()
demo.queue().launch(share=True, server_port=int(os.environ['PORT4']))


![[Labview] 改写表格内容并储存覆盖Excel](https://img-blog.csdnimg.cn/direct/e70eaf2315594ee9b08a0fdf86393b6e.png)