大部分的安卓应用都免不了与后端服务器进行通信。在通信过程中,主要面临两方面的风险:1、中间人攻击。当通信使用 HTTP 等明文协议,通信内容可被嗅探甚至篡改。2、通信内容被攻击者分析。使用加密的协议,虽然避免了中间人攻击,但是攻击者仍然可以通过各种方式获取请求内容,然后针对性的进行漏洞挖掘。
一、背景知识
1、SSL/TLS 简介
为了应对中间人攻击,通常会采用安全套接字层 (SSL,现在技术上称为传输层安全协议 (TLS))来对通信进行加密传输。
当 SSL 与 HTTP 协议相结合就形成了 HTTPS,当 SSL 与 POP3 相结合就形成了 POP3S。
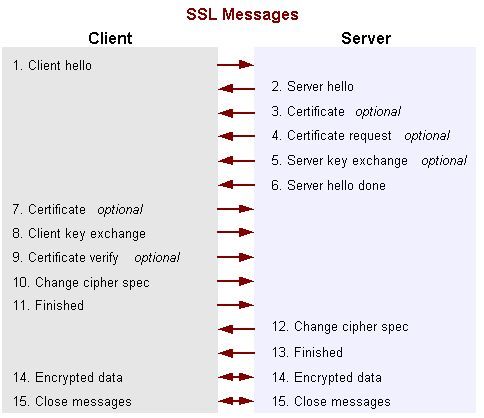
SSL/TLS 的握手过程如下图(了解下就好):
2、数字证书
证书通常是指 X.509 格式证书,是由Netscape 当初设计 SSL 协议的时候定义的。其是服务端公钥的载体,同时还包含很多其他信息,如签发者信息、以及证书申请者相关的信息(国家、组织名称、常用名称等等)、加密算法、签名算法、签名指纹等。下图展示了 baidu.com 的证书部分信息。
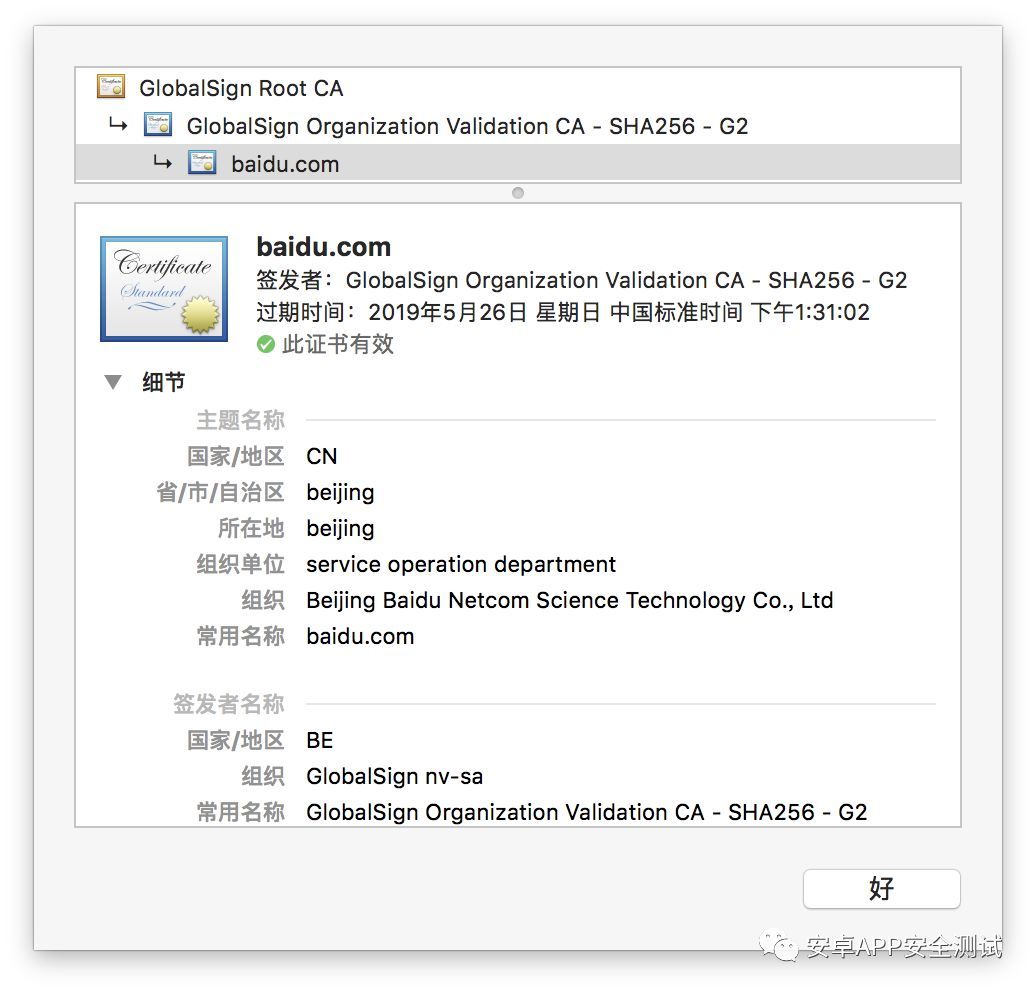
在证书校验时候,签发者(CA)信息很重要。那么,为什么一个证书还需要有签发者呢?我们知道任何组织或个人都可以生成自己的数字证书,并设置证书中的任何信息。当客户端与服务端通信的时候,客户端就很难确认当前证书是否真的是服务端组织的真实证书。这个时候,一个比较可行的方案就是有个客户端信任的第三方,这个第三方为服务端证书进行签名,来证明证书的真实性。以 Android 系统为例,其预置了知名的权威签名机构公钥证书,可以判断服务端证书是否为这些机构签发。如果不是知名的权威机构签发,则认为证书是非法的,不会建立 SSL/TLS 通信。
除了签发者(CA)信息之外,证书中的常用名称(Common Name)也是比较重要的信息,常被用来校验HTTPS通信的域名是否正确。
3.自签名证书
自签名证书是无需别的证书为其签名来证明其合法性的证书,根证书都是自签名证书。私有 CA 签名证书则是指,为域名证书签名的 CA,其合法有效性没有得到广泛的认可,该 CA 的根证书没有被内置到系统中。
在实际的开发过程中,有时为了节省昂贵的购买证书的费用,而想要自己给自己的服务器的域名签发域名证书,这即是私有 CA 签名的证书。为了能够使用这种证书,需要在客户端预埋根证书,并对客户端证书合法性验证的过程进行干预,通过我们预埋的根证书为服务端的证书做合法性验证,而不依赖系统的根证书库。
二 .Android 的根证书管理
在 AOSP 源码库中,CA 根证书主要存放在 system/ca-certificates 目录下,而在 Android 系统中,则存放在 /system/etc/security/cacerts 目录下
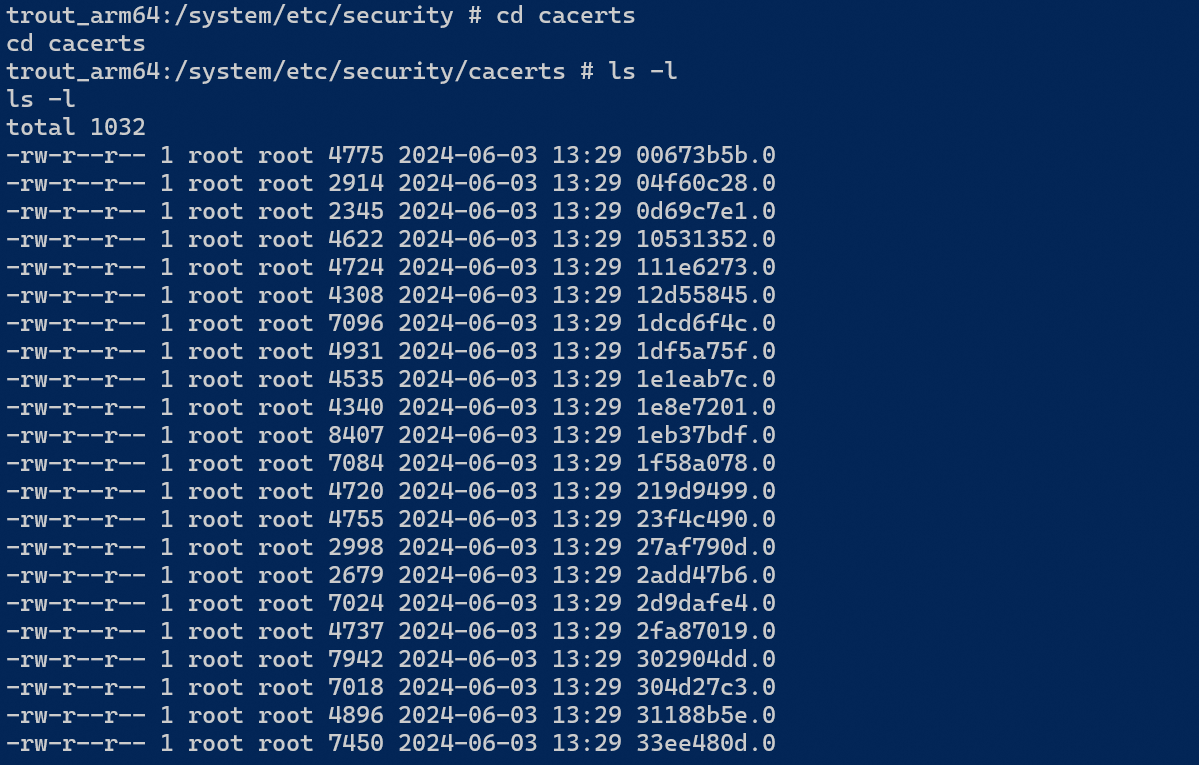
它们都是 PEM 格式的 X.509 证书。Android 系统通过 SystemCertificateSource、DirectoryCertificateSource 和 CertificateSource 等类管理系统根证书库。CertificateSource定义(位于frameworks/base/core/java/android/security/net/config/CertificateSource.java)了可以对根证书库执行的操作,主要是对根证书的获取和查找:
public interface CertificateSource {
    Set<X509Certificate> getCertificates();
    X509Certificate findBySubjectAndPublicKey(X509Certificate cert);
    X509Certificate findByIssuerAndSignature(X509Certificate cert);
    Set<X509Certificate> findAllByIssuerAndSignature(X509Certificate cert);
    void handleTrustStorageUpdate();
}
 @Override
    public Set<X509Certificate> getCertificates() {
        // TODO: loading all of these is wasteful, we should instead use a keystore style API.
        synchronized (mLock) {
            if (mCertificates != null) {
                return mCertificates;
            }

            Set<X509Certificate> certs = new ArraySet<X509Certificate>();
            if (mDir.isDirectory()) {
                for (String caFile : mDir.list()) {
                    if (isCertMarkedAsRemoved(caFile)) {
                        continue;
                    }
                    X509Certificate cert = readCertificate(caFile);
                    if (cert != null) {
                        certs.add(cert);
                    }
                }
            }
            mCertificates = certs;
            return mCertificates;
        }
    }
获取根证书库的 getCertificates() 操作在第一次被调用时,遍历文件系统,并加载系统所有的根证书文件,并缓存起来,以备后面访问。根证书的查找操作,主要依据证书文件的文件名进行,证书文件被要求以 [SubjectName 的哈希值].[Index] 的形式命名。
三.OKHTTP中的SSL,双向验证
    public Builder sslSocketFactory(SSLSocketFactory sslSocketFactory) {
            if (sslSocketFactory == null)
                throw new NullPointerException("sslSocketFactory == null");
            this.sslSocketFactory = sslSocketFactory;
            this.certificateChainCleaner = Platform.get().buildCertificateChainCleaner
                    (sslSocketFactory);
            return this;
        }
    //如果没有设置sslSocketFactory,就会使用默认的systemDefaultSslSocketFactory
    if (builder.sslSocketFactory != null || !isTLS) {
            this.sslSocketFactory = builder.sslSocketFactory;
            this.certificateChainCleaner = builder.certificateChainCleaner;
        } else {
            X509TrustManager trustManager = Util.platformTrustManager();
            this.sslSocketFactory = newSslSocketFactory(trustManager);
            this.certificateChainCleaner = CertificateChainCleaner.get(trustManager);
        }
默认的SslSocketFactory
  private static SSLSocketFactory newSslSocketFactory(X509TrustManager trustManager) {
    try {
      SSLContext sslContext = Platform.get().getSSLContext();
      sslContext.init(null, new TrustManager[] { trustManager }, null);
      return sslContext.getSocketFactory();
    } catch (GeneralSecurityException e) {
      throw new AssertionError("No System TLS", e); // The system has no TLS. Just give up.
    }
  }
在newSslSocketFactory方法中
1.调用SSLContext初始化获取SSLContext对象
2.调用init方法
3.获取SocketFactory
在SSL中有两种类型的校验模式:
单向校验:服务器向客户端发送证书进行校验
双向校验:除了服务器向客户端发送证书以外,客户端需要发送证书到服务器进行校验
sslContext.init(null, new TrustManager[]{trustManager}, null);
init函数中第一个传NULL,默认表示Okhttp只支持单向校验。
TrustManager[]{trustManager} 参数表示信任证书
X509TrustManager
 public static X509TrustManager platformTrustManager() {
    try {
      TrustManagerFactory trustManagerFactory = TrustManagerFactory.getInstance(
          TrustManagerFactory.getDefaultAlgorithm());
      trustManagerFactory.init((KeyStore) null);
      TrustManager[] trustManagers = trustManagerFactory.getTrustManagers();
      if (trustManagers.length != 1 || !(trustManagers[0] instanceof X509TrustManager)) {
        throw new IllegalStateException("Unexpected default trust managers:"
            + Arrays.toString(trustManagers));
      }
      return (X509TrustManager) trustManagers[0];
    } catch (GeneralSecurityException e) {
      throw new AssertionError("No System TLS", e); // The system has no TLS. Just give up.
    }
  }
getTrustManagers
public TrustManager[] engineGetTrustManagers() {
        if (keyStore == null) {
            throw new IllegalStateException(
                    "TrustManagerFactory is not initialized");
        }
        return new TrustManager[] { new TrustManagerImpl(keyStore) };
    }
keyStore:
 public void engineInit(KeyStore ks) throws KeyStoreException {
        if (ks != null) {
            keyStore = ks;
        } else {
            keyStore = Platform.getDefaultCertKeyStore();  //获取默认的系统根证书
        }
    }
系统根证书查看
代码如下:
        try {
        KeyStore keyStore = KeyStore.getInstance("AndroidCAStore");
            keyStore.load(null, null);
            Enumeration<String> aliases = keyStore.aliases();
            while (aliases.hasMoreElements()){
                String alias = aliases.nextElement();
                Certificate certificate = keyStore.getCertificate(alias);
                Log.i(TAG, "alias: "+alias);
                Log.i(TAG, "certificate: "+certificate);
            }
        } catch (IOException | CertificateException | NoSuchAlgorithmException | KeyStoreException e) {
        }
打印结果:
2024-06-26 18:58:10.416 6813-6813/com.jarvis.permission I/LX-MainActivity: alias: system:3c899c73.0
2024-06-26 18:58:10.418 6813-6813/com.jarvis.permission I/LX-MainActivity: certificate: Certificate:
        Data:
//版本号
            Version: 3 (0x2)
//序列号
            Serial Number:
                21:2a:56:0c:ae:da:0c:ab:40:45:bf:2b:a2:2d:3a:ea
//证书签名算法
        Signature Algorithm: ecdsa-with-SHA384
//证书发行者
            Issuer: C=CH, O=WISeKey, OU=OISTE Foundation Endorsed, CN=OISTE WISeKey Global Root GC CA
//证书有效时间
            Validity
                Not Before: May  9 09:48:34 2017 GMT
                Not After : May  9 09:58:33 2042 GMT
//证书主体名称
            Subject: C=CH, O=WISeKey, OU=OISTE Foundation Endorsed, CN=OISTE WISeKey Global Root GC CA
//证书公钥信息
            Subject Public Key Info:
//公钥算法
                Public Key Algorithm: id-ecPublicKey
//公钥
                    Public-Key: (384 bit)
                    00000000  04 4c e9 50 c0 c6 0f 72  18 bc d8 f1 ba b3 89 e2  |.L.P...r........|
                    00000010  79 4a a3 16 a7 6b 54 24  db 51 ff ea f4 09 24 c3  |yJ...kT$.Q....$.|
                    00000020  0b 22 9f cb 6a 27 82 81  0d d2 c0 af 31 e4 74 82  |."..j'......1.t.|
                    00000030  6e ca 25 d9 8c 75 9d f1  db d0 9a a2 4b 21 7e 16  |n.%..u......K!~.|
                    00000040  a7 63 90 d2 39 d4 b1 87  78 5f 18 96 0f 50 1b 35  |.c..9...x_...P.5|
                    00000050  37 0f 6a c6 dc d9 13 4d  a4 8e 90 37 e6 bd 5b 31  |7.j....M...7..[1|
                    00000060  91
                    //扩展|.|
            X509v3 extensions:
                X509v3 Key Usage: critical
                    Certificate Sign, CRL Sign
                X509v3 Basic Constraints: critical
                    CA:TRUE
                X509v3 Subject Key Identifier:
                    48:87:14:AC:E3:C3:9E:90:60:3A:D7:CA:89:EE:D3:AD:8C:B4:50:66
                1.3.6.1.4.1.311.21.1:
                    ...
                      //签名算法
        Signature Algorithm: ecdsa-with-SHA384
             30:65:02:30:26:c7:69:5b:dc:d5:e7:b2:e7:c8:0c:8c:8c:c3:
             dd:79:8c:1b:63:d5:c9:52:94:4e:4d:82:4a:73:1e:b2:80:84:
             a9:25:c0:4c:5a:6d:49:29:60:78:13:e2:7e:48:eb:64:02:31:
             00:db:34:20:32:08:ff:9a:49:02:b6:88:de:14:af:5d:6c:99:
             71:8d:1a:3f:8b:d7:e0:a2:36:86:1c:07:82:3a:76:53:fd:c2:
             a2:ed:ef:7b:b0:80:4f:58:0f:4b:53:39:bd
如果目标 URL 服务器下发的证书不在已信任的证书列表里,或者该证书是自签名的,不是由权威机构颁发,那么会出异常,如何处理?
四.自签名证书处理:
方式一:修改 X509TrustManager 所用的根证书库
private static TrustManager[] prepareTrustManager(InputStream certificates) {
        if (certificates == null) {
            return null;
        }
        try {
            CertificateFactory certificateFactory = CertificateFactory.getInstance("X.509");
            KeyStore keyStore = KeyStore.getInstance(KeyStore.getDefaultType());
            keyStore.load(null);
            int index = 0;
            Collection<? extends Certificate> certs = certificateFactory.generateCertificates(certificates);
            for (Certificate certificate : certs) {
                String certificateAlias = Integer.toString(index++);
                keyStore.setCertificateEntry(certificateAlias, certificate);
            }
            TrustManagerFactory trustManagerFactory = TrustManagerFactory.
                    getInstance(TrustManagerFactory.getDefaultAlgorithm());
            trustManagerFactory.init(keyStore);

            return trustManagerFactory.getTrustManagers();
        } catch (Exception e) {
            e.printStackTrace();
        }
        return null;

    }
方式二:自定义TrustManager
通过自定义TrustManager自己实现对服务器证书的校验
@SuppressLint("CustomX509TrustManager")
    private static class MyTrustManager implements X509TrustManager {
        private static final String TAG = MyTrustManager.class.getSimpleName();
        private final X509TrustManager defaultTrustManager;
        private final X509TrustManager localTrustManager;

        public MyTrustManager(X509TrustManager localTrustManager) throws NoSuchAlgorithmException, KeyStoreException {
            TrustManagerFactory var4 = TrustManagerFactory.getInstance(TrustManagerFactory.getDefaultAlgorithm());
            var4.init((KeyStore) null);
            defaultTrustManager = chooseTrustManager(var4.getTrustManagers());
            this.localTrustManager = localTrustManager;
        }


        @Override
        public void checkClientTrusted(X509Certificate[] chain, String authType) {
            Log.i(TAG, "checkClientTrusted,authType=" + authType);
        }

        @Override
        public void checkServerTrusted(X509Certificate[] chain, String authType) throws CertificateException {
            try {
                defaultTrustManager.checkServerTrusted(chain, authType);
            } catch (CertificateException ce) {
                localTrustManager.checkServerTrusted(chain, authType);
            }
        }


        @Override
        public X509Certificate[] getAcceptedIssuers() {
            return new X509Certificate[0];
        }
    }
