Arduino - MG996R
In this tutorial, we are going to learn how to use the MG996R high-torque servo motor with Arduino.
在本教程中,我们将学习如何将MG996R高扭矩伺服电机与Arduino一起使用。
Hardware Required 所需硬件
| 1 | × | Arduino UNO or Genuino UNO Arduino UNO 或 Genuino UNO | |
|---|---|---|---|
| 1 | × | USB 2.0 cable type A/B USB 2.0 电缆 A/B 型 | |
| 1 | × | MG996R Servo Motor MG996R 伺服电机 | |
| 1 | × | Jumper Wires 跳线 | |
| 1 | × | (Optional) 9V Power Adapter for Arduino (可选)用于Arduino的9V电源适配器 | |
| 1 | × | (Recommended) Screw Terminal Block Shield for Arduino Uno (推荐)用于Arduino Uno的螺钉接线端子屏蔽层 | |
| 1 | × | (Optional) Transparent Acrylic Enclosure For Arduino Uno (可选)Arduino Uno透明亚克力外壳 |
About Servo Motor 关于伺服电机
The MG996R servo motor is a high-torque servo motor capable of lifting up to 15kg in weight. The motor can rotate its handle from 0° to 180°, providing precise control of angular position. For basic information about servo motors, please refer to the Arduino - Servo Motor tutorial.
MG996R伺服电机是一款高扭矩伺服电机,能够举起高达15kg的重量。电机可以将其手柄旋转 0° 至 180°,从而提供对角度位置的精确控制。有关伺服电机的基本信息,请参阅Arduino - 伺服电机教程。
Pinout 引脚排列
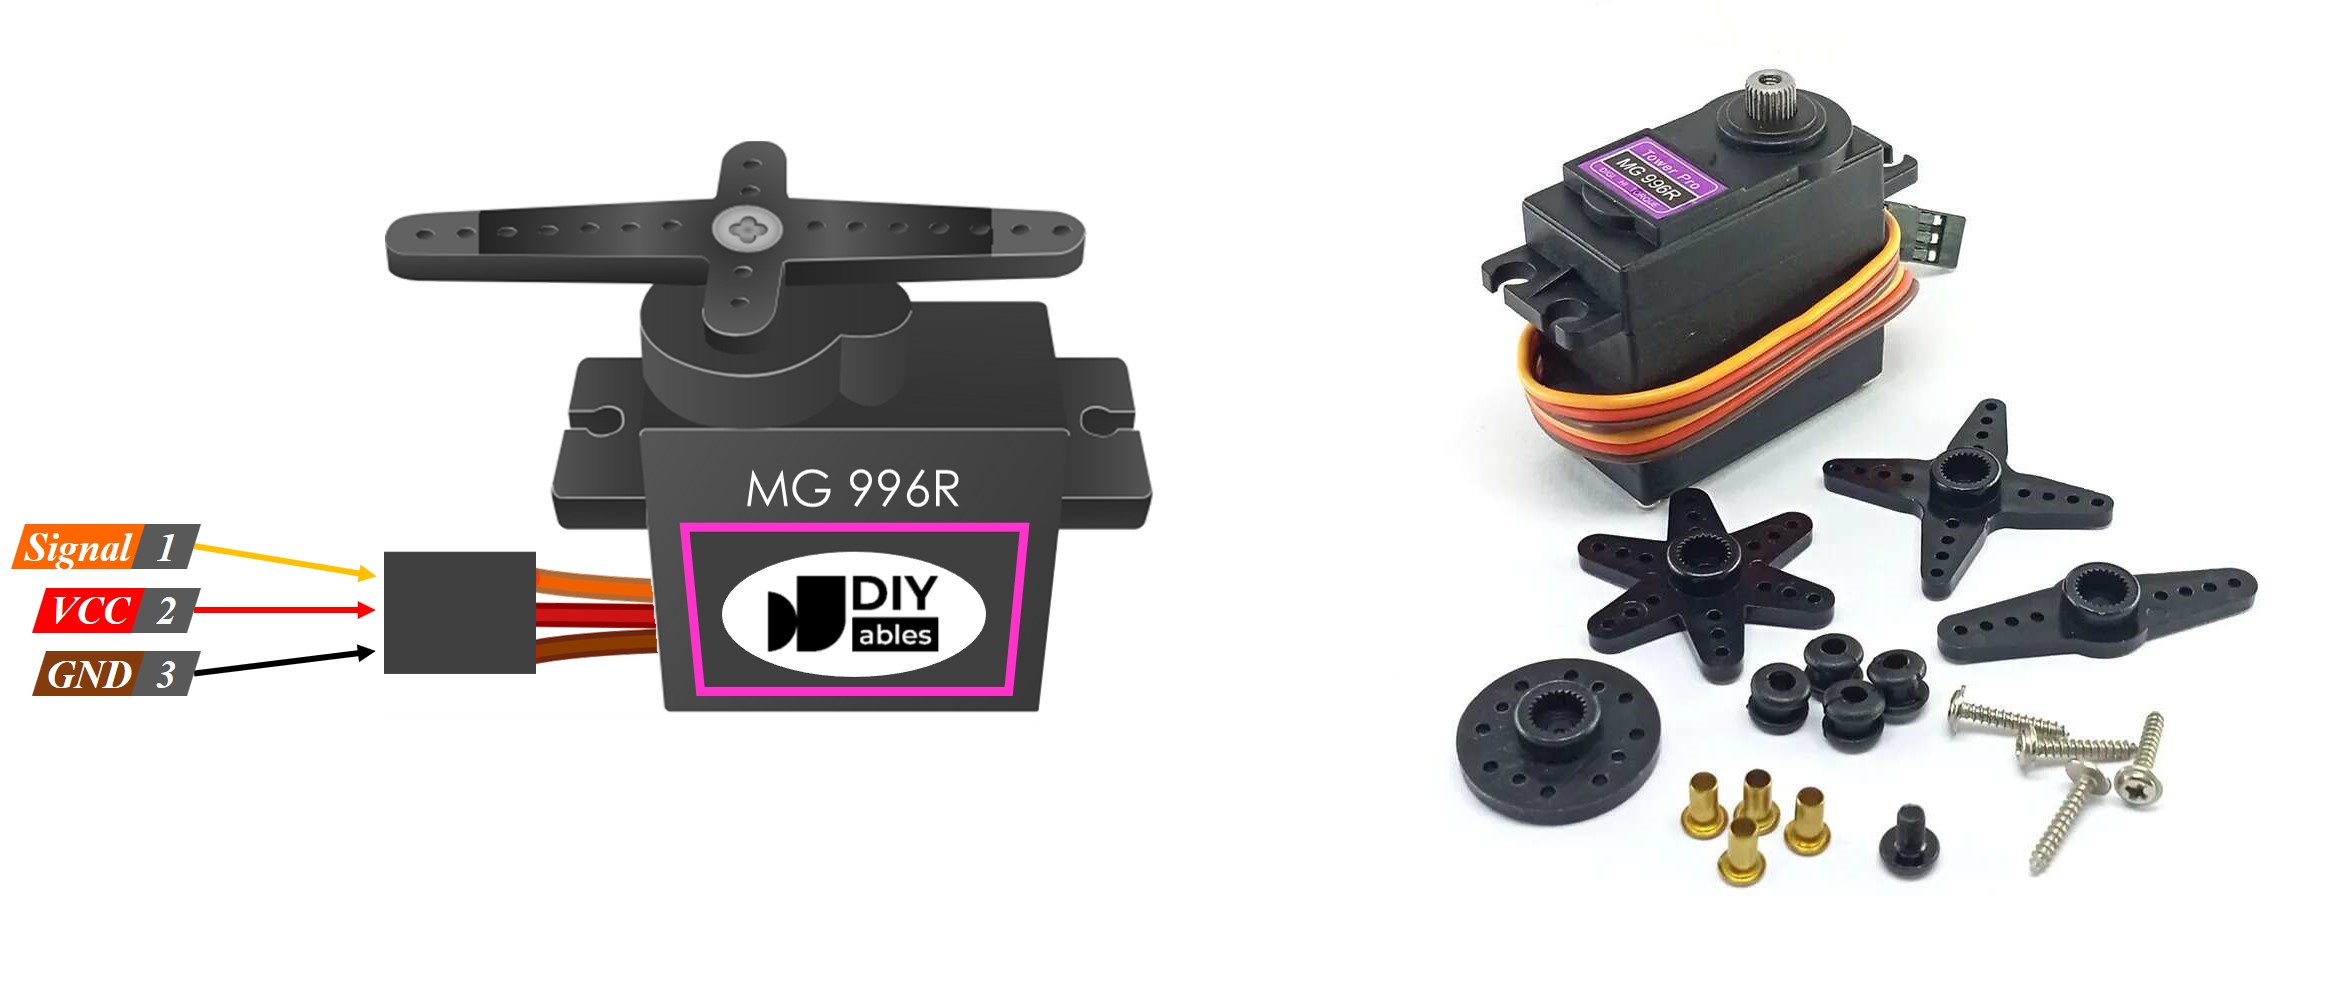
The MG996R servo motor used in this example includes three pins:
本例中使用的MG996R伺服电机包括三个引脚:
- VCC pin: (typically red) needs to be connected to VCC (4.8V – 7.2V)
VCC 引脚:(通常为红色)需要连接到 VCC (4.8V – 7.2V) - GND pin: (typically black or brown) needs to be connected to GND (0V)
GND 引脚:(通常为黑色或棕色)需要连接到 GND (0V) - Signal pin: (typically yellow or orange) receives the PWM control signal from an Arduino’s pin.
信号引脚:(通常为黄色或橙色)接收来自Arduino引脚的PWM控制信号。
Wiring Diagram 接线图
Since the MG996R is a high-torque servo motor, it draws a lot of power. We should not power this motor via the 5v pin of Arduino. Instead, we need to use the external power supply for the MG996R servo motor.
由于MG996R是一款高扭矩伺服电机,因此它消耗了大量的动力。我们不应该通过Arduino的5v引脚为该电机供电。相反,我们需要使用MG996R伺服电机的外部电源。
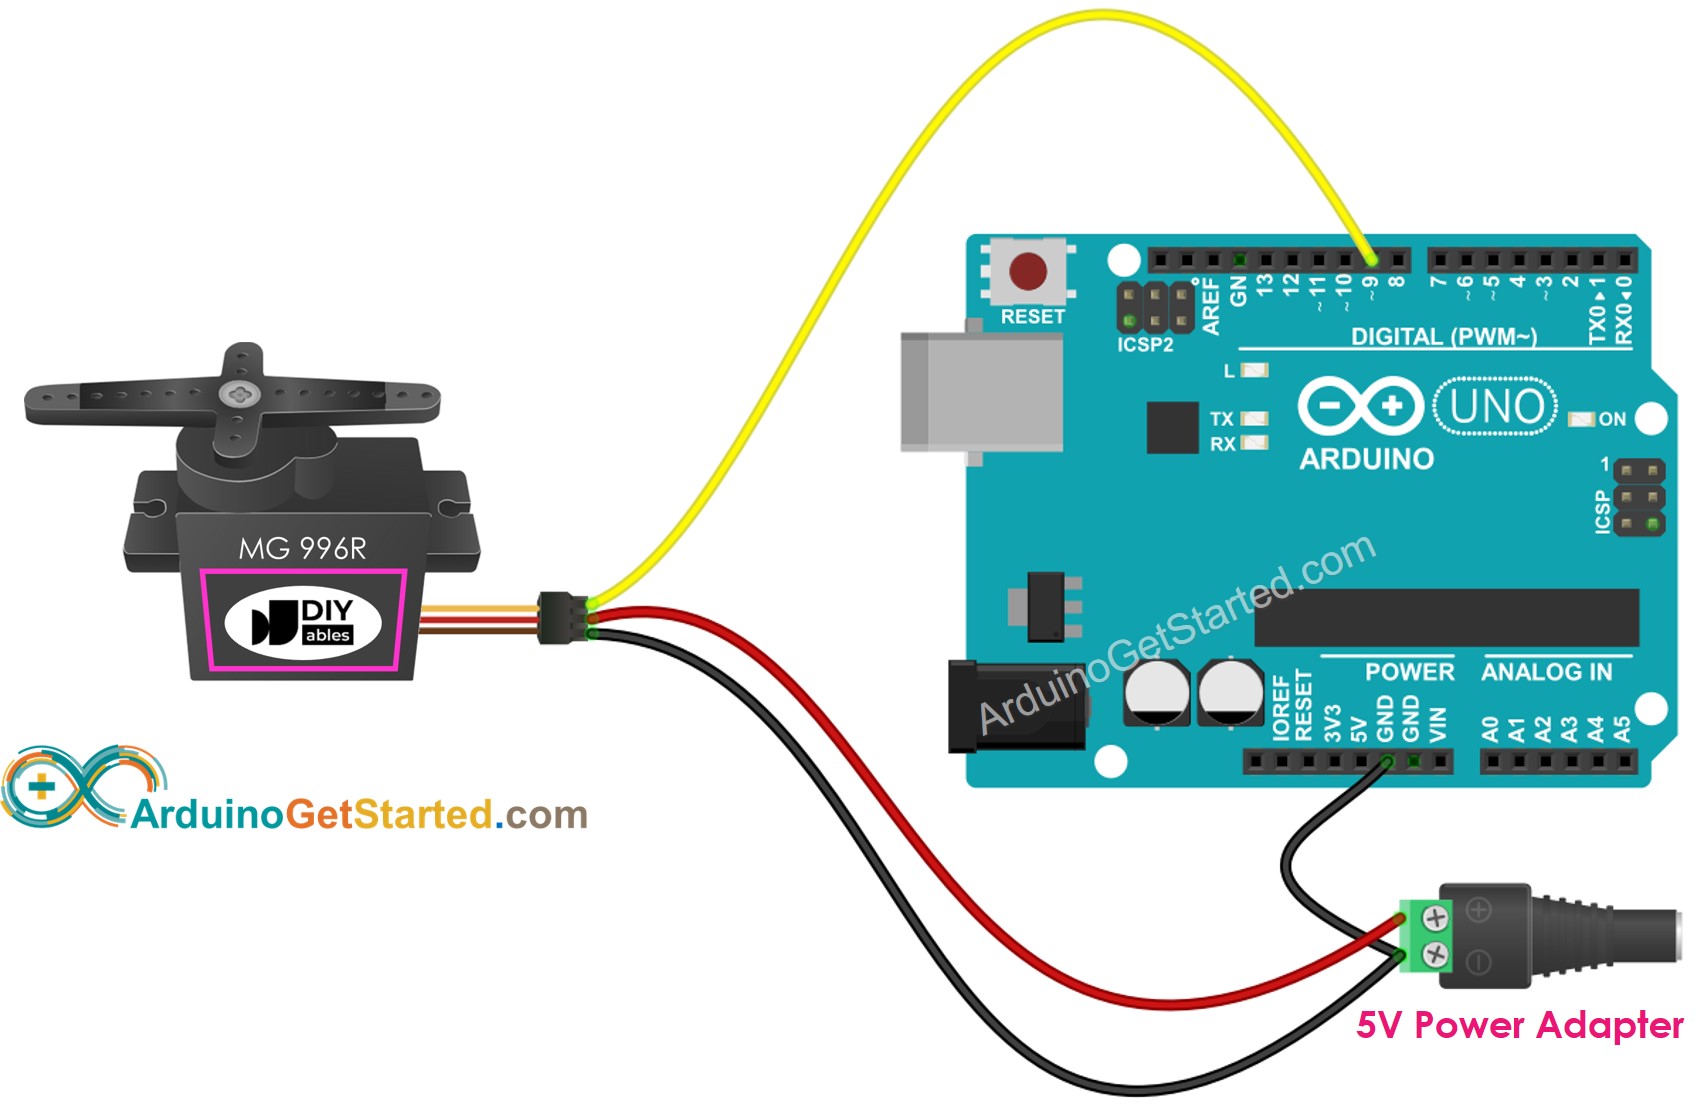
This image is created using Fritzing. Click to enlarge image
此图像是使用 Fritzing 创建的。点击放大图片
Arduino Code Arduino代码
/*

 * Created by ArduinoGetStarted.com
   *
 * This example code is in the public domain
   *
 * Tutorial page: https://arduinogetstarted.com/tutorials/arduino-mg996r
   */

#include <Servo.h>

Servo servo;  // create servo object to control a servo

void setup() {
  servo.attach(9);  // attaches the servo on pin 9 to the servo objectư
  servo.write(0);   // rotate slowly servo to 0 degrees immediately
}

void loop() {
  for (int angle = 0; angle <= 180; angle += 1) {  // rotate slowly from 0 degrees to 180 degrees, one by one degree
    // in steps of 1 degree
    servo.write(angle);  // control servo to go to position in variable 'angle'
    delay(10);         // waits 10ms for the servo to reach the position
  }

  for (int angle = 180; angle >= 0; angle -= 1) {  // rotate from 180 degrees to 0 degrees, one by one degree
    servo.write(angle);                        // control servo to go to position in variable 'angle'
    delay(10);                               // waits 10ms for the servo to reach the position
  }
}
Quick Steps 快速步骤
- Connect Arduino to PC via USB cable
通过USB线将Arduino连接到PC - Open Arduino IDE, select the right board and port
打开Arduino IDE,选择正确的板卡和端口 - Copy the above code and open with Arduino IDE
复制上面的代码并使用Arduino IDE打开 - Click Upload button on Arduino IDE to upload code to Arduino
单击Arduino IDE上的“上传”按钮,将代码上传到Arduino
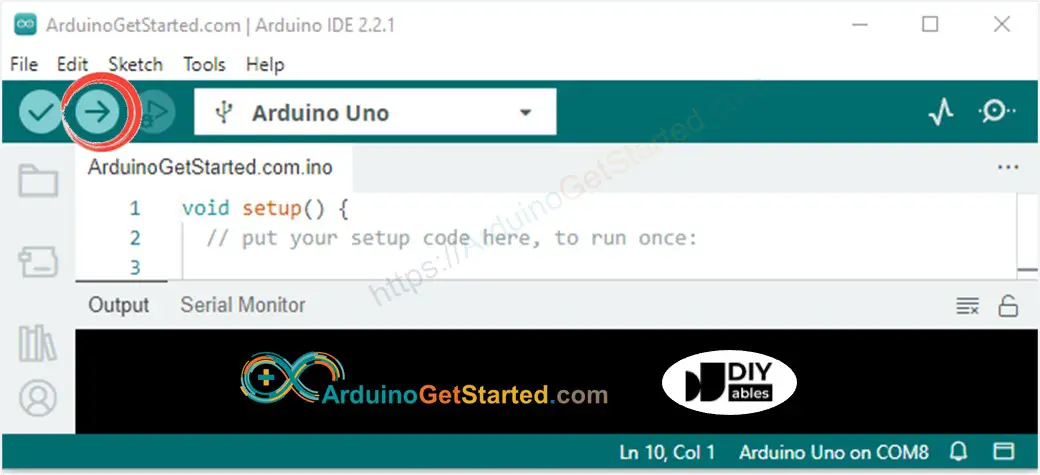
- See the result: Servo motor rotates slowly from 0 to 180° and then back rotates slowly from 180 back to 0°
查看结果:伺服电机从 0 到 180° 缓慢旋转,然后从 180° 缓慢旋转到 0°
Code Explanation 代码说明
Read the line-by-line explanation in comment lines of code!
阅读代码注释行中的逐行说明!
How to Control Speed of Servo Motor 伺服电机的速度如何控制
By using map() and millis() functions, we can control the speed of servo motor smoothly without blocking other code
通过使用 map() 和 millis() 函数,我们可以在不阻塞其他代码的情况下平稳地控制伺服电机的速度
/*

 * Created by ArduinoGetStarted.com
   *
 * This example code is in the public domain
   *
 * Tutorial page: https://arduinogetstarted.com/tutorials/arduino-mg996r
   */

#include <Servo.h>

Servo myServo;
unsigned long MOVING_TIME = 3000; // moving time is 3 seconds
unsigned long moveStartTime;
int startAngle = 30; // 30°
int stopAngle  = 90; // 90°

void setup() {
  myServo.attach(9);
  moveStartTime = millis(); // start moving

  // TODO: other code
}

void loop() {
  unsigned long progress = millis() - moveStartTime;

  if (progress <= MOVING_TIME) {
    long angle = map(progress, 0, MOVING_TIME, startAngle, stopAngle);
    myServo.write(angle);
  }

  // TODO: other code
}
Video Tutorial 视频教程
We are considering to make the video tutorials. If you think the video tutorials are essential, please subscribe to our YouTube channel to give us motivation for making the videos.
我们正在考虑制作视频教程。如果您认为视频教程是必不可少的,请订阅我们的 YouTube 频道,为我们制作视频提供动力。
Function References 函数参考
- map()
- millis()
- Servo.attach()
- Servo.write()
- Servo.writeMicroseconds()
- Servo.read()
- Servo.attached()
- Servo.detach()
