Arduino 旋转编码器
电位计
Arduino - Rotary Encoder
In this tutorial, we are going to learn how to use the incremental encoder with Arduino. In detail, we will learn:
在本教程中,我们将学习如何将增量编码器与Arduino一起使用。详细来说,我们将学习:
- How a rotary encoder works
旋转编码器的工作原理 - Rotary encoder vs potentiometer
旋转编码器与电位器区别 - How to connect the rotary encoder to Arduino
如何将旋转编码器连接到Arduino - How to program Arduino to read the direction and position from the rotary encoder WITHOUT interrupt
如何对Arduino进行编程,使其不间断地从旋转编码器读取方向和位置 - How to program Arduino to read the direction and position from the rotary encoder WITH interrupt
如何对Arduino进行编程,使其从旋转编码器读取方向和位置,并带有中断
About Rotary Encoder 关于旋转编码器
A rotary encoder is an electromechanical device that converts rotational movement into an electrical signal. It measures the rotation and position of a shaft or knob. There are two main types:
旋转编码器是一种将旋转运动转换为电信号的机电设备。它测量轴或旋钮的旋转和位置。主要有两种类型:
- Incremental encoder: which generates pulses to measure relative change
增量编码器:产生脉冲以测量相对变化 - Absolute encoder: which provides a unique digital code for each position, making them ideal for precise positioning even after power loss.
绝对值编码器:为每个位置提供唯一的数字代码,即使在断电后也能实现精确定位。
This guide is about the incremental encoder.
本指南是关于增量编码器的。
Rotary Encoder Module Pinout 旋转编码器模块引脚排列
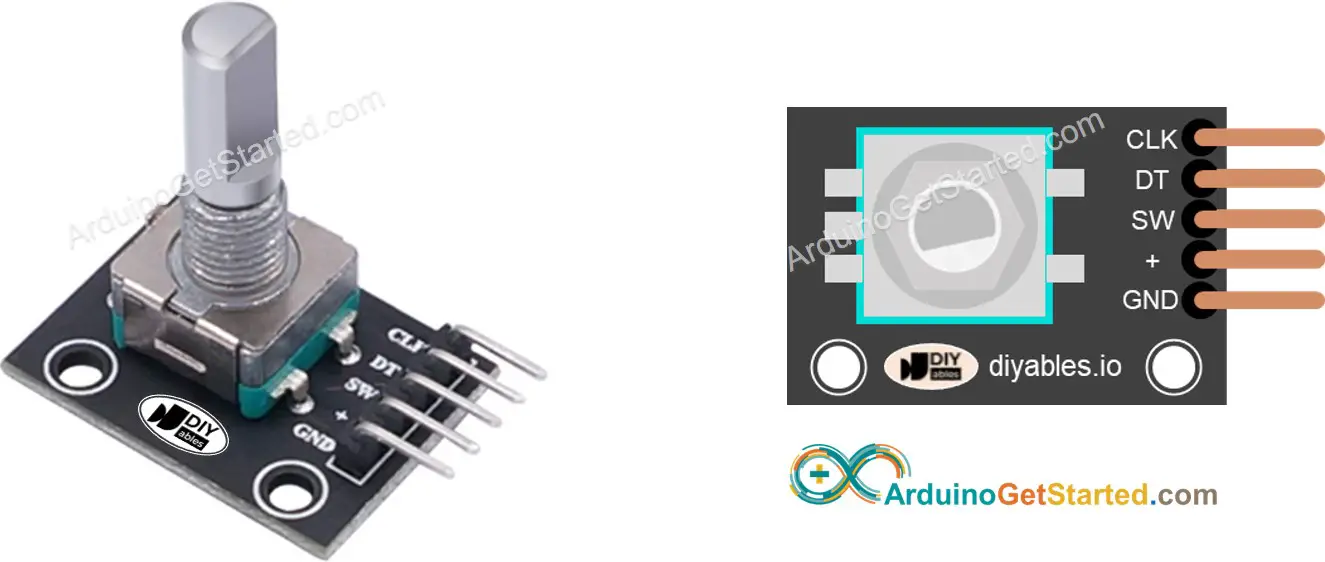
A rotary encoder module has 4 pins:
旋转编码器模块有 4 个引脚:
- CLK pin (Output A): is the main pulse that tells us how much rotation has occurred. Whenever you turn the knob by one detent (click) in either direction, the CLK pin outputs a signal that is a completes a full cycle (LOW → HIGH → LOW).
CLK 引脚(输出 A):是告诉我们发生了多少旋转的主脉冲。每当您在任一方向上转动旋钮(咔嗒一声)时,CLK 引脚都会输出一个完整的周期(低→高→低)的信号。 - DT pin (Output B): acts like the CLK pin but outputs a signal lags behind CLK signal by 90 degrees. It helps us figure out the direction of rotation (clockwise or anticlockwise).
DT 引脚(输出 B):其作用类似于 CLK 引脚,但输出的信号比 CLK 信号滞后 90 度。它可以帮助我们确定旋转方向(顺时针或逆时针)。 - SW pin: is the output from the pushbutton inside the encoder. It’s normally open. If we use a pull-up resistor in this pin, the SW pin will be HIGH when the knob is not pressed, and LOW when it is pressed.
SW引脚:是编码器内部按钮的输出。它通常开放。如果我们在此引脚中使用上拉电阻,则未按下旋钮时 SW 引脚将为高电平,按下旋钮时将为低电平。 - VCC pin (+): needs to be connected to VCC (between 3.3 and 5 volts)
VCC 引脚 (+):需要连接到 VCC(3.3 到 5 伏之间) - GND pin: needs to be connected to GND (0V)
GND引脚:需要接GND(0V)
Rotary Encoder vs Potentiometer 旋转编码器与电位计区别
You may confuse the rotary encoder with the potentiometer. but they are distinct components. Here’s a comparison between them:
您可能会将旋转编码器与电位计混淆。但它们是不同的组成部分。以下是它们之间的比较:
- Rotary encoder is like the modern version of potentiometer, but they can do more things.
旋转编码器就像现代版的电位器,但它们可以做更多的事情。 - Rotary encoder can spin around in a full circle without stopping, while potentiometer can only turn about three-quarters of the circle.
旋转编码器可以不停地旋转一整圈,而电位器只能旋转大约四分之三的圆圈。 - Rotary encoder outputs pulses, while potentiometer outputs the analog voltage.
旋转编码器输出脉冲,而电位计输出模拟电压。 - Rotary encoder is handy when you just need to figure out how much the knob has moved, not exactly where it is. Potentiometer is useful when you really need to know exactly where a knob is.
当您只需要弄清楚旋钮移动了多少,而不是确切地知道它在哪里时,旋转编码器就很方便。当您确实需要确切知道旋钮的位置时,电位计非常有用。
How Rotary Encoder Works 旋转编码器的工作原理
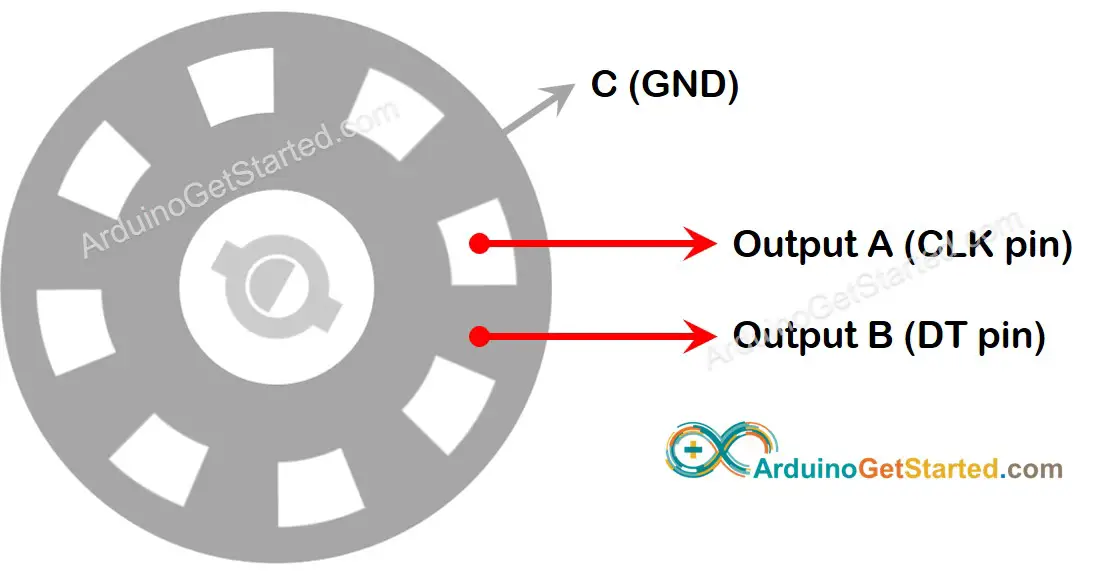
Inside the encoder, there’s a disc with slots connected to a pin called C, which is like a shared ground. There are two more pins, A and B.
在编码器内部,有一个圆盘,其插槽连接到一个名为 C 的引脚,就像一个共享接地。还有两个引脚,A 和 B。
- When you twist the knob, pins A and B touch the shared ground pin C, but in a certain order depending on which way you turn the knob (clockwise or counter-clockwise).
扭动旋钮时,A 针和 B 针会接触到共用接地针 C,但顺序有所不同,这取决于旋钮的旋转方向(顺时针或逆时针)。 - These touches create two signals. They’re a bit different in timing because one pin touches the ground before the other. Two signals are 90 degrees out of sync with each other. This is called quadrature encoding.
这些接触会产生两个信号。它们在时间上有点不同,因为一个引脚比另一个引脚先接地。两个信号相互不同步 90 度。这就是正交编码。 - When you turn the knob in clockwise direction, pin A touches the ground before pin B. When you turn the knob to the counterclockwise direction, pin B touches the ground before pin A.
当您顺时针方向转动旋钮时,引脚 A 在引脚 B 之前接触GND。当您将旋钮向逆时针方向转动时,引脚 B 在引脚 A 之前接触GND。 - By monitoring when each pin touches or leaves the ground, we can figure out which way the knob is turning. We do this by checking what happens to pin B when pin A changes.
通过监测每个引脚触地或离地的时间,我们就能知道旋钮在朝哪个方向转动。为此,我们要检查 A 引脚发生变化时 B 引脚的情况。
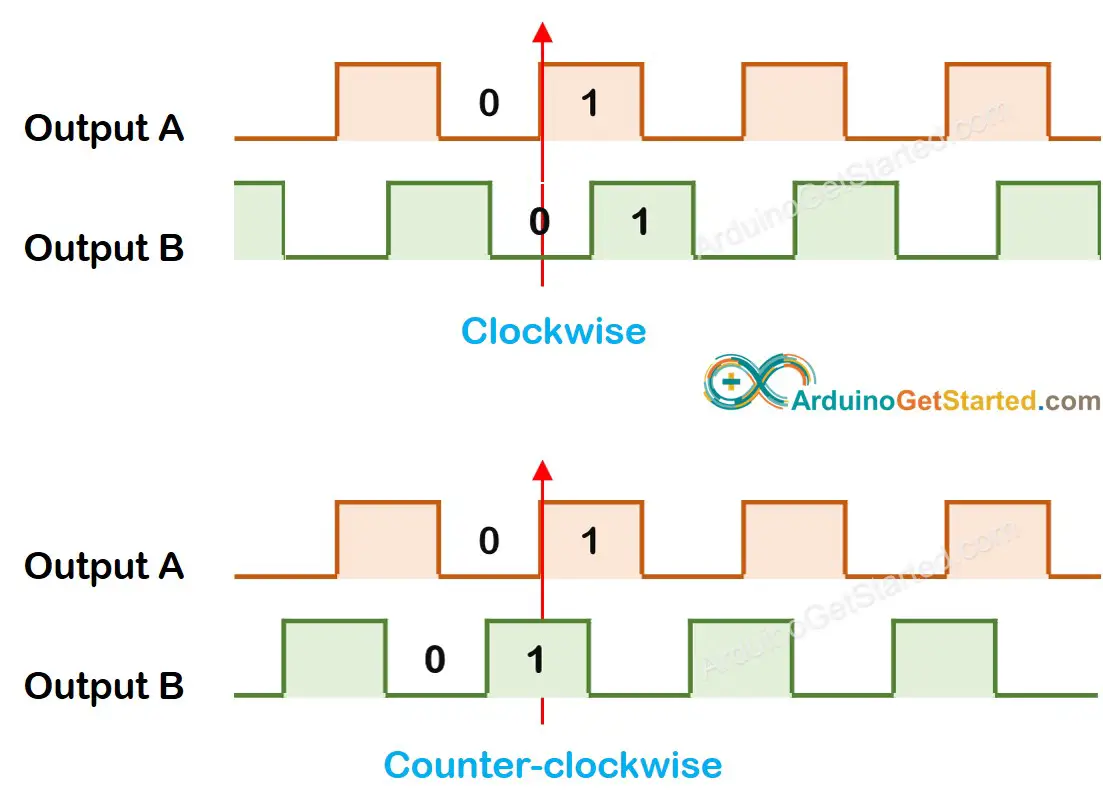
When A changes states from LOW to HIGH:
当 A 将状态从 LOW 更改为 HIGH 时:
If B is LOW, the knob is turned clockwise.
如果 B 为低电平,则顺时针转动旋钮。
- If B is HIGH, the knob is turned counter-clockwise.
如果 B 为 HIGH,则逆时针转动旋钮。
※ NOTE THAT: ※ 注意事项:
Pin A and B are connected to CLK and DT pins. However, depending on the manufacturers, the order may be different. The codes provided below are tested with the rotary encoder from DIYables
引脚 A 和 B 连接到 CLK 和 DT 引脚。但是,根据制造商的不同,顺序可能会有所不同。下面提供的代码是用DIYables的旋转编码器测试的
How To Program For Rotary Encoder 如何对旋转编码器进行编程
- Check the signal from CLK pin
检查来自 CLK 引脚的信号 - If the state changes from LOW to HIGH, check the state of the DT pin.
如果状态从LOW变为HIGH,请检查DT引脚的状态。- If the state of the DT pin is HIGH, the knob is turned in the counter-clockwise direction, increase the counter by 1
如果 DT 引脚状态为 HIGH,则旋钮逆时针方向转动,将计数器增加 1 - If the state of the DT pin is LOW, the knob is turned in the clockwise direction, decrease the counter by 1
如果 DT 引脚的状态为 LOW,则旋钮顺时针方向转动,将计数器减少 1
- If the state of the DT pin is HIGH, the knob is turned in the counter-clockwise direction, increase the counter by 1
Wiring Diagram 接线图
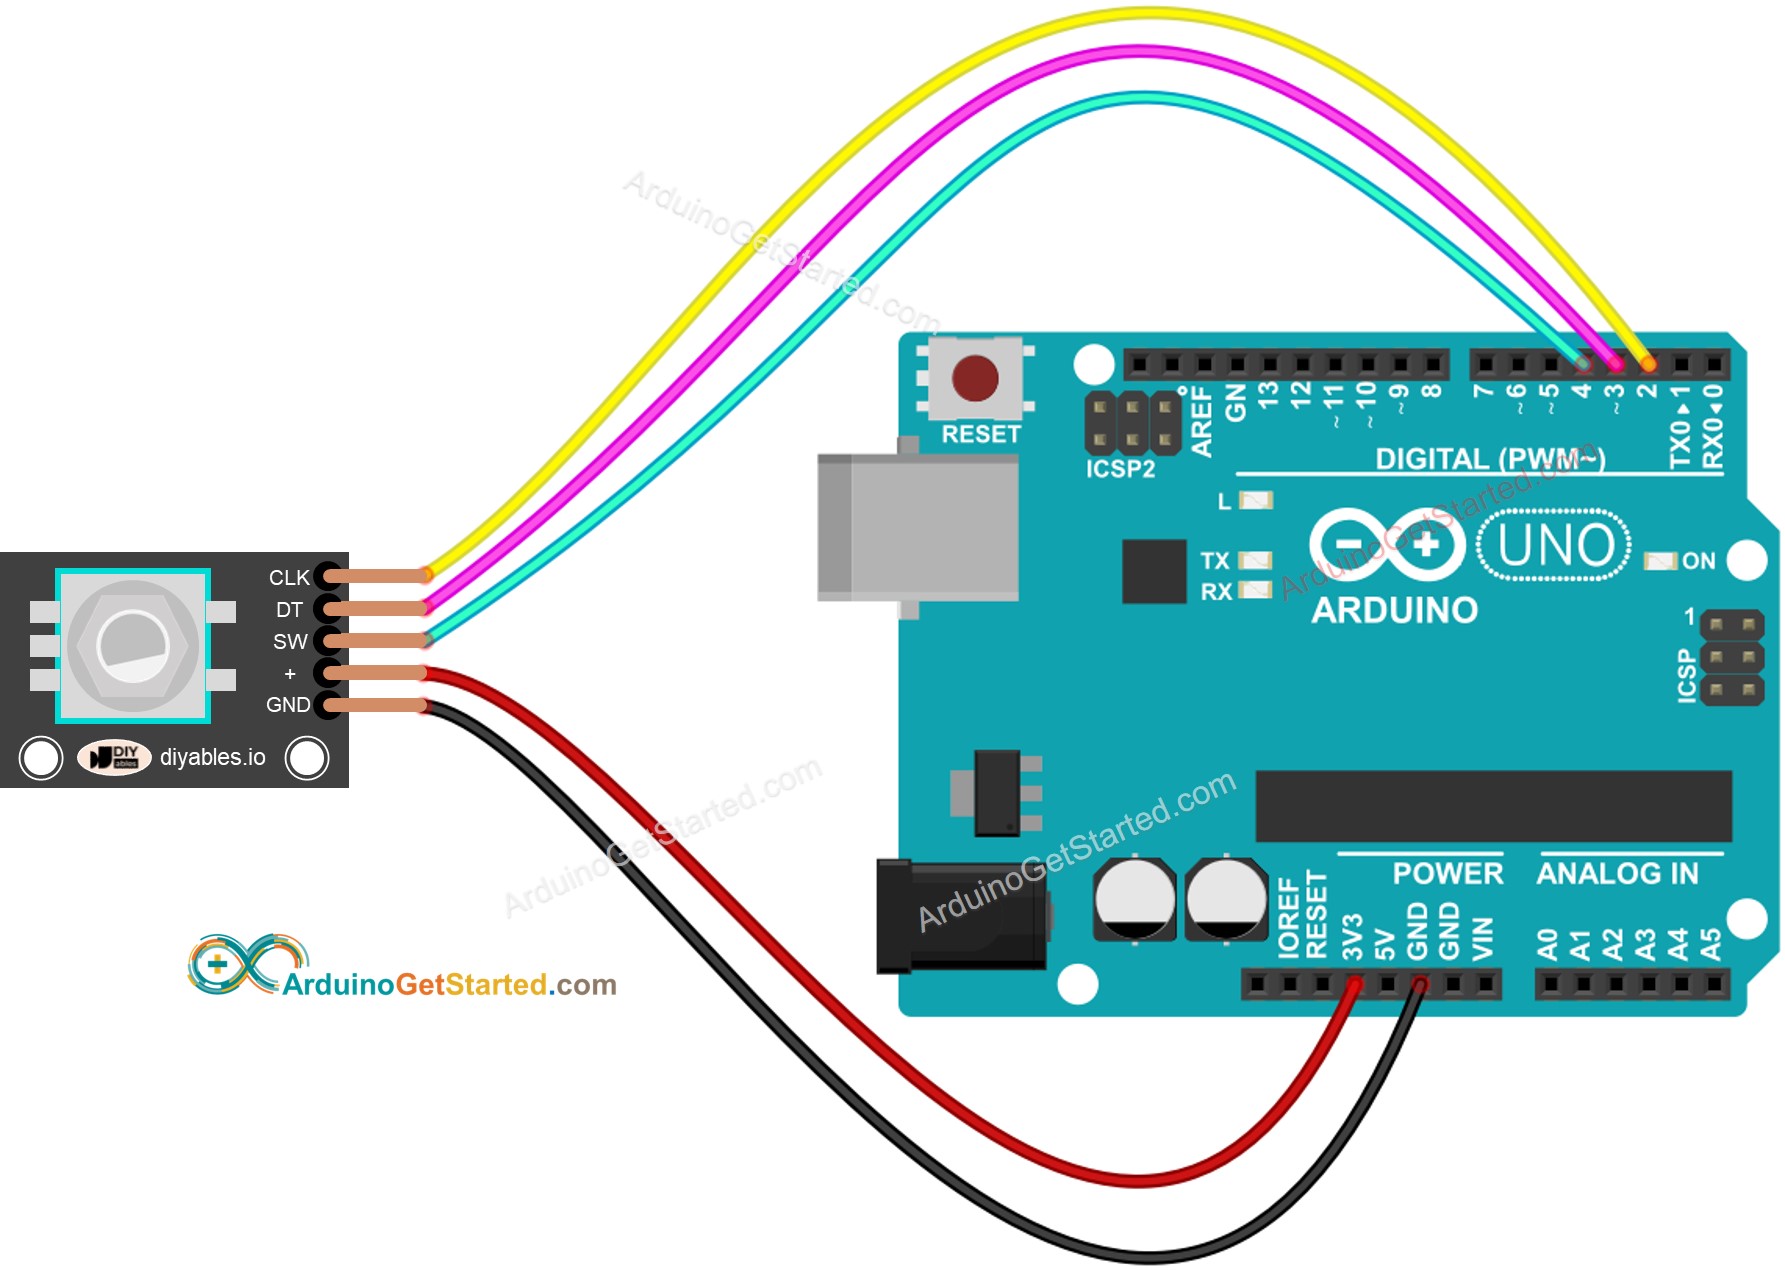
This image is created using Fritzing. Click to enlarge image
此图像是使用 Fritzing 创建的。点击放大图片
Arduino Code – Rotary Encoder without Interrupt Arduino代码 – 无中断旋转编码器
The below Arduino code does:
下面的Arduino代码可以:
- Detects the direction and amount of rotation of the encoder.
检测编码器的旋转方向和旋转量。- If detecting the knob turned by one detent (click) in clockwise direction, increase the counter by one.
如果检测到旋钮按一个止动器(咔嗒声)顺时针方向转动,请将计数器增加一个。 - If detecting the knob turned by one detent (click) in anticlockwise direction, decrease the counter by one.
如果检测到旋钮逆时针方向转动一个咔嗒声,请将计数器减小一个。
- If detecting the knob turned by one detent (click) in clockwise direction, increase the counter by one.
- Detects if the button is pressed.
检测按钮是否被按下。
/*
* Created by ArduinoGetStarted.com
*
* This example code is in the public domain
*
* Tutorial page: https://arduinogetstarted.com/tutorials/arduino-rotary-encoder
*/
#include <ezButton.h> // the library to use for SW pin
#define CLK_PIN 2
#define DT_PIN 3
#define SW_PIN 4
#define DIRECTION_CW 0 // clockwise direction
#define DIRECTION_CCW 1 // counter-clockwise direction
int counter = 0;
int direction = DIRECTION_CW;
int CLK_state;
int prev_CLK_state;
ezButton button(SW_PIN); // create ezButton object that attach to pin 4
void setup() {
Serial.begin(9600);
// configure encoder pins as inputs
pinMode(CLK_PIN, INPUT);
pinMode(DT_PIN, INPUT);
button.setDebounceTime(50); // set debounce time to 50 milliseconds
// read the initial state of the rotary encoder's CLK pin
prev_CLK_state = digitalRead(CLK_PIN);
}
void loop() {
button.loop(); // MUST call the loop() function first
// read the current state of the rotary encoder's CLK pin
CLK_state = digitalRead(CLK_PIN);
// If the state of CLK is changed, then pulse occurred
// React to only the rising edge (from LOW to HIGH) to avoid double count
if (CLK_state != prev_CLK_state && CLK_state == HIGH) {
// if the DT state is HIGH
// the encoder is rotating in counter-clockwise direction => decrease the counter
if (digitalRead(DT_PIN) == HIGH) {
counter--;
direction = DIRECTION_CCW;
} else {
// the encoder is rotating in clockwise direction => increase the counter
counter++;
direction = DIRECTION_CW;
}
Serial.print("DIRECTION: ");
if (direction == DIRECTION_CW)
Serial.print("Clockwise");
else
Serial.print("Counter-clockwise");
Serial.print(" | COUNTER: ");
Serial.println(counter);
}
// save last CLK state
prev_CLK_state = CLK_state;
if (button.isPressed()) {
Serial.println("The button is pressed");
}
}
To simplify the code for button debouncing, the ezButton library is used.
为了简化按钮去抖动的代码,使用了 ezButton 库。
Quick Steps 快速步骤
- Install ezButton library on Arduino IDE. See How To
在Arduino IDE上安装ezButton库。了解操作方法 - Copy the above code and open with Arduino IDE
复制上面的代码并使用Arduino IDE打开 - Click Upload button on Arduino IDE to upload code to Arduino
单击Arduino IDE上的“上传”按钮,将代码上传到Arduino - Turn the knob in clockwise, then anticlockwise
顺时针转动旋钮,然后逆时针转动 - Press the knob 按下旋钮
- See the result on Serial Monitor.
在串行监视器上查看结果。
Arduino Code – Rotary Encoder with Interrupt Arduino代码 – 带中断的旋转编码器
In the previous example code, we use the polling method, which continuously check the pin’s state. This has two disadvantages:
在前面的示例代码中,我们使用轮询方法,该方法持续检查引脚的状态。这有两个缺点:
- Waste Arduino resource 浪费Arduino资源
- Some counter may be missed if another code takes long time to excecute.
如果另一个代码需要很长时间才能完成,则可能会错过某些计数器。
One approach to handle this is by using interrupts. Interrupts eliminate the need for constant checking of a particular event. This allows the Arduino to carry out other tasks without overlooking an event.
处理此问题的一种方法是使用中断。中断消除了对特定事件进行持续检查的需要。这允许Arduino在不忽略事件的情况下执行其他任务。
Here’s an example of how to read a rotary encoder with interrupts.
下面是一个示例,说明如何读取带有中断的旋转编码器。
/*
* Created by ArduinoGetStarted.com
*
* This example code is in the public domain
*
* Tutorial page: https://arduinogetstarted.com/tutorials/arduino-rotary-encoder
*/
#include <ezButton.h> // the library to use for SW pin
#define CLK_PIN 2
#define DT_PIN 3
#define SW_PIN 4
#define DIRECTION_CW 0 // clockwise direction
#define DIRECTION_CCW 1 // counter-clockwise direction
volatile int counter = 0;
volatile int direction = DIRECTION_CW;
volatile unsigned long last_time; // for debouncing
int prev_counter;
ezButton button(SW_PIN); // create ezButton object that attach to pin 4
void setup() {
Serial.begin(9600);
// configure encoder pins as inputs
pinMode(CLK_PIN, INPUT);
pinMode(DT_PIN, INPUT);
button.setDebounceTime(50); // set debounce time to 50 milliseconds
// use interrupt for CLK pin is enough
// call ISR_encoderChange() when CLK pin changes from LOW to HIGH
attachInterrupt(digitalPinToInterrupt(CLK_PIN), ISR_encoderChange, RISING);
}
void loop() {
button.loop(); // MUST call the loop() function first
if (prev_counter != counter) {
Serial.print("DIRECTION: ");
if (direction == DIRECTION_CW)
Serial.print("Clockwise");
else
Serial.print("Counter-clockwise");
Serial.print(" | COUNTER: ");
Serial.println(counter);
prev_counter = counter;
}
if (button.isPressed()) {
Serial.println("The button is pressed");
}
// TO DO: your other work here
}
void ISR_encoderChange() {
if ((millis() - last_time) < 50) // debounce time is 50ms
return;
if (digitalRead(DT_PIN) == HIGH) {
// the encoder is rotating in counter-clockwise direction => decrease the counter
counter--;
direction = DIRECTION_CCW;
} else {
// the encoder is rotating in clockwise direction => increase the counter
counter++;
direction = DIRECTION_CW;
}
last_time = millis();
}
Now, As you twist the knob, you’ll notice information appearing on the Serial Monitor, much like what you saw in the earlier code.
现在,当您转动旋钮时,您会注意到串行监视器上出现的信息,与您在前面的代码中看到的非常相似。
※ NOTE THAT: ※ 注意事项:
- If you use the interrupt, you need to connect the encoder’s CLK pin to an Arduino pin that can handle interrupts. But remember, not all Arduino pins can do this. For example, on the Arduino Uno, only pins 2 and 3 can work with interrupts.
如果使用中断,则需要将编码器的 CLK 引脚连接到可以处理中断的 Arduino 引脚。但请记住,并非所有Arduino引脚都可以做到这一点。例如,在 Arduino Uno 上,只有引脚 2 和 3 可以使用中断。 - You might come across tutorials on other websites that use two interrupts for a single encoder, but this is unnecessary and wasteful. Just one interrupt is sufficient.
您可能会在其他网站上遇到对单个编码器使用两个中断的教程,但这是不必要的和浪费的。只需一次中断就足够了。 - It’s important to use the volatile keyword for global variables used in the interrupt. Neglecting this could lead to unexpected issues.
对中断中使用的全局变量使用 volatile 关键字非常重要。忽视这一点可能会导致意想不到的问题。 - Keep the code within the interrupt as straightforward as you can. Avoid using Serial.print() or Serial.println() inside the interrupt.
在中断中保持代码尽可能简单明了。避免在中断中使用Serial.print() 或 Serial.println()。
Arduino Rotary Encoder Application Arduino旋转编码器应用
With Rotary Encoder, we can do the following applications but not limit:
使用旋转编码器,我们可以执行以下应用,但不限于:
- Arduino - Rotary Encoder controls Position of Sevo Motor
Arduino - 旋转编码器控制 Sevo 电机的位置 - Arduino - Rotary Encoder controls Brightness of LED
Arduino - 旋转编码器控制 LED 亮度 - Arduino - Rotary Encoder controls Speed of Stepper Motor
Arduino - 旋转编码器控制步进电机的速度
示例1
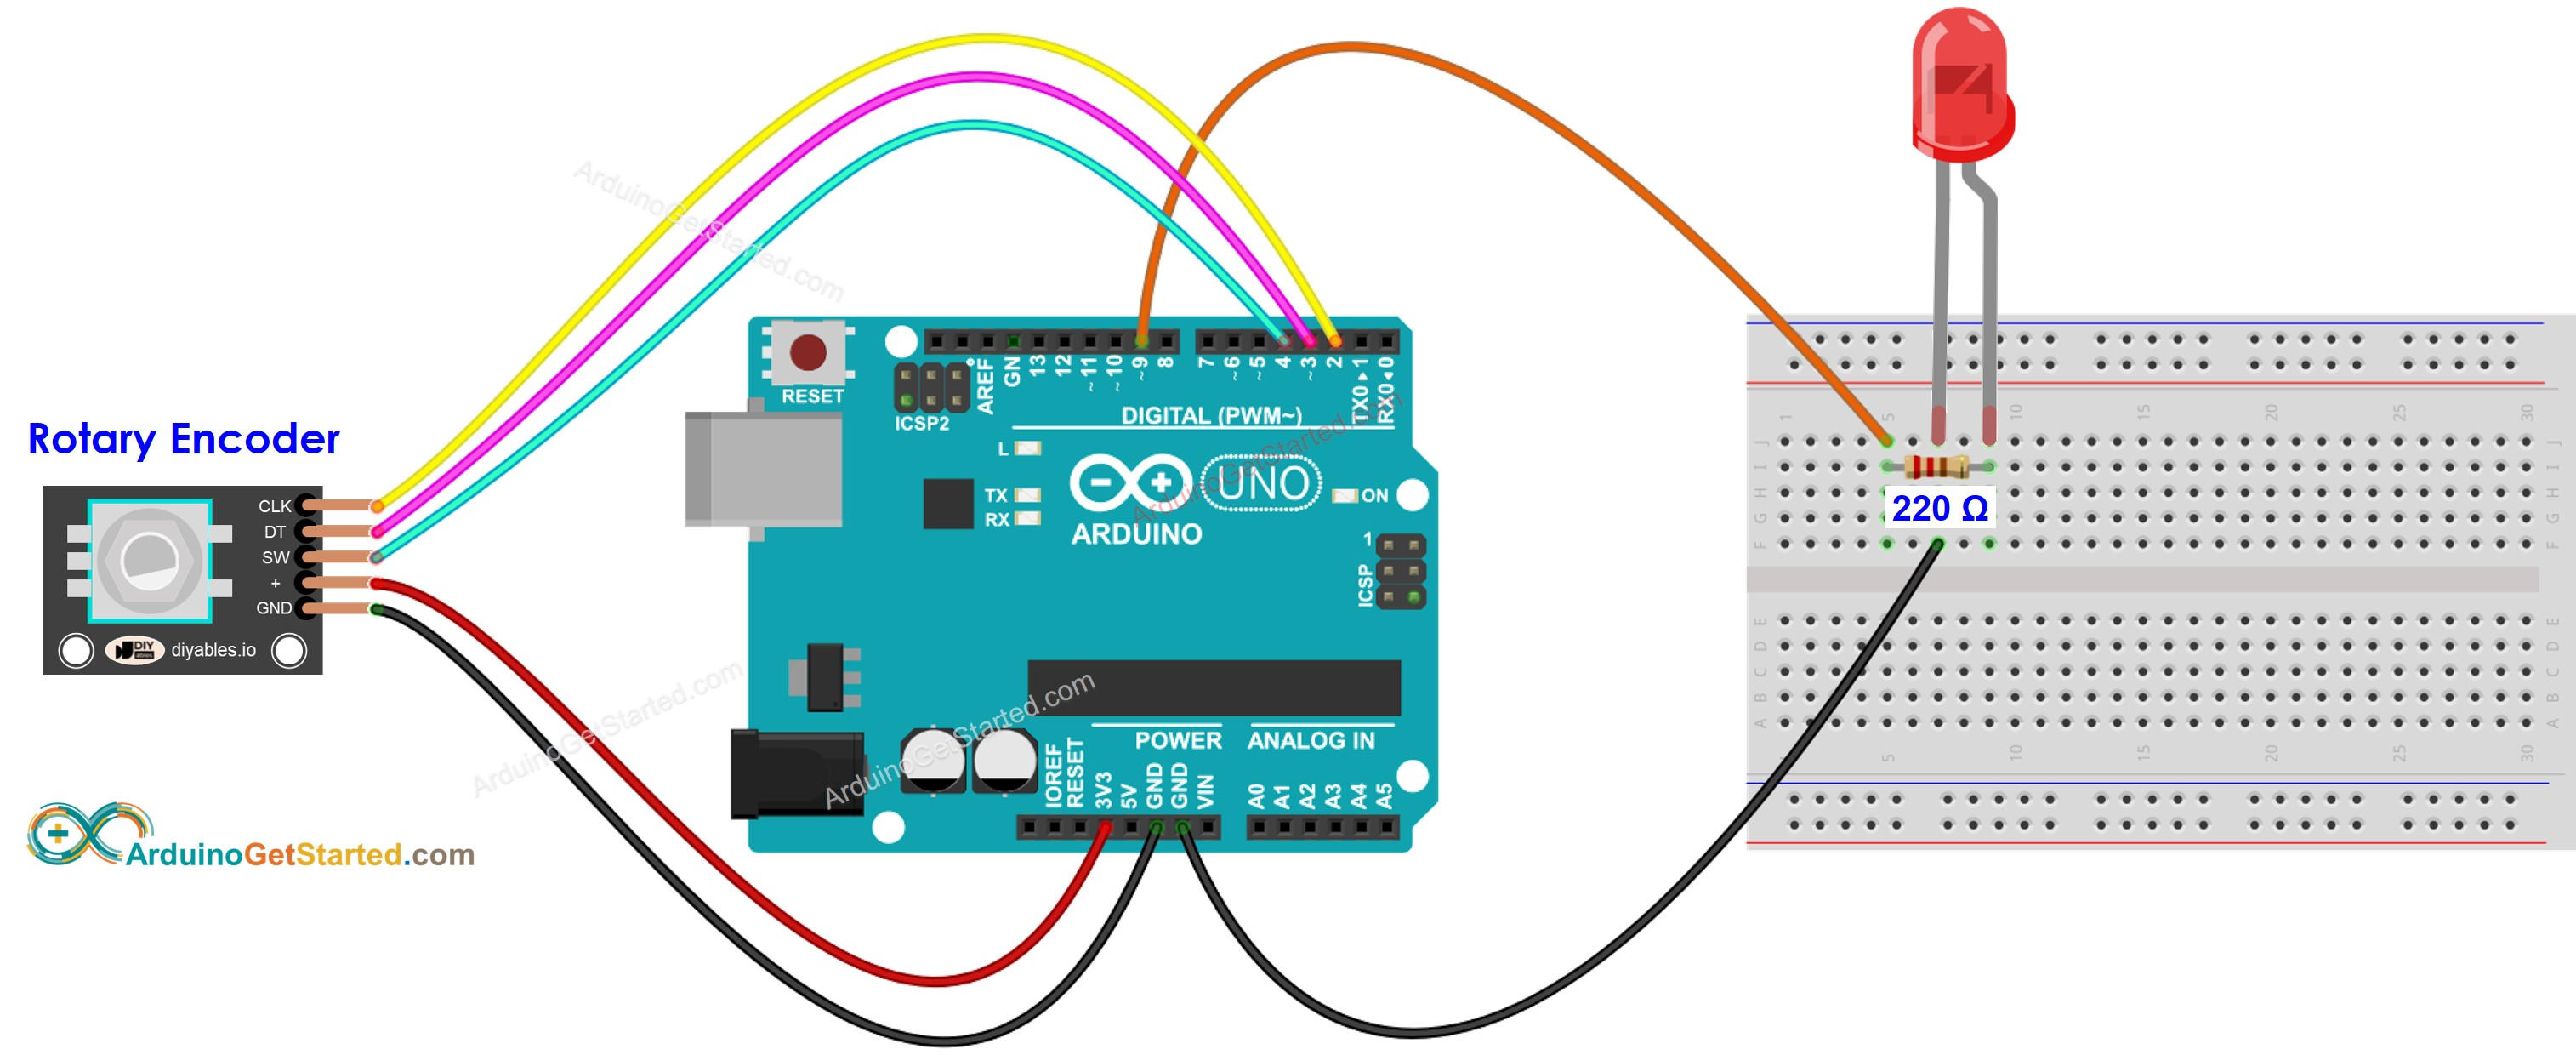
/*
 * Created by ArduinoGetStarted.com
 *
 * This example code is in the public domain
 *
 * Tutorial page: https://arduinogetstarted.com/tutorials/arduino-rotary-encoder-led
 */

#include <Servo.h>

#define CLK_PIN 2
#define DT_PIN 3
#define SW_PIN 4
#define LED_PIN 9

#define DIRECTION_CW 0   // clockwise direction
#define DIRECTION_CCW 1  // counter-clockwise direction

int counter = 0;
int direction = DIRECTION_CW;
int CLK_state;
int prev_CLK_state;
int brightness = 125;  // middle value

void setup() {
  Serial.begin(9600);

  // configure encoder pins as inputs
  pinMode(CLK_PIN, INPUT);
  pinMode(DT_PIN, INPUT);

  // read the initial state of the rotary encoder's CLK pin
  prev_CLK_state = digitalRead(CLK_PIN);
  pinMode(LED_PIN, OUTPUT);
}

void loop() {

  // read the current state of the rotary encoder's CLK pin
  CLK_state = digitalRead(CLK_PIN);

  // If the state of CLK is changed, then pulse occurred
  // React to only the rising edge (from LOW to HIGH) to avoid double count
  if (CLK_state != prev_CLK_state && CLK_state == HIGH) {
    // if the DT state is HIGH
    // the encoder is rotating in counter-clockwise direction => decrease the counter
    if (digitalRead(DT_PIN) == HIGH) {
      direction = DIRECTION_CCW;
      counter--;
      brightness -= 10;  // you can change this value
    } else {
      // the encoder is rotating in clockwise direction => increase the counter
      direction = DIRECTION_CW;
      counter++;
      brightness += 10;  // you can change this value
    }

    if (brightness < 0)
      brightness = 0;
    else if (brightness > 255)
      brightness = 255;

    // sets the brightness of LED according to the counter
    analogWrite(LED_PIN, brightness);

    Serial.print("COUNTER: ");
    Serial.print(counter);
    Serial.print(" | BRIGHTNESS: ");
    Serial.println(brightness);
  }

  // save last CLK state
  prev_CLK_state = CLK_state;
}
示例2
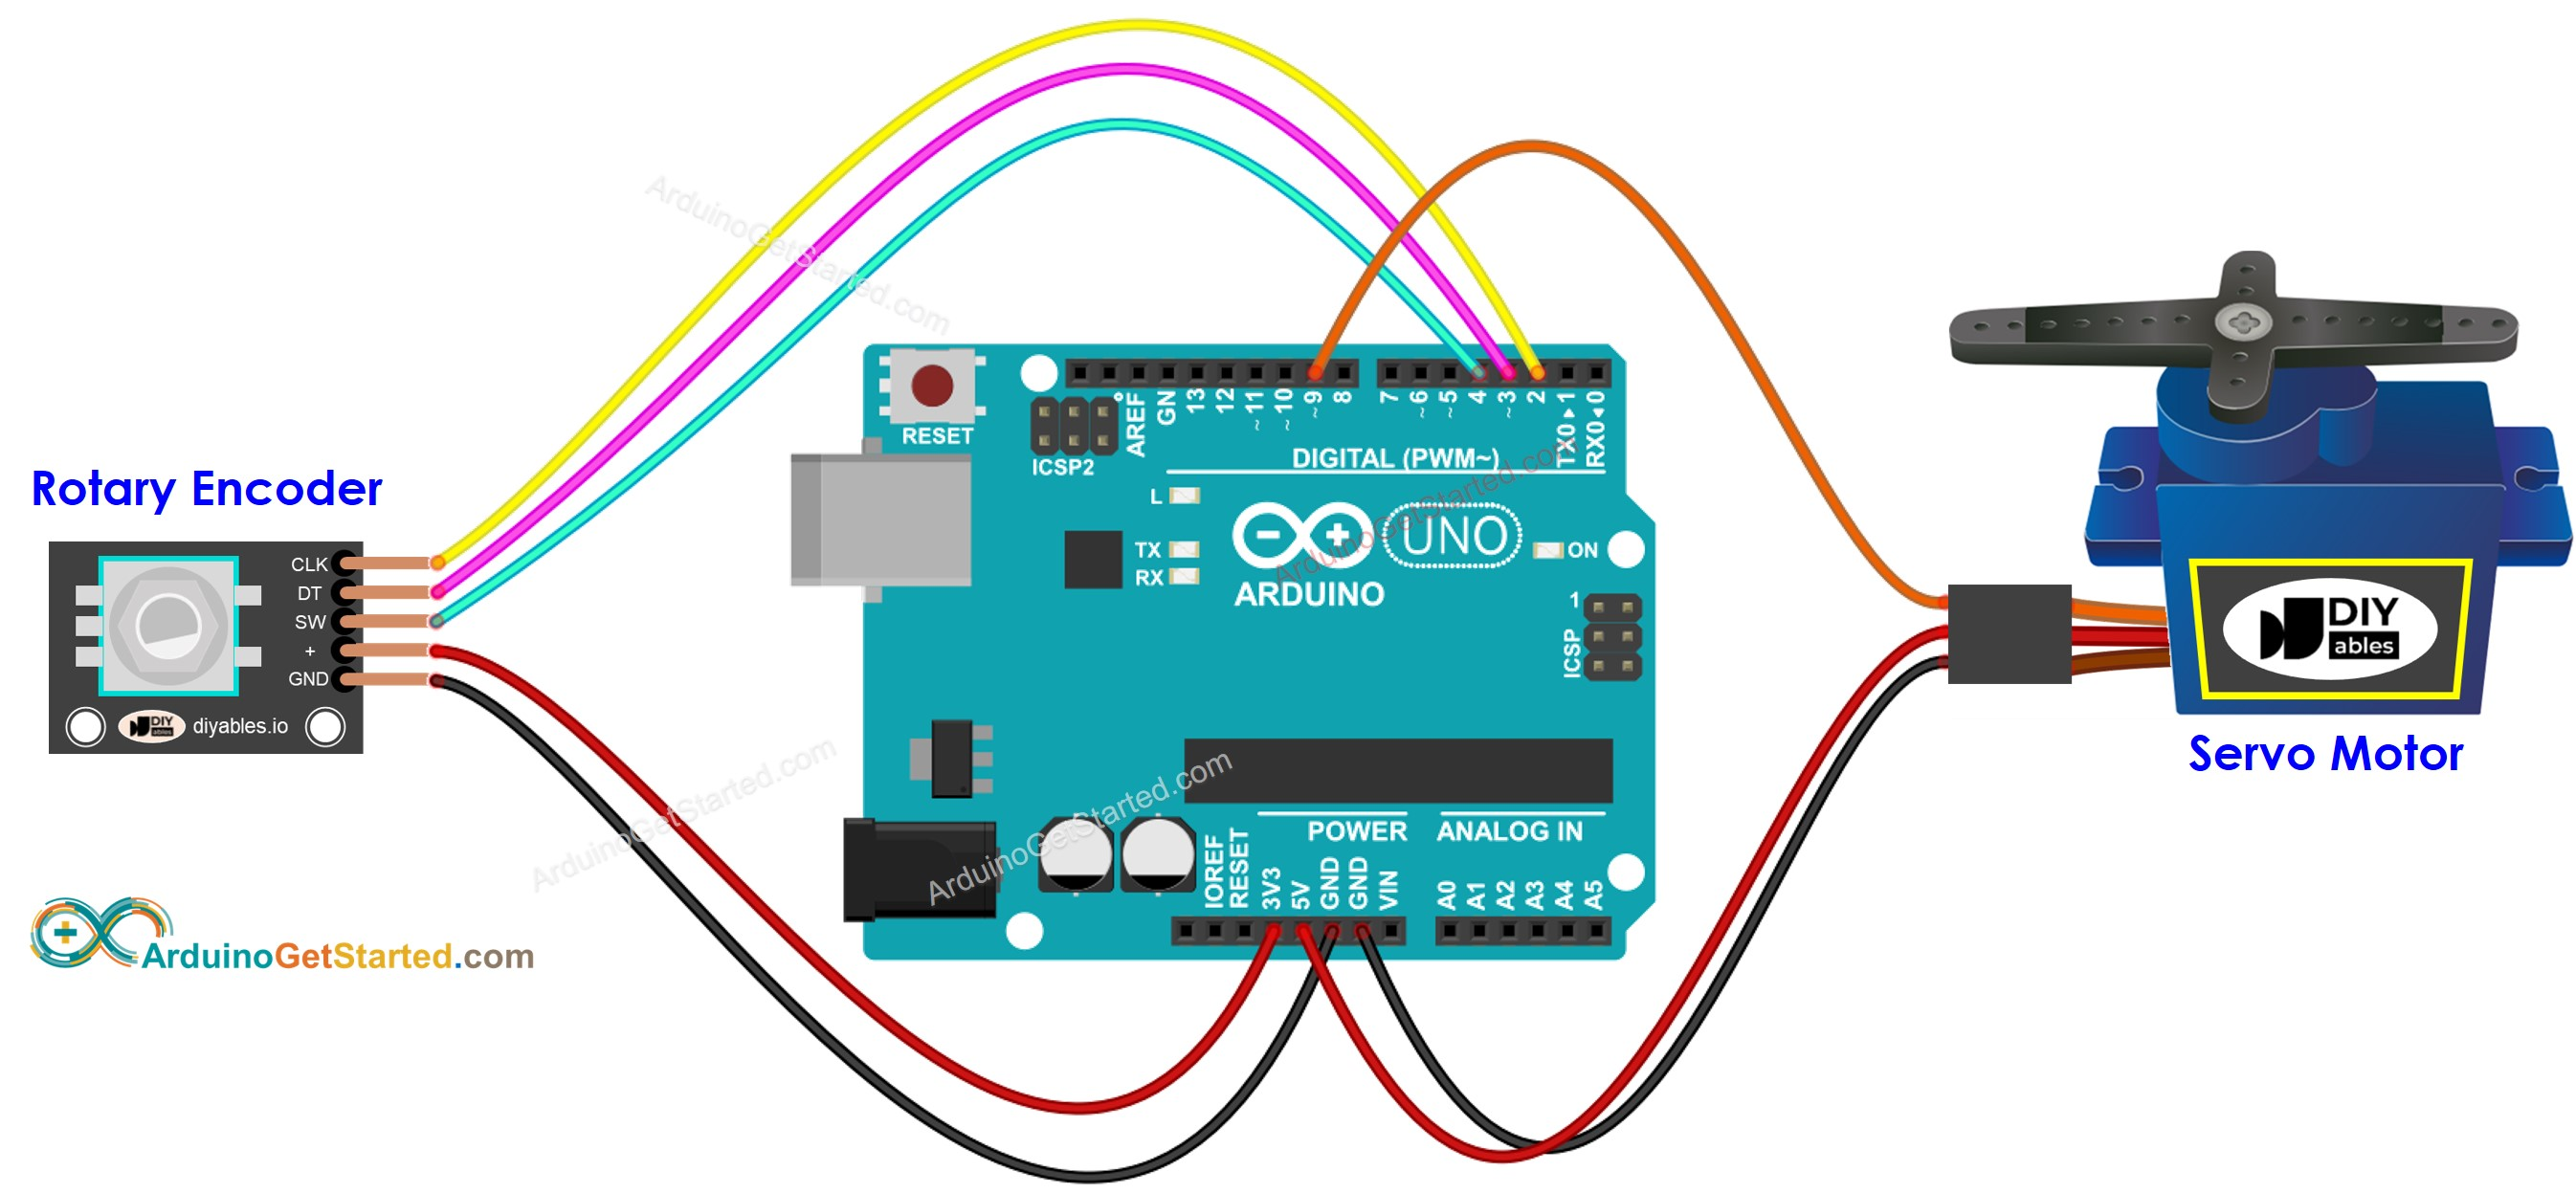
/*
 * Created by ArduinoGetStarted.com
 *
 * This example code is in the public domain
 *
 * Tutorial page: https://arduinogetstarted.com/tutorials/arduino-rotary-encoder-servo-motor
 */

#include <Servo.h>

#define CLK_PIN 2
#define DT_PIN 3
#define SW_PIN 4
#define SERVO_PIN 9

#define DIRECTION_CW 0   // clockwise direction
#define DIRECTION_CCW 1  // counter-clockwise direction

int counter = 0;
int direction = DIRECTION_CW;
int CLK_state;
int prev_CLK_state;

Servo servo;  // create servo object to control a servo

void setup() {
  Serial.begin(9600);

  // configure encoder pins as inputs
  pinMode(CLK_PIN, INPUT);
  pinMode(DT_PIN, INPUT);

  // read the initial state of the rotary encoder's CLK pin
  prev_CLK_state = digitalRead(CLK_PIN);
  servo.attach(SERVO_PIN);  // attaches the servo on pin 9 to the servo object
  servo.write(0);
}

void loop() {

  // read the current state of the rotary encoder's CLK pin
  CLK_state = digitalRead(CLK_PIN);

  // If the state of CLK is changed, then pulse occurred
  // React to only the rising edge (from LOW to HIGH) to avoid double count
  if (CLK_state != prev_CLK_state && CLK_state == HIGH) {
    // if the DT state is HIGH
    // the encoder is rotating in counter-clockwise direction => decrease the counter
    if (digitalRead(DT_PIN) == HIGH) {
      counter--;
      direction = DIRECTION_CCW;
    } else {
      // the encoder is rotating in clockwise direction => increase the counter
      counter++;
      direction = DIRECTION_CW;
    }

    Serial.print("DIRECTION: ");
    if (direction == DIRECTION_CW)
      Serial.print("Clockwise");
    else
      Serial.print("Counter-clockwise");

    Serial.print(" | COUNTER: ");
    Serial.println(counter);

    if (counter < 0)
      counter = 0;
    else if (counter > 180)
      counter = 180;

    // sets the servo angle according to the counter
    servo.write(counter);
  }

  // save last CLK state
  prev_CLK_state = CLK_state;
}
Video Tutorial 视频教程
We are considering to make the video tutorials. If you think the video tutorials are essential, please subscribe to our YouTube channel to give us motivation for making the videos.
我们正在考虑制作视频教程。如果您认为视频教程是必不可少的,请订阅我们的 YouTube 频道,为我们制作视频提供动力。
Function References
-
pinMode()
-
digitalRead()
-
Serial
See Also
- Arduino - Rotary Encoder LED
- Arduino - Rotary Encoder - Servo Motor
