1. Spring Boot缓存
1.1 JSR-107
Spring从3.1开始定义了org.springframework.cache.Cache
和org.springframework.cache.CacheManager接口来统一不同的缓存技术;
并支持使用JCache(JSR-107)注解简化我们开发。
- Cache接口为缓存的组件规范定义,包含缓存的各种操作集合;
- Cache接口下Spring提供了各种xxxCache的实现;如RedisCache,EhCacheCache, ConcurrentMapCache等;
- 每次调用需要缓存功能的方法时,Spring会检查检查指定参数的指定的目标方法是否已经被调用过;如果有就直接从缓存中获取方法调用后的结果,如果没有就调用方法并缓存结果后返回给用户。下次调用直接从缓存中获取;
- 使用Spring缓存抽象时我们需要关注以下两点:
1、确定方法需要被缓存以及他们的缓存策略
2、从缓存中读取之前缓存存储的数据
1.2 Springboot缓存抽象的缓存注解
| Cache | 缓存接口,定义缓存操作。实现有:RedisCache、EhCacheCache、ConcurrentMapCache等 |
| CacheManager | 缓存管理器,管理各种缓存(Cache)组件 |
| @Cacheable | 主要针对方法配置,能够根据方法的请求参数对其结果进行缓存 |
| @CacheEvict | 清空缓存 |
| @CachePut | 保证方法被调用,又希望结果被缓存 |
| @EnableCaching | 开启基于注解的缓存 |
| keyGenerator | 缓存数据时key生成策略 |
| serialize | 缓存数据时value序列化策略 |
@Cacheable/@CachePut/@CacheEvict 主要的参数
| value | 缓存的名称,在spring 配置文件中定义,必须指定至少一个 | 例如:@Cacheable(value=”mycache”) 或者@Cacheable(value={”cache1”,”cache2”} |
| key | 缓存的key,可以为空,如果指定要按照SpEL 表达式编写,如果不指定,则缺省按照方法的所有参数进行组合 | 例如:@Cacheable(value=”testcache”,key=”#userName”) |
| condition | 缓存的条件,可以为空,使用SpEL 编写,返回true 或者false,只有为true 才进行缓存/清除缓存 | 例如:@Cacheable(value=”testcache”,condition=”#userName.length()>2”) |
| allEntries (@CacheEvict ) | 是否清空所有缓存内容,缺省为false,如果指定为true,则方法调用后将立即清空所有缓存 | 例如:@CachEvict(value=”testcache”,allEntries=true) |
| beforeInvocation (@CacheEvict) | 是否在方法执行前就清空,缺省为false,如果指定为true,则在方法还没有执行的时候就清空缓存,缺省情况下,如果方法执行抛出异常,则不会清空缓存 | 例如: @CachEvict(value=”testcache”,beforeInvocation=true) |
1.3 Springboot缓存注解的使用
1.3.1 搭建环境
参照:谈谈SpringBoot(一)9. SpringBoot与数据访问
/resources/application.properties
#开启驼峰命名
#mybatis.configuration.map-underscore-to-camel-case=true
#将日志级别设置为debug
logging.level.com.zmj.springboot.mapper=debug
#打开自动配置报告
debug=true
pom.xml依赖
    <dependencies>
        <dependency>
            <groupId>org.springframework.boot</groupId>
            <artifactId>spring-boot-starter-cache</artifactId>
        </dependency>
        <dependency>
            <groupId>org.springframework.boot</groupId>
            <artifactId>spring-boot-starter-jdbc</artifactId>
        </dependency>
        <dependency>
            <groupId>org.springframework.boot</groupId>
            <artifactId>spring-boot-starter-web</artifactId>
        </dependency>
        <dependency>
            <groupId>org.mybatis.spring.boot</groupId>
            <artifactId>mybatis-spring-boot-starter</artifactId>
            <version>2.1.4</version>
        </dependency>
        <dependency>
            <groupId>com.mysql</groupId>
            <artifactId>mysql-connector-j</artifactId>
            <version>8.0.31</version>
            <scope>runtime</scope>
        </dependency>
        <dependency>
            <groupId>org.springframework.boot</groupId>
            <artifactId>spring-boot-starter-test</artifactId>
            <scope>test</scope>
        </dependency>
        <dependency>
            <groupId>com.alibaba</groupId>
            <artifactId>druid</artifactId>
            <version>1.2.15</version>
        </dependency>
        <dependency>
            <groupId>org.apache.log4j</groupId>
            <artifactId>com.springsource.org.apache.log4j</artifactId>
            <version>1.2.16</version>
        </dependency>
    </dependencies>
不使用时,每次查询都要进入数据库

1.3.2 使用缓存
@Service
public class EmployeeService {
    @Autowired
    private EmployeeMapper employeeMapper;

    @Cacheable(cacheNames = {"emp"})//缓存组件名称为emp
    public Employee getEmpById(Integer id){
        Employee emp = employeeMapper.getEmpById(id);
        return emp;
    }
}
@RestController
public class EmployeeController {
@Autowired
private EmployeeService employeeService;
@GetMapping("/emp/{id}")
public Employee queryEmp(@PathVariable("id") Integer id){
return employeeService.getEmpById(id);
}
}@EnableCaching //开启缓存
@MapperScan("com.zmj.springboot.mapper")
@SpringBootApplication
public class SpringbootCacheApplication {
public static void main(String[] args) {
SpringApplication.run(SpringbootCacheApplication.class, args);
}
}使用缓存后,第一次查询进入数据库,后面如果是相同的数据,直接从缓存中获取
1.4 @Cacheable的工作原理和流程
1.4.1) 服务启动,执行SpringApplication.run方法
1.4.2) 首先找到缓存的自动配置类,根据命名规范可知是CacheAutoConfiguration
@Configuration
@ConditionalOnClass({CacheManager.class})
@ConditionalOnBean({CacheAspectSupport.class})
@ConditionalOnMissingBean(
    value = {CacheManager.class},
    name = {"cacheResolver"}
)
@EnableConfigurationProperties({CacheProperties.class})
@AutoConfigureBefore({HibernateJpaAutoConfiguration.class})
@AutoConfigureAfter({CouchbaseAutoConfiguration.class, HazelcastAutoConfiguration.class, RedisAutoConfiguration.class})
@Import({CacheAutoConfiguration.CacheConfigurationImportSelector.class})
public class CacheAutoConfiguration {
}
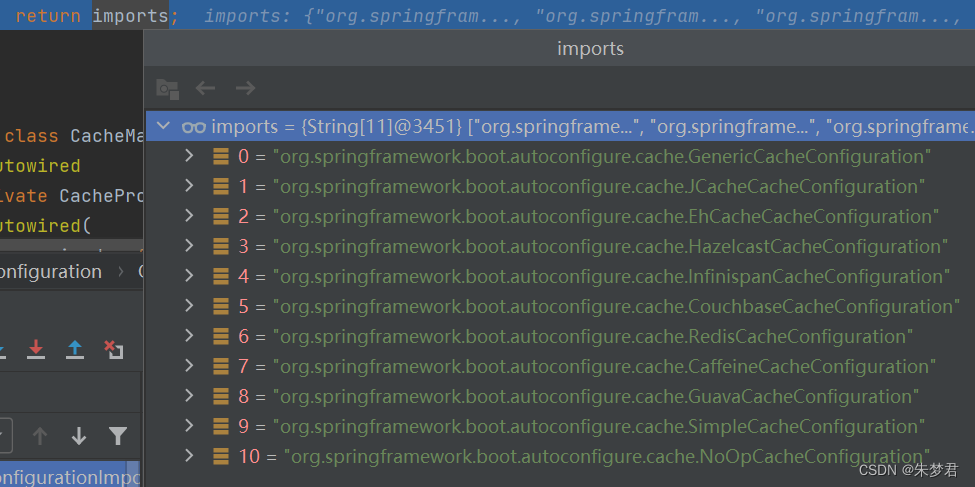
1.4.3) 通过@Import得知,需要导入CacheConfigurationImportSelector类
@Import({CacheAutoConfiguration.CacheConfigurationImportSelector.class})
public class CacheAutoConfiguration {
    static class CacheConfigurationImportSelector implements ImportSelector {
        CacheConfigurationImportSelector() {
        }
        public String[] selectImports(AnnotationMetadata importingClassMetadata) {
            CacheType[] types = CacheType.values();
            String[] imports = new String[types.length];

            for(int i = 0; i < types.length; ++i) {
                imports[i] = CacheConfigurations.getConfigurationClass(types[i]);
            }

            return imports;
        }
    }
}
1.4.4) 缓存的自动配置类中,默认SimpleCacheConfiguration类生效
----通过打印出来的自动配置报告获得
SimpleCacheConfiguration matched:
- Cache org.springframework.boot.autoconfigure.cache.SimpleCacheConfiguration automatic cache type (CacheCondition)
- @ConditionalOnMissingBean (types: org.springframework.cache.CacheManager; SearchStrategy: all) did not find any beans (OnBeanCondition)
@Configuration
@ConditionalOnMissingBean({CacheManager.class})
@Conditional({CacheCondition.class})
class SimpleCacheConfiguration {

    @Bean
    public ConcurrentMapCacheManager cacheManager() {
        ConcurrentMapCacheManager cacheManager = new ConcurrentMapCacheManager();
        List<String> cacheNames = this.cacheProperties.getCacheNames();
        if (!cacheNames.isEmpty()) {
            cacheManager.setCacheNames(cacheNames);
        }
        return (ConcurrentMapCacheManager)this.customizerInvoker.customize(cacheManager);
    }
}
1.4.5) SimpleCacheConfiguration的ConcurrentMapCacheManager
ConcurrentMapCacheManager中有一个cacheMap,后来的缓存数据就是保存到这里
public class ConcurrentMapCacheManager implements CacheManager, BeanClassLoaderAware {
    private final ConcurrentMap<String, Cache> cacheMap = new ConcurrentHashMap(16);
}
1.4.6)浏览器发送第一次请求
http://localhost:8080/emp/1
public class ConcurrentMapCacheManager implements CacheManager, BeanClassLoaderAware {
    private final ConcurrentMap<String, Cache> cacheMap = new ConcurrentHashMap(16);
    public Cache getCache(String name) {
        Cache cache = (Cache)this.cacheMap.get(name);//name=emp
        if (cache == null && this.dynamic) {//第一次请求缓存为null且this.dynamic为true
            synchronized(this.cacheMap) {
                cache = (Cache)this.cacheMap.get(name);
                if (cache == null) {//再次检测,还是为null
                    cache = this.createConcurrentMapCache(name);//创建新缓存
                    this.cacheMap.put(name, cache);
                }
            }
        }
        return cache;
    }
}
1.4.7)创建新缓存对象
public class ConcurrentMapCacheManager implements CacheManager, BeanClassLoaderAware {
    protected Cache createConcurrentMapCache(String name) {
        SerializationDelegate actualSerialization = this.isStoreByValue() ? this.serialization : null;
        return new ConcurrentMapCache(name, new ConcurrentHashMap(256), this.isAllowNullValues(), actualSerialization);
    }
}
1.4.8)生成key和value(cache对象)
key是默认按照keyGenerator策略生成的,默认是使用SimpleKeyGenerator生成key
value是通过回调函数,调用EmployeeService.getEmpById()拿到实例对象
public abstract class CacheAspectSupport extends AbstractCacheInvoker implements BeanFactoryAware, InitializingBean, SmartInitializingSingleton {
    private Object execute(final CacheOperationInvoker invoker, Method method, CacheAspectSupport.CacheOperationContexts contexts) {
        if (contexts.isSynchronized()) {
            CacheAspectSupport.CacheOperationContext context = (CacheAspectSupport.CacheOperationContext)contexts.get(CacheableOperation.class).iterator().next();
            if (this.isConditionPassing(context, CacheOperationExpressionEvaluator.NO_RESULT)) {
                Object key = this.generateKey(context, CacheOperationExpressionEvaluator.NO_RESULT);
                Cache cache = (Cache)context.getCaches().iterator().next();

                try {
                    return this.wrapCacheValue(method, cache.get(key, new Callable<Object>() {
                        public Object call() throws Exception {
                            return CacheAspectSupport.this.unwrapReturnValue(CacheAspectSupport.this.invokeOperation(invoker));
                        }
                    }));
                } catch (ValueRetrievalException var10) {
                    throw (ThrowableWrapper)var10.getCause();
                }
            } else {
                return this.invokeOperation(invoker);
            }
        } else {
            this.processCacheEvicts(contexts.get(CacheEvictOperation.class), true, CacheOperationExpressionEvaluator.NO_RESULT);
            ValueWrapper cacheHit = this.findCachedItem(contexts.get(CacheableOperation.class));
            List<CacheAspectSupport.CachePutRequest> cachePutRequests = new LinkedList();
            if (cacheHit == null) {
                this.collectPutRequests(contexts.get(CacheableOperation.class), CacheOperationExpressionEvaluator.NO_RESULT, cachePutRequests);
            }

            Object cacheValue;
            Object returnValue;
            if (cacheHit != null && cachePutRequests.isEmpty() && !this.hasCachePut(contexts)) {
                cacheValue = cacheHit.get();
                returnValue = this.wrapCacheValue(method, cacheValue);
            } else {
                returnValue = this.invokeOperation(invoker);
                cacheValue = this.unwrapReturnValue(returnValue);
            }

            this.collectPutRequests(contexts.get(CachePutOperation.class), cacheValue, cachePutRequests);
            Iterator var8 = cachePutRequests.iterator();

            while(var8.hasNext()) {
                CacheAspectSupport.CachePutRequest cachePutRequest = (CacheAspectSupport.CachePutRequest)var8.next();
                cachePutRequest.apply(cacheValue);
            }

            this.processCacheEvicts(contexts.get(CacheEvictOperation.class), false, cacheValue);
            return returnValue;
        }
    }
    protected class CacheOperationContext implements CacheOperationInvocationContext<CacheOperation> {
        public CacheOperationContext(CacheAspectSupport.CacheOperationMetadata metadata, Object[] args, Object target) {
        protected Object generateKey(Object result) {
            if (StringUtils.hasText(this.metadata.operation.getKey())) {
                EvaluationContext evaluationContext = this.createEvaluationContext(result);
                return CacheAspectSupport.this.evaluator.key(this.metadata.operation.getKey(), this.methodCacheKey, evaluationContext);
            } else {
                return this.metadata.keyGenerator.generate(this.target, this.metadata.method, this.args);
            }
        }
    }
}
1.4.9)浏览器发送第二次请求
http://localhost:8080/emp/1
public class ConcurrentMapCacheManager implements CacheManager, BeanClassLoaderAware {
    public Cache getCache(String name) {
        Cache cache = (Cache)this.cacheMap.get(name);//name=emp
        if (cache == null && this.dynamic) {//此时cache不为空,条件不成立
            synchronized(this.cacheMap) {
                cache = (Cache)this.cacheMap.get(name);
                if (cache == null) {
                    cache = this.createConcurrentMapCache(name);
                    this.cacheMap.put(name, cache);
                }
            }
        }
        return cache;//直接返回缓存数据
    }
}
1.5 @Cacheable的其他属性
1.5.1 第一种方式
@Service
public class EmployeeService {
    @Autowired
    private EmployeeMapper employeeMapper;

    //@Cacheable(cacheNames = {"emp"})//缓存组件名称为emp
    //@Cacheable(cacheNames = {"emp"},condition = "#id > 0")//缓存的条件是id > 0
    @Cacheable(cacheNames = {"emp"},key="#root.methodName+'['+#id+']'")//key=方法名+id
    public Employee getEmpById(Integer id){
        Employee emp = employeeMapper.getEmpById(id);
        return emp;
    }
}
1.5.2 第二种方式
@Configuration
public class MyCacheConfig {

    @Bean("myKeyGenerator")
    public KeyGenerator keyGenerator() {//自定义key的生成策略
        return new KeyGenerator(){
            @Override
            public Object generate(Object target, Method method, Object... params) {
                return method.getName()+ "["+Arrays.asList(params).toString()+"]";
            }
        };
    }
}
@Service
public class EmployeeService {
@Autowired
private EmployeeMapper employeeMapper;
@Cacheable(cacheNames = {"emp"},keyGenerator = "myKeyGenerator")//key为自定义策略
//@Cacheable(cacheNames = {"emp"},keyGenerator="myKeyGenerator",condition = "#id > 1")
//@Cacheable(cacheNames = {"emp"},keyGenerator = "myKeyGenerator",condition = "#id > 1",unless = "#a0==2")
public Employee getEmpById(Integer id){
Employee emp = employeeMapper.getEmpById(id);
return emp;
}
}1.6 其他缓存注解
@CacheConfig(cacheNames = {"emp"})//全局配置缓存名字都是emp
@Service
public class EmployeeService {
    @Autowired
    private EmployeeMapper employeeMapper;

    @Cacheable()
    //@Cacheable(cacheNames = {"emp"},keyGenerator = "myKeyGenerator",condition = "#id > 1",unless = "#a0==2")
    public Employee getEmpById(Integer id){
        Employee emp = employeeMapper.getEmpById(id);
        return emp;
    }
    //更新缓存,key为员工ID
    @CachePut(key = "#employee.id")
    public Employee updateEmp(Employee employee) {
        employeeMapper.updateEmp(employee);
        return employee;
    }
    //清除缓存,key为员工ID
    @CacheEvict(key = "#id")
    public void deleteEmp(Integer id) {
        employeeMapper.deleteEmp(id);
    }

    //@Caching定义复杂的缓存规则
    @Caching(
            cacheable = {
                    @Cacheable(key = "#lastName")
            },
            put = {
                   @CachePut(key = "#result.id"),
                   @CachePut(key = "#result.email")
            }
    )
    public Employee getEmpByLastName(String lastName){
        Employee emp = employeeMapper.getEmpByLastName(lastName);
        return emp;
    }
}
2. Springboot整合Redis
2.1 Docker中启动Redis
参照:谈谈Docker
docker run -d -p 16379:6379 --name myredis8 16ecd27729342.2 依赖和配置
        <dependency>
            <groupId>org.springframework.boot</groupId>
            <artifactId>spring-boot-starter-data-redis</artifactId>
        </dependency>
spring.redis.host=192.168.1.200
spring.redis.port=16379