整合JDBC
1、创建一个新的工程,勾选JDBC API和MySQL Driver

2、导入web启动器

3、编写yaml配置文件,连接数据库
spring:
  datasource:
    username: root
    password: 123456
    url: jdbc:mysql://localhost:3306/mybatis?useUnicode=true&characterEncoding=utf-8&serverTimezone=UTC
    driver-class-name: com.mysql.cj.jdbc.Driver
4、编写controller
@RestController
public class Jdbccontroller {
    @Resource
    JdbcTemplate jdbcTemplate;  //xxxTemplate是springboot已经配置好的模板bean,直接拿来用就行

    @GetMapping("/addUser")
    public String addUser(){
        String sql = "insert into mybatis.user(id,name,pwd) values(4,'丘桔','123456')";
        jdbcTemplate.update(sql);
        return "添加成功";
    }

    @GetMapping("/delete/{id}")
    public String delete(@PathVariable("id") int id){
        String sql = "delete from mybatis.user where id = ?";
        jdbcTemplate.update(sql, id);
        return "删除成功";
    }

    @GetMapping("/update/{id}")
    public String update(@PathVariable("id") int id){
        String sql = "update mybatis.user set name=?, pwd=? where id=" + id;
        //封装参数
        Object[] objects = new Object[2];
        objects[0] = "旺财";
        objects[1] = "666";
        jdbcTemplate.update(sql,objects);
        return "更新成功";
    }

    @GetMapping("/userList")
    public List<Map<String, Object>> userList(){
        //查询数据库的所有信息
        //没有实体类,怎么获取数据库里面的数据?用map
        String sql = "select * from user";
        List<Map<String, Object>> list_maps = jdbcTemplate.queryForList(sql);
        return list_maps;
    }
}
整合Druid数据源
优点:针对监控而生的数据源
1、导入依赖
        <dependency>
            <groupId>com.alibaba</groupId>
            <artifactId>druid</artifactId>
            <version>1.1.18</version>
        </dependency>
        <dependency>
            <groupId>log4j</groupId>
            <artifactId>log4j</artifactId>
            <version>1.2.17</version>
        </dependency>
2、在application.yaml中指定使用druid数据源,并且自定义配置
    type: com.alibaba.druid.pool.DruidDataSource

    #Spring Boot 默认是不注入这些属性值的,需要自己绑定
    #druid 数据源专有配置
    initialSize: 5
    minIdle: 5
    maxActive: 20
    maxWait: 60000
    timeBetweenEvictionRunsMillis: 60000
    minEvictableIdleTimeMillis: 300000
    validationQuery: SELECT 1 FROM DUAL
    testWhileIdle: true
    testOnBorrow: false
    testOnReturn: false
    poolPreparedStatements: true

    #配置监控统计拦截的filters,stat:监控统计、log4j:日志记录、wall:防御sql注入
    #如果允许时报错  java.lang.ClassNotFoundException: org.apache.log4j.Priority
    #则导入 log4j 依赖即可,Maven 地址:https://mvnrepository.com/artifact/log4j/log4j
    filters: stat,wall,log4j
    maxPoolPreparedStatementPerConnectionSize: 20
    useGlobalDataSourceStat: true
    connectionProperties: druid.stat.mergeSql=true;druid.stat.slowSqlMillis=500
3、添加 druidDataSource 组件到容器中,并且绑定之前在application.yaml中配置的属性,再配置Druid数据源监控
@Configuration
public class DruidConfig {
    @ConfigurationProperties(prefix = "spring.datasource")
    @Bean
    public DataSource druidDataSource(){
        return new DruidDataSource();
    }

    //后台监控
    //因为SpringBoot内置了servlet容器,所以没有web.xml,替代方法:ServletRegistrationBean
    @Bean
    public ServletRegistrationBean statViewServlet(){
        ServletRegistrationBean<StatViewServlet> bean = new ServletRegistrationBean<>(new StatViewServlet(), "/druid/*");
        //后台需要有人登录,配置账号密码
        HashMap<String, String> initParameter = new HashMap<>();
        //增加配置
        initParameter.put("loginUsername","admin"); //登录的key(loginUsername和loginPassword)都是固定的
        initParameter.put("loginPassword","123456");
        //允许谁能访问
        initParameter.put("allow","");  //设置为空,表示谁都能访问

        bean.setInitParameters(initParameter);  //设置初始化参数
        return bean;
    }
}
4、测试一下
访问http://localhost:8080/druid/ 会自动跳转到 http://localhost:8080/druid/login.html页面

登录之后,就可以进入到监控页面 
5、补充:
还可以在 DruidConfig中配置过滤器
    //过滤器:配置哪些资源需要被druid监控,哪些不需要被druid监控
    public FilterRegistrationBean webStatFilter(){
        FilterRegistrationBean<Filter> bean = new FilterRegistrationBean<>();
        bean.setFilter(new WebStatFilter());
        HashMap<String, String> initParameters = new HashMap<>();
        //这些资源不被druid监控
        initParameters.put("exclusion","*.js, *.css, /druid/*");
        bean.setInitParameters(initParameters);
        return bean;
    }
整合MyBatis
1、创建一个新的工程,并且勾选依赖

2、导入依赖
        <dependency>
            <groupId>org.mybatis.spring.boot</groupId>
            <artifactId>mybatis-spring-boot-starter</artifactId>
            <version>2.2.0</version>
        </dependency>
3、在application.yaml中配置数据源
spring:
  datasource:
    username: root
    password: 666666QIU
    url: jdbc:mysql://localhost:3306/mybatis?useUnicode=true&characterEncoding=utf-8&serverTimezone=UTC
    driver-class-name: com.mysql.cj.jdbc.Driver
4、在pojo包下,编写User实体类
@Data
@AllArgsConstructor
@NoArgsConstructor
public class User {
    private int id;
    private String name;
    private String pwd;
}
5、编写UserMapper接口
@Mapper //这个注解表示了这是一个mybatis的mapper类/接口
@Repository
public interface UserMapper {
    List<User> queryUserList();
    User queryUserById(int id);
    int addUser(User user);
    int deleteUser(int id);
    int updateUser(User user);
}
6、编写UserMapper.xml
<?xml version="1.0" encoding="UTF-8" ?>
<!DOCTYPE mapper
        PUBLIC "-//mybatis.org//DTD Mapper 3.0//EN"
        "https://mybatis.org/dtd/mybatis-3-mapper.dtd">
<mapper namespace="com.mapper.UserMapper">
    <select id="queryUserList" resultType="User">
        select * from user;
    </select>
    <select id="queryUserById" resultType="User">
        select * from user where id = #{id};
    </select>
    <insert id="addUser" parameterType="User">
        insert into user(id,name,pwd) values(#{id}, #{name}, #{pwd});
    </insert>
    <delete id="deleteUser">
        delete from user where id = #{id};
    </delete>
    <update id="updateUser" parameterType="User">
        update user set name = #{name}, pwd = #{pwd} where id = #{id};
    </update>
</mapper>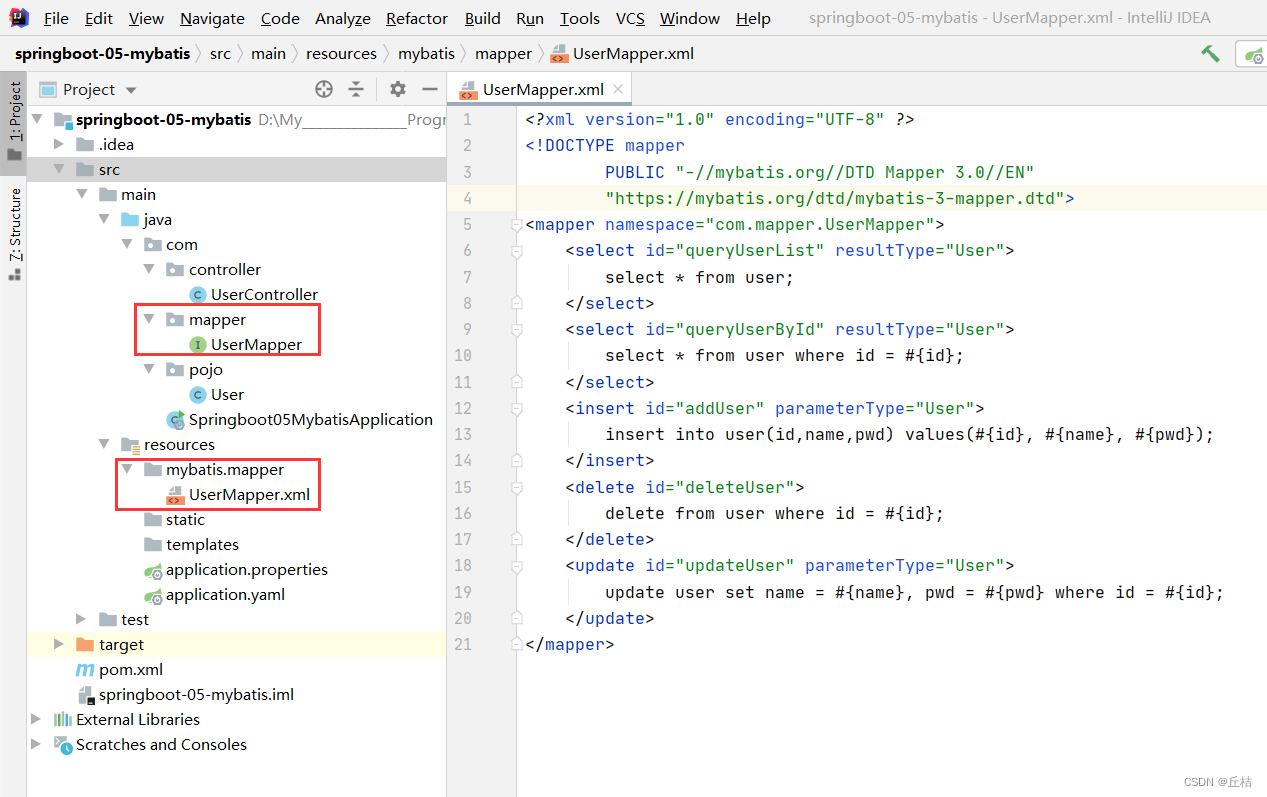
7、在application.yaml中整合mybatis
#整合mybatis
mybatis:
  type-aliases-package: com.pojo
  mapper-locations: classpath:mybatis/mapper/*.xml
8、编写controller(service层省略了)
@RestController
public class UserController {
    @Autowired
    private UserMapper userMapper;
    @GetMapping("/userList")
    public List<User> queryUserList(){
        List<User> userList = userMapper.queryUserList();
        return userList;
    }
    @GetMapping("/queryUserById")
    public User queryUserById(int id){
        User user = userMapper.queryUserById(4);
        return user;
    }
    @GetMapping("/addUser")
    public String addUser(){
        User user = new User(9,"旺财","123");
        userMapper.addUser(user);
        return "添加成功:" + user.toString();
    }
    @GetMapping("/deleteUser")
    public String deleteUser(){
        userMapper.deleteUser(4);
        return "删除成功";
    }
    @GetMapping("/updateUser")
    public String updateUser(){
        User user = new User(9,"旺财666","666");
        userMapper.updateUser(user);
        return "更新成功";
    }
}
![[前端笔记——CSS] 12.处理不同方向文本](https://img-blog.csdnimg.cn/e384135dcc3444dea61e8b2b903fb86b.png)