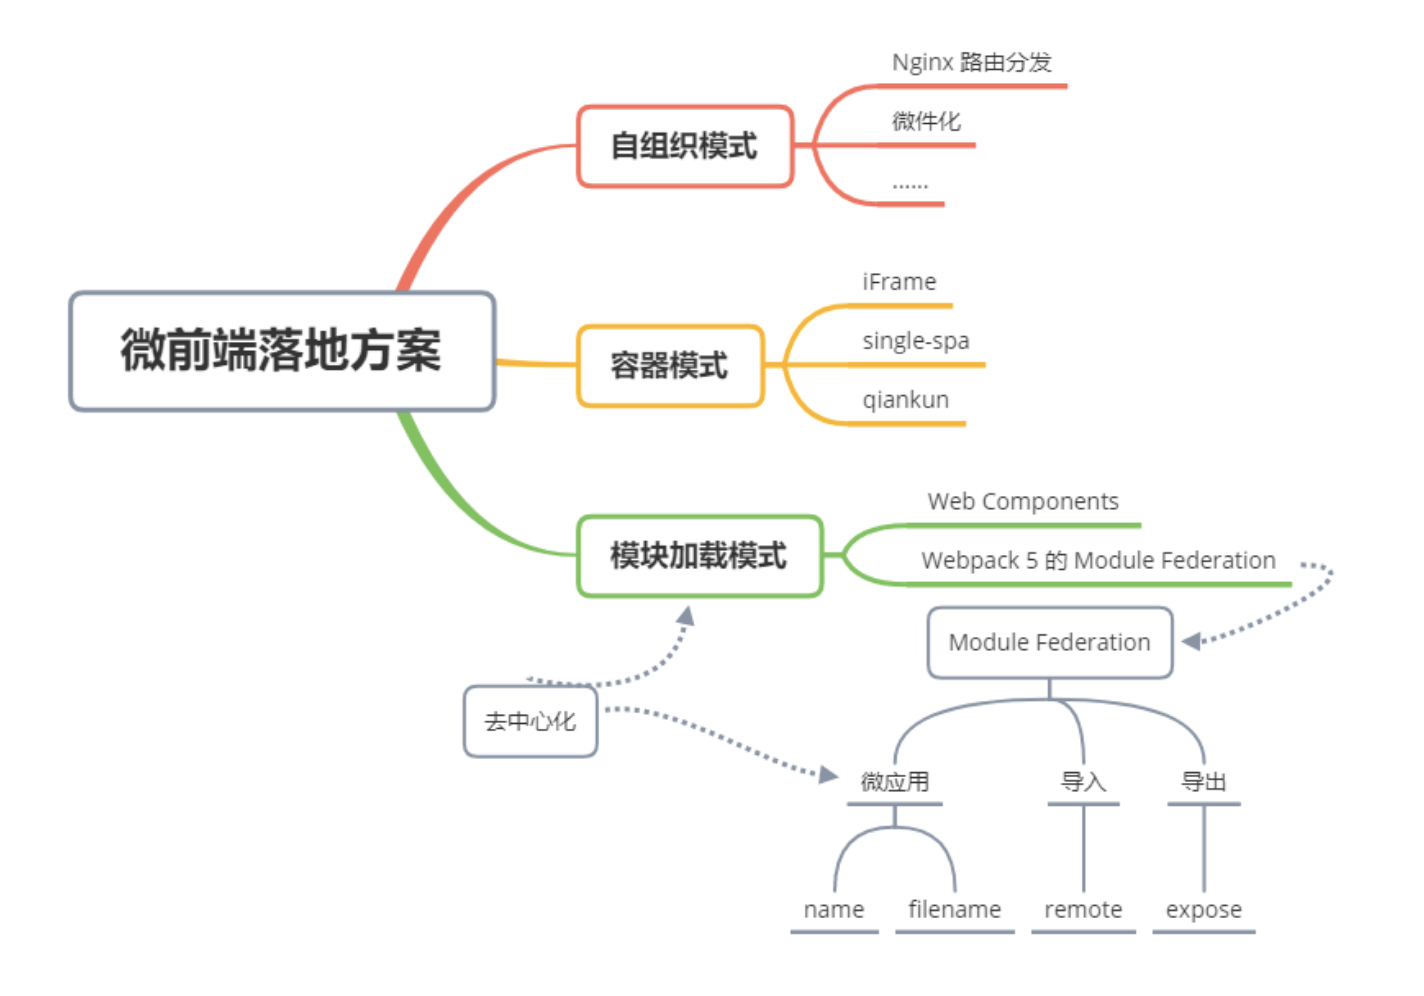
微前端现有的落地方案可以分为三类,自组织模式、基座模式以及模块加载模式。
一、为什么需要微前端?
这里我们通过3W(what,why,how)的方式来讲解什么是微前端:
1.What?什么是微前端?
微前端就是将不同的功能按照不同的维度拆分成多个子应用。通过主应用来加载这些子应用。
微前端的核心在于拆, 拆完后再合!
2.Why?为什么去使用他?
不同团队间开发同一个应用技术栈不同怎么破? 希望每个团队都可以独立开发,独立部署怎么破? 项目中还需要老的应用代码怎么破?
我们是不是可以将一个应用划分成若干个子应用,再将子应用打包成一个个的lib呢?当路径切换时加载不同的子应用,这样每个子应用都是独立的,技术栈也就不用再做限制了!从而解决了前端协同开发的问题。
3.How?怎样落地微前端?
2018年 Single-SPA诞生了, single-spa是一个用于前端微服务化的JavaScript前端解决方案 (本身没有处理样式隔离、js执行隔离) 实现了路由劫持和应用加载; 2019年 qiankun基于Single-SPA, 提供了更加开箱即用的 API (single-spa + sandbox + import-html-entry),它 做到了技术栈无关,并且接入简单(有多简单呢,像iframe一样简单)
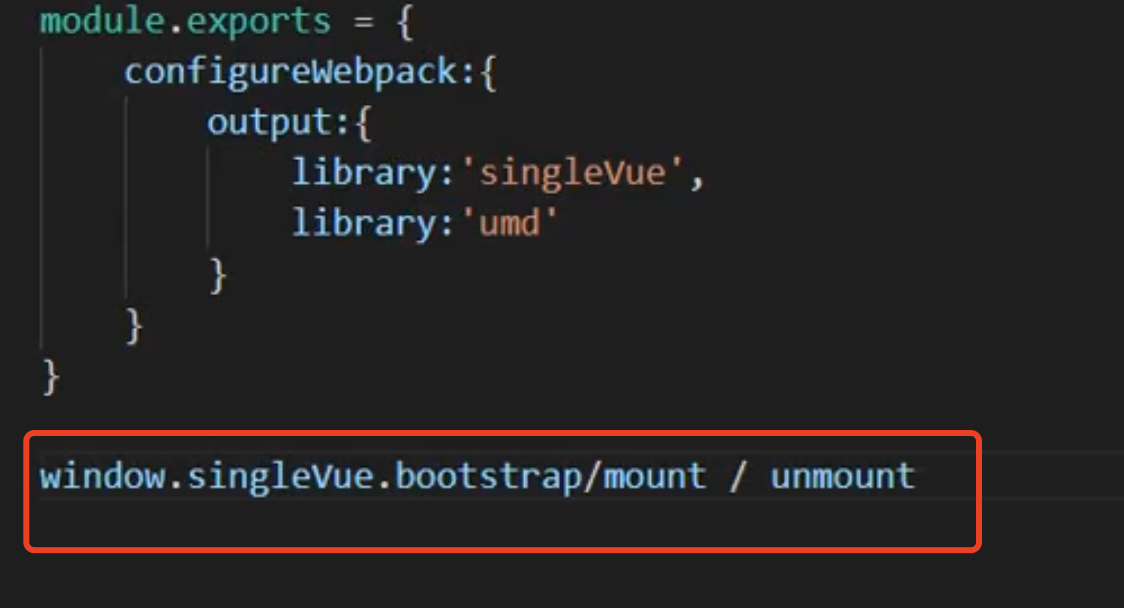
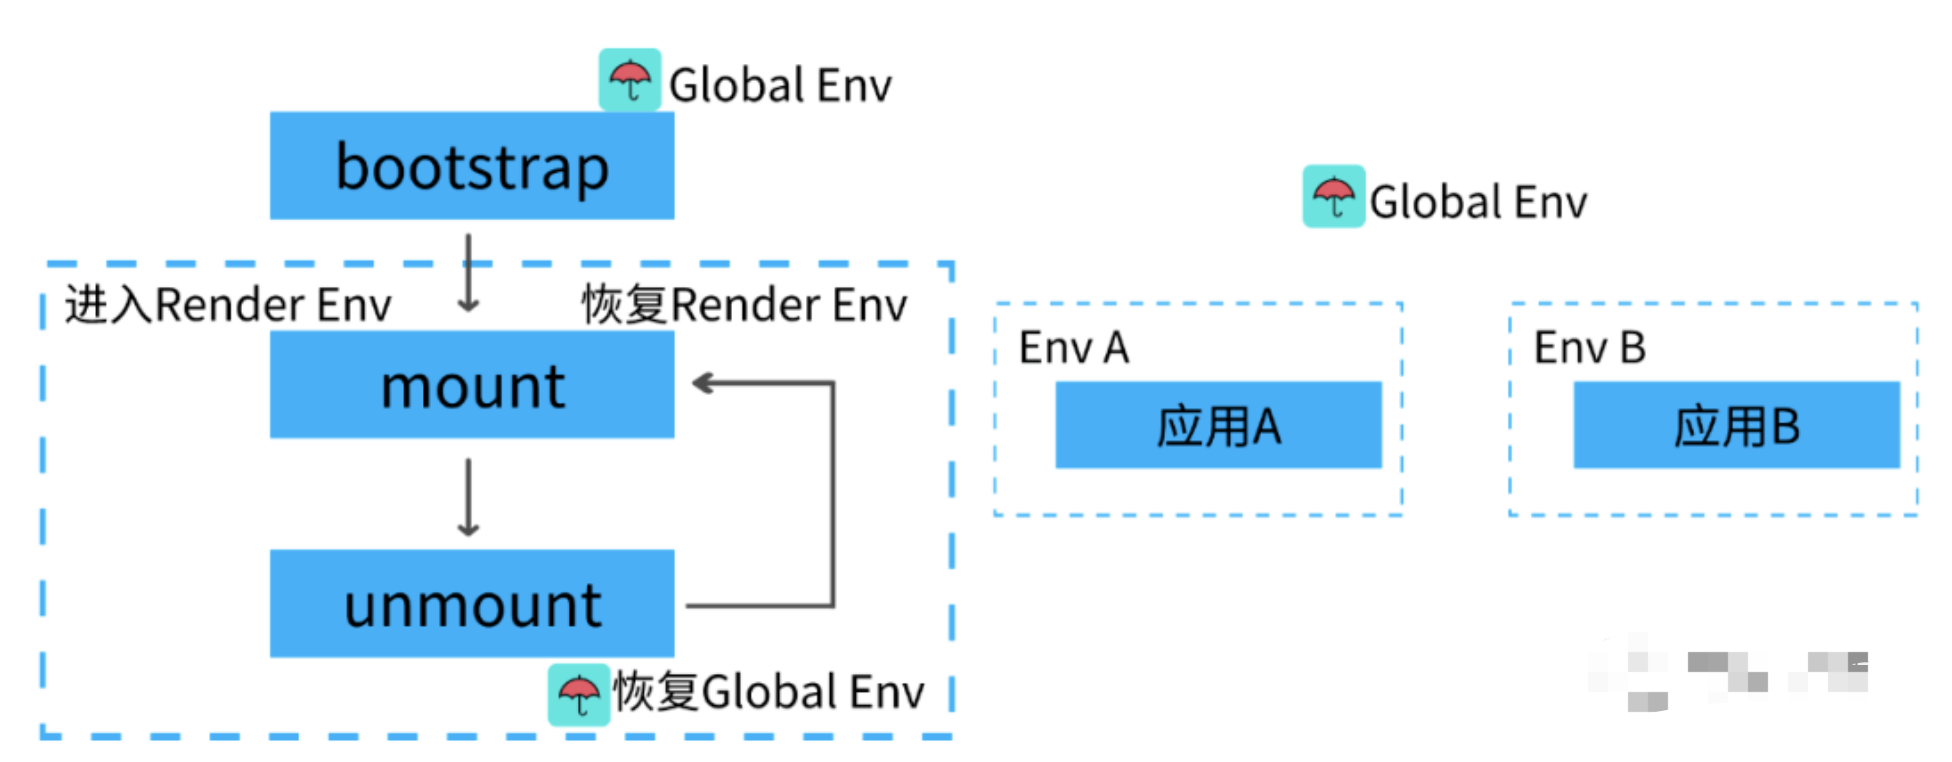
总结:子应用可以独立构建,运行时动态加载,主子应用完全解耦,并且技术栈无关,靠的是协议接入(这里提前强调一下:子应用必须导出 bootstrap、mount、unmount三个方法)。
这里先回答一下大家可能会有的疑问:
这不是iframe吗?
如果使用的是iframe,当iframe中的子应用切换路由时用户刷新页面就尴尬了。
应用间如何通信?
基于URL来进行数据传递,但是这种传递消息的方式能力较弱 基于CustomEvent实现通信;
使用全局变量、Redux进行通信 如何处理公共依赖?
CDN - externals webpack联邦模块 二、SingleSpa实战
官网 https://zh-hans.single-spa.js.org/docs/configuration
1.构建子应用
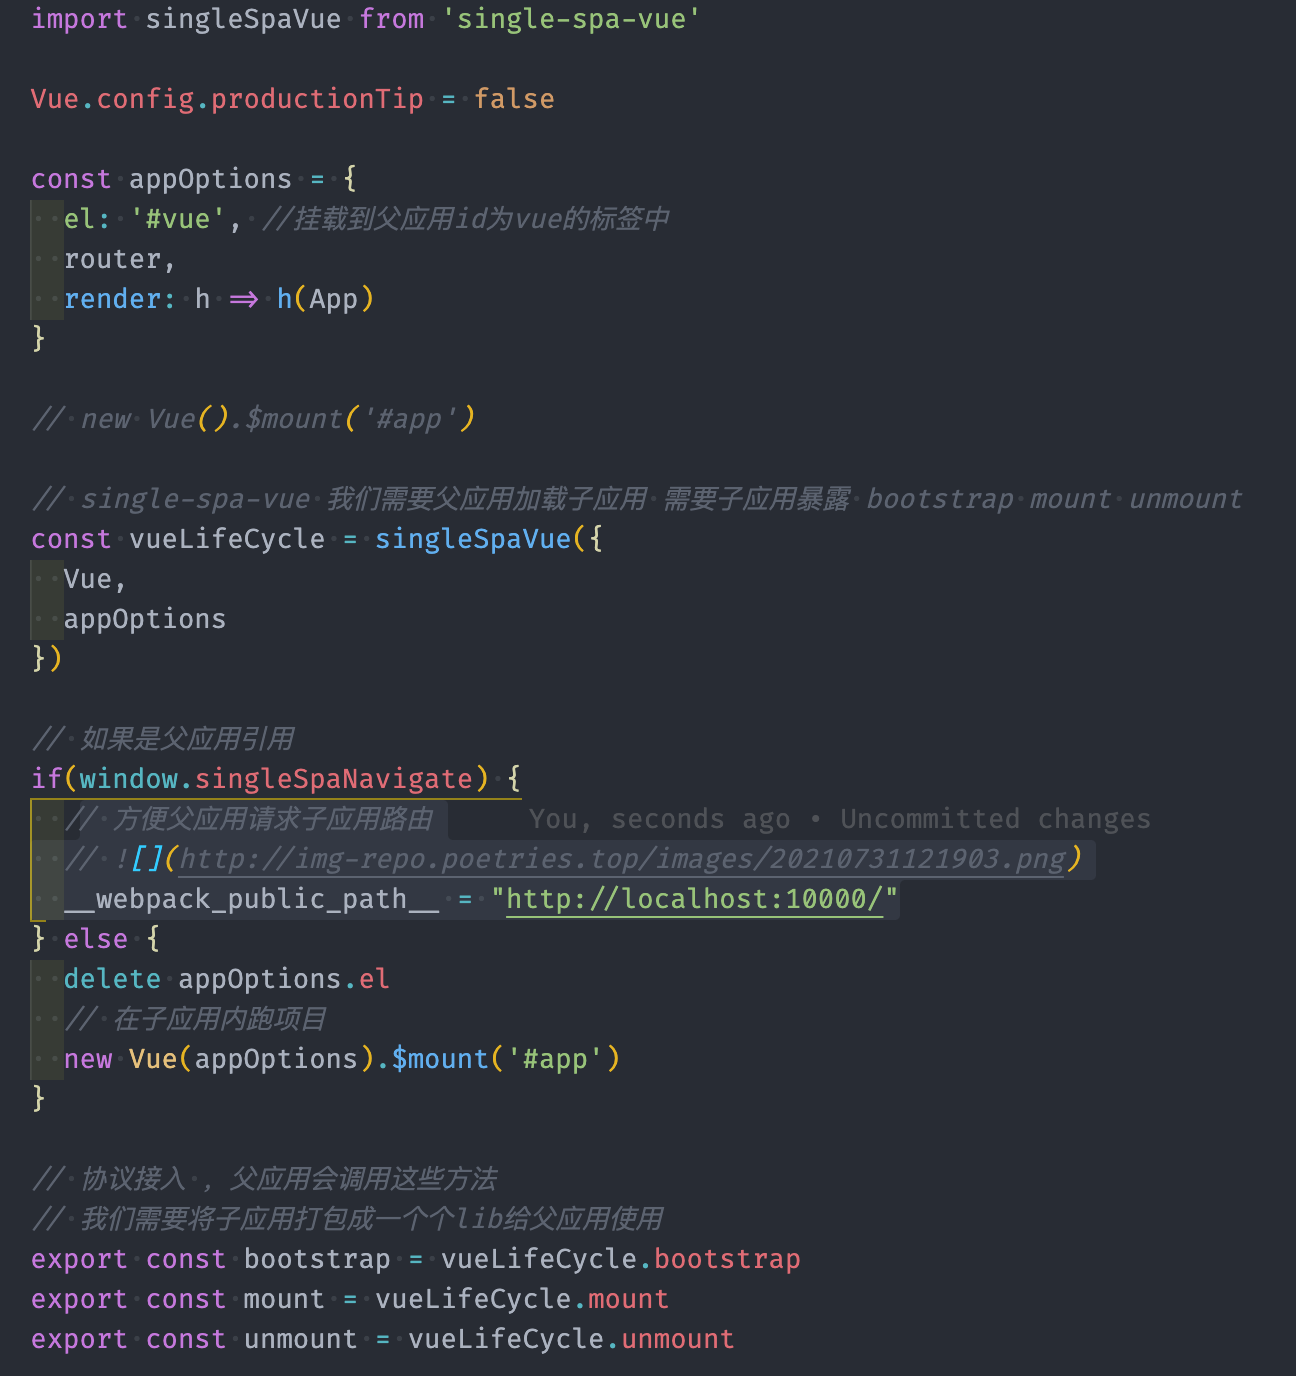
首先创建一个vue子应用,并通过single-spa-vue来导出必要的生命周期:
vue create spa-vue
npm install single-spa-vue
import singleSpaVue from 'single-spa-vue' ;const appOptions = { el: '#vue' , router, render: h => } if (!window .singleSpaNavigate){ delete appOptions.el; new Vue(appOptions).$mount('#app' ); } const vueLifeCycle = singleSpaVue({ Vue, appOptions }); export const bootstrap = vueLifeCycle.bootstrap;export const mount = vueLifeCycle.mount;export const unmount = vueLifeCycle.unmount;export default vueLifeCycle;
配置子路由基础路径
const router = new VueRouter({ mode: 'history' , base: '/vue' , routes })
2.配置库打包
将子模块打包成类库
module .exports = { configureWebpack: { output: { library: 'singleVue' , libraryTarget: 'umd' }, devServer:{ port:10000 } } }
3.主应用搭建
<div id="nav">
    <router-link to="/vue">vue项目router-link>
    <div id="vue">div>
div>
将子应用挂载到id="vue"标签中
import Vue from 'vue' import App from './App.vue' import router from './router' import {registerApplication,start} from 'single-spa' Vue.config.productionTip = false async function loadScript (url ) return new Promise ((resolve,reject )=> { let script = document .createElement('script' ) script.src = url script.onload = resolve script.onerror = reject document .head.appendChild(script) }) } registerApplication('myVueApp' , async ()=>{ console .info('load' ) await loadScript('http://localhost:10000/js/chunk-vendors.js' ) await loadScript('http://localhost:10000/js/app.js' ) return window .singleVue }, location=>location.pathname.startsWith('/vue' ), ) start() new Vue({ router, render: h => }).$mount('#app' )
4.动态设置子应用publicPath
if (window .singleSpaNavigate){ __webpack_public_path__ = 'http://localhost:10000/' }
三、qiankun实战
qiankun是目前比较完善的一个微前端解决方案,它已在蚂蚁内部经受过足够大量的项目考验及打磨,十分健壮。这里附上官网。
https://qiankun.umijs.org/zh/guide
1.主应用编写
<template > <div > <el-menu :router ="true" mode ="horizontal" > <el-menu-item index ="/" > Home</el-menu-item > <el-menu-item index ="/vue" > vue应用</el-menu-item > <el-menu-item index ="/react" > react应用</el-menu-item > </el-menu > <router-view /> <div id ="vue" /> <div id ="react" /> </div > </template > <style > </style >
注册子应用
import { registerMicroApps,start } from 'qiankun' const apps = [ { name: 'vueApp' , entry: '//localhost:10000' , container: '#vue' , activeRule: '/vue' , props: { a: 1 , } }, { name: 'reactApp' , entry: '//localhost:20000' , container: '#react' , activeRule: '/react' }, ] registerMicroApps(apps) start({ prefetch: false })
2.子Vue应用
const router = new VueRouter({ mode: 'history' , base: '/vue' , routes })
import Vue from 'vue' import App from './App.vue' import router from './router' Vue.config.productionTip = false let instance = null function render ( instance = new Vue({ router, render: h => }).$mount('#app' ) } if (!window .__POWERED_BY_QIANKUN__) { render() } if (window .__POWERED_BY_QIANKUN__) { __webpack_public_path__ = window .__INJECTED_PUBLIC_PATH_BY_QIANKUN__; } export async function bootstrap (props ) export async function mount (props ) render() } export async function unmount (props ) instance.$destroy() }
这里不要忘记子应用的钩子导出。
module .exports = { devServer:{ port:10000 , headers:{ 'Access-Control-Allow-Origin' :'*' } }, configureWebpack:{ output:{ library:'vueApp' , libraryTarget:'umd' } } }
3.子React应用
再起一个子应用,为了表明技术栈无关特性,这里使用了一个React项目:
// app.js import logo from './logo.svg'; import './App.css'; import {BrowserRouter,Route,Link} from 'react-router-dom' function App() { return ( // /react跟主应用配置保持一致 <BrowserRouter basename ="/react" > <Link to ="/" > 首页</Link > <Link to ="/about" > 关于</Link > <Route path ="/" exact render ={() => ( <div className ="App" > <header className ="App-header" > <img src ={logo} className ="App-logo" alt ="logo" /> <p > Edit <code > src/App.js</code > and save to reload. </p > <a className ="App-link" href ="https://reactjs.org" target ="_blank" rel ="noopener noreferrer" > Learn React </a > </header > </div > )} /> <Route path ="/about" exact render ={() => ( <h1 > About Page</h1 > )}></Route > </BrowserRouter > ); } export default App;
import React from 'react' ;import ReactDOM from 'react-dom' ;import './index.css' ;import App from './App' ;import reportWebVitals from './reportWebVitals' ;function render ( ReactDOM.render( <React.StrictMode> <App /> </React.StrictMode>, document.getElementById('root') ); } / / If you want to start measuring performance in your app, pass a function / / to log results (for example: reportWebVitals(console.log)) / / or send to an analytics endpoint. Learn more: https:/ /bit.ly/ CRA-vitalsreportWebVitals(); if (!window .__POWERED_BY_QIANKUN__){ render() } export async function bootstrap (export async function mount ( render() } export async function unmount ( ReactDOM.unmountComponentAtNode(document .getElementById("root" )); }
重写react中的webpack配置文件 (config-overrides.js)
yarn add react-app-rewired --save-dev
修改package.json文件
"scripts" : { "start" : "react-app-rewired start" , "build" : "react-app-rewired build" , "test" : "react-app-rewired test" , "eject" : "react-app-rewired eject" },
在根目录新建配置文件
touch config-overrides.js
module .exports = { webpack: (config ) => { config.output.library = 'reactApp' ; config.output.libraryTarget = "umd" ; config.output.publicPath = 'http://localhost:20000/' return config }, devServer: function (configFunction ) return function (proxy, allowedHost ) const config = configFunction(proxy, allowedHost); config.headers = { "Access-Control-Allow-Origin" : "*" , }; return config; }; }, };
配置.env文件
根目录新建.env
PORT=20000
# socket发送端口
WDS_SOCKET_PORT=20000
React路由配置
import { BrowserRouter, Route, Link } from "react-router-dom" const BASE_NAME = window .__POWERED_BY_QIANKUN__ ? "/react" : "" ;function App ( return ( <BrowserRouter basename={BASE_NAME}><Link to="/">首页Link><Link to="/about">关于Link><Route path="/" exact render={() => <h1>hello homeh1>}>Route><Route path="/about" render={() => <h1>hello abouth1>}>Route>BrowserRouter> ); }
四、飞冰微前端实战
官方接入指南 https://micro-frontends.ice.work/docs/guide
4.1 react主应用编写
$ npm init ice icestark-layout @icedesign/stark-layout-scaffold
$ cd icestark-layout
$ npm install
$ npm start
const appConfig: IAppConfig = { ... icestark: { type: 'framework' , Layout: FrameworkLayout, getApps: async () => { const apps = [ { path: '/vue' , title: 'vue微应用测试' , sandbox: false , url: [ "http://localhost:3001/js/chunk-vendors.js" , "http://localhost:3001/js/app.js" , ], }, { path: '/react' , title: 'react微应用测试' , sandbox: true , url: [ "http://localhost:3000/static/js/bundle.js" , ], } ]; return apps; }, appRouter: { LoadingComponent: PageLoading, }, }, };
const asideMenuConfig = [ { name: 'vue微应用测试' , icon: 'set' , path: '/vue' }, { name: 'React微应用测试' , icon: 'set' , path: '/react' }, ]
4.2 vue子应用接入
# 创建一个子应用
vue create vue-child
module .exports = { devServer: { open: true , port: 3001 , headers: { 'Access-Control-Allow-Origin' : '*' , 'Access-Control-Allow-Methods' : 'GET, POST, PUT, DELETE, PATCH, OPTIONS' , 'Access-Control-Allow-Headers' : 'X-Requested-With, content-type, Authorization' , } }, configureWebpack: { output: { library: 'icestark-vue' , libraryTarget: 'umd' , }, } }
src/main.js改造
import { createApp } from 'vue' import App from './App.vue' import router from './router' import store from './store' import { isInIcestark, getMountNode, registerAppEnter, registerAppLeave, setLibraryName } from '@ice/stark-app' let vue = createApp(App)vue.use(store) vue.use(router) setLibraryName('icestark-vue' ) export function mount ({ container } ) console .log(container,'container' ) vue.mount(container); } export function unmount ( vue.unmount(); } if (!isInIcestark()) { vue.mount('#app' ) }
router改造
import { getBasename } from '@ice/stark-app';


const router = createRouter({
  // 重要 在主应用中的基准路由
  base: getBasename(),
  routes
})

export default router
4.3 react子应用接入
create-react-app react-child
// src/app.js

import { isInIcestark, getMountNode, registerAppEnter, registerAppLeave } from '@ice/stark-app';

export function mount(props) {
  ReactDOM.render(<App />, props.container);
}

export function unmount(props) {
  ReactDOM.unmountComponentAtNode(props.container);
}

if (!isInIcestark()) {
  ReactDOM.render(<App />, document.getElementById('root'));
}

if (isInIcestark()) {
  registerAppEnter(() => {
    ReactDOM.render(<App />, getMountNode());
  })
  registerAppLeave(() => {
    ReactDOM.unmountComponentAtNode(getMountNode());
  })
} else {
  ReactDOM.render(<App />, document.getElementById('root'));
}
npm run eject后,改造 config/webpackDevServer.config.js
hot: '' , port: '' , ... headers: { 'Access-Control-Allow-Origin' : '*' , 'Access-Control-Allow-Methods' : 'GET, POST, PUT, DELETE, PATCH, OPTIONS' , 'Access-Control-Allow-Headers' : 'X-Requested-With, content-type, Authorization' , },
五、CSS隔离方案
子应用之间样式隔离:
Dynamic Stylesheet动态样式表,当应用切换时移除掉老应用样式,再添加新应用样式,保证在一个时间点内只有一个应用的样式表生效
主应用和子应用之间的样式隔离:
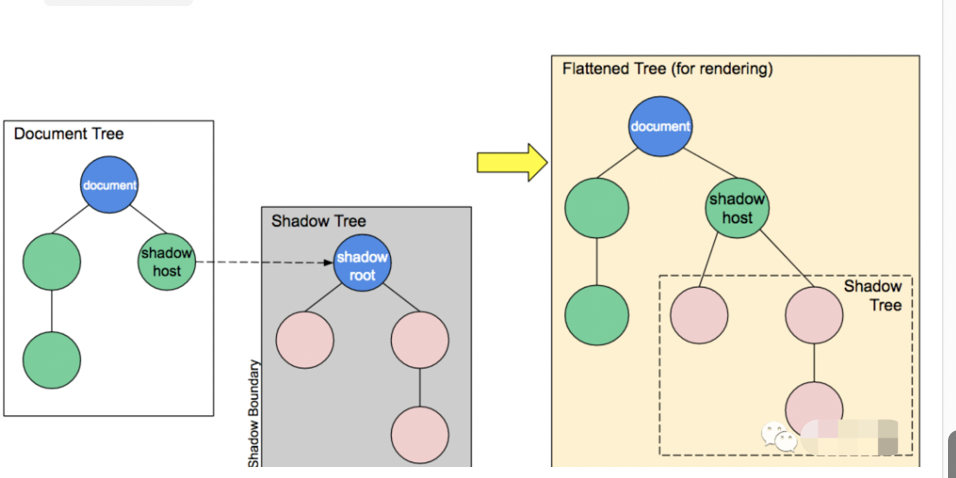
BEM(Block Element Modifier) 约定项目前缀CSS-Modules 打包时生成不冲突的选择器名Shadow DOM 真正意义上的隔离 css-in-js
<!DOCTYPE html> <html lang ="" > <head > <meta charset ="utf-8" > <meta http-equiv ="X-UA-Compatible" content ="IE=edge" > <meta name ="viewport" content ="width=device-width,initial-scale=1.0" > <title > shadow dom</title > </head > <body > <p > hello world</p > <div id ="shadow" > </div > <script > let shadowDOM = document .getElementById('shadow' ).attachShadow({mode : 'closed' }) let pEle = document .createElement('p' ) pEle.innerHTML = 'hello shadowDOM' let styleEle = document .createElement('style' ) styleEle.textContent = `p{color:red} ` shadowDOM.appendChild(styleEle) shadowDOM.appendChild(pEle) </script > </body > </html >
shadow DOM 内部的元素始终不会影响到它的外部元素,可以实现真正意义上的隔离
六、JS沙箱机制
当运行子应用时应该跑在内部沙箱环境中
快照沙箱,当应用沙箱挂载或卸载时记录快照,在切换时依据快照恢复环境 (无法支持多实例) Proxy 代理沙箱,不影响全局环境1.快照沙箱
激活时将当前window属性进行快照处理 失活时用快照中的内容和当前window属性比对 如果属性发生变化保存到modifyPropsMap中,并用快照还原window属性 再次激活时,再次进行快照,并用上次修改的结果还原window属性
class SnapshotSandbox constructor () { this .proxy = window ; this .modifyPropsMap = {}; this .active(); } active() { this .windowSnapshot = {}; for (const prop in window ) { if (window .hasOwnProperty(prop)) { this .windowSnapshot[prop] = window [prop]; } } Object .keys(this .modifyPropsMap).forEach(p => window [p] = this .modifyPropsMap[p]; }); } inactive() { for (const prop in window ) { if (window .hasOwnProperty(prop)) { if (window [prop] !== this .windowSnapshot[prop]) { this .modifyPropsMap[prop] = window [prop]; window [prop] = this .windowSnapshot[prop]; } } } } }
let sandbox = new SnapshotSandbox();((window { window .a = 1 ; window .b = 2 ; window .c = 3 console .log(a,b,c) sandbox.inactive(); console .log(a,b,c) })(sandbox.proxy);
快照沙箱只能针对单实例应用场景,如果是多个实例同时挂载的情况则无法解决,这时只能通过Proxy代理沙箱来实现
2.Proxy 代理沙箱
class ProxySandbox constructor () { const rawWindow = window ; const fakeWindow = {} const proxy = new Proxy (fakeWindow, { set (target, p, value) { target[p] = value; return true }, get (target, p) { return target[p] || rawWindow[p]; } }); this .proxy = proxy } } let sandbox1 = new ProxySandbox();let sandbox2 = new ProxySandbox();window .a = 1 ;((window { window .a = 'hello' ; console .log(window .a) })(sandbox1.proxy); ((window { window .a = 'world' ; console .log(window .a) })(sandbox2.proxy);
每个应用都创建一个proxy来代理window对象,好处是每个应用都是相对独立的,不需要直接更改全局的window属性
