文章目录
- 简介
- wsgiref
- 安装
- 配置文件
- 方式一(debug方式配置)
- 方式二(环境变量方式,很少见)
- 方式三(配置文件方式)
- 其他配置方式
- flask app
- 路由
- 组成
- 写法
- 动态路由的过滤
- 查询字符串传参
- json和form等数据
- 反向解析url_for
- 自定义路由过滤器
- 请求响应
- 模版(无用)
- 渲染变量和循环
- if判断
- 加载静态文件
- cookie
- 获取,删除cookie
- session
- app.session_interface中save_session的参数(设置cookie的参数)
- session源码的执行流程
- 闪现(message)
- 请求扩展(中间件)
- before_request
- after_request
- before_first_request
- teardown_request
- errorhandler
- template_global
- template_filter
- 中间件
- 蓝图
- Blueprint
- 注册蓝图
- 小结
- g对象
- g对象和session的区别
- 数据库连接池
- DBUtils
- SQLAlchemy
- Flask-SQLAlchemy
- wtforms
- 使用一
- 使用二
- 信号
- 内置信号
- 使用信号
- 一个流程中的信号触发点
- 自定义信号
- 多app应用
- flask-script
- 自定制命令
- threading.local
- 自定义threading.local
- 用字典实现
- 面向对象实现
- 偏函数
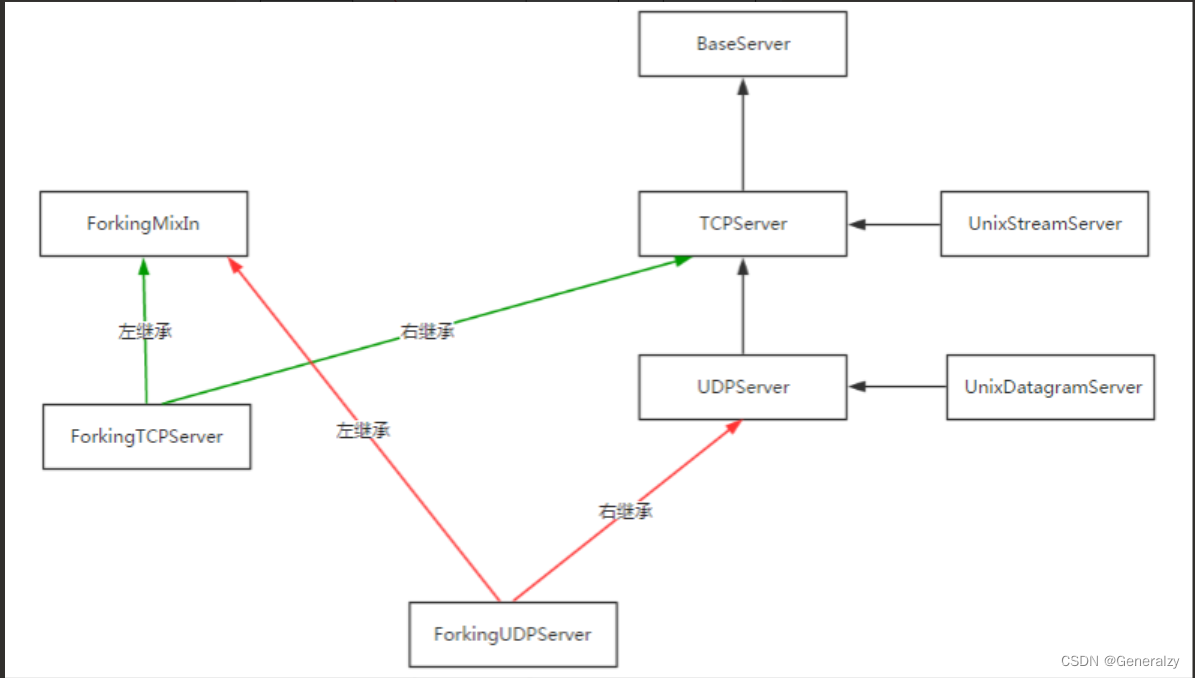
- socketserver实现并发
- server类
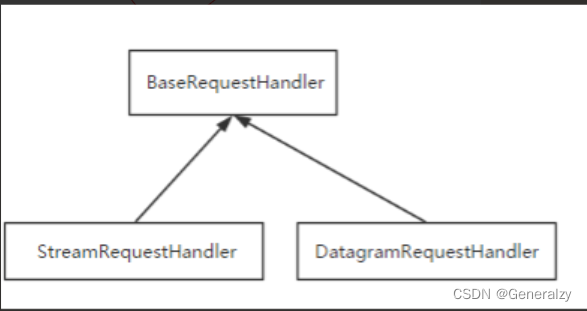
- request类
- 继承关系
- flask请求上下文
简介
Flask是一个基于Python开发并且依赖jinja2模板和Werkzeug WSGI服务的一个微型框架,对于Werkzeug本质是Socket服务端,其用于接收http请求并对请求进行预处理,然后触发Flask框架,开发人员基于Flask框架提供的功能对请求进行相应的处理,并返回给用户,如果要返回给用户复杂的内容时,需要借助jinja2模板来实现对模板的处理,即:将模板和数据进行渲染,将渲染后的字符串返回给用户浏览器。
wsgiref
因为我们不希望接触到TCP连接、HTTP原始请求和响应格式,所以,需要一个统一的接口协议来实现这样的服务器软件,让我们专心用Python编写Web业务。
这个接口就是WSGI:Web Server Gateway Interface,而wsgiref模块就是python基于wsgi协议开发的服务模块。
from wsgiref.simple_server import make_server

def mya(environ, start_response):
    print(environ)
    start_response('200 OK', [('Content-Type', 'text/html')])
    if environ.get('PATH_INFO') == '/index':
        with open('index.html','rb') as f:
            data=f.read()

    elif environ.get('PATH_INFO') == '/login':
        with open('login.html', 'rb') as f:
            data = f.read()
    else:
        data=b'<h1>Hello, web!</h1>'
    return [data]

if __name__ == '__main__':
    myserver = make_server('', 8011, mya)
    print('监听8010')
    myserver.serve_forever()
安装
pip install flask
配置文件
flask中的配置文件是一个flask.config.Config对象(继承字典),默认配置为:
{
    'DEBUG':                                get_debug_flag(default=False),  是否开启Debug模式
    'TESTING':                              False,                          是否开启测试模式
    'PROPAGATE_EXCEPTIONS':                 None,
    'PRESERVE_CONTEXT_ON_EXCEPTION':        None,
    'SECRET_KEY':                           None,
    'PERMANENT_SESSION_LIFETIME':           timedelta(days=31),
    'USE_X_SENDFILE':                       False,
    'LOGGER_NAME':                          None,
    'LOGGER_HANDLER_POLICY':               'always',
    'SERVER_NAME':                          None,
    'APPLICATION_ROOT':                     None,
    'SESSION_COOKIE_NAME':                  'session',
    'SESSION_COOKIE_DOMAIN':                None,
    'SESSION_COOKIE_PATH':                  None,
    'SESSION_COOKIE_HTTPONLY':              True,
    'SESSION_COOKIE_SECURE':                False,
    'SESSION_REFRESH_EACH_REQUEST':         True,
    'MAX_CONTENT_LENGTH':                   None,
    'SEND_FILE_MAX_AGE_DEFAULT':            timedelta(hours=12),
    'TRAP_BAD_REQUEST_ERRORS':              False,
    'TRAP_HTTP_EXCEPTIONS':                 False,
    'EXPLAIN_TEMPLATE_LOADING':             False,
    'PREFERRED_URL_SCHEME':                 'http',
    'JSON_AS_ASCII':                        True,
    'JSON_SORT_KEYS':                       True,
    'JSONIFY_PRETTYPRINT_REGULAR':          True,
    'JSONIFY_MIMETYPE':                     'application/json',
    'TEMPLATES_AUTO_RELOAD':                None,
}
方式一(debug方式配置)
app.config['DEBUG'] = True
由于Config对象本质上是字典,所以还可以使用app.config.update(...)
方式二(环境变量方式,很少见)
#通过环境变量配置
app.config.from_envvar("环境变量名称")
#app.config.from_pyfile(os.environ['YOURAPPLICATION_SETTINGS'])
环境变量的值为python文件名称名称,内部调用from_pyfile方法
方式三(配置文件方式)
#通过py文件配置
app.config.from_pyfile("python文件名称")

# settings.py
DEBUG = True
其他配置方式
# json格式
# JSON文件名称,必须是json格式,因为内部会执行json.loads
app.config.from_json("json文件名称")

# 字典格式
app.config.from_mapping({'DEBUG': True})

# 类(类也是对象)
app.config.from_object("python类或类的路径")
app.config.from_object('pro_flask.settings.TestingConfig')

settings.py
class Config(object):
    DEBUG = False
    TESTING = False
    DATABASE_URI = 'sqlite://:memory:'

class ProductionConfig(Config):
    DATABASE_URI = 'mysql://user@localhost/foo'

class DevelopmentConfig(Config):
    DEBUG = True

class TestingConfig(Config):
    TESTING = True


PS: 路径从sys.path中已经存在路径开始写(即从根root路径开始写)
PS: settings.py文件默认路径要放在程序root_path目录,如果instance_relative_config为True,则就是instance_path目录(Flask对象init方法的参数)
flask app
from flask import Flask

app = Flask(__name__)


@app.route('/')
def hello_world():
    return 'Hello World!'


if __name__ == '__main__':
    app.run()
路由
url是统一资源定位符(Uniform Resource Locator的简写),对可以从互联网上得到的资源的位置和访问方法的一种简洁的表示,是互联网上标准资源的地址。互联网上的每个文件都有一个唯一的URL,它包含的信息指出文件的位置以及浏览器应该怎么处理它。
组成
scheme://host:port/path/?parameter=xxx
https://www.baidu.com/Public/linux/?fr=aladdin
- scheme:代表的是访问的协议,一般为http或者https以及ftp等。
- host:主机名,域名,比如www.baidu.com。
- port:端口号。当你访问一个网站的时候,浏览器默认使用80端口。
- path:路径。比如:www.baidu.com/Public/linux/?python=aladdin#23,www.baidu.com后面的Public/linux就是path。
- query-string:查询字符串,比如:www.baidu.com/s?wd=python,?后面的python=aladdin就是查询字符串。
- anchor:锚点,后台一般不用管,前端用来做页面定位的。比如:https://www.oldboyedu.com/Public/linux/?fr=aladdin#23 ,#后面的23就是锚点
写法
1. 经典写法
@app.route('/detail',methods=['GET'],endpoint='detail')

@setupmethod
def route(self, rule: str, **options: t.Any) -> t.Callable[[T_route], T_route]:
    def decorator(f: T_route) -> T_route:
        endpoint = options.pop("endpoint", None)
        self.add_url_rule(rule, endpoint, f, **options)
        return f

    return decorator

2. add_url_rule写法
app.add_url_rule('/login', 'n2', login, methods=['GET',"POST"])
def add_url_rule(
        self,
        # 路由规则
        rule: str,
        # url名,用于反向解析,若不传入则默认为视图函数名称
        endpoint: t.Optional[str] = None,
        # 视图函数
        view_func: t.Optional[ft.RouteCallable] = None,
        provide_automatic_options: t.Optional[bool] = None,
        **options: t.Any,
    ) -> None:
    pass

# options其他参数

# 对URL最后的 / 符号是否严格要求
strict_slashes = None
#重定向到指定地址
redirect_to = None
#子域名访问
subdomain = None
# 当URL中无参数,函数需要参数时,使用defaults = {'k': 'v'}为函数提供参数
defaults = None
动态路由的过滤
DEFAULT_CONVERTERS = {
    'default':          UnicodeConverter,	# 默认
    'string':           UnicodeConverter, # 默认的数据类型,接收没有任何斜杠"\   /"的字符串
    'any':              AnyConverter,	# 可以指定多种路径
    'path':             PathConverter,	# 和string类型相似,但是接受斜杠,如:可以接受参数/aa/bb/cc/多条放在一起
    'int':              IntegerConverter,	# 整型
    'float':            FloatConverter,	# 浮点型
    'uuid':             UUIDConverter,	# 只接受uuid格式的字符串字符串,
}
@app.route('/detail/<int:nid>',methods=['GET'],endpoint='detail')

@app.route('/detail/<float:nid>',methods=['GET'],endpoint='detail')
def detail(nid):
	return f"nid为{nid}"

# any
@app.route('/<any(student,class):url_path>/<id>/')
1. /student/1  # url_path = student,id=1
2. /class/2	# url_path=class,id=2
def detail(url_path,id):
	return "fuck off"
查询字符串传参
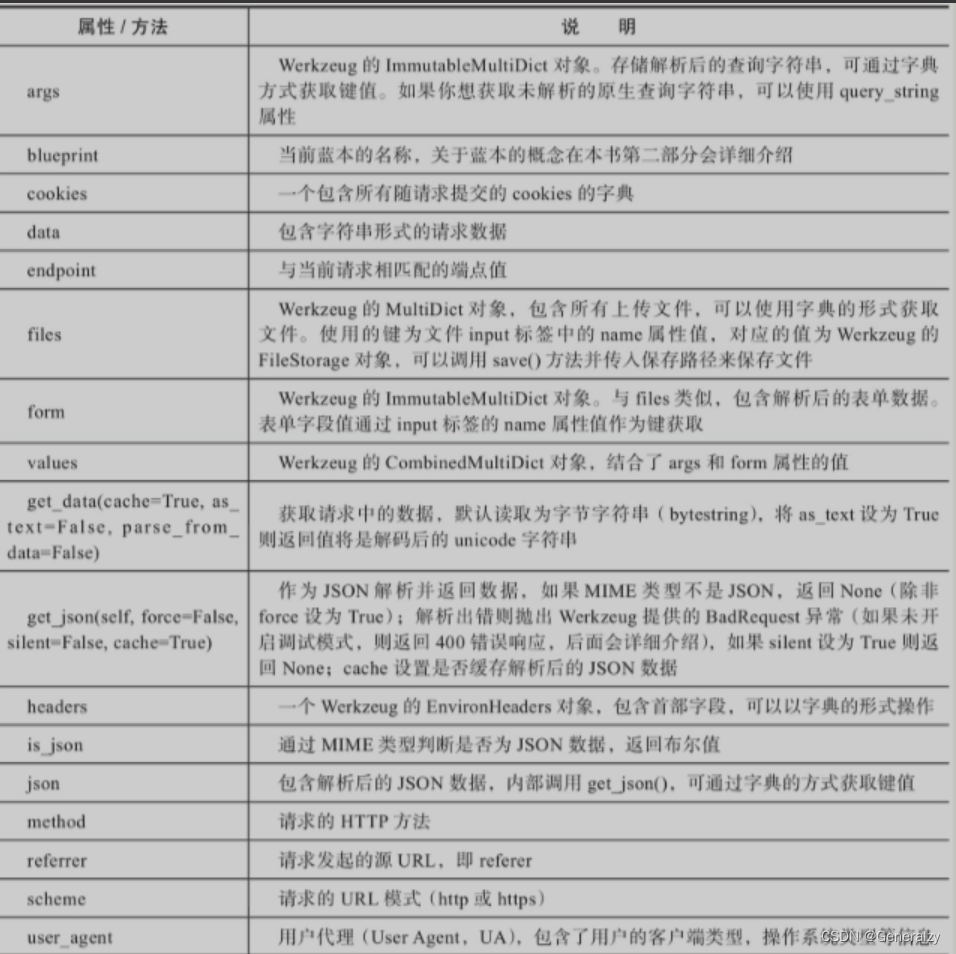
args 是request的一个属性,其本质是一个Werkzeug依赖包的的immutableMultiDict的对象,用于解析我们传入的查询字符串,immutableMultiDict对象也继承了Dict类,所以可以使用字典的.get()方法来获取,当然了如果我们有获取原生未解析的原生查询字符串的需求,可以使用query_string属性。
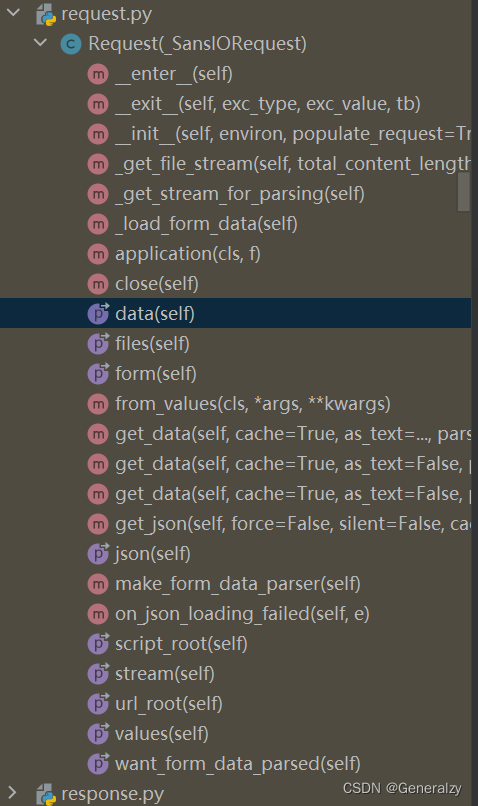
json和form等数据
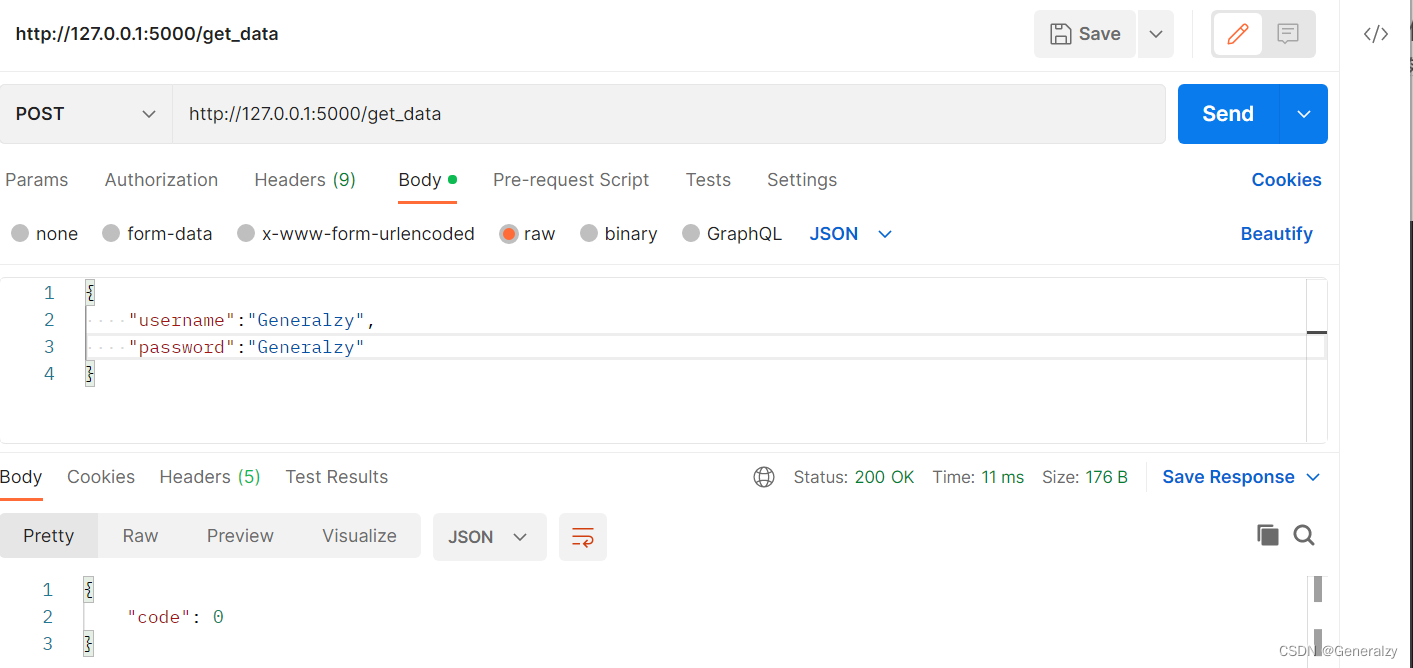
@app.route("/get_data",methods=["GET","POST"])
def get_data():
	# {'username': 'Generalzy', 'password': 'Generalzy'}
    print(request.json)

	# ImmutableMultiDict([])
    print(request.form)

	# b'{\r\n    "username":"Generalzy",\r\n    "password":"Generalzy"\r\n}'
    print(request.data)

	# ImmutableMultiDict([])
    print(request.args)

	# CombinedMultiDict([ImmutableMultiDict([]), ImmutableMultiDict([])])
    print(request.values)

	# ImmutableMultiDict([])
    print(request.files)
    return jsonify({"code":0})
反向解析url_for
url_for("视图函数名称") # 返回视图函数url

@app.route("/get_data", methods=["GET", "POST"],endpoint="fuck")
def get_data():
	# /get_data
    print(url_for("fuck"))
    return jsonify({"code": 0})
额外参数:
1. 处理动态路由
@app.route("/get_data/<str:username>", methods=["GET", "POST"])
url_for("/get_data",username="G")
/get_data/G

2. 处理查询参数
url_for("/get_data",username="G",password="123456")
123456将拼接为:/get_data/G?password=123456
自定义路由过滤器
#1 写类,继承BaseConverter
#2 注册:app.url_map.converters['regex'] = RegexConverter
#3 使用:@app.route('/index/<regex("\d+"):nid>')  正则表达式会当作第二个参数传递到类中
from flask import Flask, views, url_for
from werkzeug.routing import BaseConverter

app = Flask(import_name=__name__)

class RegexConverter(BaseConverter):
    """
    自定义URL匹配正则表达式
    """
    def __init__(self, map, regex):
        super(RegexConverter, self).__init__(map)
        self.regex = regex

    def to_python(self, value):
        """
        路由匹配时,匹配成功后传递给视图函数中参数的值
        """
        return int(value)

    def to_url(self, value):
        """
        使用url_for反向生成URL时,传递的参数经过该方法处理,返回的值用于生成URL中的参数
        """
        val = super(RegexConverter, self).to_url(value)
        return val

# 添加到flask中
app.url_map.converters['regex'] = RegexConverter

# 使用
@app.route('/index/<regex("\d+"):nid>')
def index(nid):
    print(url_for('index', nid='888'))
    return 'Index'

if __name__ == '__main__':
    app.run()
请求响应
from flask import Flask
from flask import request
from flask import render_template
from flask import redirect
from flask import make_response

app = Flask(__name__)


@app.route('/login.html', methods=['GET', "POST"])
def login():
    # 请求相关信息
    # request.method  提交的方法
    # request.args  get请求提及的数据
    # request.form   post请求提交的数据
    # request.values  post和get提交的数据总和
    # request.cookies  客户端所带的cookie
    # request.headers  请求头
    # request.json 		json数据
    # request.data 		二进制原始数据
    # request.path     不带域名,请求路径
    # request.full_path  不带域名,带参数的请求路径
    # request.script_root
    # request.url           带域名带参数的请求路径
    # request.base_url		带域名请求路径
    # request.url_root      域名
    # request.host_url		域名
    # request.host			127.0.0.1:500
    # request.files
    # obj = request.files['the_file_name']
    # obj.save('/var/www/uploads/' + secure_filename(f.filename))

    # 响应相关信息
    # return "字符串"
    # return render_template('html模板路径',**{})
    # return redirect('/index.html')
    # return jsonify({'k1':'v1'})
    # return send_file(文件)

    # response = make_response(render_template('index.html'))
    # response是flask.wrappers.Response类型
    # response.delete_cookie('key')
    # response.set_cookie('key', 'value')
    # response.headers['X-Something'] = 'A value'
    # return response
    return "内容"

if __name__ == '__main__':
    app.run()
模版(无用)
- Markup等价django的mark_safe ,
- extends,include一模一样
from flask import Flask,render_template,Markup,jsonify,make_response
app = Flask(__name__,template_folder='C:/Users/Administrator/Desktop/templates')

def func1(arg):
    return Markup("<input type='text' value='%s' />" %(arg,))

@app.route('/')
def index():
	# index.html需要在app注册好的templates目录下
    return render_template('index.html',ff = func1,name="g")

@app.route("/index"):
def index2():
	# 第二种传值方法
	context = {"name":"G"}
	return render_template('index.html',ctx=context)
	# {{ ctx.name}}

if __name__ == '__main__':
    app.run()
<!DOCTYPE html>
<html lang="en">
<head>
    <meta charset="UTF-8">
    <title>Title</title>
</head>
<body>

    {{ff('六五')}}
	{{ff('六五')|safe}}

</body>
</html>
渲染变量和循环
<!DOCTYPE html>
<html lang="en">
<head>
    <meta charset="UTF-8">
    <title>Title</title>
</head>
<body>
    <h1>用户列表</h1>
    <table>
        {% for k,v in user_dict.items() %}
        <tr>
            <td>{{k}}</td>
            <td>{{v.name}}</td>
            <td>{{v['name']}}</td>
            <td>{{v.get('name')}}</td>
            <td><a href="/detail/{{k}}">查看详细</a></td>
        </tr>
        {% endfor %}
    </table>
</body>
</html>
| for循环常用变量 | 功能描述 |
|---|---|
| loop.index | 当前循环的索引(从1开始) |
| loop.index0 | 当前循环的索引(从0开始) |
| loop.first | 是否是第一次循环,是返回True,否则返回Flase |
| loop.last | 是否是最后一次循环,是返回True,否则返回Flase |
| loop.length | 总共可以循环的次数 / 迭代器的长度 |
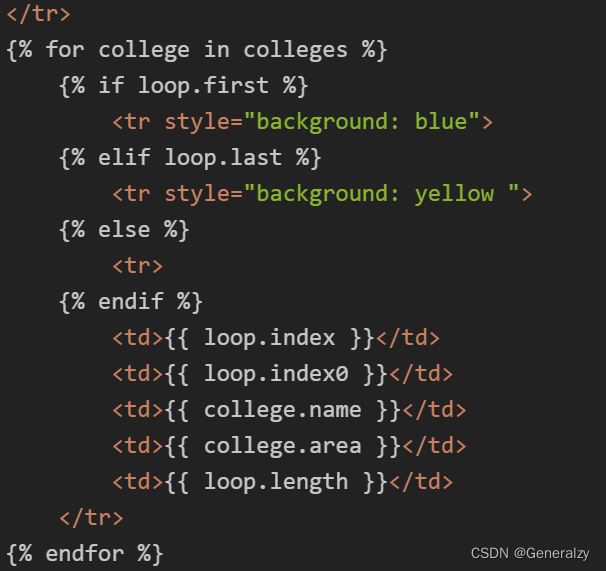
if判断
<!DOCTYPE html>
<html lang="en">
<head>
    <meta charset="UTF-8">
    <title>Title</title>
</head>
<body>
    <h1>用户列表</h1>
    <table>
        {% if name %}
          <h1>Hello {{ name }}!</h1>
        {% else %}
          <h1>Hello World!</h1>
        {% endif %}
    </table>
</body>
</html>
加载静态文件
{{ url_for('static',filename='相对于static文件夹的路径') }}
<link rel=“stylesheet” href=“{{ url_for(‘static’,filename=‘css/demo.css’) }}”>
cookie
在Flask中如果想要在响应中添加一个cookie,最方便的做法是使用内置的Response类提供的set_cookie()。
| 属性 | 说明 |
|---|---|
| key | cookie的键(名称) |
| value | cookie的值 |
| max_age | cookie被保存的时间数,单位为秒。 |
| expires | 具体的过期时间,一个datetime对象或UNIX时间戳 |
| path | 限制cookie只在给定的路径可用,默认为整个域名下路径都可用 |
| domain | 设置cookie可用的域名,默认是当前域名,子域名需要利用通配符domain=.当前域名 |
| secure | 如果设为True,只有通过HTTPS才可以用 |
| httponly | 如果设为True,进制客户端JavaScript获取cookie |
获取,删除cookie
request.cookies.get()

response.delete_cookie()
session
在使用session之前必须现在设置一下密钥。
app.secret_key="密钥"
设置:session['username'] = 'xxx'
# 在django中发什么三件事,1,生成一个随机的字符串 2 往数据库存 3 写入cookie返回浏览器
# 在flask中他没有数据库:生成一个密钥写入这个cookie,然后下次请求的时候,通过这个cookie解密,然后赋值给session

删除:session.pop('username', None)
app.session_interface中save_session的参数(设置cookie的参数)
key, 键
value='', 值
max_age=None, 超时时间 cookie需要延续的时间(以秒为单位)如果参数是\ None`` ,这个cookie会延续到浏览器关闭为止
expires=None, 超时时间(IE requires expires, so set it if hasn't been already.)
path='/', Cookie生效的路径,/ 表示根路径,特殊的:根路径的cookie可以被任何url的页面访问,浏览器只会把cookie回传给带有该路径的页面,这样可以避免将cookie传给站点中的其他的应用。
domain=None, Cookie生效的域名 你可用这个参数来构造一个跨站cookie。如, domain=".example.com"所构造的cookie对下面这些站点都是可读的:www.example.com 、 www2.example.com 和an.other.sub.domain.example.com 。如果该参数设置为 None ,cookie只能由设置它的站点读取
secure=False, 浏览器将通过HTTPS来回传cookie
httponly=False 只能http协议传输,无法被JavaScript获取(不是绝对,底层抓包可以获取到也可以被覆盖
session源码的执行流程
-save_seesion
	-响应的时候,把session中的值加密序列化放大到了cookie中,返回到浏览器中
-open_session
	-请求来了,从cookie中取出值,反解,生成session对象,以后再视图函数中直接用sessoin就可以了。
闪现(message)
设置:flash('aaa')
取值:get_flashed_message()
假设在a页面操作出错,跳转到b页面,在b页面显示a页面的错误信息
from flask import Flask,flash,get_flashed_messages,request,redirect

app = Flask(__name__)
app.secret_key = 'asdfasdf'


@app.route('/index')
def index():
    # 从某个地方获取设置过的所有值,并清除。
    val = request.args.get('v')
    if val == 'oldboy':
        return 'Hello World!'
    flash('超时错误',category="x1")
    return "ssdsdsdfsd"
    # return redirect('/error')


@app.route('/error')
def error():
    """
    展示错误信息
    :return:
    如果get_flashed_messages(with_category=True)
    """
    data = get_flashed_messages(category_filter=['x1'])
    if data:
        msg = data[0]
    else:
        msg = "..."
    return "错误信息:%s" %(msg,)

if __name__ == '__main__':
    app.run()
请求扩展(中间件)
与django中间件不同的是,before_request请求拦截后(也就是有return值),response所有都执行。
before_request
类比django中间件中的process_request,在请求收到之前绑定一个函数做一些事情,
如果有一个写了return返回值,那么其他的before_request不会执行,视图也不会执行。
# 登录认证
@app.before_request
def process_request(*args,**kwargs):
    if request.path == '/login':
        return None
    user = session.get('user_info')
    if user:
        return None
    return redirect('/login')
after_request
类比django中间件中的process_response,每一个请求之后绑定一个函数,请求出现异常不会执行
@app.after_request
def process_response1(response):
    print('process_response1 走了')
    return response
before_first_request
第一次请求时,跟浏览器无关
@app.before_first_request
def first():
    pass
teardown_request
每次请求之后绑定了一个函数,在非debug模式下即使遇到了异常也会执行。
@app.teardown_request
def ter(error):
    pass
errorhandler
路径不存在时404,服务器内部错误500,可以自定义监听响应的状态码并处理:
@app.errorhandler(404)
def error_404(arg):
    return "404错误了"
template_global
全局模板标签
@app.template_global()
def sb(a1, a2):
    return a1 + a2
#{{sb(1,2)}}
template_filter
全局模板过滤器
@app.template_filter()
def db(a1, a2, a3):
    return a1 + a2 + a3
#{{ 1|db(2,3,4)}}
中间件
from flask import Flask

app = Flask(__name__)

@app.route('/')
def index():
    return 'Hello World!'

# 模拟中间件
class Md(object):
    def __init__(self,old_wsgi_app):
        self.old_wsgi_app = old_wsgi_app

    def __call__(self,  environ, start_response):
        print('开始之前')
        ret = self.old_wsgi_app(environ, start_response)
        print('结束之后')
        return ret

if __name__ == '__main__':
    #1 当执行app.run方法的时候,最终执行run_simple,最后执行app(),也就是在执行app.__call__方法
    #2 在__call__里面,执行的是self.wsgi_app().
    #3 如果希望在执行他本身的wsgi之前做点事情,
    #4 先用Md类中__init__,保存之前的wsgi,然后将app.wsgi转化成Md的对象。
    #5 那执行新的的app.wsgi_app,就是执行Md的__call__方法。
    #6 把原来的wsgi_app替换为自定义的,

    app.wsgi_app = Md(app.wsgi_app)
    app.run()
蓝图
- 对程序进行目录结构划分。
- 蓝图相当于一个小的flask app。
Blueprint
def __init__(
        self,
        name: str,
        import_name: str,
        static_folder: t.Optional[t.Union[str, os.PathLike]] = None,
        static_url_path: t.Optional[str] = None,
        template_folder: t.Optional[str] = None,
        url_prefix: t.Optional[str] = None,
        subdomain: t.Optional[str] = None,
        url_defaults: t.Optional[dict] = None,
        root_path: t.Optional[str] = None,
        cli_group: t.Optional[str] = _sentinel,  # type: ignore
    ):
    	pass

参数:
name: 蓝图的名称
import_name: 名称,一般用__name__
static_folder: 蓝图级的静态文件路劲,当前找不到会找总static_folder
template_folder: 蓝图级的模板文件路劲,当前找不到会找总templates
url_prefix: 蓝图URL前缀,表示url的前缀,在该蓝图下所有url都加前缀
注册蓝图
from view import view_bp

app = Flask(__name__)
app.register_blueprint(view_bp)
小结
-
蓝图的befort_request,对当前蓝图有效
-
大型项目,可以模拟出类似于django中app的概念
g对象
专门用来存储用户信息的g对象,g的全称的为global
g对象在一次请求中的所有的代码的地方,都是可以使用的.
g对象和session的区别
session对象是可以跨request的,只要session还未失效,不同的request的请求会获取到同一个session,但是g对象不是,g对象不需要管过期时间,请求一次就g对象就改变了一次,或者重新赋值了一次.
数据库连接池
DBUtils
SQLAlchemy
Flask-SQLAlchemy
wtforms
pip3 install wtforms
使用一
from flask import Flask, render_template, request, redirect
from wtforms import Form
from wtforms.fields import simple
from wtforms import validators
from wtforms import widgets

app = Flask(__name__, template_folder='templates')

app.debug = True


class LoginForm(Form):
    # 字段(内部包含正则表达式)
    name = simple.StringField(
        label='用户名',
        validators=[
            validators.DataRequired(message='用户名不能为空.'),
            validators.Length(min=6, max=18, message='用户名长度必须大于%(min)d且小于%(max)d')
        ],
        widget=widgets.TextInput(), # 页面上显示的插件
        render_kw={'class': 'form-control'}

    )
    # 字段(内部包含正则表达式)
    pwd = simple.PasswordField(
        label='密码',
        validators=[
            validators.DataRequired(message='密码不能为空.'),
            validators.Length(min=8, message='用户名长度必须大于%(min)d'),
            validators.Regexp(regex="^(?=.*[a-z])(?=.*[A-Z])(?=.*\d)(?=.*[$@$!%*?&])[A-Za-z\d$@$!%*?&]{8,}",
                              message='密码至少8个字符,至少1个大写字母,1个小写字母,1个数字和1个特殊字符')

        ],
        widget=widgets.PasswordInput(),
        render_kw={'class': 'form-control'}
    )


@app.route('/login', methods=['GET', 'POST'])
def login():
    if request.method == 'GET':
        form = LoginForm()
        return render_template('login.html', form=form)
    else:
        form = LoginForm(formdata=request.form)
        if form.validate():
            print('用户提交数据通过格式验证,提交的值为:', form.data)
        else:
            print(form.errors)
        return render_template('login.html', form=form)

if __name__ == '__main__':
    app.run()
使用二
from flask import Flask, render_template, request, redirect
from wtforms import Form
from wtforms.fields import core
from wtforms.fields import html5
from wtforms.fields import simple
from wtforms import validators
from wtforms import widgets

app = Flask(__name__, template_folder='templates')
app.debug = True


class RegisterForm(Form):
    name = simple.StringField(
        label='用户名',
        validators=[
            validators.DataRequired()
        ],
        widget=widgets.TextInput(),
        render_kw={'class': 'form-control'},
        default='alex'
    )

    pwd = simple.PasswordField(
        label='密码',
        validators=[
            validators.DataRequired(message='密码不能为空.')
        ],
        widget=widgets.PasswordInput(),
        render_kw={'class': 'form-control'}
    )

    pwd_confirm = simple.PasswordField(
        label='重复密码',
        validators=[
            validators.DataRequired(message='重复密码不能为空.'),
            validators.EqualTo('pwd', message="两次密码输入不一致")
        ],
        widget=widgets.PasswordInput(),
        render_kw={'class': 'form-control'}
    )

    email = html5.EmailField(
        label='邮箱',
        validators=[
            validators.DataRequired(message='邮箱不能为空.'),
            validators.Email(message='邮箱格式错误')
        ],
        widget=widgets.TextInput(input_type='email'),
        render_kw={'class': 'form-control'}
    )

    gender = core.RadioField(
        label='性别',
        choices=(
            (1, '男'),
            (2, '女'),
        ),
        coerce=int # “1” “2”
     )
    city = core.SelectField(
        label='城市',
        choices=(
            ('bj', '北京'),
            ('sh', '上海'),
        )
    )

    hobby = core.SelectMultipleField(
        label='爱好',
        choices=(
            (1, '篮球'),
            (2, '足球'),
        ),
        coerce=int
    )

    favor = core.SelectMultipleField(
        label='喜好',
        choices=(
            (1, '篮球'),
            (2, '足球'),
        ),
        widget=widgets.ListWidget(prefix_label=False),
        option_widget=widgets.CheckboxInput(),
        coerce=int,
        default=[1, 2]
    )

    def __init__(self, *args, **kwargs):
        super(RegisterForm, self).__init__(*args, **kwargs)
        self.favor.choices = ((1, '篮球'), (2, '足球'), (3, '羽毛球'))

	# 钩子函数
	# def validate_fieldName(self,field):
	# 	pass
    def validate_pwd_confirm(self, field):
        """
        自定义pwd_confirm字段规则,例:与pwd字段是否一致
        :param field:
        :return:
        """
        # 最开始初始化时,self.data中已经有所有的值

        if field.data != self.data['pwd']:
            # raise validators.ValidationError("密码不一致") # 继续后续验证
            raise validators.StopValidation("密码不一致")  # 不再继续后续验证


@app.route('/register', methods=['GET', 'POST'])
def register():
    if request.method == 'GET':
        form = RegisterForm(data={'gender': 2,'hobby':[1,]}) # initial
        return render_template('register.html', form=form)
    else:
        form = RegisterForm(formdata=request.form)
        if form.validate():
            print('用户提交数据通过格式验证,提交的值为:', form.data)
        else:
            print(form.errors)
        return render_template('register.html', form=form)


if __name__ == '__main__':
    app.run()
<!DOCTYPE html>
<html lang="en">
<head>
    <meta charset="UTF-8">
    <title>Title</title>
</head>
<body>
<h1>用户注册</h1>
<form method="post" novalidate style="padding:0  50px">
    {% for field in form %}
    <p>{{field.label}}: {{field}} {{field.errors[0] }}</p>
    {% endfor %}
    <input type="submit" value="提交">
</form>
</body>
</html>
信号
Flask框架中的信号基于blinker,其主要就是让开发者可是在flask请求过程中定制一些用户行为
pip3 install blinker
内置信号
request_started = _signals.signal('request-started')                # 请求到来前执行
request_finished = _signals.signal('request-finished')              # 请求结束后执行

before_render_template = _signals.signal('before-render-template')  # 模板渲染前执行
template_rendered = _signals.signal('template-rendered')            # 模板渲染后执行

got_request_exception = _signals.signal('got-request-exception')    # 请求执行出现异常时执行

request_tearing_down = _signals.signal('request-tearing-down')      # 请求执行完毕后自动执行(无论成功与否)
appcontext_tearing_down = _signals.signal('appcontext-tearing-down')# 应用上下文执行完毕后自动执行(无论成功与否)

appcontext_pushed = _signals.signal('appcontext-pushed')            # 应用上下文push时执行
appcontext_popped = _signals.signal('appcontext-popped')            # 应用上下文pop时执行
message_flashed = _signals.signal('message-flashed')                # 调用flask在其中添加数据时,自动触发
使用信号
from flask import Flask,signals,render_template

app = Flask(__name__)

# 往信号中注册函数
def func(*args,**kwargs):
    print('触发信号',args,kwargs)
signals.request_started.connect(func)

# 触发信号: signals.request_started.send()
@app.before_first_request
def before_first1(*args,**kwargs):
    pass

@app.before_first_request
def before_first2(*args,**kwargs):
    pass

@app.before_request
def before_first3(*args,**kwargs):
    pass

@app.route('/',methods=['GET',"POST"])
def index():
    print('视图')
    return render_template('index.html')


if __name__ == '__main__':
    app.run()
一个流程中的信号触发点
a. before_first_request
b. 触发 request_started 信号
c. before_request
d. 模板渲染
	渲染前的信号 before_render_template.send(app, template=template, context=context)
		rv = template.render(context) # 模板渲染
	渲染后的信号 template_rendered.send(app, template=template, context=context)
e. after_request
f. session.save_session()
g. 触发 request_finished信号
	如果上述过程出错:
		触发错误处理信号 got_request_exception.send(self, exception=e)

h. 触发信号 request_tearing_down
自定义信号
from flask import Flask, current_app, flash, render_template
from flask.signals import _signals
app = Flask(import_name=__name__)

# 自定义信号
xxxxx = _signals.signal('xxxxx')

def func(sender, *args, **kwargs):
    print(sender)
# 自定义信号中注册函数
xxxxx.connect(func)
@app.route("/x")
def index():
    # 触发信号
    xxxxx.send('123123', k1='v1')
    return 'Index'

if __name__ == '__main__':
    app.run()
多app应用
from werkzeug.wsgi import DispatcherMiddleware
from werkzeug.serving import run_simple
from flask import Flask, current_app
app1 = Flask('app01')
app2 = Flask('app02')

@app1.route('/index')
def index():
    return "app01"

@app2.route('/index2')
def index2():
    return "app2"

# http://127.0.0.1:5000/index
# http://127.0.0.1:5000/sec/index2
dm = DispatcherMiddleware(app1, {
    '/sec': app2,
})

if __name__ == "__main__":
    run_simple('localhost', 5000, dm)
flask-script
用于实现类似于django中 python3 manage.py runserver …类似的命令。
安装:pip3 install flask-script
from flask_script import Manager
app = Flask(__name__)
manager=Manager(app)
...
if __name__ == '__main__':
    manager.run()
#以后在执行,直接:python3 manage.py runserver
#python3 manage.py runserver --help
自定制命令
@manager.command
def custom(arg):
    """
    自定义命令
    python manage.py custom 123
    :param arg:
    :return:
    """
    print(arg)


@manager.option('-n', '--name', dest='name')
@manager.option('-u', '--url', dest='url')
def cmd(name, url):
    """
    自定义命令(-n也可以写成--name)
    执行: python manage.py  cmd -n x -u x
    执行: python manage.py  cmd --x --url x
    :param name:
    :param url:
    :return:
    """
    print(name, url)
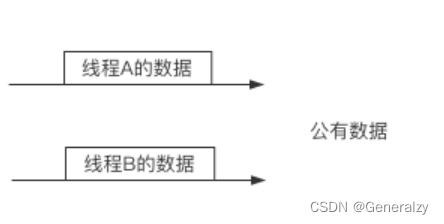
threading.local
-
threading.local()方法可以让每个线程都拥有一些自己独立的数据,这些数据是其他线程访问不到的。
-
threading.local()的设计思想其实在flask框架的上下文管理机制中也会体现到,两者基本如出一辙,所以现在了解threading.local()的原理后对flask框架的源码阅读也会变得轻松。
from threading import Thread, current_thread, local
import time

localObj = local()


def func(val):
    localObj.val = val
    time.sleep(2)
    print(localObj.val.user, current_thread().name)


class Request:
    def __init__(self, user):
        self.user = user


if __name__ == '__main__':
    ts = []
    for i in range(10):
        request = Request(user=f"user-{i}")
        t = Thread(target=func, args=(request,))
        t.start()
        ts.append(t)

    for t in ts:
        t.join()
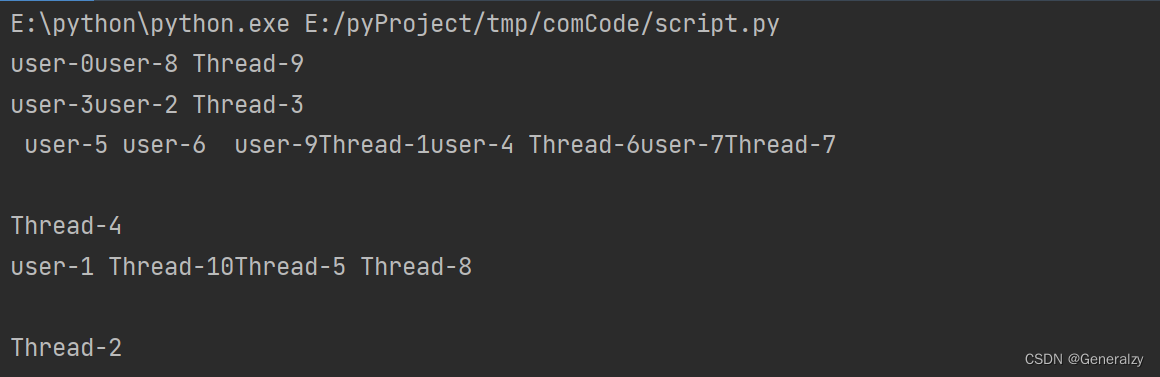
自定义threading.local
为每一个线程开辟一块空间进行数据存储
用字典实现
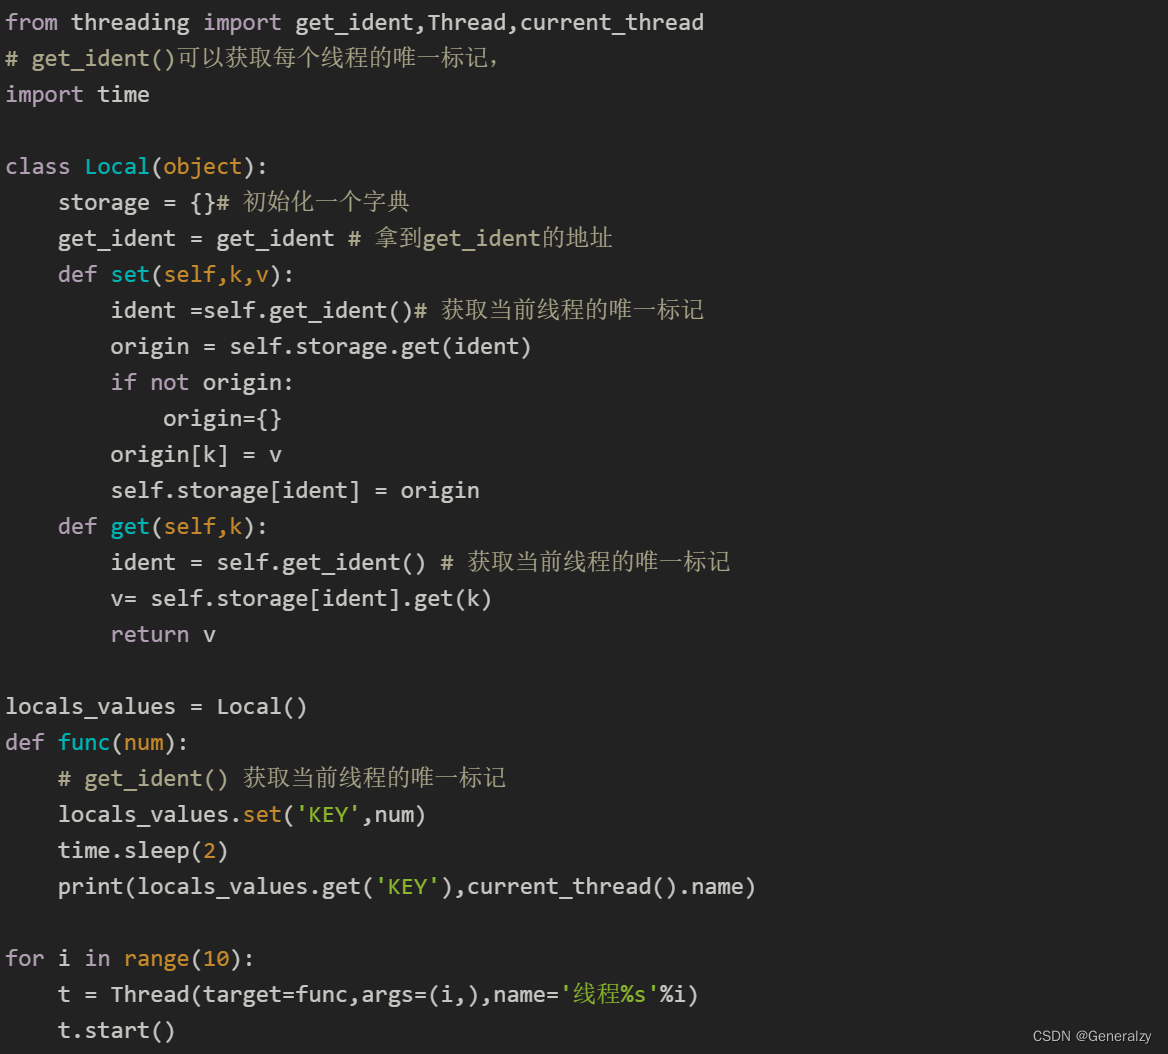
面向对象实现
import time
try:
    from greenlet import getcurrent as get_ident
except Exception as e:
    from threading import get_ident

from threading import Thread


class CustomLocal(object):
    """
    自定义local对象,基于面向对象
    为每个线程(协程)开辟一块空间进行数据的存储
    空间与空间之间是隔离的
    """

    def __init__(self):
        # self.storage = {}  # 执行此句代码的时候会先触发__setattr__方法
        # 为了避免报错:RecursionError: maximum recursion depth exceeded while calling a Python object
        # 需要先把storage创建出来,所以调用父类的__setattr__方法
        super(CustomLocal, self).__setattr__("storage", {})

    def __setattr__(self, key, value):
        ident = get_ident()
        if ident in self.storage:
            self.storage[ident][key] = value
        else:
            self.storage[ident] = {key: value}  # 执行此句的时候又会触发__setattr__方法,所有就进入了死循环

    def __getattr__(self, item):
        ident = get_ident()
        return self.storage[ident][item]


local = CustomLocal()


def task(arg):
    local.var = arg
    time.sleep(1)
    print(local.var)


if __name__ == '__main__':
    ts = []
    for i in range(10):
        t = Thread(target=task, args=(i,))
        t.start()
        ts.append(t)

    for t in ts:
        t.join()
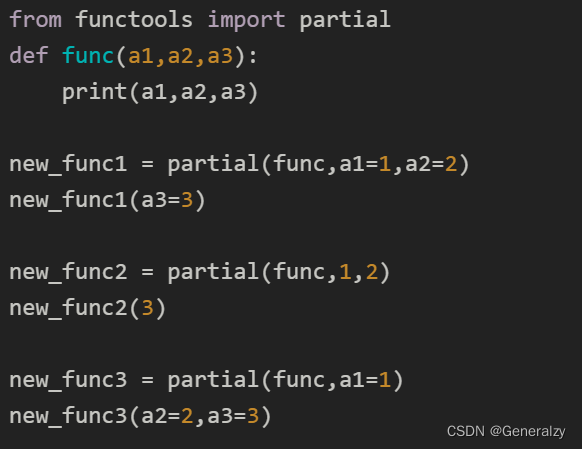
偏函数
当函数的参数个数太多,需要简化时,使用functools.partial可以创建一个新的函数,这个新函数可以固定住原函数的部分参数,从而在调用时更简单。
socketserver实现并发
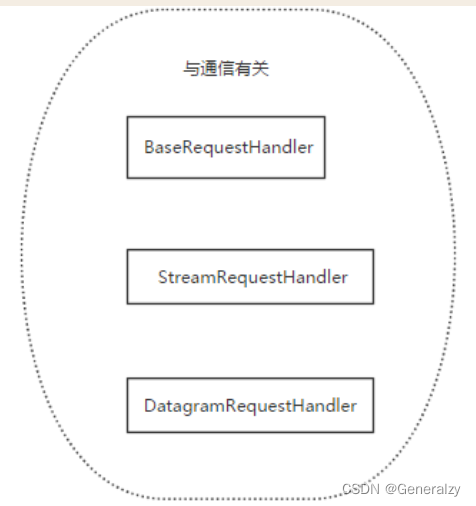
基于tcp的套接字,关键就是两个循环,一个链接循环,一个通信循环
socketserver模块中分两大类:server类(解决链接问题)和request类(解决通信问题)
server类
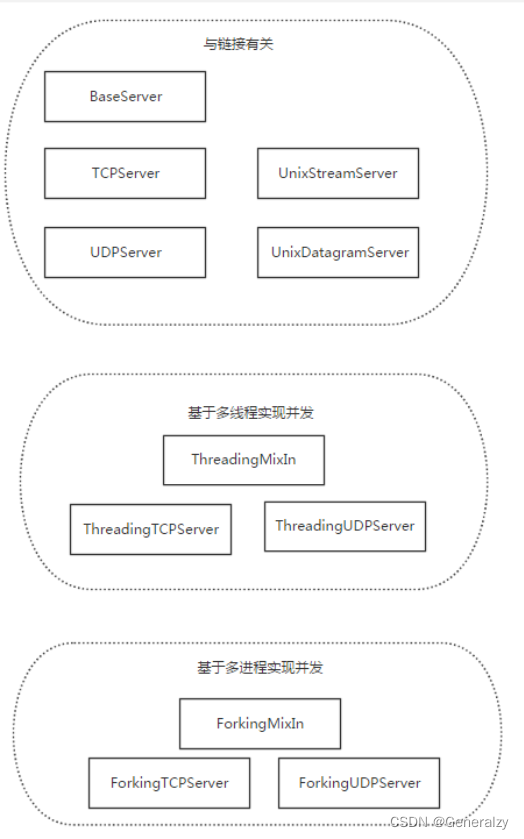
request类
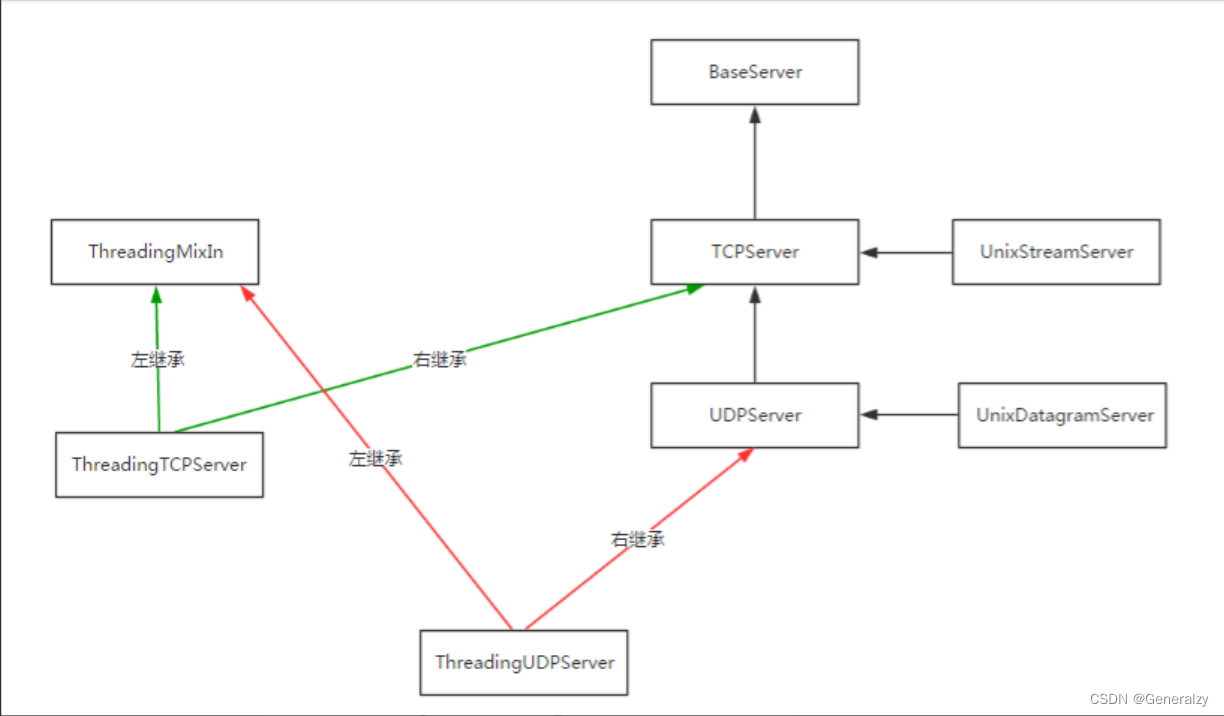
继承关系
flask请求上下文
请求上下文的作用,就是把reqeust和session放到哪里,怎么取出来。
from werkzeug.wrappers import Request, Response
from werkzeug import run_simple


# 装饰成为一个wsgiApp
@Request.application
def app(request):
    print(request, type(request))
    return Response("200 OK")


if __name__ == '__main__':
    # 请求到达会丢给app(env)
    # flask就是这个app
    # 一路查看源码最终到了BaseServer
    # 所以flask->werkzeug->tcpServer
    run_simple("127.0.0.1", 5000, app)
- run()
app.run("0.0.0.0", port=8000, processes=4)

try:
	# self是flask对象
    run_simple(t.cast(str, host), port, self, **options)
finally:
    self._got_first_request = False
- self()->flask.call(self,environ)
def __call__(self, environ: dict, start_response: t.Callable) -> t.Any:
	# self是flask对象
	# environ是原始的请求数据
    return self.wsgi_app(environ, start_response)
- self.wsgi_app(environ, start_response)->ctx = self.request_context(environ)=return RequestContext(self, environ)
def wsgi_app(self, environ: dict, start_response: t.Callable) -> t.Any:
	# 将请求的原始数据交给了request_context即RequestContext
    ctx = self.request_context(environ)
    error: t.Optional[BaseException] = None
    try:
        try:
        	# RequestContext.push()
            ctx.push()
            response = self.full_dispatch_request()
        except Exception as e:
            error = e
            response = self.handle_exception(e)
        except:  # noqa: B001
            error = sys.exc_info()[1]
            raise
        return response(environ, start_response)
    finally:
        if "werkzeug.debug.preserve_context" in environ:
            environ["werkzeug.debug.preserve_context"](_cv_app.get())
            environ["werkzeug.debug.preserve_context"](_cv_request.get())

        if error is not None and self.should_ignore_error(error):
            error = None

        ctx.pop(error)
- ctx = self.request_context(environ)->request = app.request_class(environ)
class RequestContext:
    def __init__(
        self,
        # 将flask对象赋值给app
        app: "Flask",
        environ: dict,
        request: t.Optional["Request"] = None,
        session: t.Optional["SessionMixin"] = None,
    ) -> None:
    	self.app = app
        if request is None:
        	# 得到flask的Request对象
            request = app.request_class(environ)
            request.json_module = app.json  # type: ignore[misc]
        self.request: Request = request
        self.url_adapter = None
        try:
            self.url_adapter = app.create_url_adapter(self.request)
        except HTTPException as e:
            self.request.routing_exception = e
        self.flashes: t.Optional[t.List[t.Tuple[str, str]]] = None
        # 得到flask的session对象
        self.session: t.Optional["SessionMixin"] = session
        self._after_request_functions: t.List[ft.AfterRequestCallable] = []
		# 空列表
        self._cv_tokens: t.List[t.Tuple[contextvars.Token, t.Optional[AppContext]]] = []
- RequestContext.push()->app_ctx = self.app.app_context()=return AppContext(self)
def push(self) -> None:
	# self是RequestContext对象,简称RC(request,session)
    app_ctx = _cv_app.get(None)
    # app_ctx=None

    if app_ctx is None or app_ctx.app is not self.app:
    	# flask.ctx.AppContext
    	"""
    	class AppContext:
		    def __init__(self, app: "Flask") -> None:
		        self.app = app
		        self.url_adapter = app.create_url_adapter(None)
		        self.g: _AppCtxGlobals = app.app_ctx_globals_class()
		        # 空列表
		        self._cv_tokens: t.List[contextvars.Token] = []
    	"""
        app_ctx = self.app.app_context()
        # flask.ctx.AppContext.push()
        """
        def push(self) -> None:
        	# self是AppContext的对象
        	# 对象赋值
        	self._cv_tokens.append(_cv_app.set(self))
        	# 信号
        	appcontext_pushed.send(self.app)
        """
        app_ctx.push()
    else:
        app_ctx = None

    self._cv_tokens.append((_cv_request.set(self), app_ctx))

    # Open the session at the moment that the request context is available.
    # This allows a custom open_session method to use the request context.
    # Only open a new session if this is the first time the request was
    # pushed, otherwise stream_with_context loses the session.
    # 获取session
    if self.session is None:
        session_interface = self.app.session_interface
        self.session = session_interface.open_session(self.app, self.request)

        if self.session is None:
            self.session = session_interface.make_null_session(self.app)

    # Match the request URL after loading the session, so that the
    # session is available in custom URL converters.
    # 匹配路由
    if self.url_adapter is not None:
        self.match_request()