神经网络包括卷积层,池化层,全连接层。一个最简单的神经元结构,假如有三个输入,都对应一个权重参数,然后通过权重加起来,经过一个激活函数,最后输出y。
CNN中独特的结构就是卷积层,就是一个卷积核然后根据步幅进行扫描运算,最后输出特征矩阵。卷积核的深度和输入特征矩阵的深度相同,而输出的特征矩阵深度和卷积核个数相同。如果加上偏移量bias的话,就在输出的特征矩阵进行相加减即可。
使用激活函数的目的是引用非线性因素,具备解决非线性的能力。主要有sigmoid激活函数和Relu激活函数。sigmoid激活函数饱和时梯度值非常小,当网络层较深时容易出现梯度消失。Relu激活函数,当反向传播过程中有一个非常大的梯度经过时,反向传播更新后可能导致权重分布中心小于零,该处的导数始终为零,反向传播无法更新权重,进入失活状态。
卷积后的矩阵大小计算公式为:

W代表图片大小,F是卷积核的大小,P是填充的像素数。S是步长。当卷积的时候越界的时候,可以用padding进行补0处理
池化层,我理解的就是个缩小矩阵,将特征图进行稀疏处理,减少运算量。可以进行取最大值池化,也可以取平均值池化。经过池化层,不改变深度,只改变高度和宽度,一般来说,poolsize和stride相同。
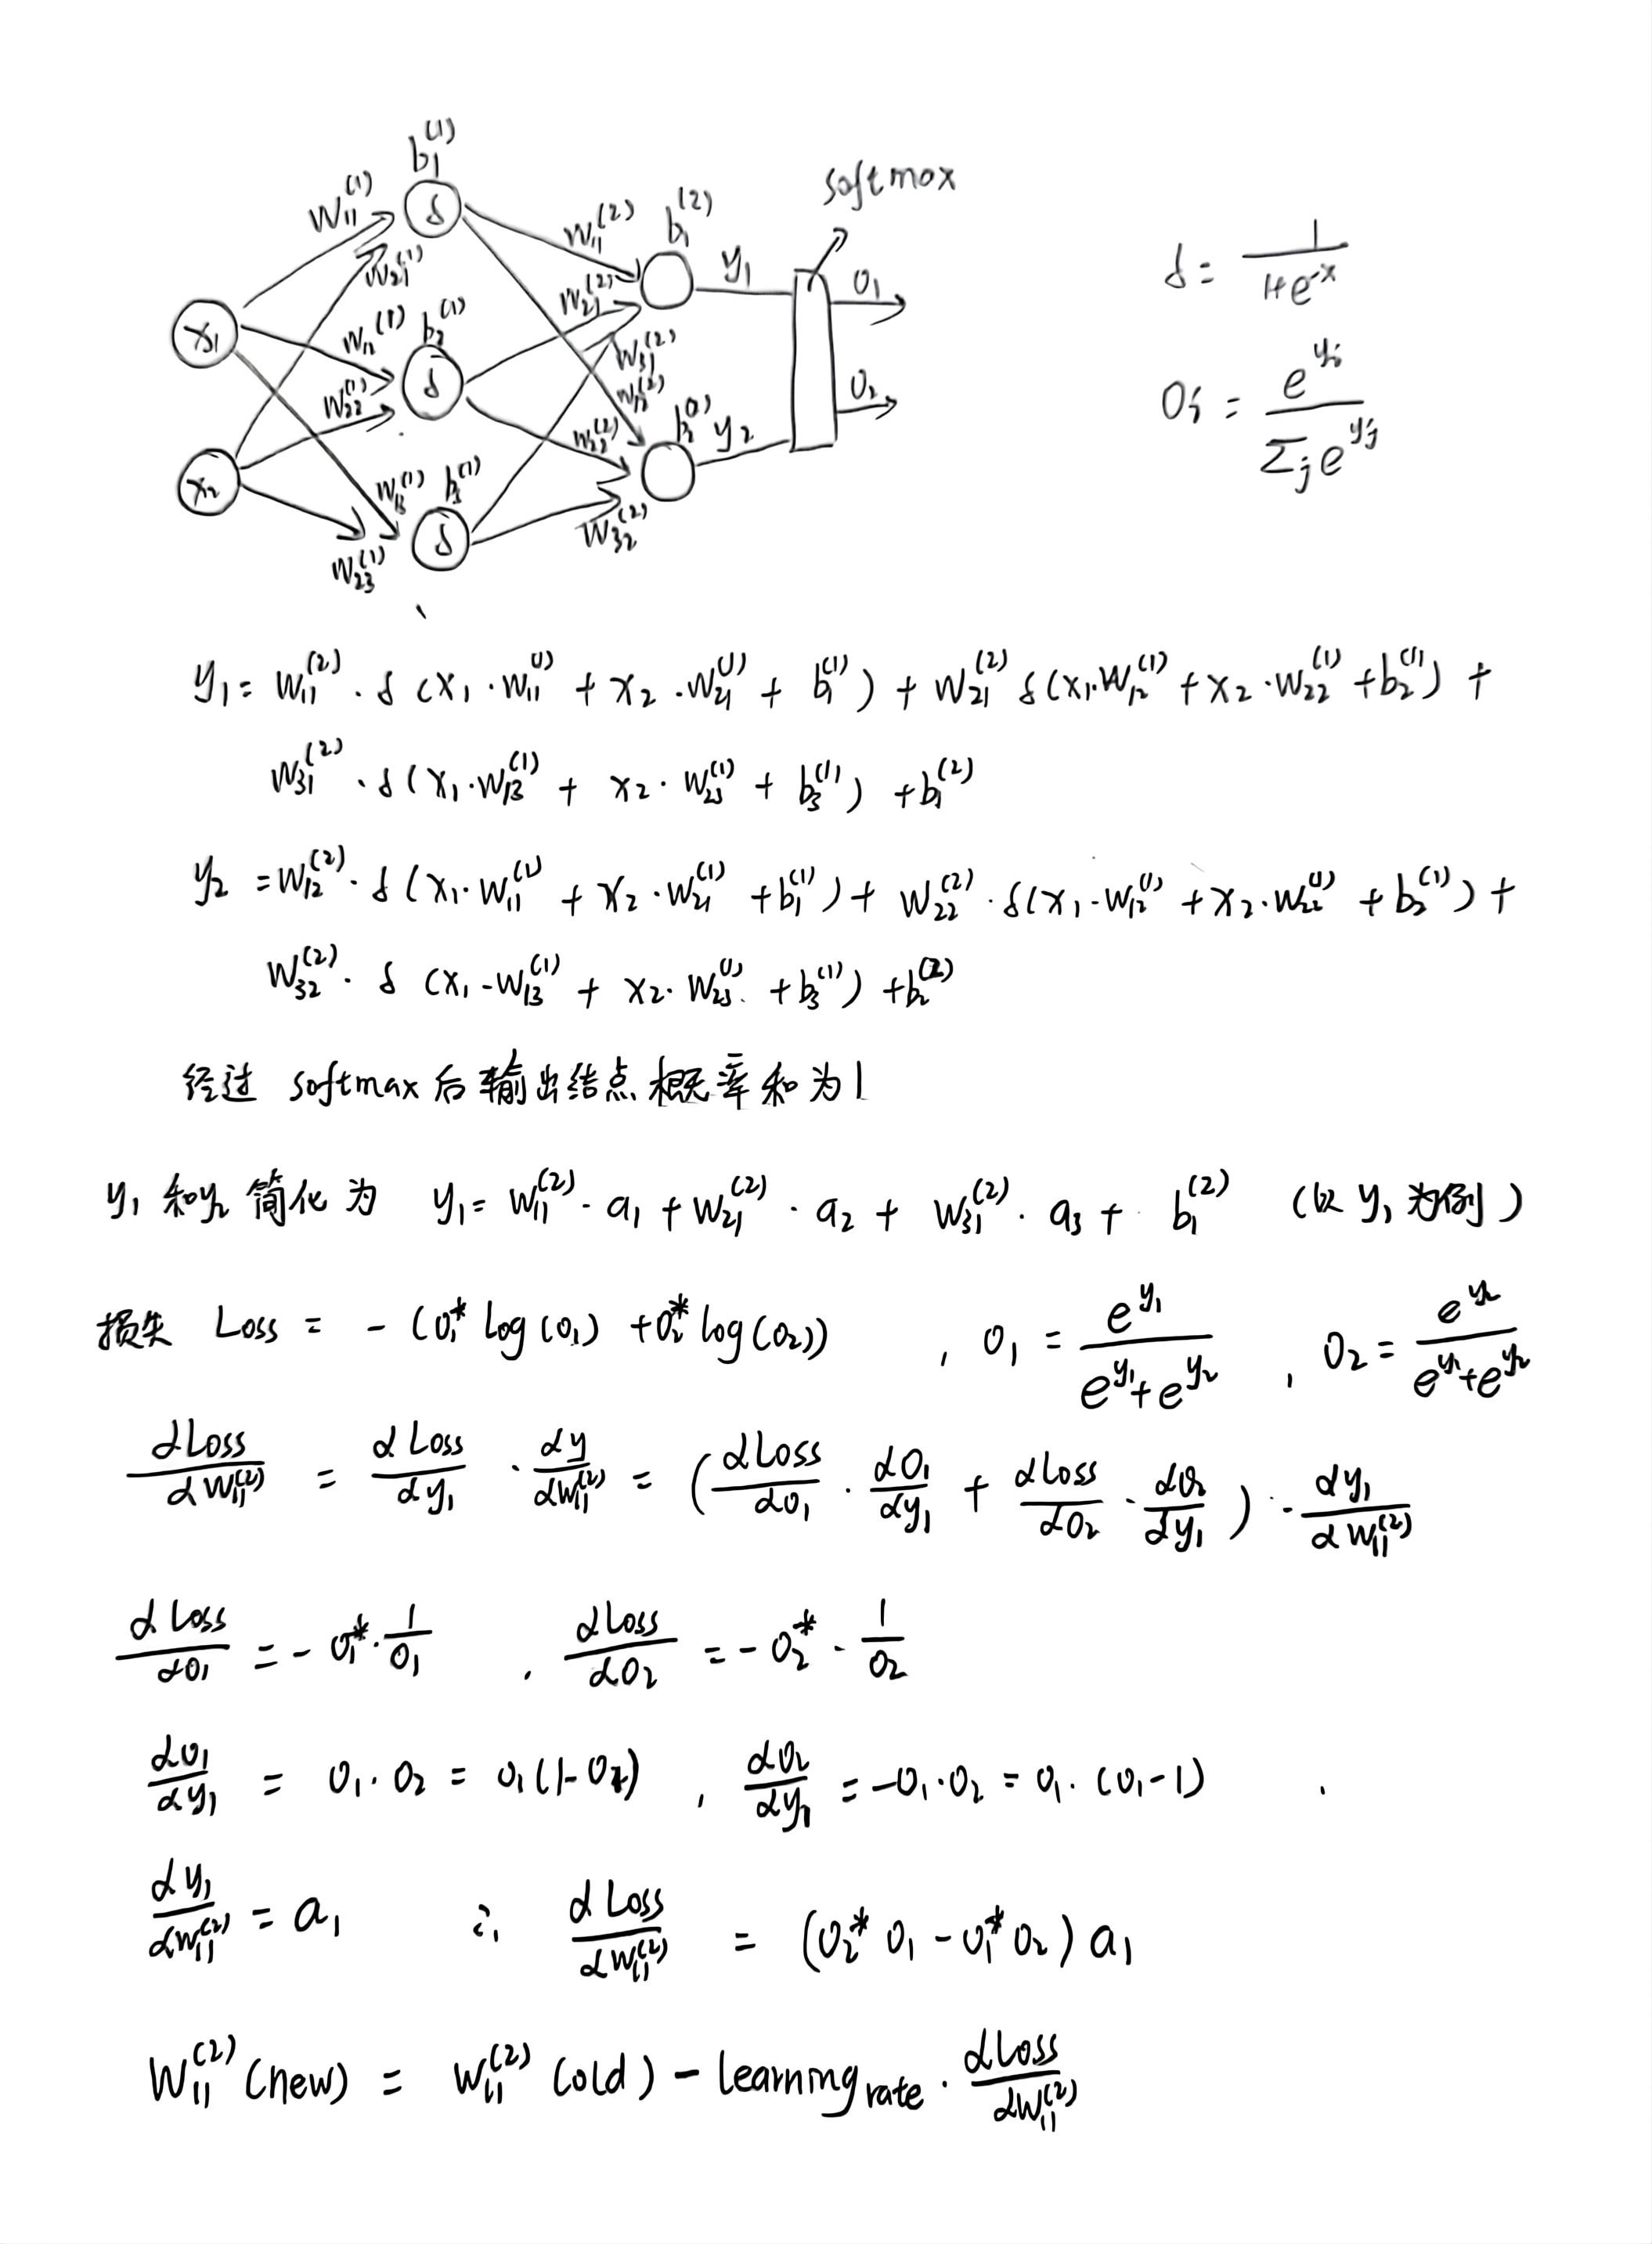
然后对于误差的计算,真是一个复杂的过程,还好计算机会帮我们计算的,推理过程比较麻烦。。。
反向传播的时候有一个交叉熵损失函数,对于多分类问题(softmax输出,所有的输出概率和为1),损失计算公式:
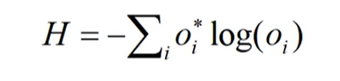
对于二分类问题(sigmoid输出,每个输出结点之间互不相干),计算公式如下:

Oi*是真实标签值,Oi为预测值。
反向传播的过程中权重会不断地更新,分批次进行求解,通常还需要一个优化器,比如SGD,Adam等,这些直接调用即可,使用优化器的目的就是使得网络更快的收敛。
为了深度理解反向传播过程,再完整推导一遍:
LeNet
LeNet基本结构就是一个5*5卷积层,padding为2,然后是2*2的池化层,步幅为2,再接一个5*5卷积层,再接一个2*2的池化层,步幅为2,最后是三个全连接层。
import torch.nn as nn
import torch.nn.functional as F

# 定义类,初始化函数,继承于nn.Module
class LeNet(nn.Module):
    def __init__(self):
        # 解决调用父类函数时可能出现的一系列问题
        super(LeNet, self).__init__()
        # 定义卷积层
        # 第一个参数是输入特征层的深度,16个卷积核,卷积核尺寸为5*5
        self.conv1 = nn.Conv2d(3, 16, 5)

        # 池化层,池化核的大小2*2,步幅为2
        self.pool1 = nn.MaxPool2d(2, 2)

        # 上一层是卷积核为16,所以输入深度应该是16。32个卷积核,卷积核尺寸为5*5
        self.conv2 = nn.Conv2d(16, 32, 5)

        # 池化层
        self.pool2 = nn.MaxPool2d(2, 2)

        # 三层全连接层
        # 全连接层需要把特征矩阵展平,32 * 5 * 5就是展平操作,120是全连接层的结点个数
        self.fc1 = nn.Linear(32 * 5 * 5, 120)
        self.fc2 = nn.Linear(120, 84)
        # 最后一层设置为10,根据训练集的类别个数来定义
        self.fc3 = nn.Linear(84, 10)

    # 正向传播过程
    def forward(self, x):
        # 经过卷积之后的矩阵尺寸大小计算公式N=(W-F+2P)/S+1,输入图片大小W*W,F是卷积核的大小,padding的像素数p,s是步长
        # 假如传入第一个卷积层input(3, 32, 32) output(16, 28, 28),输出深度为16,卷积后的矩阵大小为32*32
        x = F.relu(self.conv1(x))

        # 深度不变,高度宽度改变为原来的一半
        # output(16, 14, 14)
        x = self.pool1(x)

        # relu激活函数
        x = F.relu(self.conv2(x))  # output(32, 10, 10)

        x = self.pool2(x)  # output(32, 5, 5)

        # view代表展成一维向量,-1是第一个维度,是自动推理的
        x = x.view(-1, 32 * 5 * 5)  # output(32*5*5)

        x = F.relu(self.fc1(x))  # output(120)
        x = F.relu(self.fc2(x))  # output(84)

        # 全连接层3没用激活函数,理论应该接一个激活函数,但是在计算交叉熵损失函数时,实现了一个softmax方法,这里就不用定义了
        x = self.fc3(x)  # output(10)
        return x


import torch
# batch为32,深度为3,高度32,宽度32
input = torch.rand([32, 3, 32, 32])
# 实例化模型
model = LeNet()
# 打印模型
print(model)
# 前向传播
output = model(input)


# nn.Conv2d
# def __init__(
#         self,
#         in_channels: int,//深度
#         out_channels: int,//代表卷积核的个数,使用几个卷积核,生成深度多少维的特征矩阵
#         kernel_size: _size_2_t,//代表卷积核的大小
#         stride: _size_2_t = 1,//步距
#         padding: Union[str, _size_2_t] = 0,//四周补零处理
#         dilation: _size_2_t = 1,
#         groups: int = 1,
#         bias: bool = True,//偏置,默认是使用的
#         padding_mode: str = 'zeros',  # TODO: refine this type
#         device=None,
#         dtype=None
# ) -> None:

# MaxPool2d
# def __init__(
#        self,
#        in_channels: int,
#        out_channels: int,
#        kernel_size: _size_2_t,池化核的大小
#        stride: _size_2_t = 1,步距
#        padding: Union[str, _size_2_t] = 0,
#        dilation: _size_2_t = 1,
#        groups: int = 1,
#        bias: bool = True,
#        padding_mode: str = 'zeros',  # TODO: refine this type
#        device=None,
#        dtype=None
#    ) -> None:
AlexNet
AlexNet网络的结构还是有一点点复杂的,先是11*11的卷积层,步幅为4,然后3*3的池化层,卷积层,池化层,然后又接着3个卷积层,再接一个池化层,最后是三个全连接层。
AlexNet网络的优点在于,使用了ReLU激活函数,而不是传统的Sigmoid激活函数以及Tanh激活函数,在全连接层的前两层中使用了Dropout,进行随机失活神经元,减少过拟合,就是在正向传播的时候随机失活一部分神经元。
过拟合的原因往往是特征维度过多,模型假设过于复杂,参数多,训练数据少,噪声过多,过度的拟合了训练数据,而没有考虑泛化能力。
还有就是预测的时候记得别把图片路径写错就行了,写绝对路径记得写\\,不要写成\,这样怎么样都不会出错。
import torch.nn as nn
import torch

class AlexNet(nn.Module):
    def __init__(self, num_classes=1000, init_weights=False):
        super(AlexNet, self).__init__()
        # 网络多时,可以定义nn.Sequential
        self.features = nn.Sequential(  # 将一系列的层结构打包
            nn.Conv2d(3, 48, kernel_size=11, stride=4, padding=2),  # input[3, 224, 224]  output[48, 55, 55]
            nn.ReLU(inplace=True),  # 代表载入更大的模型
            nn.MaxPool2d(kernel_size=3, stride=2),  # output[48, 27, 27]
            nn.Conv2d(48, 128, kernel_size=5, padding=2),  # output[128, 27, 27]
            nn.ReLU(inplace=True),
            nn.MaxPool2d(kernel_size=3, stride=2),  # output[128, 13, 13]
            nn.Conv2d(128, 192, kernel_size=3, padding=1),  # output[192, 13, 13]
            nn.ReLU(inplace=True),
            nn.Conv2d(192, 192, kernel_size=3, padding=1),  # output[192, 13, 13]
            nn.ReLU(inplace=True),
            nn.Conv2d(192, 128, kernel_size=3, padding=1),  # output[128, 13, 13]
            nn.ReLU(inplace=True),
            nn.MaxPool2d(kernel_size=3, stride=2),  # output[128, 6, 6]
        )
        self.classifier = nn.Sequential(
            nn.Dropout(p=0.5),  # p随机失活的比例
            nn.Linear(128 * 6 * 6, 2048),
            nn.ReLU(inplace=True),
            nn.Dropout(p=0.5),
            nn.Linear(2048, 2048),  # 第一个2048是上一层的输出,第二个是这一层的结点个数
            nn.ReLU(inplace=True),
            nn.Linear(2048, num_classes),  # num_classes:输出是数据集类别的个数
        )
        if init_weights:
            self._initialize_weights()

    def forward(self, x):
        x = self.features(x)
        x = torch.flatten(x, start_dim=1)  # 展平
        x = self.classifier(x)  # 传入全连接层
        return x

    def _initialize_weights(self):
        for m in self.modules():  # 迭代每一层结构
            if isinstance(m, nn.Conv2d):
                nn.init.kaiming_normal_(m.weight, mode='fan_out', nonlinearity='relu')
                if m.bias is not None:
                    nn.init.constant_(m.bias, 0)
            elif isinstance(m, nn.Linear):
                nn.init.normal_(m.weight, 0, 0.01)
                nn.init.constant_(m.bias, 0)
VGG
VGG网络,算是一个替代的思想吧,比如可以堆叠两个3*3的卷积核替代5*5的卷积核,堆叠三个3*3的卷积核替代7*7的卷积核,也可以减少参数量。
以VGG-16为例,先是2个卷积层,每个有64个卷积核,再接池化层,然后接2个卷积层,128个卷积核,池化层,3个卷积层,256个卷积核,池化层,三个卷积层,512个卷积核,池化层,然后3个卷积层,512个卷积核,再接池化层,最后三个全连接层。这个网络还是比较大的,用GPU跑也得好久。

import torch.nn as nn
import torch

class VGG(nn.Module):
    def __init__(self, features, num_classes=1000, init_weights=False):
        super(VGG, self).__init__()
        self.features = features
        self.classifier = nn.Sequential(
            nn.Linear(512 * 7 * 7, 4096),
            nn.ReLU(True),

            nn.Dropout(p=0.5),  # 随机失活
            nn.Linear(4096, 4096),
            nn.ReLU(True),

            nn.Dropout(p=0.5),
            nn.Linear(4096, num_classes)
        )
        if init_weights:
            self._initialize_weights()

    def forward(self, x):
        # N x 3 x 224 x 224
        x = self.features(x)
        # N x 512 x 7 x 7
        x = torch.flatten(x, start_dim=1)  # 展平处理
        # N x 512*7*7
        x = self.classifier(x)
        return x

    def _initialize_weights(self):
        for m in self.modules():
            if isinstance(m, nn.Conv2d):
                # nn.init.kaiming_normal_(m.weight, mode='fan_out', nonlinearity='relu')
                nn.init.xavier_uniform_(m.weight)
                if m.bias is not None:
                    nn.init.constant_(m.bias, 0)
            elif isinstance(m, nn.Linear):
                nn.init.xavier_uniform_(m.weight)
                # nn.init.normal_(m.weight, 0, 0.01)
                nn.init.constant_(m.bias, 0)


# make_features生成提取特征网络结构
def make_features(cfg: list):  # 配置列表
    layers = []  # 存放创建的每一层结构
    in_channels = 3  # 输入的是RGB彩色通道,所以是3
    for v in cfg:
        if v == "M":  # 说明是池化层
            layers += [nn.MaxPool2d(kernel_size=2, stride=2)]
        else:
            conv2d = nn.Conv2d(in_channels, v, kernel_size=3, padding=1)
            layers += [conv2d, nn.ReLU(True)]
            in_channels = v
    return nn.Sequential(*layers)


def vgg(model_name="vgg16", **kwargs):
    assert model_name in cfgs, "Warning: model number {} not in cfgs dict!".format(model_name)
    cfg = cfgs[model_name]

    model = VGG(make_features(cfg), **kwargs)
    return model
GoogLeNet
GoogLeNet网络的优点在于,引入了Inception结构,使用1*1的卷积核进行降维以及映射处理,而且添加了两个辅助分类器帮助训练,丢弃了全连接层,使用平均池化层,GoogLeNet有三个输出层。
import torch.nn as nn
import torch
import torch.nn.functional as F


class GoogLeNet(nn.Module):
    def __init__(self, num_classes=1000, aux_logits=True, init_weights=False):
        super(GoogLeNet, self).__init__()
        self.aux_logits = aux_logits

        self.conv1 = BasicConv2d(3, 64, kernel_size=7, stride=2, padding=3)
        self.maxpool1 = nn.MaxPool2d(3, stride=2, ceil_mode=True)

        self.conv2 = BasicConv2d(64, 64, kernel_size=1)
        self.conv3 = BasicConv2d(64, 192, kernel_size=3, padding=1)
        self.maxpool2 = nn.MaxPool2d(3, stride=2, ceil_mode=True)

        self.inception3a = Inception(192, 64, 96, 128, 16, 32, 32)
        self.inception3b = Inception(256, 128, 128, 192, 32, 96, 64)
        self.maxpool3 = nn.MaxPool2d(3, stride=2, ceil_mode=True)

        self.inception4a = Inception(480, 192, 96, 208, 16, 48, 64)
        self.inception4b = Inception(512, 160, 112, 224, 24, 64, 64)
        self.inception4c = Inception(512, 128, 128, 256, 24, 64, 64)
        self.inception4d = Inception(512, 112, 144, 288, 32, 64, 64)
        self.inception4e = Inception(528, 256, 160, 320, 32, 128, 128)
        self.maxpool4 = nn.MaxPool2d(3, stride=2, ceil_mode=True)

        self.inception5a = Inception(832, 256, 160, 320, 32, 128, 128)
        self.inception5b = Inception(832, 384, 192, 384, 48, 128, 128)

        if self.aux_logits:
            self.aux1 = InceptionAux(512, num_classes)
            self.aux2 = InceptionAux(528, num_classes)

        self.avgpool = nn.AdaptiveAvgPool2d((1, 1))
        self.dropout = nn.Dropout(0.4)
        self.fc = nn.Linear(1024, num_classes)
        if init_weights:
            self._initialize_weights()

    def forward(self, x):
        # N x 3 x 224 x 224
        x = self.conv1(x)
        # N x 64 x 112 x 112
        x = self.maxpool1(x)
        # N x 64 x 56 x 56
        x = self.conv2(x)
        # N x 64 x 56 x 56
        x = self.conv3(x)
        # N x 192 x 56 x 56
        x = self.maxpool2(x)

        # N x 192 x 28 x 28
        x = self.inception3a(x)
        # N x 256 x 28 x 28
        x = self.inception3b(x)
        # N x 480 x 28 x 28
        x = self.maxpool3(x)
        # N x 480 x 14 x 14
        x = self.inception4a(x)
        # N x 512 x 14 x 14
        if self.training and self.aux_logits:    # eval model lose this layer
            aux1 = self.aux1(x)

        x = self.inception4b(x)
        # N x 512 x 14 x 14
        x = self.inception4c(x)
        # N x 512 x 14 x 14
        x = self.inception4d(x)
        # N x 528 x 14 x 14
        if self.training and self.aux_logits:    # eval model lose this layer
            aux2 = self.aux2(x)

        x = self.inception4e(x)
        # N x 832 x 14 x 14
        x = self.maxpool4(x)
        # N x 832 x 7 x 7
        x = self.inception5a(x)
        # N x 832 x 7 x 7
        x = self.inception5b(x)
        # N x 1024 x 7 x 7

        x = self.avgpool(x)
        # N x 1024 x 1 x 1
        x = torch.flatten(x, 1)
        # N x 1024
        x = self.dropout(x)
        x = self.fc(x)
        # N x 1000 (num_classes)
        if self.training and self.aux_logits:   # eval model lose this layer
            return x, aux2, aux1
        return x

    def _initialize_weights(self):
        for m in self.modules():
            if isinstance(m, nn.Conv2d):
                nn.init.kaiming_normal_(m.weight, mode='fan_out', nonlinearity='relu')
                if m.bias is not None:
                    nn.init.constant_(m.bias, 0)
            elif isinstance(m, nn.Linear):
                nn.init.normal_(m.weight, 0, 0.01)
                nn.init.constant_(m.bias, 0)


class Inception(nn.Module):
    def __init__(self, in_channels, ch1x1, ch3x3red, ch3x3, ch5x5red, ch5x5, pool_proj):
        super(Inception, self).__init__()

        self.branch1 = BasicConv2d(in_channels, ch1x1, kernel_size=1)

        self.branch2 = nn.Sequential(
            BasicConv2d(in_channels, ch3x3red, kernel_size=1),
            BasicConv2d(ch3x3red, ch3x3, kernel_size=3, padding=1)   # 保证输出大小等于输入大小
        )

        self.branch3 = nn.Sequential(
            BasicConv2d(in_channels, ch5x5red, kernel_size=1),
            # 在官方的实现中,其实是3x3的kernel并不是5x5,这里我也懒得改了,具体可以参考下面的issue
            # Please see https://github.com/pytorch/vision/issues/906 for details.
            BasicConv2d(ch5x5red, ch5x5, kernel_size=5, padding=2)   # 保证输出大小等于输入大小
        )

        self.branch4 = nn.Sequential(
            nn.MaxPool2d(kernel_size=3, stride=1, padding=1),
            BasicConv2d(in_channels, pool_proj, kernel_size=1)
        )

    def forward(self, x):
        branch1 = self.branch1(x)
        branch2 = self.branch2(x)
        branch3 = self.branch3(x)
        branch4 = self.branch4(x)

        outputs = [branch1, branch2, branch3, branch4]
        return torch.cat(outputs, 1)


class InceptionAux(nn.Module):
    def __init__(self, in_channels, num_classes):
        super(InceptionAux, self).__init__()
        self.averagePool = nn.AvgPool2d(kernel_size=5, stride=3)
        self.conv = BasicConv2d(in_channels, 128, kernel_size=1)  # output[batch, 128, 4, 4]

        self.fc1 = nn.Linear(2048, 1024)
        self.fc2 = nn.Linear(1024, num_classes)

    def forward(self, x):
        # aux1: N x 512 x 14 x 14, aux2: N x 528 x 14 x 14
        x = self.averagePool(x)
        # aux1: N x 512 x 4 x 4, aux2: N x 528 x 4 x 4
        x = self.conv(x)
        # N x 128 x 4 x 4
        x = torch.flatten(x, 1)
        x = F.dropout(x, 0.5, training=self.training)
        # N x 2048
        x = F.relu(self.fc1(x), inplace=True)
        x = F.dropout(x, 0.5, training=self.training)
        # N x 1024
        x = self.fc2(x)
        # N x num_classes
        return x


class BasicConv2d(nn.Module):
    def __init__(self, in_channels, out_channels, **kwargs):
        super(BasicConv2d, self).__init__()
        self.conv = nn.Conv2d(in_channels, out_channels, **kwargs)
        self.relu = nn.ReLU(inplace=True)

    def forward(self, x):
        x = self.conv(x)
        x = self.relu(x)
        return x
ResNet
到目前为止,我觉得这个网络是所有网络中最厉害的一个,迭代一次精度就到了90%多,最高94%左右,也可以利用迁移学习加速进行训练。
首先它的网络结构可以突破一百层,运用了残差块的思想,丢弃dropout,使用Batch Normalization加速训练。
18层和34层的结构,在conv2_x这一层,没有经过一个1*1的卷积层,通常使用实线直接标注,后面层的第一个残差块,都是用了一个1*1的卷积核,得到我们想要的维数。
50层,101层以及152层的结构,第一个残差块都是用了一个1*1的卷积核,注意的是,conv2_x这一层对应的1*1卷积层只改变了深度,高宽没变,接下来的几层不仅深度改变,高度宽度都改变。
运用迁移学习,可以快速的训练出一个理想的结果,当数据集较小时也能训练出理想的结果。常见的迁移学习方式有载入权重后训练所有参数,或者载入权重后只训练最后几层参数,还有就是载入权重后在原网络基础上再添加一层全连接层,仅训练一个全连接层。
还有一个ResNeXt网络,这个网络是对ResNet的一个改进,但是训练的时候,我感觉好像有点。。。基本是一个groups分组的思想,能减少一部分参数,降低错误率。
import torch.nn as nn
import torch


# 18层,34层
class BasicBlock(nn.Module):
    expansion = 1

    def __init__(self, in_channel, out_channel, stride=1, downsample=None, **kwargs):
        super(BasicBlock, self).__init__()
        self.conv1 = nn.Conv2d(in_channels=in_channel, out_channels=out_channel,
                               kernel_size=3, stride=stride, padding=1, bias=False)
        self.bn1 = nn.BatchNorm2d(out_channel)
        self.relu = nn.ReLU()
        self.conv2 = nn.Conv2d(in_channels=out_channel, out_channels=out_channel,
                               kernel_size=3, stride=1, padding=1, bias=False)
        self.bn2 = nn.BatchNorm2d(out_channel)
        self.downsample = downsample

    def forward(self, x):
        identity = x
        if self.downsample is not None:
            identity = self.downsample(x)

        out = self.conv1(x)
        out = self.bn1(out)
        out = self.relu(out)

        out = self.conv2(out)
        out = self.bn2(out)

        out += identity
        out = self.relu(out)

        return out

class ResNet(nn.Module):

    def __init__(self,
                 block,
                 blocks_num,
                 num_classes=1000,
                 include_top=True,
                 groups=1,
                 width_per_group=64):
        super(ResNet, self).__init__()
        self.include_top = include_top
        self.in_channel = 64

        self.groups = groups
        self.width_per_group = width_per_group

        self.conv1 = nn.Conv2d(3, self.in_channel, kernel_size=7, stride=2,
                               padding=3, bias=False)
        self.bn1 = nn.BatchNorm2d(self.in_channel)
        self.relu = nn.ReLU(inplace=True)
        self.maxpool = nn.MaxPool2d(kernel_size=3, stride=2, padding=1)
        self.layer1 = self._make_layer(block, 64, blocks_num[0])
        self.layer2 = self._make_layer(block, 128, blocks_num[1], stride=2)
        self.layer3 = self._make_layer(block, 256, blocks_num[2], stride=2)
        self.layer4 = self._make_layer(block, 512, blocks_num[3], stride=2)
        if self.include_top:
            self.avgpool = nn.AdaptiveAvgPool2d((1, 1))  # output size = (1, 1)
            self.fc = nn.Linear(512 * block.expansion, num_classes)

        for m in self.modules():
            if isinstance(m, nn.Conv2d):
                nn.init.kaiming_normal_(m.weight, mode='fan_out', nonlinearity='relu')

    def _make_layer(self, block, channel, block_num, stride=1):
        downsample = None
        if stride != 1 or self.in_channel != channel * block.expansion:
            downsample = nn.Sequential(
                nn.Conv2d(self.in_channel, channel * block.expansion, kernel_size=1, stride=stride, bias=False),
                nn.BatchNorm2d(channel * block.expansion))

        layers = []
        layers.append(block(self.in_channel,
                            channel,
                            downsample=downsample,
                            stride=stride,
                            groups=self.groups,
                            width_per_group=self.width_per_group))
        self.in_channel = channel * block.expansion

        for _ in range(1, block_num):
            layers.append(block(self.in_channel,
                                channel,
                                groups=self.groups,
                                width_per_group=self.width_per_group))

        return nn.Sequential(*layers)

    def forward(self, x):
        x = self.conv1(x)
        x = self.bn1(x)
        x = self.relu(x)
        x = self.maxpool(x)

        x = self.layer1(x)
        x = self.layer2(x)
        x = self.layer3(x)
        x = self.layer4(x)

        if self.include_top:
            x = self.avgpool(x)
            x = torch.flatten(x, 1)
            x = self.fc(x)

        return x


# 3463代表残差结构的个数
def resnet34(num_classes=1000, include_top=True):
    # https://download.pytorch.org/models/resnet34-333f7ec4.pth
    return ResNet(BasicBlock, [3, 4, 6, 3], num_classes=num_classes, include_top=include_top)
MobileNetV1、V2、V3
MobileNetV1网络的亮点主要是采用DW卷积,增加超参数α和β,这俩参数是人为设定的,虽然准确率稍微减少了一点,但是模型参数少了很多。
MobileNetV1网络采用了到残差结构,准确率更高,模型更小。MobileNetV3网络采用了更进一步的更新,加入了注意力机制,更新了激活函数等等。MobileNetV2实现如下。
from torch import nn
import torch

class ConvBNReLU(nn.Sequential):
    def __init__(self, in_channel, out_channel, kernel_size=3, stride=1, groups=1):
        padding = (kernel_size - 1) // 2
        super(ConvBNReLU, self).__init__(
            nn.Conv2d(in_channel, out_channel, kernel_size, stride, padding, groups=groups, bias=False),
            nn.BatchNorm2d(out_channel),
            nn.ReLU6(inplace=True)
        )


class InvertedResidual(nn.Module):
    def __init__(self, in_channel, out_channel, stride, expand_ratio):
        super(InvertedResidual, self).__init__()
        hidden_channel = in_channel * expand_ratio
        self.use_shortcut = stride == 1 and in_channel == out_channel

        layers = []
        if expand_ratio != 1:
            # 1x1 pointwise conv
            layers.append(ConvBNReLU(in_channel, hidden_channel, kernel_size=1))
        layers.extend([
            # 3x3 depthwise conv
            ConvBNReLU(hidden_channel, hidden_channel, stride=stride, groups=hidden_channel),
            # 1x1 pointwise conv(linear)
            nn.Conv2d(hidden_channel, out_channel, kernel_size=1, bias=False),
            nn.BatchNorm2d(out_channel),
        ])

        self.conv = nn.Sequential(*layers)

    def forward(self, x):
        if self.use_shortcut:
            return x + self.conv(x)
        else:
            return self.conv(x)


class MobileNetV2(nn.Module):
    def __init__(self, num_classes=1000, alpha=1.0, round_nearest=8):
        super(MobileNetV2, self).__init__()
        block = InvertedResidual
        input_channel = _make_divisible(32 * alpha, round_nearest)
        last_channel = _make_divisible(1280 * alpha, round_nearest)

        inverted_residual_setting = [
            # t, c, n, s
            [1, 16, 1, 1],
            [6, 24, 2, 2],
            [6, 32, 3, 2],
            [6, 64, 4, 2],
            [6, 96, 3, 1],
            [6, 160, 3, 2],
            [6, 320, 1, 1],
        ]

        features = []
        # conv1 layer
        features.append(ConvBNReLU(3, input_channel, stride=2))
        # building inverted residual residual blockes
        for t, c, n, s in inverted_residual_setting:
            output_channel = _make_divisible(c * alpha, round_nearest)
            for i in range(n):
                stride = s if i == 0 else 1
                features.append(block(input_channel, output_channel, stride, expand_ratio=t))
                input_channel = output_channel
        # building last several layers
        features.append(ConvBNReLU(input_channel, last_channel, 1))
        # combine feature layers
        self.features = nn.Sequential(*features)

        # building classifier
        self.avgpool = nn.AdaptiveAvgPool2d((1, 1))
        self.classifier = nn.Sequential(
            nn.Dropout(0.2),
            nn.Linear(last_channel, num_classes)
        )

        # weight initialization
        for m in self.modules():
            if isinstance(m, nn.Conv2d):
                nn.init.kaiming_normal_(m.weight, mode='fan_out')
                if m.bias is not None:
                    nn.init.zeros_(m.bias)
            elif isinstance(m, nn.BatchNorm2d):
                nn.init.ones_(m.weight)
                nn.init.zeros_(m.bias)
            elif isinstance(m, nn.Linear):
                nn.init.normal_(m.weight, 0, 0.01)
                nn.init.zeros_(m.bias)

    def forward(self, x):
        x = self.features(x)
        x = self.avgpool(x)
        x = torch.flatten(x, 1)
        x = self.classifier(x)
        return x
卷积神经网络算是正式完结了,争取下周把目标检测也尽快弄清楚hhh。