现在我们可以使用Servlet来搭建一个动态(前后端可以交互)的博客系统了(使用Hexo只能实现一个纯静态的网页,即只能在后台自己上传博客)。有一种"多年媳妇熬成婆"的感觉。
一、准备工作
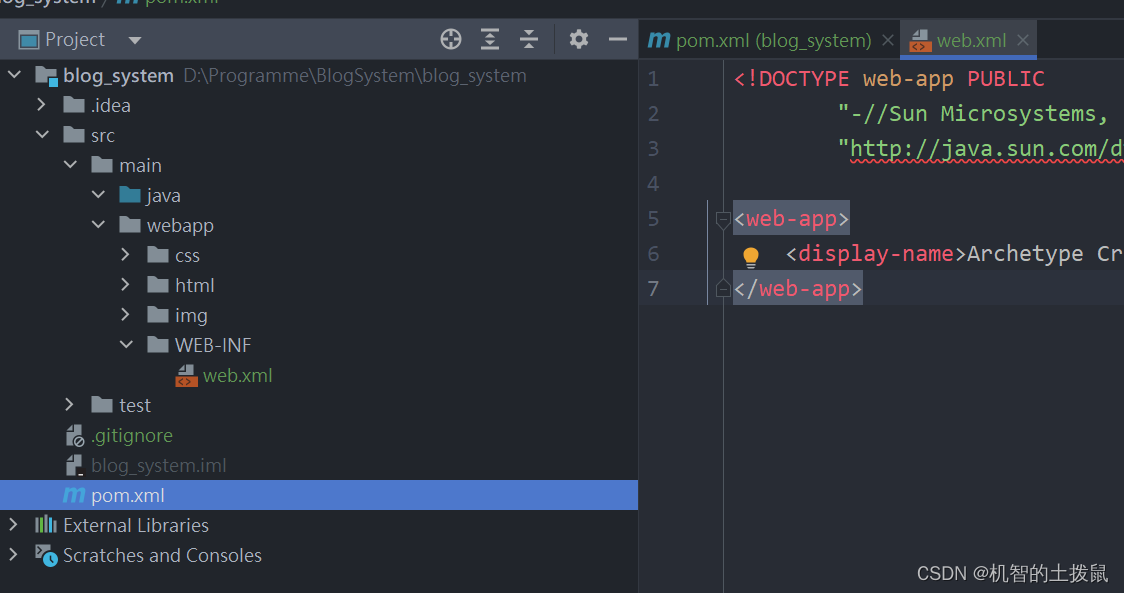
首先创建好项目,引入相关依赖。具体过程在"Servlet的创建"中介绍了。
在这我们要引入servlet,mysql,jackson的相关依赖。

然后将相关web.xml配置好,将网站前端的代码也引入webapp中。
二、业务逻辑的实现
由于数据要进行持久化保存,在这我们使用mysql数据来存储。
首先我们先进行数据库的设计。
在这个博客系统中,会涉及到写博客和登陆的简单操作,因此需要创建两个表:用户表和博客表。
因为数据库需要创建,当们换了一台机器的时候需要再一次创建,为了简便,可以将创建的sql语句保存下来,下次直接调用即可。
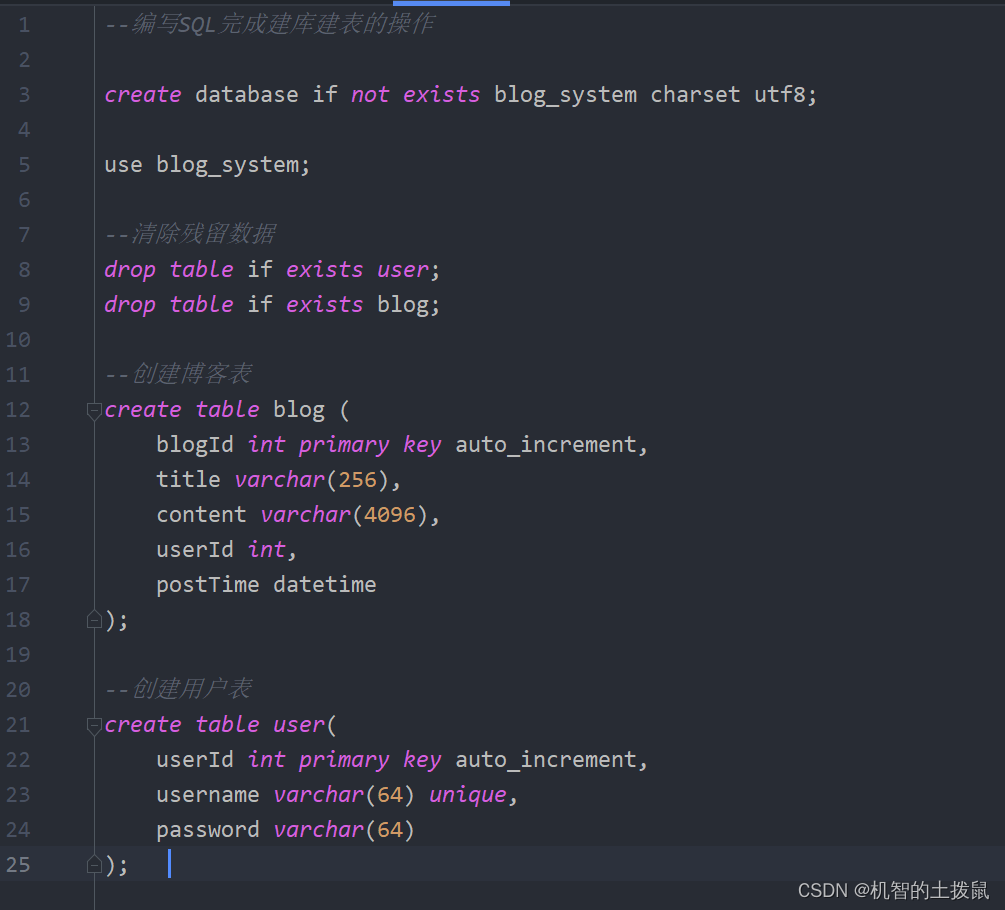
然后将上述代码复制到mysql的命令行执行即可。
封装数据库
为了简化后续对数据库的crud操作,在这对JDBC进行封装,后续代码就轻松许多了。
在这创建一个dao的文件夹,表示Data Access Object, 即数据访问对象,通过写一些类,然后通过类中的封装好的方法来间接访问数据库。
在dao文件下创建一个DBUtil的类,将连接数据库和释放资源操作进行封装。
package dao;

import com.mysql.jdbc.jdbc2.optional.MysqlDataSource;

import javax.sql.DataSource;
import java.sql.Connection;
import java.sql.PreparedStatement;
import java.sql.ResultSet;
import java.sql.SQLException;

public class DBUtil {
    //使用单例模式中的饿汉模式创建实例
    private static volatile DataSource dataSource = null;

    private static DataSource getDataSource(){
        //防止竞争太激烈
        if(dataSource == null){
            synchronized (DBUtil.class){
                if(dataSource == null){
                    dataSource = new MysqlDataSource();
                    ((MysqlDataSource)dataSource).setUrl("jdbc:mysql://127.0.0.1:3306/blog_system?characterEncoding=utf8&useSSL=false");
                    ((MysqlDataSource)dataSource).setUser("root");
                    ((MysqlDataSource)dataSource).setPassword("root");
                }
            }
        }
        return dataSource;
    }

    //获取数据库连接
    public static Connection getConnection() {
        try {
            return getDataSource().getConnection();
        } catch (SQLException e) {
            e.printStackTrace();
        }
        return null;
    }

    //释放资源
    public static void close(Connection connection, PreparedStatement statement, ResultSet resultSet){
        //一个一个释放,防止一个抛出异常,后续就不释放连接了
        if(resultSet != null){
            try {
                resultSet.close();
            } catch (SQLException e) {
                e.printStackTrace();
            }
        }

        if(statement != null){
            try {
                statement.close();
            } catch (SQLException e) {
                e.printStackTrace();
            }
        }

        if(connection != null){
            try {
                connection.close();
            } catch (SQLException e) {
                e.printStackTrace();
            }
        }
    }
}
创建实体类
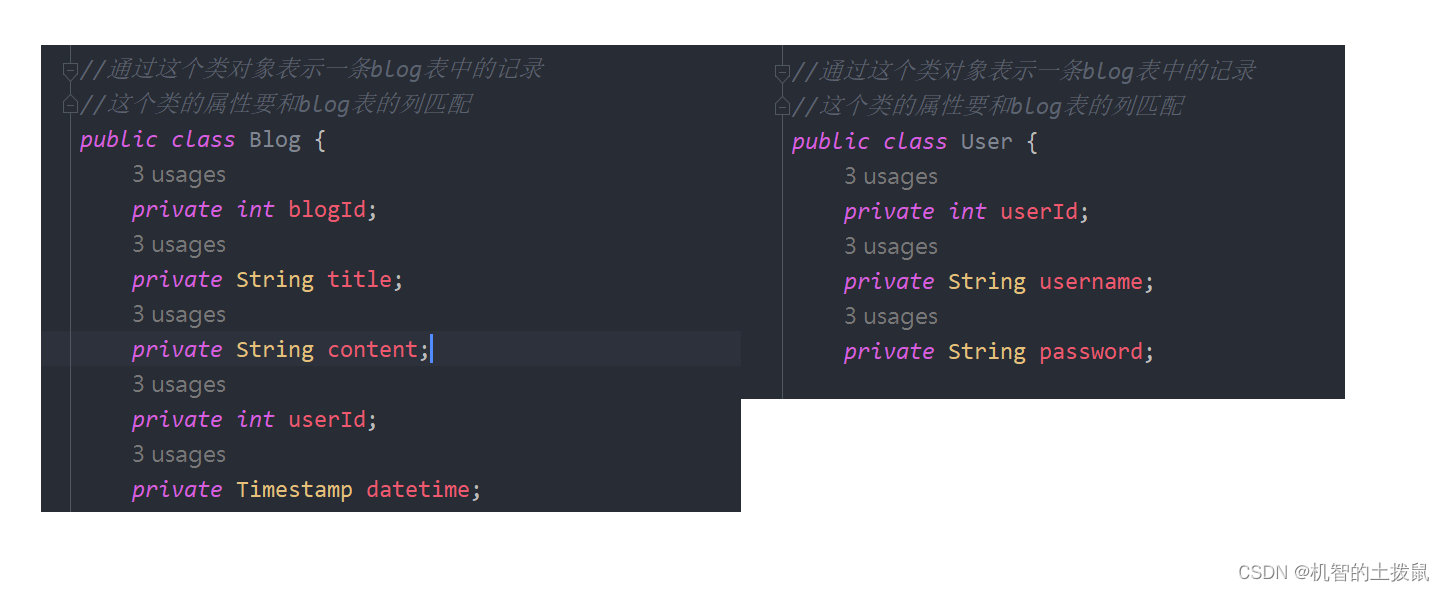
创建实体类的Dao类,进一步封装数据库操作
package dao;

import java.net.ConnectException;
import java.sql.Connection;
import java.sql.PreparedStatement;
import java.sql.ResultSet;
import java.sql.SQLException;
import java.util.ArrayList;
import java.util.List;

//通过这个类,封装针对 blog 表的增删改查操作
public class BlogDao {
    //新增一个博客
    //使用try catch捕获异常,finally释放资源
    public void insert(Blog blog)  {
        Connection connection = null;
        PreparedStatement statement = null;
        try{
            connection = DBUtil.getConnection();
            String sql = "insert into blog values(null, ?, ?, ?, now())";
            statement = connection.prepareStatement(sql);
            statement.setString(1, blog.getTitle());
            statement.setString(2, blog.getContent());
            statement.setInt(3, blog.getUserId());
            statement.executeUpdate();
        }catch (SQLException e){
            e.printStackTrace();
        }finally {
            DBUtil.close(connection, statement, null);
        }
    }

    public List<Blog> getBlogs(){
        Connection connection = null;
        PreparedStatement statement = null;
        ResultSet resultSet = null;
        List<Blog> blogs = new ArrayList<>();
        try{
            connection = DBUtil.getConnection();
            String sql = "select * from blog";
            statement = connection.prepareStatement(sql);
            resultSet = statement.executeQuery();
            while(resultSet.next()){
                Blog blog = new Blog();
                blog.setBlogId(resultSet.getInt("blogId"));
                blog.setTitle(resultSet.getString("title"));
                blog.setContent(resultSet.getString("content"));
                blog.setUserId(resultSet.getInt("userId"));
                blog.setPostTime(resultSet.getTimestamp("postTime"));
                blogs.add(blog);
            }
        }catch (SQLException e){
            e.printStackTrace();
        }finally {
            DBUtil.close(connection, statement, resultSet);
        }

        return blogs;
    }

    public Blog getBlog(){
        Connection connection = null;
        PreparedStatement statement = null;
        ResultSet resultSet = null;
        Blog blog = null;
        try{
            connection = DBUtil.getConnection();
            String sql = "select * from blog";
            statement = connection.prepareStatement(sql);
            resultSet = statement.executeQuery();
            if(resultSet.next()){
                blog = new Blog();
                blog.setBlogId(resultSet.getInt("blogId"));
                blog.setTitle(resultSet.getString("title"));
                blog.setContent(resultSet.getString("content"));
                blog.setUserId(resultSet.getInt("userId"));
                blog.setPostTime(resultSet.getTimestamp("postTime"));
            }
        } catch (SQLException e){
            e.printStackTrace();
        }finally {
            DBUtil.close(connection, statement, resultSet);
        }

        return blog;
    }

    //根据博客ID指定博客删除
    public void delete(int blogId){
        Connection connection = null;
        PreparedStatement statement = null;
        try{
            connection = DBUtil.getConnection();
            String sql = "delete from blog where blogId = ?";
            statement = connection.prepareStatement(sql);
            statement.setInt(1, blogId);
            statement.executeUpdate();
        }catch (SQLException e){
            e.printStackTrace();
        }finally {
            DBUtil.close(connection, statement, null);
        }
    }
}
后面再处理数据库操作的时候就可以直接使用这些代码了。
通过观察这些代码,我们会发现非常多重复的东西,后期通过学习了一些高级的框架后就能将代码的结构再优化一下.
同理,UserDao类也是如此完成。

至此,数据方面的东西我们都已经写完了,后续只需要调用即可。
接来下就可以进行一些前后端交互逻辑的实现了。
在这以功能点为维度进行展开,针对每个功能点,进行"设计前后端交互接口","开发后端代码","开发前端代码","调试"
实现博客列表页
让博客列表页能够加载博客列表。
大致流程如下:
-
前端发起一个HTTP请求,向后端所要博客列表数据
-
后端收到请求之后查询数据库获取数据库中的 博客列表,将数据返回给前端
-
前端拿到响应后,根据内容构造出html片段,并显示。
在写代码前,需要进行约定,即规范双方发什么样的数据,发什么请求,如何解析数据等。
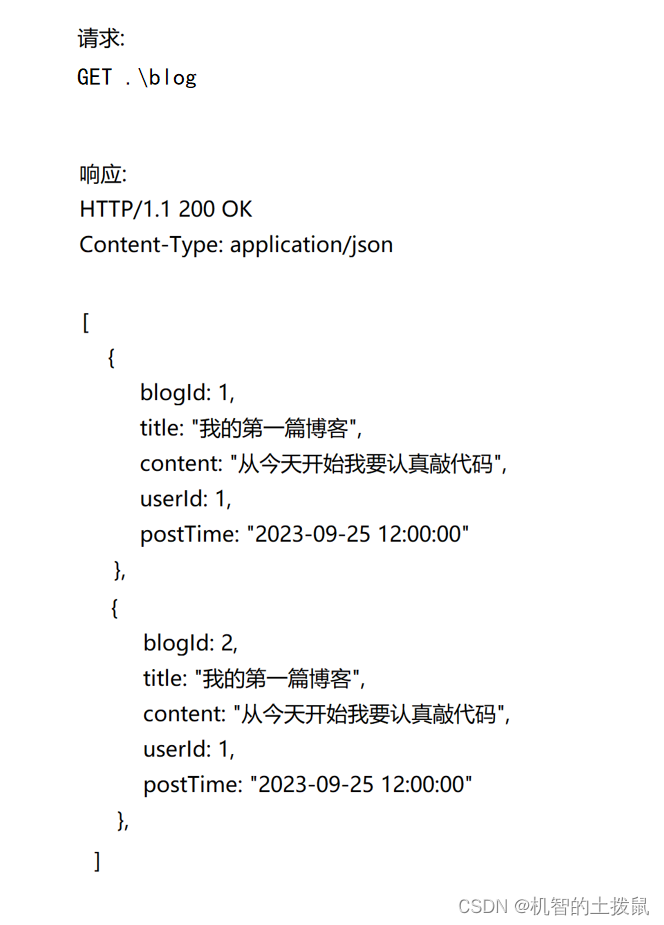
假设双方约定按照如下格式发送数据。
后端代码:
@WebServlet("/html/blog")
public class BlogServlet extends HttpServlet {
    private ObjectMapper objectMapper = new ObjectMapper();
    @Override
    protected void doGet(HttpServletRequest req, HttpServletResponse resp) throws ServletException, IOException {
        //从数据库中获取数据
        BlogDao blogDao = new BlogDao();
        List<Blog> blogs = blogDao.getBlogs();
        //将数组转换成对象字符串
        String respJson = objectMapper.writeValueAsString(blogs);
        resp.setContentType("application/json; charset=utf8");
        //写回到响应中
        resp.getWriter().write(respJson);
    }
}
前端代码:
让页面通过js的ajax的方式发起http请求。
function getBlogs(){
$.ajax({
type: 'get',
url: 'blog',
success: function(body){
let container = document.querySelector('.container-right');
for(let blog of body){
let blogDiv = document.createElement('div');
blogDiv.className='blog';
//构造标题
let titleDiv = document.createElement('div');
titleDiv.className = 'title';
titleDiv.innerHTML = blog.title;
blogDiv.appendChild(titleDiv);
//构造发布时间
let dateDiv = document.createElement('div');
dateDiv.className = 'date';
dateDiv.innerHTML = blog.postTime;
blogDiv.appendChild(dateDiv);
//构造博客摘要
let descDiv = document.createElement('div');
descDiv.className = 'desc';
descDiv.innerHTML = blog.content;
blogDiv.appendChild(descDiv);
//构造查看全文按钮
let a = document.createElement('a');
a.href = 'blog_content.html?blogId=' + blog.blogId;
a.innerHTML = '查看全文 >>';
blogDiv.appendChild(a);
container.appendChild(blogDiv);
}
}
});
}
getBlogs();由于数据库中的数据为标明啥数据,我们还需要手动指定.
效果如下:
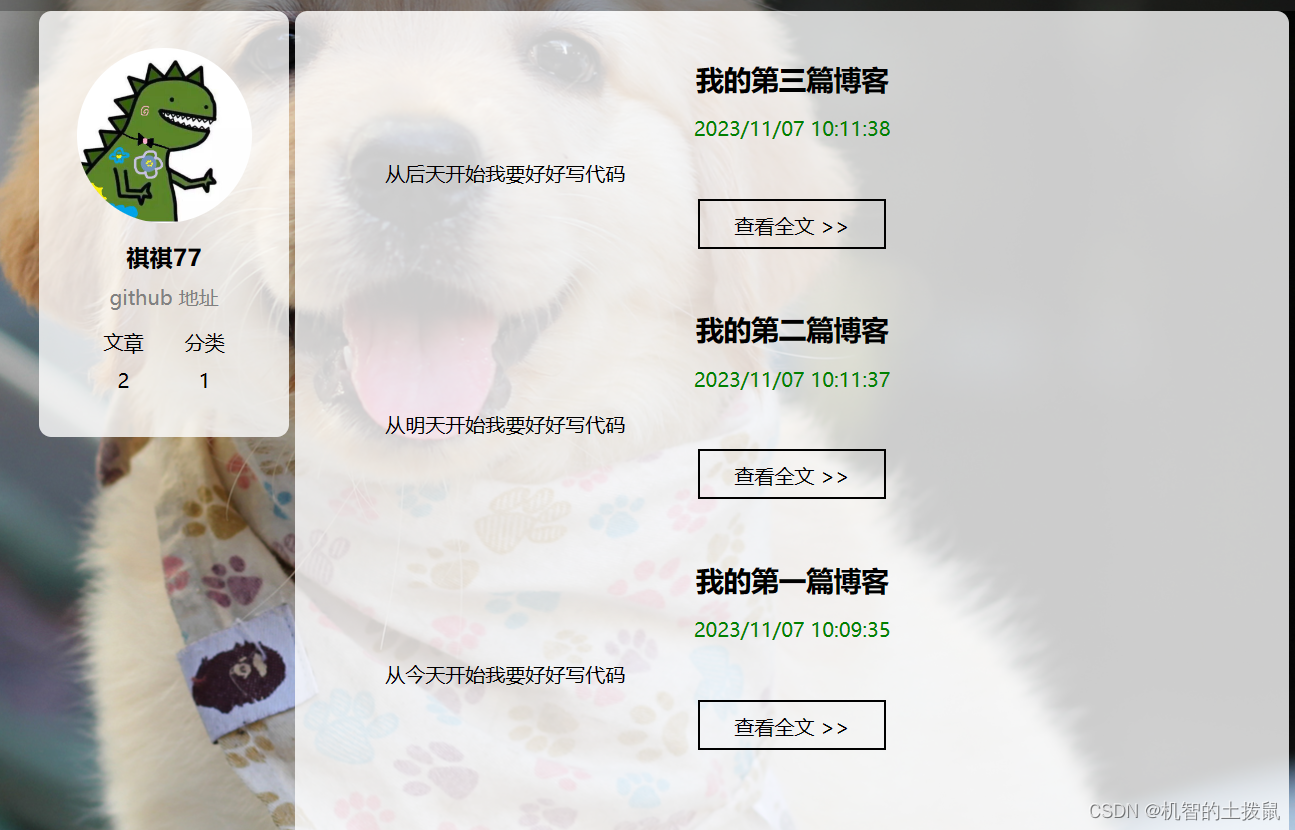
博客详情页
1.约定前后端交互接口
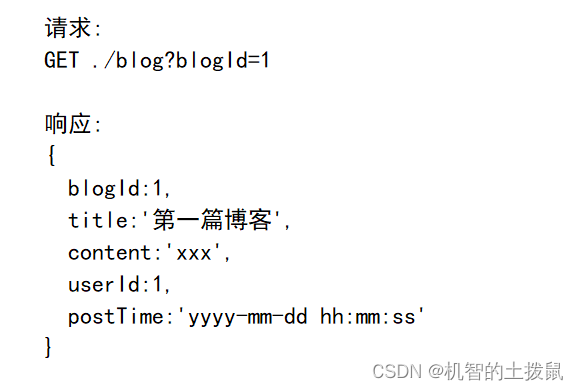
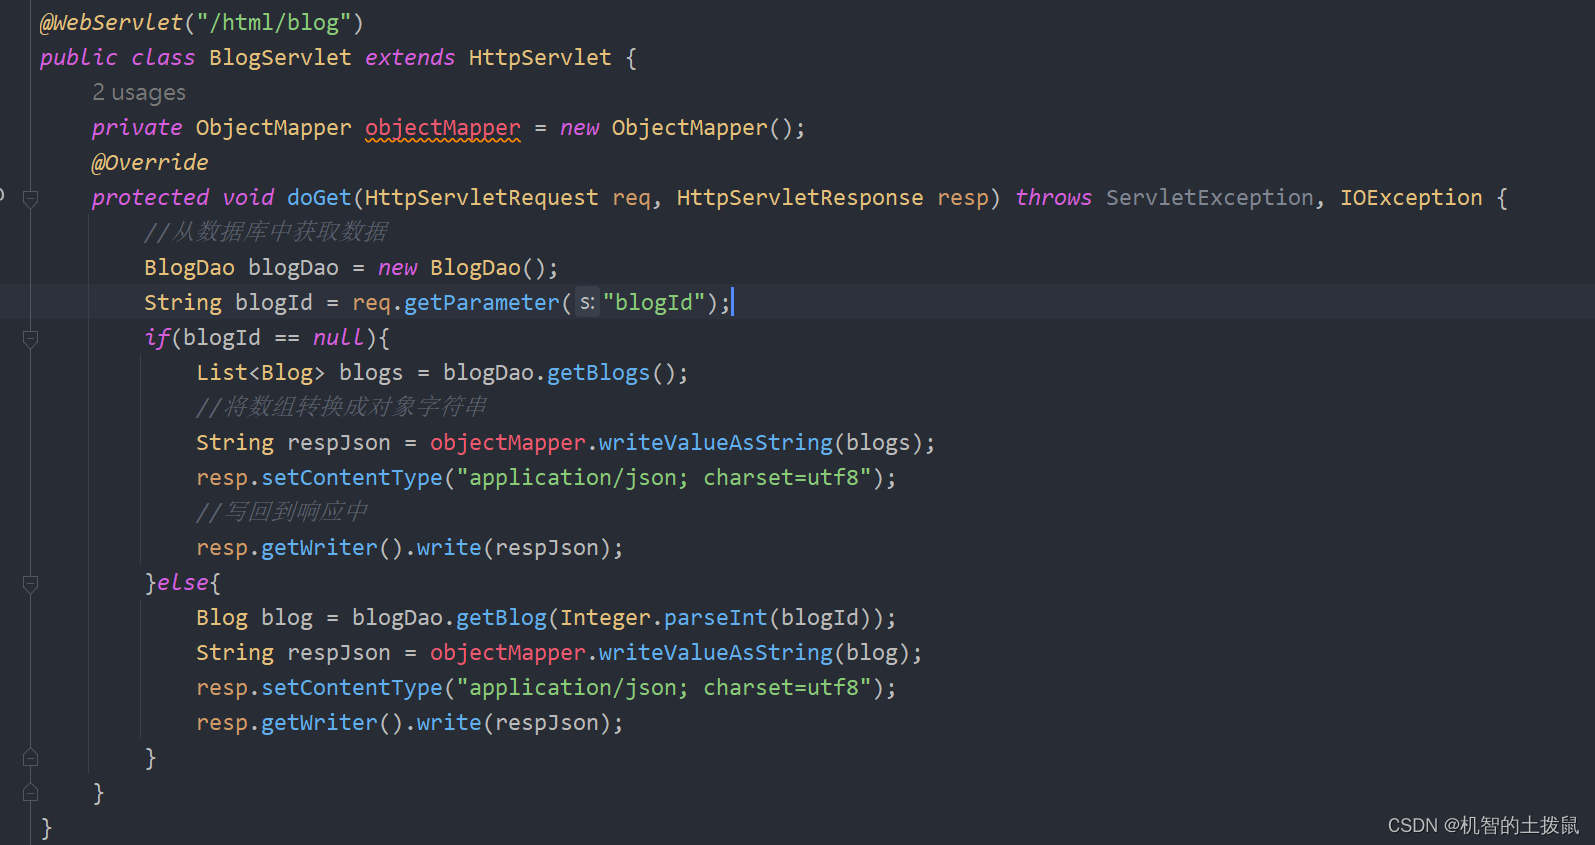
和前面博客列表页类似,不同的是我们只需要在请求中带上blogId的属性,以及后端代码的稍作修改即可。
后端代码:
我们可以通过对之前的后端代码稍作修改,就可以完成上述操作。
前端代码:
 <script src="https://cdn.bootcdn.net/ajax/libs/jquery/3.6.4/jquery.min.js"></script>

    <script>
        function getBlog(){
            $.ajax({
                type: 'get',
                url: 'blog'+location.search,
                success: function(body){
                    let h3 = document.querySelector('.container-right h3');
                    h3.innerHTML = body.title;
                    let dateDiv = document.querySelector('.container-right .date');
                    dateDiv.innerHTML = body.postTime;
                    editormd.markdownToHTML('content', { markdown: body.content });
                }
            });
        }

        getBlog();
    </script>
登录功能
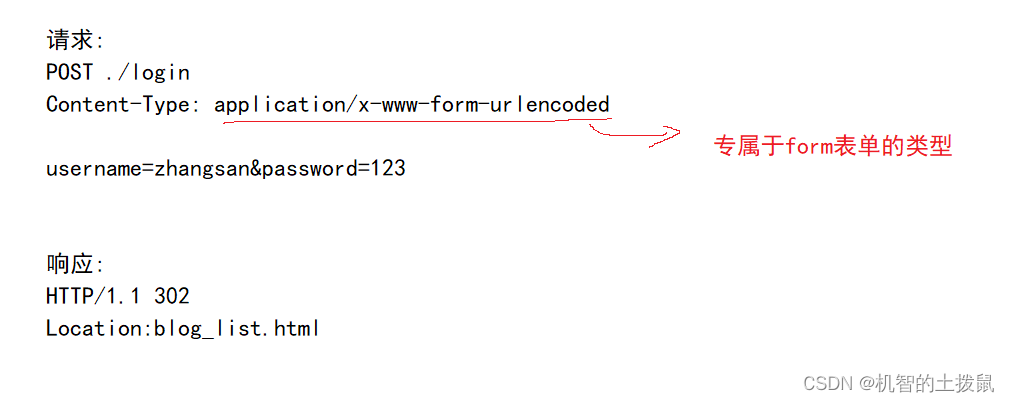
1.约定前后端交互接口
此处提交用户名和密码,可以使用form也可以使用ajax。在这使用form的形式(更简单一些)。
2.后端代码
@WebServlet("/html/login")
public class LoginServlet extends HttpServlet {
    @Override
    protected void doPost(HttpServletRequest req, HttpServletResponse resp) throws ServletException, IOException {
        //首先获取请求中的查询字符串中的用户名和密码
        //需要手动告诉Servlet,使用什么样的编码方式来读取请求
        req.setCharacterEncoding("utf8");
        String username = req.getParameter("username");
        String password = req.getParameter("password");
        if(username == null || password == null || username.equals("") || password.equals("")){
            //用户提交的数据非法
            resp.setContentType("text/html; charset=utf8");
            resp.getWriter().write("当前的用户名或密码非法");
            return;
        }
        //再去数据库中比对
        UserDao userDao = new UserDao();
        User user = userDao.getUserByName(username);
        if(user == null){
            resp.setContentType("text/html; charset=utf8");
            resp.getWriter().write("当前的用户名或密码错误");
            return;
        }
        if(!user.getPassword().equals(password)){
            resp.setContentType("text/html; charset=utf8");
            resp.getWriter().write("当前的用户名或密码错误");
        }
        //创建会话关系
        HttpSession session = req.getSession(true);
        session.setAttribute("user", user);
        //发送重定向网页,跳转到列表页
        resp.sendRedirect("blog_list.html");
    }
}
注意:
由于请求中可能带有中文字符,我们需要手动指定一下字符集utf8,防止读取请求的时候出现乱码。
使用一个会话,让服务器保存当前用户的一些数据。
3.前端代码
            <form action="login" method="post">
                <div class="row">
                    <span>用户名</span>
                    <input type="text" id="username">
                </div>
                <div class="row">
                    <span>密码</span>
                    <input type="password" id="password">
                </div>
                <div class="row">
                    <input type="submit" id="submit" value="登录">
                </div>
            </form>
检查用户登录状态
强制用户登录,当用户直接去访问博客列表页或者其他页面的时候,如果是未登录过的状态,会强制跳转到登录页要求用户登录。
如何实现?
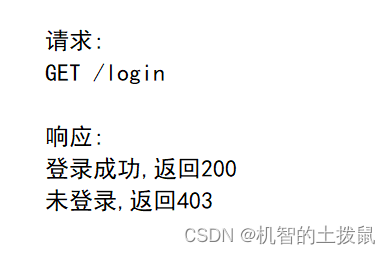
在其他页面中的前端代码,写一个ajax请求,通过这个请求,访问服务器来获取当前的登录状态。
如果当前未登录,则跳转登录页面,如果已经登录,就不进行操作。
1.约定前后端交互接口
2.后端代码
   protected void doGet(HttpServletRequest req, HttpServletResponse resp) throws ServletException, IOException {
        HttpSession session = req.getSession(false);
        if(session == null){
            resp.setStatus(403);
            return;
        }

        User user = (User) session.getAttribute("user");
        if(user == null){
            resp.setStatus(403);
            return;
        }

        resp.setStatus(200);
    }
3.前端代码
<div class="login-container">
        <!-- 登录对话框 -->
        <div class="login-dialog">
            <h3>登录</h3>
            <!-- 使用 form 包裹一下下列内容, 便于后续给服务器提交数据 -->
            <form action="login" method="post">
                <div class="row">
                    <span>用户名</span>
                    <input type="text" id="username" name="username">
                </div>
                <div class="row">
                    <span>密码</span>
                    <input type="password" id="password" name="password">
                </div>
                <div class="row">
                    <input type="submit" id="submit" value="登录">
                </div>
            </form>
        </div>
    </div>
form表单中的action为请求中的url,method为请求中的方法类型,id属性时针对html获取元素,name属性则是针对form表单构造http请求。
显示用户信息
当我们进入博客列表页的时候,用户显示的内容应该是登录用户的信息,一旦我们进入到博客详情页的时候,显示的就应该是该博客作者的信息。
首先是博客列表页
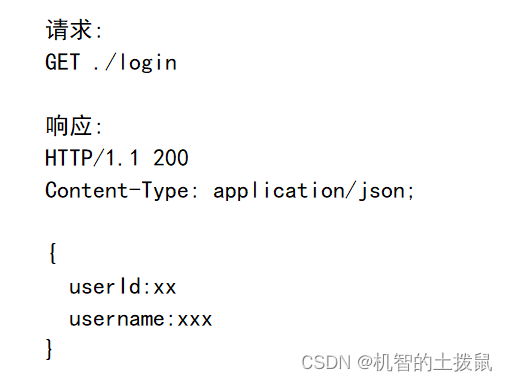
1.约定前后端交互接口
2.后端代码
由于我们进入博客列表页,首先会去检查是否已经登录过,如果登录过就可以拿到用户的数据,此时我们可以将用户数据返回给前端,然后修改用户姓名的属性。此时我们也只要在前面代码的基础上稍加修改。
        //防止将密码传输回去
        user.setPassword("");
        String respJson = objectMapper.writeValueAsString(user);
        resp.setContentType("application/json; charset=utf8");
        resp.getWriter().write(respJson);
3.前端代码
前端代码也只需要在之前的基础上稍加修改就行
function checkLogin(){
   $.ajax({
    type: 'get',
    url: 'login',
    success: function(body){
        let h3 = document.querySelector('h3');
        h3.innerHTML = body.username;
    },

    error: function(body){
        location.assign('blog_login.html');
    }
   }) ;
}
然后是博客详情页
详情页这里显示的是当前文章的作者信息,由于我们知道blogId,就可以查询到userId然后就能查询到user的信息。最后再将信息显示出来即可。
1.约定前后端交互接口
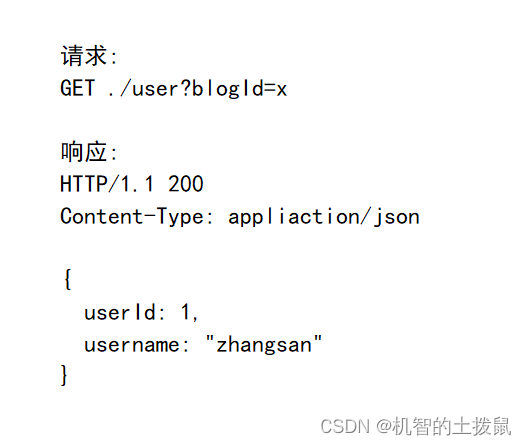
2.后端代码
public class UserServlet extends HttpServlet {
    private ObjectMapper objectMapper = new ObjectMapper();
    @Override
    protected void doGet(HttpServletRequest req, HttpServletResponse resp) throws ServletException, IOException {
        String blogId = req.getParameter("blogId");
        //如果用户直接访问博客详情页
        if(blogId == null){
            //从session中拿到user对象
            HttpSession session = req.getSession(false);
            if(session == null){
                //为了方便后续统一处理,返回空对象
                User user = new User();
                String respJson = objectMapper.writeValueAsString(user);
                resp.setContentType("application/json; charset=utf8");
                resp.getWriter().write(respJson);
                return;
            }
            User user = (User)session.getAttribute("user");
            String respJson = objectMapper.writeValueAsString(user);
            resp.setContentType("application/json; charset=utf8");
            resp.getWriter().write(respJson);
        }else{
            BlogDao blogDao = new BlogDao();
            Blog blog = blogDao.getBlog(Integer.parseInt(blogId));

            if(blog == null){
                User user = new User();
                String respJson = objectMapper.writeValueAsString(user);
                resp.setContentType("application/json; charset=utf8");
                resp.getWriter().write(respJson);
                return;
            }

            UserDao userDao = new UserDao();
            User user = userDao.getUserById(blog.getUserId());

            if(user == null){
                String respJson = objectMapper.writeValueAsString(user);
                resp.setContentType("application/json; charset=utf8");
                resp.getWriter().write(respJson);
                return;
            }

            String respJson = objectMapper.writeValueAsString(user);
            resp.setContentType("application/json; charset=utf8");
            resp.getWriter().write(respJson);
        }
    }
}
3.前端代码
前端代码前面博客列表页类似
        function getUser(){
            $.ajax({
                type:'get',
                url:'user'+location.search,
                success: function(body){
                    let h3 = document.querySelector('.card h3');
                    h3.innerHTML = body.username;
                }
            });
        }

        getUser();
用户退出功能
当用户点击注销的时候,即点击了a标签,此时会触发一个get请求,服务器收到这个get请求,就可以把当前用户会话中的user对象删除。即通过代码删除之前的session对象(最好是删除映射关系,但是Servlet没有提供相应简单的API).
1.约定前后端交互接口

2.后端代码
@WebServlet("/html/logout")
public class LogoutServlet extends HttpServlet {
    @Override
    protected void doGet(HttpServletRequest req, HttpServletResponse resp) throws ServletException, IOException {
        HttpSession session = req.getSession(false);
        if(session == null){
            resp.sendRedirect("blog_login.html");
            return;
        }

        session.removeAttribute("user");
        resp.sendRedirect("blog_login.html");
    }
}
3.前端代码
只需要给a元素写个href即可。
![]()
发布博客
在写博客页中,用户可以写博客标题,正文,然后点击发布即可上传数据。
1.约定前后端交互接口
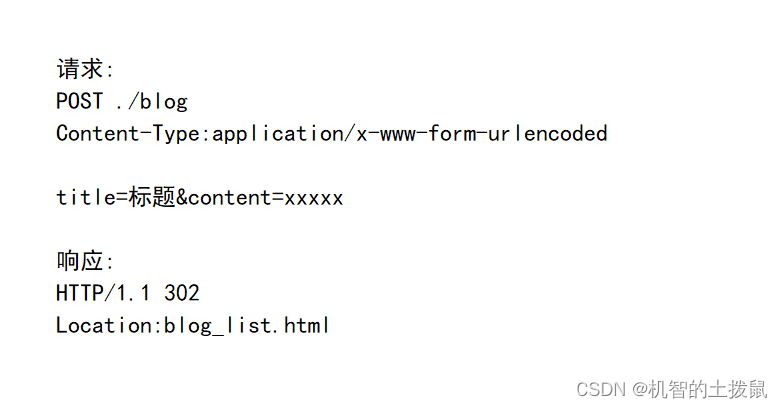
2.后端代码
 @Override
    protected void doPost(HttpServletRequest req, HttpServletResponse resp) throws ServletException, IOException {
        HttpSession session = req.getSession(false);
        if(session == null){
            resp.setContentType("text/html; charset=utf8");
            resp.getWriter().write("用户未登录! 无法发布博客!");
            return;
        }
        User user = (User)session.getAttribute("user");
        if (user == null) {
            resp.setContentType("text/html; charset=utf8");
            resp.getWriter().write("用户未登录! 无法发布博客!");
            return;
        }

        resp.setCharacterEncoding("utf8");
        String title = req.getParameter("title");
        String content = req.getParameter("content");
        if (title == null || content == null || "".equals(title) || "".equals(content)) {
            resp.setContentType("text/html; charset=utf8");
            resp.getWriter().write("标题或者正文为空");
            return;
        }

        Blog blog = new Blog();
        blog.setTitle(title);
        blog.setContent(content);
        blog.setUserId(user.getUserId());
        BlogDao blogDao = new BlogDao();
        blogDao.insert(blog);
        resp.sendRedirect("blog_list.html");
    }
3.前端代码
    <div class="blog-edit-container">
        <form action="blog" method="post">
            <!-- 标题编辑区 -->
            <div class="title">
                <input type="text" id="title-input" name="title">
                <input type="submit" id="submit">
            </div>
            <!-- 博客编辑器 -->
            <!-- 把 md 编辑器放到这个 div 中 -->
            <div id="editor">
                <textarea name="content" style="display: none;"></textarea>
            </div>
        </form>
    </div>
