目录
- 基本概念
- 常用命令
- 使用docker compose启动脚本
- 创建自己的image
使用Docker是现在最为流行的软件发布方式, 本系列将阐述Docker的基本概念,常用命令,启动脚本和如何生产自己的docker image。
在我们发布软件时,往往需要把我们开发的app打包成image。下面就要介绍如何build自己的image。
这里,我们以一个Flask项目为例,来讲解如何构建build image。
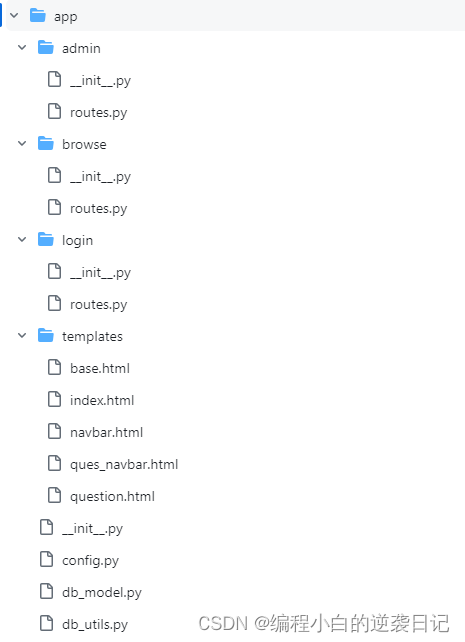
先介绍一下这个flask项目的目录结构,app目录位于项目根目录下,也就是说项目根目录下仅一个app目录,没有任何文件。init.py, config.py, db_model.py, db_utils.py 都是位于app目录下。 我们的当前目录是项目的根目录(这点很重要)。
1. 准备工作
执行以下命令,使用pip生成requirements.txt.
pip freeze > requirements.txt
2. 编写Dockerfile
我们要编写一个Dockerfile来描述如何构造这个image。
Dockerfile作为默认文件名,不建议修改。但是,编译时也可以通过-f参数来指定文件作为image的构造描述文件。
Dockerfile必须在项目根目录下,这点很重要,因为在build image时会默认搜索当前目录下的Dockerfile文件。
- python开发环境配置
在hub.docker.com 选择一个python的image作为起始点, 我选的是基于Alpine Linux的Python3.11的版本。
# start by pulling the python image
FROM python:3.11-alpine
将之前生成的requirements.txt文件复制到image里
# copy the requirements file into the image
COPY requirements.txt /app/requirements.txt
接下来,安装pip和postgressql-client。pip是为了后续安装python包,而postgresql-client是要用来测试数据连通性的。Alpine Linux下面安装软件需要用apk。Ubuntu Linux 下安装软件则用apt-get。
# upgrade pip
RUN apk add py3-pip
# install postgre client
RUN apk add postgresql-client
用pip install来安装需要的python库
# install the dependencies and packages in the requirements file
RUN pip install -r requirements.txt
- 工作目录设定
WORKDIR /app
- 复制文件和目录
复制目录的书写方式如下:
COPY ./app/*.py /app/app/
特别注意: “/app/app/” 表示的是目录, 如果最后不加”/" 则表示文件。使用COPY命令时,会自动生成新的目录。
为了将本地的目录结构复制到image里,需要对每个目录下的文件分别使用COPY命令,具体如下:
# copy every content from the local file to the image
COPY ./app/*.py /app/app/
COPY ./app/.env /app/app/
COPY ./app/admin/*.py /app/app/admin/
COPY ./app/browse/*.py /app/app/browse/
COPY ./app/login/*.py /app/app/login/
COPY ./app/templates/*.html /app/app/templates/
- 设置环境变量
我的flask启动命令是”app:create_app(‘production’)“,‘production’ 表示生产环境,使用ENV设置FLASK_APP参数,具体命令如下。
# set flask env config
ENV FLASK_APP "app:create_app('production')"
- 最后使用CMD命令启动python3,运行flask run。
# run the app
CMD [ "python3", "-m" , "flask", "run", "--host=0.0.0.0"]
3. Build Image:
确保你的当前目录项目的根目录,且Dockerfile在你的当前目录下。运行如下命令:
docker build -t examapp:1.0 .
examapp是你要build的image名字,1.0是版本号,这个版本号不是必须的。如果你build image时不指定版本号,则编译生成的image会是latest。
最后,”.“ 是 表示生成的image保存在当前目录下。 请确保始终使用**”.“** 作为生成image保存的位置,因为你在Dockerfile里COPY使用的相对目录是基于这个位置而言的。
比如,你的image保存在项目根目录下,那么在Dockerfile里admin目录的相对位置就是 ./app/admin/ , 即当前目录下的app目录下的admin目录。
如果,你把你生成image的位置改到项目根目录下的dockerimage目录:
docker build -t examapp:1.0 ./dockerimage/
那么,那么在Dockerfile里admin目录的相对位置就是 …/app/admin/ , 即当前目录dockerimage的上级目录(即项目根目录)下的app目录下的admin。
docker build 还可以通过 -f参数来指定Dockerfile。比如,你使用Dockerfile-20240527作为文件名, 并存放在根目录下的dockerimage目录下。那么你的docker build命令可以如下:
docker build -f ./dockerimage/Dockerfile-20240527 -t examapp:1.0 .
4. 查看并启动image
成功生成image后,在linux下可以使用命令行查看该image。
docker images
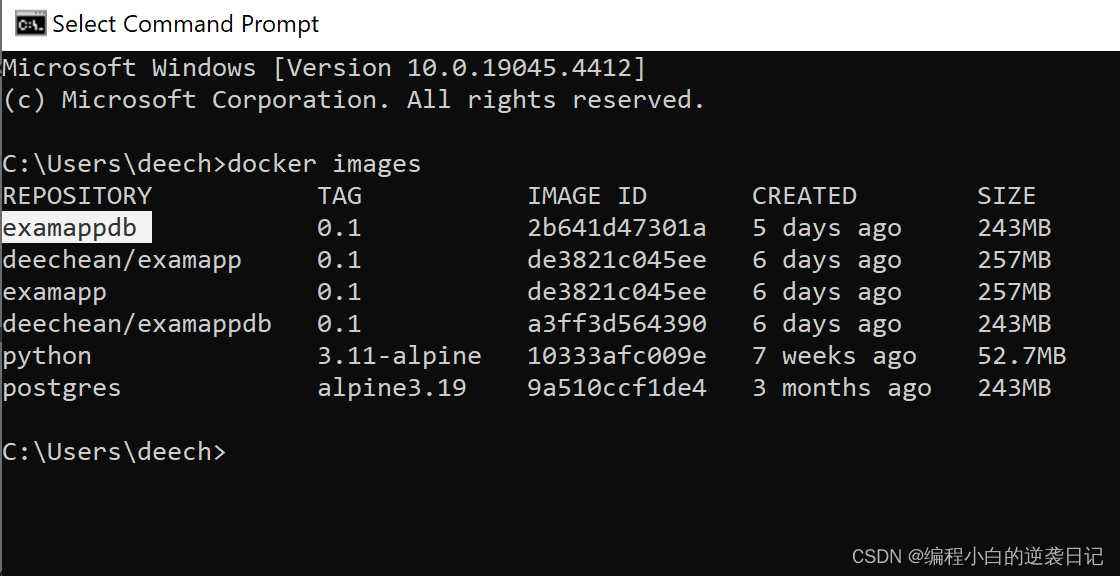
在Windows下以上命令一样有效,但还可以使用docker desktop的图形界面来查看。
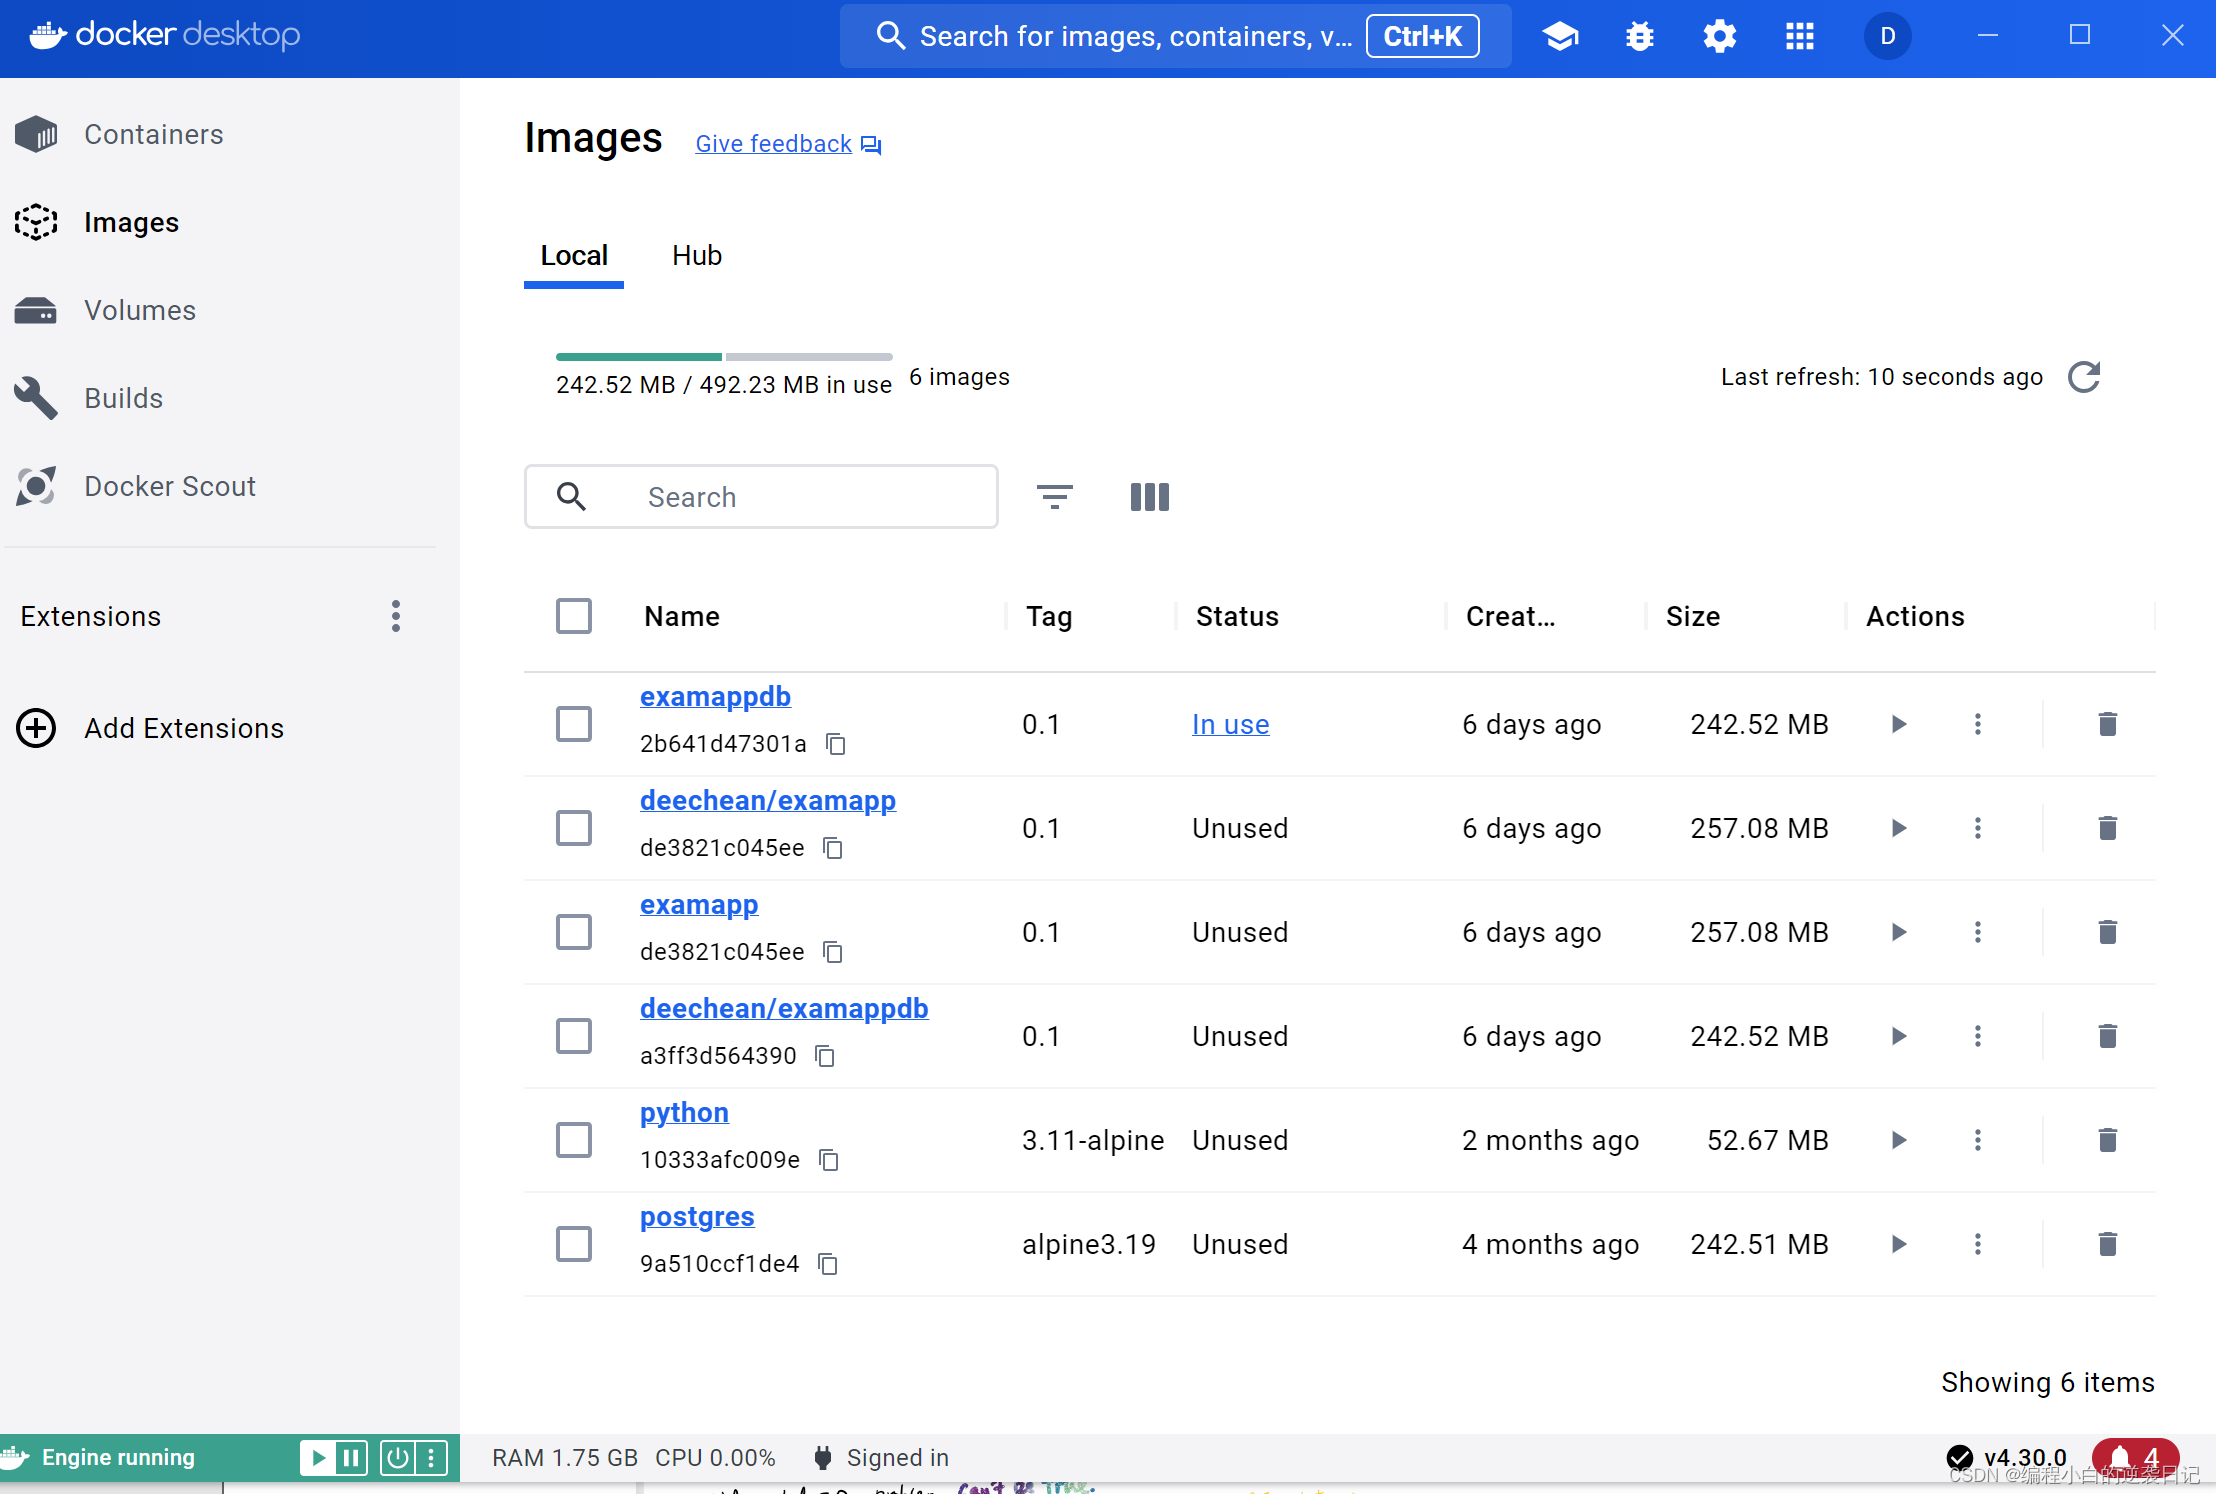
使用docker run来启动image:
docker run -d \
	-p 80:5000 \
	-e FLASK_APP="app:create_app('production')" \
	--name examapp
examapp:1.0
也可有使用yaml脚本来启动,脚本如下。
service:
	web:
		image: examapp:1.0
		ports:
			- 80:5000
		expose:
			-5000
		links:
			-db
		environment:
			FLASK_APP: "app:create_app('production')"
7. 使用docker build来初始化数据库
我们有了web app的docker image,但是数据库部分,也可以打包成docker image来发布。这里,我们以posgresql为例。
我们首先要准备一个数据库初始化的脚本,create_db_schema.sql.
--CREATE DATABASE examapp_db;
GRANT ALL PRIVILEGES ON DATABASE examapp_db TO postgres;

CREATE SCHEMA examapp AUTHORIZATION postgres;

-- examapp.tb_exam_list definition
CREATE TABLE examapp.tb_exam_list (
	exam_id varchar NOT NULL,
	exam_desc varchar DEFAULT 'Description of the exam'::character varying NOT NULL,
	CONSTRAINT tb_exam_list_pk PRIMARY KEY (exam_id)
);
-- examapp.tb_exam_questions definition
CREATE TABLE examapp.tb_exam_questions (
	id uuid NOT NULL,
	question varchar NOT NULL,
	"index" int NULL,
	optiona varchar NULL,
	optionb varchar NULL,
	optionc varchar NULL,
	optiond varchar NULL,
	optione varchar NULL,
	optionf varchar NULL,
	correct_ans varchar NULL,
	explanation varchar NULL,
	exam_id varchar NULL,
	ansnum int not null default 1,
	CONSTRAINT exam_questions_pk PRIMARY KEY (id),
	CONSTRAINT exam_questions_tb_exam_list_fk FOREIGN KEY (exam_id) REFERENCES examapp.tb_exam_list(exam_id)
);
-- examapp.tb_user definition
CREATE TABLE examapp.tb_user (
	id bigserial NOT NULL,
	email varchar NOT NULL,
	"password" varchar NOT NULL,
	"admin" bool DEFAULT false,
	username varchar NOT NULL,
	active bool DEFAULT true NOT NULL,
	confirmed_at date NULL,
	CONSTRAINT tb_user_pk PRIMARY KEY (id),
	CONSTRAINT tb_user_unique UNIQUE (email),
	CONSTRAINT tb_user_unique_1 UNIQUE (username)
);
-- examapp.tb_usernotes definition
CREATE TABLE examapp.tb_usernotes (
	note_id uuid NOT NULL,
	question_id uuid NOT NULL,
	category varchar NULL,
	notes varchar NULL,
	user_id int8 NOT NULL,
	my_ans varchar NULL,
	CONSTRAINT tb_usernotes_pk PRIMARY KEY (note_id),
	CONSTRAINT tb_usernotes_unique UNIQUE (question_id, user_id)
);
-- examapp.tb_highlightnotes definition
CREATE TABLE examapp.tb_highlightnotes (
	note_id uuid NOT NULL,
	usernote_id uuid NOT NULL,
	column_name varchar NOT NULL,
	start_pos int4 NOT NULL,
	"length" int4 NOT NULL,
	highlight_color varchar DEFAULT 'yellow'::character varying NOT NULL,
	highlight_notes varchar NULL,
	CONSTRAINT tb_highlightnotes_pk PRIMARY KEY (note_id)
);
INSERT INTO examapp.tb_exam_list(exam_id, exam_desc)
VALUES('AWS-CLF-C01', 'AWS Certified Cloud Practitioner Certification'),
('AWS-SAA-C03','AWS Certified Solutions Architect – Associate Certification'),
('AWS-DVA-C02','AWS Certified Developer - Associate Certification');

INSERT INTO examapp.tb_user(email, "password", "admin", username, active, confirmed_at)
VALUES('example@email.com', '$2b$12$1/3.r0NKjI1mXjM8oa/cyuryjVM3zhjMShWjC1HKCWgVhOSZtm2Aq', TRUE, 'admin', TRUE, '2024-05-21');
我们把这数据库脚本放到目录/examapp_db/下,然后开始编写Dockerfile。
# start by pulling the posgres image
FROM posgres:alpine3.19

#set environment
ENV POSTGRES_USER posgres
ENV POSTGRES_PASSWORD Password1
ENV POSTGRES_DB examapp_db

# copy the sql script into the init location
COPY create_db_schema.sql /docker-entrypoint-initdb.d/create_db_schema.sql
环境变量POSTGRES_DB定义了初始数据库名。
数据库初始化脚本必须复制到/docker-entrypoint-initdb.d/目录下,这样在image初始化时会被执行一次。
在和Dockerfile,create_db_schema.sql的同一目录下执行以下命令来创建image。
docker build -t examapp_db:1.0 .
我们最后要把数据库的image和web app的image放到一个examapp-docker-launch.yaml里,这样确保他们会被一起创建。
service:
	db:
		image: examapp_db:1.0
		restart: always
		shm_size: 128mb
		ports:
			- 5432:5432
		expose
			- 5432
		volumes:
			- postgre_data: /var/lib/postgresql/data
		environment:
			POSTGRES_PASSWORD: Password1
	web:
		image: examapp:1.0
		ports:
			- 80:5000
		expose:
			-5000
		links:
			-db
		environment:
			FLASK_APP: "app:create_app('production')"
volumes:
	postgre_data:
运行如下命令启动image
docker-compose -f examapp-docker-launch.yaml up
6. 附录
完整Dockerfile
# start by pulling the python image
FROM python:3.11-alpine

# copy the requirements file into the image
COPY requirements.txt /app/requirements.txt

# switch working directory
WORKDIR /app

# upgrade pip
RUN apk add py3-pip

# install postgre client
RUN apk add postgresql-client

# install the dependencies and packages in the requirements file
RUN pip install -r requirements.txt

# copy every content from the local file to the image
COPY ./app/*.py /app/app/
COPY ./app/.env /app/app/
COPY ./app/admin/*.py /app/app/admin/
COPY ./app/browse/*.py /app/app/browse/
COPY ./app/login/*.py /app/app/login/
COPY ./app/templates/*.html /app/app/templates/

# set flask env config
ENV FLASK_ENV "development"
ENV FLASK_APP "app:create_app('development')"

# run the app
CMD [ "python3", "-m" , "flask", "run", "--host=0.0.0.0"]

