求解机器学习问题的步骤可以分为“学习”和“推理”两个阶段。
本例假设“学习”阶段已经完成,并将学习到的权重和偏置参数保存在pickle文件sample_weight.pkl中。至于是如何学习的,斋藤康毅指出会在后续章节详述。之后,使用学习到的权重和偏置参数,进行“推理”阶段的操作。
在“手写数字识别”项目中,所谓“推理”,即使用学习到的权重和偏置参数,对输入数据进行分类。
“手写数字识别”项目的代码含 mnist.py、neuralnet_mnist.py 及 sample_weight.pkl 等3个文件,它们位于同一文件夹下。项目创建及执行主要有两步,如下所示。
一、首先,在任一文件夹中新建 mnist.py 文件,内容如下:
try:
    import urllib.request
except ImportError:
    raise ImportError('You should use Python 3.x')
import os.path
import gzip
import pickle
import os
import numpy as np


url_base = 'http://yann.lecun.com/exdb/mnist/'
key_file = {
    'train_img':'train-images-idx3-ubyte.gz',
    'train_label':'train-labels-idx1-ubyte.gz',
    'test_img':'t10k-images-idx3-ubyte.gz',
    'test_label':'t10k-labels-idx1-ubyte.gz'
}

dataset_dir = os.path.dirname(os.path.abspath('__file__'))
save_file = dataset_dir + "/mnist.pkl"

train_num = 60000
test_num = 10000
img_dim = (1, 28, 28)
img_size = 784


def _download(file_name):
    file_path = dataset_dir + "/" + file_name

    if os.path.exists(file_path):
        return

    print("Downloading " + file_name + " ... ")
    urllib.request.urlretrieve(url_base + file_name, file_path)
    print("Done")

def download_mnist():
    for v in key_file.values():
       _download(v)

def _load_label(file_name):
    file_path = dataset_dir + "/" + file_name

    print("Converting " + file_name + " to NumPy Array ...")
    with gzip.open(file_path, 'rb') as f:
            labels = np.frombuffer(f.read(), np.uint8, offset=8)
    print("Done")

    return labels

def _load_img(file_name):
    file_path = dataset_dir + "/" + file_name

    print("Converting " + file_name + " to NumPy Array ...")
    with gzip.open(file_path, 'rb') as f:
            data = np.frombuffer(f.read(), np.uint8, offset=16)
    data = data.reshape(-1, img_size)
    print("Done")

    return data

def _convert_numpy():
    dataset = {}
    dataset['train_img'] =  _load_img(key_file['train_img'])
    dataset['train_label'] = _load_label(key_file['train_label'])
    dataset['test_img'] = _load_img(key_file['test_img'])
    dataset['test_label'] = _load_label(key_file['test_label'])

    return dataset

def init_mnist():
    download_mnist()
    dataset = _convert_numpy()
    print("Creating pickle file ...")
    with open(save_file, 'wb') as f:
        pickle.dump(dataset, f, -1)
    print("Done!")

def _change_one_hot_label(X):
    T = np.zeros((X.size, 10))
    for idx, row in enumerate(T):
        row[X[idx]] = 1

    return T


def load_mnist(normalize=True, flatten=True, one_hot_label=False):
    """读入MNIST数据集

    Parameters
    ----------
    normalize : 将图像的像素值正规化为0.0~1.0
    one_hot_label :
        one_hot_label为True的情况下,标签作为one-hot数组返回
        one-hot数组是指[0,0,1,0,0,0,0,0,0,0]这样的数组
    flatten : 是否将图像展开为一维数组

    Returns
    -------
    (训练图像, 训练标签), (测试图像, 测试标签)
    """
    if not os.path.exists(save_file):
        init_mnist()

    with open(save_file, 'rb') as f:
        dataset = pickle.load(f)

    if normalize:
        for key in ('train_img', 'test_img'):
            dataset[key] = dataset[key].astype(np.float32)
            dataset[key] /= 255.0

    if one_hot_label:
        dataset['train_label'] = _change_one_hot_label(dataset['train_label'])
        dataset['test_label'] = _change_one_hot_label(dataset['test_label'])

    if not flatten:
         for key in ('train_img', 'test_img'):
            dataset[key] = dataset[key].reshape(-1, 1, 28, 28)

    return (dataset['train_img'], dataset['train_label']), (dataset['test_img'], dataset['test_label'])


if __name__ == '__main__':
    init_mnist()
初次运行 mnist.py 文件时,会下载 MNIST 数据集,所以需要保证网络畅通。
由于连接的是 MNIST handwritten digit database, Yann LeCun, Corinna Cortes and Chris Burges,经验表明一般早上下载时网速好一些。
执行 mnist.py 文件时,会有如下提示信息:
Downloading train-images-idx3-ubyte.gz ...
Done
Downloading train-labels-idx1-ubyte.gz ...
Done
Downloading t10k-images-idx3-ubyte.gz ...
Done
Downloading t10k-labels-idx1-ubyte.gz ...
Done
Converting train-images-idx3-ubyte.gz to NumPy Array ...
Done
Converting train-labels-idx1-ubyte.gz to NumPy Array ...
Done
Converting t10k-images-idx3-ubyte.gz to NumPy Array ...
Done
Converting t10k-labels-idx1-ubyte.gz to NumPy Array ...
Done
Creating pickle file ...
Done!
运行 mnist.py 文件后,会在mnist.py 文件所在的文件夹下看到 MNIST 数据集所含的 'train-images-idx3-ubyte.gz'、'train-labels-idx1-ubyte.gz'、't10k-images-idx3-ubyte.gz'、't10k-labels-idx1-ubyte.gz' 等四个文件,以及生成的 mnist.pkl 文件。
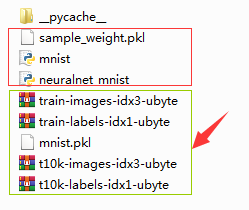
若想查看 mnist.pkl 文件的内容,可运行如下代码:
import pickle
f=open('mnist.pkl','rb')
data=pickle.load(f)
print(data)
之后,可看到 mnist.pkl 文件的内容如下:
{

'train_img': array([[0, 0, 0, ..., 0, 0, 0],
       [0, 0, 0, ..., 0, 0, 0],
       [0, 0, 0, ..., 0, 0, 0],
       ...,
       [0, 0, 0, ..., 0, 0, 0],
       [0, 0, 0, ..., 0, 0, 0],
       [0, 0, 0, ..., 0, 0, 0]], dtype=uint8),

'train_label': array([5, 0, 4, ..., 5, 6, 8], dtype=uint8),

'test_img': array([[0, 0, 0, ..., 0, 0, 0],
       [0, 0, 0, ..., 0, 0, 0],
       [0, 0, 0, ..., 0, 0, 0],
       ...,
       [0, 0, 0, ..., 0, 0, 0],
       [0, 0, 0, ..., 0, 0, 0],
       [0, 0, 0, ..., 0, 0, 0]], dtype=uint8),

'test_label': array([7, 2, 1, ..., 4, 5, 6], dtype=uint8)

}
二、将 neuralnet_mnist.py 文件及 sample_weight.pkl 文件复制到 mnist.py 文件所在的文件夹下。其中,neuralnet_mnist.py 文件的内容如下:
import sys, os
sys.path.append(os.pardir)  # 为了导入父目录的文件而进行的设定
import numpy as np
import pickle
from mnist import load_mnist

def sigmoid(x):
    return 1 / (1 + np.exp(-x))

def softmax(x):
    if x.ndim == 2:
        x = x.T
        x = x - np.max(x, axis=0)
        y = np.exp(x) / np.sum(np.exp(x), axis=0)
        return y.T
    x = x - np.max(x)
    return np.exp(x) / np.sum(np.exp(x))


def get_data():
    (x_train, t_train), (x_test, t_test) = load_mnist(normalize=True, flatten=True, one_hot_label=False)
    return x_test, t_test


def init_network():
    with open("sample_weight.pkl", 'rb') as f:
        network = pickle.load(f)
    return network


def predict(network, x):
    W1, W2, W3 = network['W1'], network['W2'], network['W3']
    b1, b2, b3 = network['b1'], network['b2'], network['b3']

    a1 = np.dot(x, W1) + b1
    z1 = sigmoid(a1)
    a2 = np.dot(z1, W2) + b2
    z2 = sigmoid(a2)
    a3 = np.dot(z2, W3) + b3
    y = softmax(a3)

    return y


x, t = get_data()
network = init_network()
accuracy_cnt = 0
for i in range(len(x)):
    y = predict(network, x[i])
    p= np.argmax(y) # 获取概率最高的元素的索引
    if p == t[i]:
        accuracy_cnt += 1

print("Accuracy:" + str(float(accuracy_cnt) / len(x)))
运行 neuralnet_mnist.py 文件后,会得到运行结果:Accuracy:0.9352,表示有93.52%的数据被正确分类了。
至此,一个识别精度达到93.52%的“手写数字识别”的神经网络就构建完成了。
-----------------------------------------------------------------------------------------------------------------------------------
● 若想显示 MNIST 图像,同时也确认一下数据,则可用下面的 mnist_show.py 进行。下面的 mnist_show.py 代码执行后将显示第一张训练图像。
import sys, os
sys.path.append(os.pardir)  # 为了导入父目录的文件而进行的设定
import numpy as np
from mnist import load_mnist
from PIL import Image


def img_show(img):
    pil_img = Image.fromarray(np.uint8(img))
    pil_img.show()

(x_train, t_train), (x_test, t_test) = load_mnist(flatten=True, normalize=False)

img = x_train[0]
label = t_train[0]
print(label)  # 5

print(img.shape)  # (784,)
img = img.reshape(28, 28)  # 把图像的形状变为原来的尺寸
print(img.shape)  # (28, 28)

img_show(img)
● 若想实现高速运算,则可引入“批处理”技巧。下面的 neuralnet_mnist_batch.py 给出了对 MNIST 数据集进行“批处理”的代码。
import sys, os
sys.path.append(os.pardir)  # 为了导入父目录的文件而进行的设定
import numpy as np
import pickle
from mnist import load_mnist

def sigmoid(x):
    return 1 / (1 + np.exp(-x))

def softmax(x):
    if x.ndim == 2:
        x = x.T
        x = x - np.max(x, axis=0)
        y = np.exp(x) / np.sum(np.exp(x), axis=0)
        return y.T
    x = x - np.max(x)
    return np.exp(x) / np.sum(np.exp(x))


def get_data():
    (x_train, t_train), (x_test, t_test) = load_mnist(normalize=True, flatten=True, one_hot_label=False)
    return x_test, t_test


def init_network():
    with open("sample_weight.pkl", 'rb') as f:
        network = pickle.load(f)
    return network


def predict(network, x):
    w1, w2, w3 = network['W1'], network['W2'], network['W3']
    b1, b2, b3 = network['b1'], network['b2'], network['b3']

    a1 = np.dot(x, w1) + b1
    z1 = sigmoid(a1)
    a2 = np.dot(z1, w2) + b2
    z2 = sigmoid(a2)
    a3 = np.dot(z2, w3) + b3
    y = softmax(a3)

    return y


x, t = get_data()
network = init_network()

batch_size = 100 # 批数量
accuracy_cnt = 0

for i in range(0, len(x), batch_size):
    x_batch = x[i:i+batch_size]
    y_batch = predict(network, x_batch)
    p = np.argmax(y_batch, axis=1)
    accuracy_cnt += np.sum(p == t[i:i+batch_size])

print("Accuracy:" + str(float(accuracy_cnt) / len(x)))



![[MRCTF2020]Ez_bypass](https://img-blog.csdnimg.cn/02c4556fe6584fee923a78654f65dc21.png)


