目录
- Eureka/注册中心
- 简介
- 模式
- 使用Eureka实现注册中心
- 1.创建一个名称为demo-eureka-server的Spring Boot项目
- 2.添加项目依赖
- 3. 在启动类添加启动注解
- 4.添加配置信息
- Eureka的自我保护机制
- 为Eureka Server添加用户认证
- 1.添加依赖
- 2. 添加配置信息
- 3.添加放行代码
- 4.启动服务,出现登录页面
- Eureka的集群配置
- 原因
- 思路
- 实现Eureka的集群配置
- 准备
- 步骤
- Eureka注册与发现步骤
- 注册Provider微服务到Eureka Server
- 创建项目
- 依赖
- 添加启动注解:@EnableDiscoveryClient
- 添加配置信息
- 注册Consumer微服务到Eureka Server
- 创建项目
- 添加依赖
- 添加启动注解:@EnableDiscoveryClient
- 添加配置信息
- 面试题
- 谈谈你对Spring Boot和Spring Cloud的理解?
- Eureka和Zookeeper都可以提供服务的注册与发现,说说它们的区别?
- 谈谈Dubbo和Spring Cloud的区别?
Eureka/注册中心
简介
- Eureka是Spring Cloud中的一个负责服务注册与发现的组件。遵循着CAP理论中的A(可用性)和P(分区容错性)。
- Eureka是Netflix中的一个开源框架。它和 Zookeeper、Consul一样,都是用于服务注册管理的,同样,Spring-Cloud 还集成了Zookeeper和Consul。
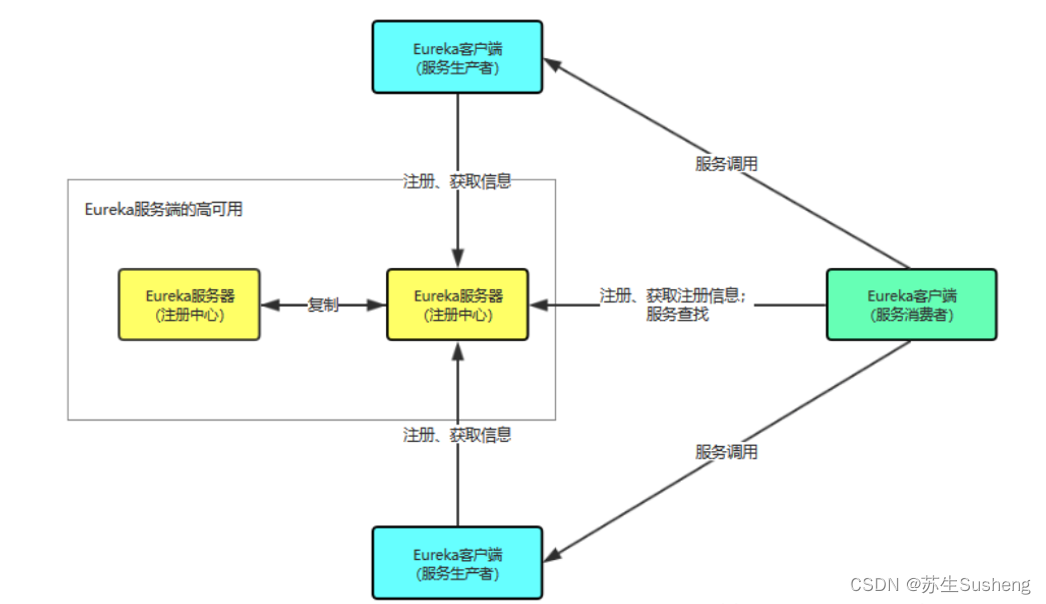
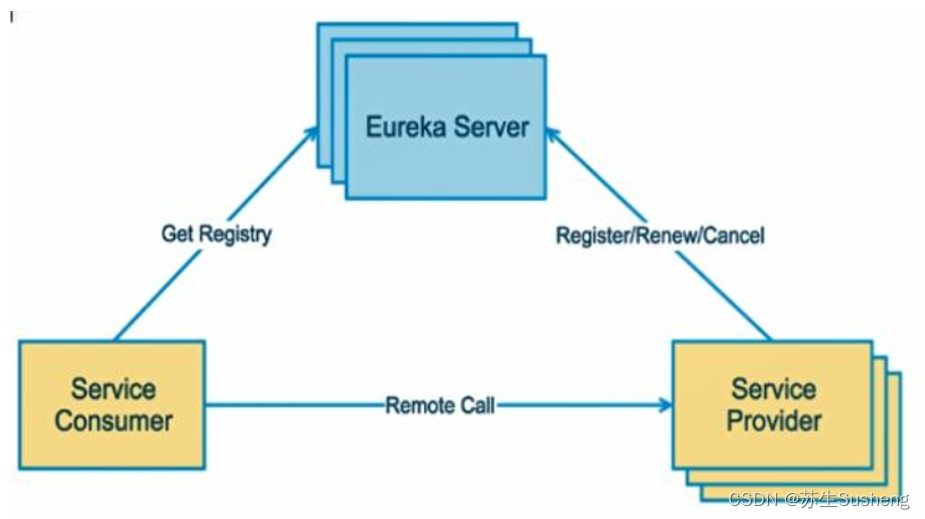
- 一个Eureka中分为Eureka Server和EurekaClient
- Eureka Server
- 提供服务注册与发现服务
- Eureka Client
- Service Provider 服务提供方,将自身服务注册到Eureka,从而使服务消费方能够找到;
- Service Consumer服务消费方,从Eureka获取注册服务列表,从而能够消费服务。
- Eureka Server
模式
使用Eureka实现注册中心
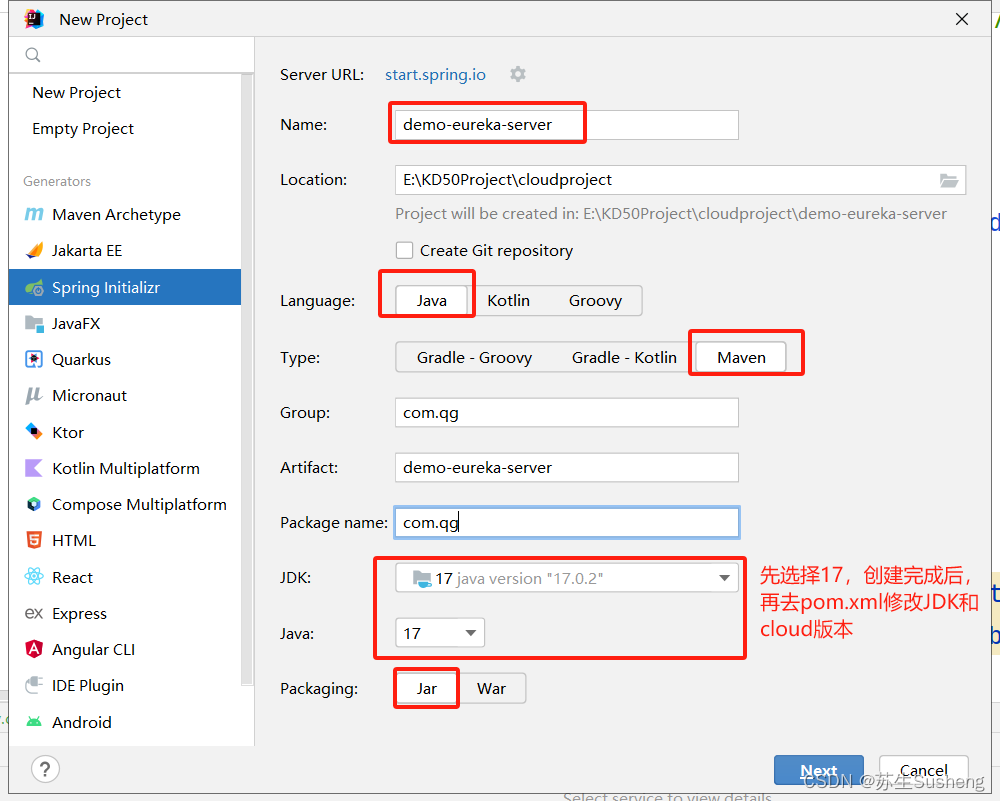
1.创建一个名称为demo-eureka-server的Spring Boot项目
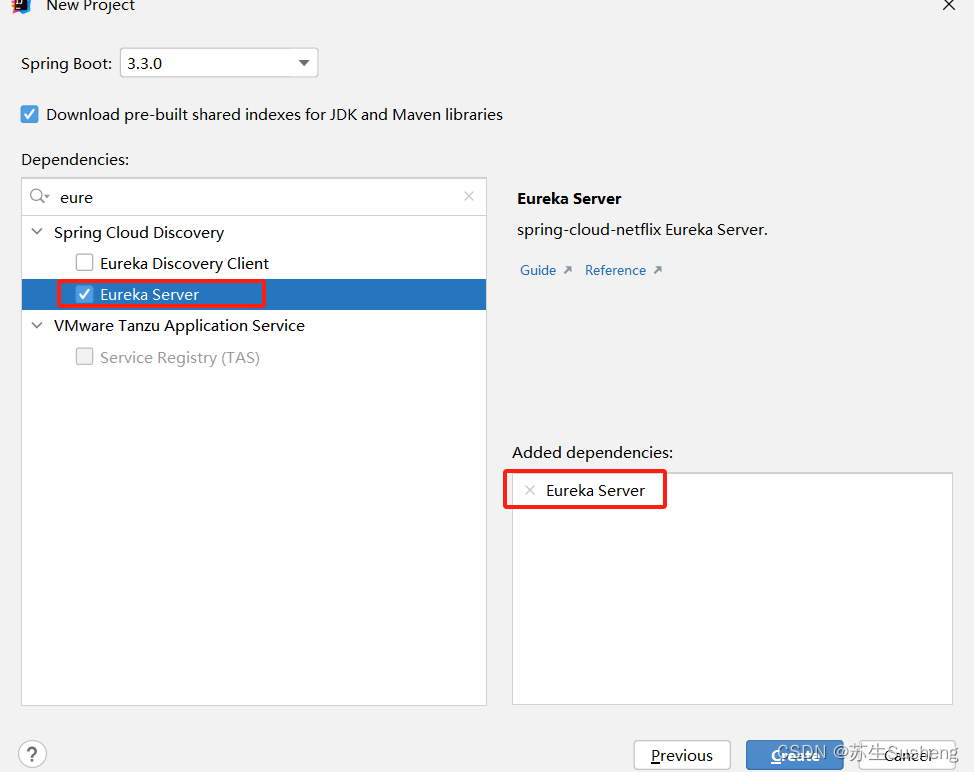
2.添加项目依赖
    <parent>
        <groupId>org.springframework.boot</groupId>
        <artifactId>spring-boot-starter-parent</artifactId>
        <version>2.3.12.RELEASE</version>
        <relativePath/> <!-- lookup parent from repository -->
    </parent>
    ...
    <properties>
        <java.version>1.8</java.version>
        <spring-cloud.version>Hoxton.SR1</spring-cloud.version>
    </properties>
    <dependencies>
        <dependency>
            <groupId>org.springframework.cloud</groupId>
            <artifactId>spring-cloud-starter-netflix-eureka-server</artifactId>
        </dependency>

        <dependency>
            <groupId>org.springframework.boot</groupId>
            <artifactId>spring-boot-starter-test</artifactId>
            <scope>test</scope>
        </dependency>
    </dependencies>
3. 在启动类添加启动注解
@EnableEurekaServer
@SpringBootApplication
@EnableEurekaServer
public class DemoEurekaServerApplication {
    public static void main(String[] args) {
        SpringApplication.run(DemoEurekaServerApplication.class, args);
    }
}
4.添加配置信息
server:
  port: 7776
eureka:
  instance:
    hostname: localhost
  client:
    register-with-eureka: false # 不向注册中心注册自己
    fetch-registry: false # 表示自己就是注册中心,主要是维护服务实例,不检索服务
    service-url:
      defaultZone: http://${eureka.instance.hostname}:${server.port}/eureka/
  server:
    enable-self-preservation: true # 开启自我保护
    eviction-interval-timer-in-ms: 5000
spring:
  application:
    name: register-center
Eureka的自我保护机制
- 在默认配置中,Eureka Server在默认90s没有得到客户端的心跳则注销该实例,
- 但是往往因为微服务跨进程调用,网络通信往往会面临着各种问题,比如微服务状态正常,但是因为网络分区故障时,Eureka Server注销服务实例则会让大部分微服务不可用,这很危险,因为服务明明没有问题。
- 为了解决这个问题,Eureka 有自我保护机制。
- 它的原理是,当Eureka Server节点在短时间内丢失过多的客户端时(可能发生了网络故障),那么这个节点将进入自我保护模式,不再注销任何微服务,当网络故障回复后,该节点会自动退出自我保护模式。
为Eureka Server添加用户认证
1.添加依赖
        <dependency>
            <groupId>org.springframework.boot</groupId>
            <artifactId>spring-boot-starter-security</artifactId>
        </dependency>
2. 添加配置信息
server:
  port: 7776
eureka:
  instance:
    hostname: localhost
  client:
    register-with-eureka: false # 不向注册中心注册自己
    fetch-registry: false # 表示自己就是注册中心,主要是维护服务实例,不检索服务
    service-url:
      defaultZone: http://${eureka.instance.hostname}:${server.port}/eureka/
  server:
    enable-self-preservation: true # 开启自我保护
    eviction-interval-timer-in-ms: 5000
spring:
  application:
    name: register-center
  security:
    user:
      name: root
      password: root
3.添加放行代码
@SpringBootApplication
@EnableEurekaServer
public class DemoEurekaServerApplication {
    public static void main(String[] args) {
        SpringApplication.run(DemoEurekaServerApplication.class, args);
    }
    @EnableWebSecurity
    static class WebSecurityConfig extends WebSecurityConfigurerAdapter {
        @Override
        protected void configure(HttpSecurity http) throws Exception {
            http.csrf().disable();
            super.configure(http);
        }
    }
}
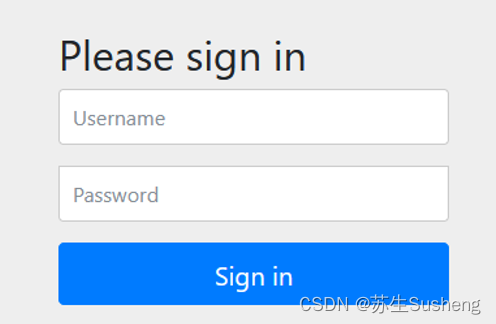
4.启动服务,出现登录页面
Eureka的集群配置
原因
- 在分布式系统中,任何的地方存在单点,整个体系就不是高可用的,Eureka 也一样,而是以集群的方式对外提供服务。
- 如果单机版本Eureka服务端宕机,会导致所有服务都无法获取使用,为了保证高可用性,我们需要搭建Eureka集群
- 在实际的生产环境中,Eureka 常常是以集群的方式提供服务的,目的就是要保证高可用性,同时它还保证了分区容错性。这也满足了一个健壮的分布式系统所要求的 CAP 理论原则,即 Eureka 保证了高可用性,分区容错性。
思路
- Eureka Server同时也可以是Eureka Client,当有多个节点时,如上图1d,1e,1c之间的Eureka Server通过互相复制来同步自己的服务注册表。
- Eureka Client也会缓存服务注册表中的信息,这样不用每次请求都查询Eureka Server,降低Eureka Server的压力,即使所有Eureka Server都宕机了,消费者仍然可以根据缓存来完成调用。

实现Eureka的集群配置
准备
这里为了方便调试,把刚才的权限认证去掉吧
- 删除pom中security依赖,重新加载maven
- 删除启动类中关于security的配置代码
- 删除yml文件中的security的配置信息
步骤
- 再复制两个注册中心项目出来
- 三个注册中心端口分别是7776,7777,7778
- 配置文件中基本不做修改,只是
eureka.client.service-url.defaultZone的配置内容要修改
server:
  port: 7776
eureka:
  instance:
    hostname: localhost
  client:
    register-with-eureka: false # 不向注册中心注册自己
    fetch-registry: false # 表示自己就是注册中心,主要是维护服务实例,不检索服务
    service-url:
      # defaultZone: http://${eureka.instance.hostname}:${server.port}/eureka/
      # 改为集群配法,另外那个服务也这么配置,配置为其他注册中心的地址
      defaultZone: http://127.0.0.1:7778/eureka/
  server:
    enable-self-preservation: true # 开启自我保护
    eviction-interval-timer-in-ms: 5000
spring:
  application:
    name: register-center
  security:
    user:
      name: root
      password: root
Eureka注册与发现步骤
注册Provider微服务到Eureka Server
创建项目
指定artifactId为demo-user-provider
依赖
    <parent>
        <groupId>org.springframework.boot</groupId>
        <artifactId>spring-boot-starter-parent</artifactId>
        <version>2.3.12.RELEASE</version>
        <relativePath/> <!-- lookup parent from repository -->
    </parent>
    ...
    <properties>
        <java.version>1.8</java.version>
        <spring-cloud.version>Hoxton.SR1</spring-cloud.version>
    </properties>
    <dependencies>
        <dependency>
            <groupId>org.springframework.boot</groupId>
            <artifactId>spring-boot-starter-web</artifactId>
        </dependency>
        <dependency>
            <groupId>org.springframework.cloud</groupId>
            <artifactId>spring-cloud-starter-netflix-eureka-client</artifactId>
        </dependency>

        <dependency>
            <groupId>org.springframework.boot</groupId>
            <artifactId>spring-boot-configuration-processor</artifactId>
            <optional>true</optional>
        </dependency>
        <dependency>
            <groupId>org.projectlombok</groupId>
            <artifactId>lombok</artifactId>
            <optional>true</optional>
        </dependency>
        <dependency>
            <groupId>org.springframework.boot</groupId>
            <artifactId>spring-boot-starter-test</artifactId>
            <scope>test</scope>
        </dependency>
    </dependencies>
添加启动注解:@EnableDiscoveryClient
@SpringBootApplication
@EnableDiscoveryClient
public class DemoUserProviderApplication {

    public static void main(String[] args) {
        SpringApplication.run(DemoUserProviderApplication.class, args);
    }
}
添加配置信息
server:
  port: 8081
spring:
  application:
    name: demo-user-provider
eureka:
  client:
    service-url:
      # 要向所有的注册中心都注册才行
      defaultZone: http://localhost:7776/eureka/,http://192.168.2.220:7777/eureka/
    fetch-registry: true
    register-with-eureka: true
注册Consumer微服务到Eureka Server
创建项目
指定artifactId为demo-user-consumer
添加依赖
同上
添加启动注解:@EnableDiscoveryClient
添加配置信息
基本同上
面试题
谈谈你对Spring Boot和Spring Cloud的理解?
- Spring Boot 是 基于Spring 的一套快速配置脚手架,可以基于Spring Boot 快速开发单个微服务;
- Spring Cloud是一个基于Spring Boot实现的云应用开发工具;Spring Boot专注于快速、方便集成的单个个体,
- Spring Cloud是关注全局的服务治理框架;Spring Boot使用了默认大于配置的理念,很多集成方案已经帮你选择好了,能不配置就不配置,Spring Cloud很大的一部分是基于Spring Boot来实现。
- Spring Boot可以离开Spring Cloud独立使用开发项目,但是Spring Cloud离不开Spring boot,属于依赖的关系。
Eureka和Zookeeper都可以提供服务的注册与发现,说说它们的区别?
Eureka和Zookeeper都是用于服务注册与发现的工具,但在实现和使用上有一些区别:
- 架构:Eureka是基于RESTful风格的微服务框架Netflix OSS中的一部分,而Zookeeper是一个分布式协调服务。
- 功能:Eureka主要用于服务注册与发现,它使用了两个组件,即Eureka Server和Eureka Client。Eureka Server负责服务注册和发现,Eureka Client负责服务注册、心跳和将自身信息注册到Eureka Server。另一方面,Zookeeper不仅可以提供服务注册与发现,还可以用于分布式锁、配置管理等其他用途。
- 数据一致性:Eureka在默认情况下采用的是AP(可用性和分区容错性)模型,允许网络分区的存在,但可能导致数据不一致。而Zookeeper采用的是CP(一致性和分区容忍性)模型,可以保证数据一致性,但在网络分区下可能出现服务不可用的情况。
- 性能:由于Zookeeper采用的是复制的方式保持数据一致性,所以在写入操作上会有一定的性能开销。而Eureka采用的是异步的方式进行副本同步,所以在写入操作上性能较好。
- 社区支持:Eureka是Netflix开源的项目,具有较大的社区支持,相应的文档和教程较为丰富。而Zookeeper是Apache基金会的项目,同样也有相应的社区支持。
综上所述,Eureka更适合于构建基于云端的微服务架构,而Zookeeper则更适合于构建复杂的分布式系统。选择使用哪个工具,应根据具体的需求和项目背景来决定。
谈谈Dubbo和Spring Cloud的区别?
Dubbo和Spring Cloud都是常用的微服务框架,但在实现和使用上有一些区别:
-
架构:Dubbo是一款高性能的分布式服务框架,由阿里巴巴开源,采用了RPC(远程过程调用)的方式实现服务间的通信。而Spring Cloud是基于Spring框架的一套微服务解决方案,主要采用HTTP协议和RESTful风格的网络通信方式。
-
社区支持:Dubbo是阿里巴巴开源的项目,有较大的社区支持,相应的文档和教程较为丰富。Spring Cloud是Spring团队提供的解决方案,也有广泛的社区支持。
-
功能:Dubbo主要关注服务的调用和网络通信,提供了服务注册与发现、负载均衡、容错、服务治理等功能。而Spring Cloud提供了更完善的微服务解决方案,除了服务调用和通信外,还包括服务注册与发现、负载均衡、熔断器、API网关、配置管理、服务监控等功能。
-
技术栈:Dubbo的核心技术栈是Java,提供了对Java的良好支持。而Spring Cloud基于Spring框架,可以与各种语言和技术栈进行整合,支持多语言开发。
-
使用复杂度:Dubbo相对来说使用起来较为复杂,需要进行服务接口的定义、编写配置文件、引入相关依赖等。Spring Cloud在使用上较为简单,可以通过注解和配置文件来进行服务注册和调用。
综上所述,Dubbo适合于大规模复杂的分布式系统,提供了高性能的服务调用和通信能力。Spring Cloud则提供了更完善的微服务解决方案,更适合于快速构建、开发和部署微服务架构。在选择时,可以根据具体的需求和项目背景来决定使用哪个框架。

