效果图
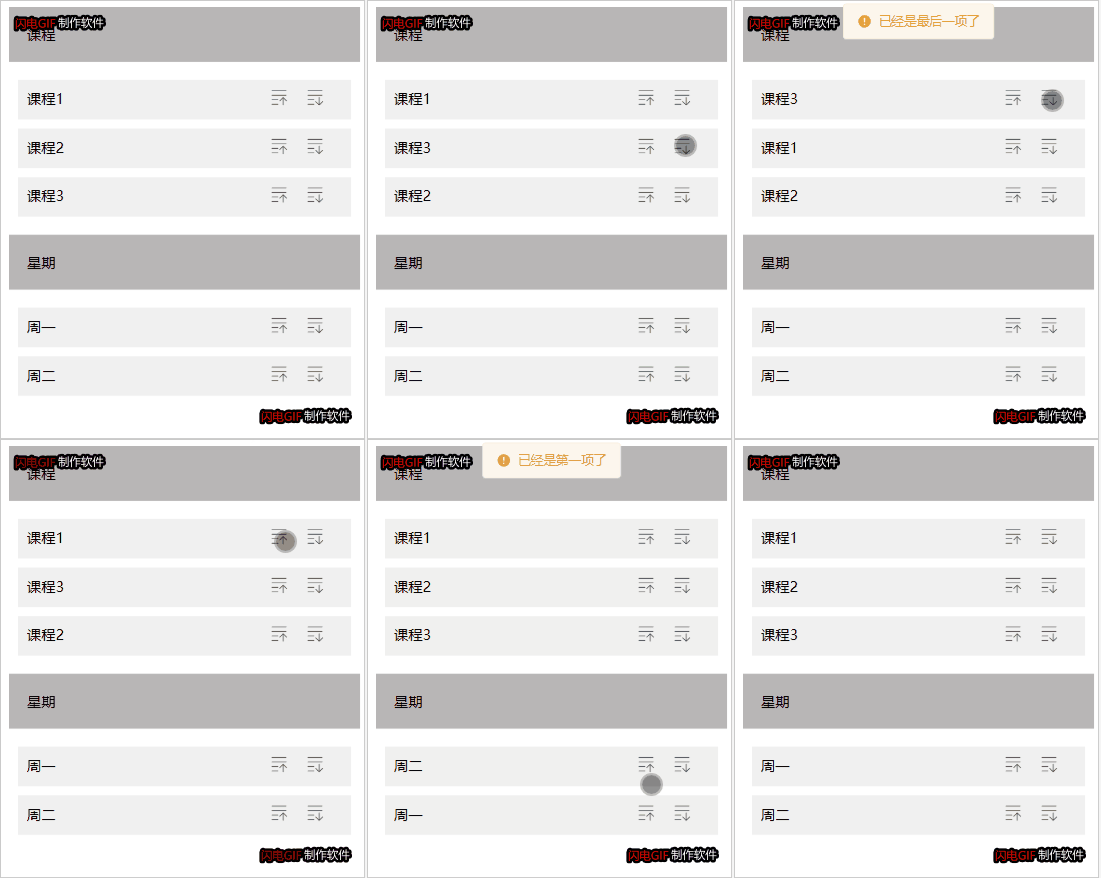
效果说明
每一组数据只能在对应的二级类目中进行上下移动,当点击上移图标的时候【左边的】会将当前元素与上一个元素交换位置,当点击的元素为该组的第一个元素时,将提示已经是第一项了并且不能进行移动;当点击下移图标的时候【右边的】会将当前元素与下一个元素交换位置,当点击的元素为该组的最后一个元素时,将提示已经是最后一项了并且不能进行移动。
效果实现代码
本效果需要用到 vue、vur-router、scss、element plus
第一步:创建项目
yarn create vite demo第二步:安装所需要的依赖
yarn
yarn add vue-router
yarn add sass sass-loader
yarn add element-plus
yarn add path
第三步:配置别名@,并设置element组件的按需导入
vite.config.js
import { defineConfig } from 'vite'
import vue from '@vitejs/plugin-vue'
import path from 'path'
import AutoImport from 'unplugin-auto-import/vite'
import Components from 'unplugin-vue-components/vite'
import { ElementPlusResolver } from 'unplugin-vue-components/resolvers'

// https://vitejs.dev/config/
export default defineConfig({
  plugins: [
    vue(),
    AutoImport({
      resolvers: [ElementPlusResolver()],
    }),
    Components({
      resolvers: [ElementPlusResolver()],
    })
  ],
  resolve: {
    alias: {
      '@': path.resolve(__dirname, 'src')
    }
  },
})
main.js
import { createApp } from 'vue'
import './style.css'
import App from './App.vue'
import router from './router'
import 'element-plus/es/components/message/style/css'

createApp(App).use(router).mount('#app')
第四步:创建Drag组件,并书写相关的逻辑代码
src/views/Drag.vue
<template>
  <div>
    <div v-for="obj in showList" :key="obj.id">
      <div class="obj">{{ obj.title }}</div>
      <div class="item" v-for="(item, index) in obj.children" :key="item.id">
        <span>{{ item.title }}</span>
        <div>

          <img
            src="@/assets/imgs/上移.png"
            alt="上移"
            title="上移"
            @click="handleMove('up', obj, index)"
          />
          <img
            src="@/assets/imgs/下移.png"
            alt="下移"
            title="下移"
            @click="handleMove('dowm', obj, index)"
          />
        </div>
      </div>
    </div>
  </div>
</template>

<script setup>
import { ref } from "vue";

const list = [
  {
    id: 1,
    title: "课程",
    children: [
      { id: 2, title: "课程1" },
      { id: 3, title: "课程2" },
      { id: 4, title: "课程3" },
    ],
  },
  {
    id: 5,
    title: "星期",
    children: [
      {
        id: 6,
        title: "周一",
      },
      {
        id: 7,
        title: "周二",
      },
    ],
  },
];
const showList = ref(list);

const handleMove = (type, obj, index) => {
  let warningMessage = "";
  let swapIndex = -1;

  if (type === "up") {
    if (index === 0) {
      warningMessage = "已经是第一项了";
    } else {
      swapIndex = index - 1;
    }
  } else {
    if (index === obj.children.length - 1) {
      warningMessage = "已经是最后一项了";
    } else {
      swapIndex = index + 1;
    }
  }

  if (warningMessage) {
    ElMessage.warning(warningMessage);
    return;
  }

  showList.value.forEach((element) => {
    if (element.id === obj.id) {
      const temp = element.children[swapIndex];
      element.children[swapIndex] = element.children[index];
      element.children[index] = temp;
    }
  });
};
</script>

<style lang="scss" scoped>
.obj {
  margin: 20px;
  padding: 20px;
  background: #b8b6b6;
}
.item {
  margin: 10px 30px;
  padding: 10px;
  display: flex;
  justify-content: space-between;
  background: #f0f0f0;
  img {
    width: 20px;
    height: 20px;
    margin-right: 20px;
  }
}
</style>
第五步:创建路由文件
src/router/index.js
import { createRouter, createWebHistory } from 'vue-router'
const routes = [
  {
    path: '/',
    component: () => import('@/views/Drag.vue')
  }
]
// 创建路由
const router = createRouter({
  history: createWebHistory(),
  routes
})
// 导出路由
export default router
通过以上代码即可实现图片中的效果

