别人的议论,那是别人的,你的人生,才是你的
—— 24.5.7
一、复合选择器
定义:由两个或多个基础选择器,通过不同的方式组合而成
作用:更准确、更高效的选择目标元素(标签)
1.后代选择器
后代选择器:选中某元素的后代元素
选择器写法:父选择器、子选择器(CSS属性),父子选择器之间用空格隔开
后代选择器包含后代的所有,包含儿子、孙子、重孙子
示例:
<!DOCTYPE html>
<html lang="zh-CN">
<head>
    <meta charset="UTF-8">
    <meta name="viewport" content="width=device-width, initial-scale=1.0">
    <title>后代选择器</title>
    <style>
        /* div 里面的 span 文字颜色是红色 */
        div span {
            color:aquamarine;
        }
    </style>
</head>
<body>
    <span>span 标签</span>
    <div>
        <span>
            这个是div的儿子span
        </span>
        <p>
            <span>
                这个是div的孙子span
            </span>
        </p>
    </div>
</body>
</html>
2.子代选择器
子代选择器:选中某元素的子代元素(最近的子级)
选择器写法:父选择器 > 子选择器{CSS 属性},父子选择器之间用 > 隔开
示例:
<!DOCTYPE html>
<html lang="zh-CN">
<head>
    <meta charset="UTF-8">
    <meta name="viewport" content="width=device-width, initial-scale=1.0">
    <title>子代选择器</title>
    <style>
        /* div 的儿子 span 文字颜色是红色 */
        div > span {
            color: red;
        }
    </style>
</head>
<body>
    <div>
        <span>儿子 span</span>
        <p>
            <span>孙子 span</span>
        </p>
    </div>
</body>
</html>
3.并集选择器
并集选择器:选中多组标签设置相同的样式,
选择器写法:选择器1,选择器2,…, 选择器N {CSS 属性},选择器之间用,隔开。
示例:
<!DOCTYPE html>
<html lang="zh-CN">
<head>
    <meta charset="UTF-8">
    <meta name="viewport" content="width=device-width, initial-scale=1.0">
    <title>并集选择器</title>
    <style>
        /* div p span 颜色是红色 */
        div,p,span {
            color:red;
        }
    </style>
</head>
<body>
    <div>
        div 标签
    </div>
    <p>
        p 标签
    </p>
    <span>
        span 标签
    </span>
</body>
</html>
4.交集选择器(了解)
交集选择器:选中同时满足多个条件的元素。
选择器写法:选择器1选择器2{CSS 属性},选择器之间连写,没有任何符号
示例:
<!DOCTYPE html>
<html lang="zh-CN">
<head>
    <meta charset="UTF-8">
    <meta name="viewport" content="width=device-width, initial-scale=1.0">
    <title>交集选择器</title>
    <style>
        /* 类选择器的名字就是点加类名 .是类选择器自带的 */
        p.box{
            color: red;
        }
    </style>
</head>
<body>
    <p class="box">
        p 标签,使用了类选择器 box
    </p>
    <p>p 标签</p>
    <div class="box">div 标签,使用了类选择器 box</div>
</body>
</html>
5.伪类选择器
伪类选择器:伪类表示元素状态,选中元素的某个状态设置样式
鼠标悬停状态:选择器:hover{CSS 属性}
示例:
<!DOCTYPE html>
<html lang="zh-CN">
<head>
    <meta charset="UTF-8">
    <meta name="viewport" content="width=device-width, initial-scale=1.0">
    <title>伪类选择器</title>
    <style>
        a:hover {
            color: brown;
        }
    /* 任何标签都可以设置鼠标悬停的状态 */
        .box:hover {
            color: greenyellow;
        }

        p:hover {
            color: aqua;
        }
    </style>
</head>
<body>
    <a href="#">a 标签,超链接</a>
    <div class="box">div标签</div>
    <p>
        一切都会好的
    </p>
</body>
</html>
伪类 — 超链接
超链接一共有四个状态
选择器 作用
:link 访问前
:visited 访问后
:hover 鼠标悬停
:active 点击时(激活)提示:如果要给超链接设置以上四个状态,需要按 LVHA 的顺序书写。
示例:
<!DOCTYPE html>
<html lang="zh-CN">
<head>
    <meta charset="UTF-8">
    <meta name="viewport" content="width=device-width, initial-scale=1.0">
    <title>超链接标签</title>
    <style>
        /*
        a:link {
            color:red;
        }

        a:visited{
            color: green;
        }

        a:hover{
            color:blue;
        }

        a:active{
            color:cadetblue;
        }
        */
        /* 工作中,一个 a 标签选择器设置超链接的样式,hover状态特殊位置 */
        a{
            color:red;
        }

        a:hover{
            color:green;
        }
    </style>
</head>
<body>
    <a href="#">a 标签,测试伪类</a>
</body>
</html>
二、CSS 特性
CSS特性:
化简代码 / 定位问题,并解决问题
继承性
继承性:子级默认继承父级的文字控制属性
当标签有自己的属性,则会使用自己的属性,不需要继承
<!DOCTYPE html>
<html lang="zh-CN">
<head>
    <meta charset="UTF-8">
    <meta name="viewport" content="width=device-width, initial-scale=1.0">
    <title>CSS特性-继承性</title>
    <style>
        body{
            font-size: 30px;
            color: green;
            font-weight: 700;
        }
    </style>
</head>
<body>
    <div>div 标签</div>
    <p>p 标签</p>
    <span>span 标签</span>
    <!-- 如果标签自己有样式,则生效自己的,不继承,超链接默认是蓝的,所以不用继承 -->
    <a href="#">a 标签</a>
    <h1>
        h1 标签
    </h1>
</body>
</html>
层叠性
特点:
相同的属性会覆盖:后面的 CSS 属性覆盖前面的 CSS 属性
不同的属性会叠加:不同的 CSS 属性都生效
<!DOCTYPE html>
<html lang="zh-CN">
<head>
    <meta charset="UTF-8">
    <meta name="viewport" content="width=device-width, initial-scale=1.0">
    <title>CSS特性-层叠性</title>
    <style>
        /* 覆盖 叠加 */
        div{
            color: red;
            font-weight: 700;
        }

        /* 想要生效的相同属性放在后面 */
        div{
            color:green;
            font-size: 30px;
        }
    </style>
</head>
<body>
    <div>
        div标签
    </div>
</body>
</html>
优先级优先级:
也叫权重,当一个标签使用了多种选择器时,基于不同种类的选择器的匹配规则。
规则:
选择器优先级高的样式生效
公式:
通配符选择器 < 标签选择器 < 类选择器 < id选择器 < 行内样式 < !important>选择器选中标签的范围越大,优先级/权重越低
(选中标签的范围越大,优先级/权重越低)
!important 是一个提权功能,提高权重/优先级到 最高,慎用
<!DOCTYPE html>
<html lang="zh-CN">
<head>
    <meta charset="UTF-8">
    <meta name="viewport" content="width=device-width, initial-scale=1.0">
    <title>特性-优先级</title>
    <style>
        *{
            /* !important 是一个提权功能,提高权重/优先级到 最高,慎用 */
            color:aquamarine !important;
        }

        div{
            color:red;
        }

        .box{
            color: blue;
        }

        #test{
            color:orange;
        }

    </style>
</head>
<body>
    <div class="box" id="test" style="color:purple">div 标签</div>
</body>
</html>
优先级-叠加计算规则
叠加计算
叠加计算:如果是复合选择器,则需要权重叠加计算。公式:(每一级之间不存在进位)
(行内样式,id选择器个数,类选择器个数,标签选择器个数)规则:
① 从左向右依次比较选个数,同一级个数多的优先级高,如果个数相同,则向后比较
② !important 权重最高
③ 继承权重最低题1
<!DOCTYPE html>
<html lang="zh-CN">
<head>
    <meta charset="UTF-8">
    <meta name="viewport" content="width=device-width, initial-scale=1.0">
    <title>权重叠加1</title>
    <style>
        /* 行内样式为0 id选择器为0 类选择器为2 标签选择器为1*/
        .c1 .c2 div{
            color: blue;
        }

        /* 行内样式为0 id选择器为1 类选择器为0 标签选择器为1*/
        div #box3{
            color: green;
        }

        /* 行内样式为0 id选择器为1 类选择器为1 标签选择器为0*/
        /* 最终生效第三个 所以浏览器颜色是橙色 */
        #box1 .c3{
            color:orange;
        }
    </style>
</head>
<body>
    <div id="box1" class="c1">
        <div id="box2" class="c2">
            <div id="box3" class="c3">
                这行文本是什么颜色的?
            </div>
        </div>
    </div>
</body>
</html>
题2
<!DOCTYPE html>
<html lang="zh-CN">
<head>
    <meta charset="UTF-8">
    <meta name="viewport" content="width=device-width, initial-scale=1.0">
    <title>权重叠加2</title>
    <style>
        div p{
            color:red;
        }

        .father{
            color: blue;
        }
    </style>
</head>
<body>
    <div class="father">
        <p class="son">
            文字
        </p>
    </div>
</body>
</html>
题3
<!DOCTYPE html>
<html lang="zh-CN">
<head>
    <meta charset="UTF-8">
    <meta name="viewport" content="width=device-width, initial-scale=1.0">
    <title>权重叠加3</title>
    <style>
        /* 行内样式为0 id选择器为2 类选择器为0 标签选择器为0*/
        #father #son{
            color: blue;
        }

        /* 行内样式为0 id选择器为1 类选择器为1 标签选择器为1*/
        #father p.c2{
            color: black;
        }

        /* 行内样式为0 id选择器为0 类选择器为2 标签选择器为2*/
        div.c1 p.c2{
            color:red;
        }

        /* father是继承 所以即使有!important也排除 */
        #father{
            color:green !important;
        }

        div#father.c1{
            color:yellow;
        }
    </style>
</head>
<body>
    <div id="father" class="c1">
        <p id="son" class="c2">
            这行文本是什么颜色?
        </p>
    </div>
</body>
</html>
三、Emmet 写法
Emmet 写法
Emmet写法:代码的简写方式,输入缩写 VS Code 会自动生成对应的代码
HTML:
如下表所示
CSS:
大多数简写方式为属性单词的首字母
四、背景属性
1.背景属性-拆分写法
背景图 background-image
网页中,使用背景图实现装饰性的图片效果
属性名:
background-image(bgi)
属性值:
url(背景图 URL)
div {
    width: 400px;
    height:400px;
    background-image:url(./images/1.png);
}
示例:
<!DOCTYPE html>
<html lang="zh-CN">
<head>
    <meta charset="UTF-8">
    <meta name="viewport" content="width=device-width, initial-scale=1.0">
    <title>背景图</title>
    <style>
        /* 盒子是 400 * 400 */
        div {
            width: 400px;
            height: 400px;
            /* 背景图默认是平铺效果 盒子太大会默认复制 */
            background-image: url(./images/小猫.png);
        }
    </style>
</head>
<body>
    <div>div标签</div>
</body>
</html>
背景图平铺方式 background-repeat
属性名:
background-repeat ( bgr)
属性值 效果
no-repeat 不平铺
repeat 平铺(默认效果)
repeat-x 水平方向平铺
repeat-y 垂直方向平铺示例:
<!DOCTYPE html>
<html lang="zh-CN">
<head>
    <meta charset="UTF-8">
    <meta name="viewport" content="width=device-width, initial-scale=1.0">
    <title>背景图平铺方式</title>
    <style>
        div{
            width: 400px;
            height: 400px;
            background-color:  pink;
            background-image: url(./images/小猫.png);
            /* 不平铺:盒子的左上角显示一张背景图 */
            background-repeat: no-repeat;
        }
    </style>
</head>
<body>
    <div>
        div标签
    </div>
</body>
</html>
背景图位置
属性名:
background-position(bgp)
属性值:
水平方向位置 垂直方向位置
关键字
关键字 位置
left 左侧
right 右侧
centei 居中
top 顶部
bottom 底部
坐标(数字+px,正负都可以)水平:正数向右;负数向左
垂直:正数向下;负数向上div { width: 400px; height:400px; background-color: pink; background-image:url(./images/1.png) background-repeat:no-repeat; background-position:center bottom; background-position:50px -100px; background-position:50px center; }示例:
<!DOCTYPE html>
<html lang="zh-CN">
<head>
    <meta charset="UTF-8">
    <meta name="viewport" content="width=device-width, initial-scale=1.0">
    <title>背景图位置</title>
    <style>
        div{
            width: 400px;
            height: 400px;
            background-color: pink;
            background-image: url(./images/小猫.png);
            background-repeat: no-repeat;

            /* 调整背景图位置 left左边 right右边 bottom底部 top首部*/
            background-position: right bottom;
            /* 也可以 符号 像素 0  */
            /* background-position: 50px 0;
            background-position: 100px 0;
            background-position: -100px 0;
            background-position: 0 100px;
            background-position: 0 -100px;
            background-position: 0 -50px; */
        }
    </style>
</head>
<body>
    <div>div 标签</div>
</body>
</html>
提示:
关键字取值方式写法,可以颠倒取值顺序
可以只写一个关键字,另一个方向默认为居中;数字只写一个值表示水平方向,垂直方向为居中示例:
<!DOCTYPE html>
<html lang="zh-CN">
<head>
    <meta charset="UTF-8">
    <meta name="viewport" content="width=device-width, initial-scale=1.0">
    <title>背景图位置</title>
    <style>
        div{
            width: 400px;
            height: 400px;
            background-color: pink;
            background-image: url(./images/小猫.png);
            background-repeat: no-repeat;
            /* 只写一个数字表示水平方向,垂直方向不写表示居中 */
            background-position: 30px;
        }
    </style>
</head>
<body>
    <div>div 标签</div>
</body>
</html>
背景图缩放
作用:
设置背景图大小
属性名:
background-size(bgz)
常用属性值:
关键字
cover:等比例缩放背景图片以完全覆盖背景区,可能背景图片部分看不见contain:等比例缩放背景图片以完全装入背景区,可能背景区部分空白
百分比:根据盒子尺寸计算图片大小
数字+单位(例如:px)示例:
<!DOCTYPE html>
<html lang="zh-CN">
<head>
    <meta charset="UTF-8">
    <meta name="viewport" content="width=device-width, initial-scale=1.0">
    <title>背景图缩放</title>
    <style>
        div {
            width: 700px;
            height: 600px;
            background-color: pink;

            background-image: url(./images/小猫.png);
            background-repeat: no-repeat;

            /* contain等比例缩放,如果图的宽高跟盒子尺寸相等停止缩放,可能导致盒子有留白 */
            /* background-size: contain; */

            /* cover完全覆盖盒子,可能导致图片显示不全 */
            /* background-size: cover; */

            /* 取百分比的写法,可能导致图片显示不全,100%表示图片的宽度和盒子宽度一样,高度按照图片比例等比例缩放 */
            background-size: 85%;
        }
    </style>
</head>
<body>
    <div>
        div 标签
    </div>
</body>
</html>
背景图固定
作用:
背景不会随着元素的内容滚动。
属性名:
background-attachment(bga)
属性值:
fixed
body {
    background-image:url(./images/bg.jpg);
    background-repeat:no-repeat;
    background-attachment:fixed;
}
示例:
<!DOCTYPE html>
<html lang="zh-CN">
<head>
    <meta charset="UTF-8">
    <meta name="viewport" content="width=device-width, initial-scale=1.0">
    <title>背景图固定</title>
    <style>
        body{
            background-image: url(./images/我始终相信.jpg);
            background-repeat: no-repeat;
            background-position: center top;

            background-attachment: fixed;
        }
    </style>
</head>
<body>
    <p>测试文字,撑开body,让浏览器有滚动条</p>
    <p>测试文字,撑开body,让浏览器有滚动条</p>
    <p>测试文字,撑开body,让浏览器有滚动条</p>
    <p>测试文字,撑开body,让浏览器有滚动条</p>
    <p>测试文字,撑开body,让浏览器有滚动条</p>
    <p>测试文字,撑开body,让浏览器有滚动条</p>
    <p>测试文字,撑开body,让浏览器有滚动条</p>
    <p>测试文字,撑开body,让浏览器有滚动条</p>
    <p>测试文字,撑开body,让浏览器有滚动条</p>
    <p>测试文字,撑开body,让浏览器有滚动条</p>
    <p>测试文字,撑开body,让浏览器有滚动条</p>
    <p>测试文字,撑开body,让浏览器有滚动条</p>
    <p>测试文字,撑开body,让浏览器有滚动条</p>
    <p>测试文字,撑开body,让浏览器有滚动条</p>
    <p>测试文字,撑开body,让浏览器有滚动条</p>
    <p>测试文字,撑开body,让浏览器有滚动条</p>
    <p>测试文字,撑开body,让浏览器有滚动条</p>
    <p>测试文字,撑开body,让浏览器有滚动条</p>
    <p>测试文字,撑开body,让浏览器有滚动条</p>
    <p>测试文字,撑开body,让浏览器有滚动条</p>
    <p>测试文字,撑开body,让浏览器有滚动条</p>
    <p>测试文字,撑开body,让浏览器有滚动条</p>
    <p>测试文字,撑开body,让浏览器有滚动条</p>
    <p>测试文字,撑开body,让浏览器有滚动条</p>
    <p>测试文字,撑开body,让浏览器有滚动条</p>
    <p>测试文字,撑开body,让浏览器有滚动条</p>
    <p>测试文字,撑开body,让浏览器有滚动条</p>
    <p>测试文字,撑开body,让浏览器有滚动条</p>
    <p>测试文字,撑开body,让浏览器有滚动条</p>
    <p>测试文字,撑开body,让浏览器有滚动条</p>
    <p>测试文字,撑开body,让浏览器有滚动条</p>
    <p>测试文字,撑开body,让浏览器有滚动条</p>
    <p>测试文字,撑开body,让浏览器有滚动条</p>
    <p>测试文字,撑开body,让浏览器有滚动条</p>
    <p>测试文字,撑开body,让浏览器有滚动条</p>
    <p>测试文字,撑开body,让浏览器有滚动条</p>
    <p>测试文字,撑开body,让浏览器有滚动条</p>
    <p>测试文字,撑开body,让浏览器有滚动条</p>
    <p>测试文字,撑开body,让浏览器有滚动条</p>
    <p>测试文字,撑开body,让浏览器有滚动条</p>
    <p>测试文字,撑开body,让浏览器有滚动条</p>
    <p>测试文字,撑开body,让浏览器有滚动条</p>
    <p>测试文字,撑开body,让浏览器有滚动条</p>
</body>
</html>
2.背景属性-复合属性
背景复合属性
属性名:
background(bg)
属性值:
背景色 背景图 背景图平铺方式 背景图位置/背景图缩放 背景图固定 (空格隔开各个属性值,不区分顺序)
div {
    width: 400px;
    height:400px;
    background: pink url(./images/1.png) no-repeat right center/cover;
}
示例:
<!DOCTYPE html>
<html lang="zh-CN">
<head>
    <meta charset="UTF-8">
    <meta name="viewport" content="width=device-width, initial-scale=1.0">
    <title>background属性</title>
    <style>
        div {
            width: 600px;
            height: 600px;

            /* background: pink url(./images/我始终相信.jpg)no-repeat center bottom/cover; */
            background: pink url(./images/我始终相信.jpg)no-repeat center bottom/contain;
        }
    </style>
</head>
<body>
    <div>div 标签</div>
</body>
</html>
3.显示模式
显示模式:标签(元素)的显示方式。
作用:
布局网页的时候,根据标签的显示模式选择合适的标签摆放内容
块级元素
独占一行
宽度默认是父级的100%
添加宽高属性生效
行内元素
一行可以显示多个
宽高尺寸由内容撑开
设置宽高属性不生效行内块元素
一行可以显示多个
宽高尺寸也可以由内容撑开设置宽高属性生效
<!DOCTYPE html>
<html lang="zh-CN">
<head>
    <meta charset="UTF-8">
    <meta name="viewport" content="width=device-width, initial-scale=1.0">
    <title>显示模式</title>
    <style>
        /* 块级别元素:独占一行 块元素宽度默认是父级的100% 添加宽高属性生效 */
        div {
            width: 100px;
            height: 100px;
        }

        .div1{
            background-color: brown;
        }

        .div2{
            background-color: orange;
        }

        span{
            width: 200px;
            height: 200px;
        }

        .span1{
            background-color: brown;
        }

        .span2{
            background-color: orange;
        }

        /* 图片的宽高会生效 */
        img{
            width: 100px;
            height: 100px;
        }
    </style>
</head>
<body>
    <!-- 块级别元素:独占一行 块元素宽度默认是父级的100% 添加宽高属性生效-->
    <div class="div1">div1 标签1</div>
    <div class="div2">div2 标签2</div>

    <!-- 行内元素:一行可以共存多个:尺寸由内容撑开,价款高不生效 -->
    <span class="span1">span111111111</span>
    <span class="span2">span1</span>

    <!-- 行内块元素:一行共存多个,默认尺寸由内容撑开,加宽高生效 -->
    <img src="./images/我始终相信.jpg" alt="">
    <img src="./images/我始终相信.jpg" alt="">

</body>
</html>
总结
1.“独占一行;宽高属性生效;默认宽度是父级的100%”是什么显示模式的特点?
块级
2.“一行共存多个;宽高属性不生效;宽高由内容撑开”是什么显示模式的特点?
行内3.“一行共存多个;宽高属性生效;宽高默认由内容撑开”是什么显示模式特点
行内块
转换显示模式
属性名:
display
属性值:
属性值 效果
block 块级
inline-block 行内块
inline 行内块级和行内块是工作中常用的属性,行内属性基本不用
示例:
<!DOCTYPE html>
<html lang="zh-CN">
<head>
    <meta charset="UTF-8">
    <meta name="viewport" content="width=device-width, initial-scale=1.0">
    <title>显示模式转换</title>
    <style>
        /* 块级别元素:独占一行 块元素宽度默认是父级的100% 添加宽高属性生效 */
        div {
            width: 100px;
            height: 100px;

            /* 转换为行内块显示模式 */
            display: inline-block;

            /* 转换为行内显示模式 */
            display: inline;
        }

        .div1{
            background-color: brown;
        }

        .div2{
            background-color: orange;
        }

        span{
            width: 200px;
            height: 200px;

            /* 把默认的行内模式转换为块模式 */
            display: block;
            /* 转换为行内块模式 */
            display: inline-block;
        }

        .span1{
            background-color: brown;
        }

        .span2{
            background-color: orange;
        }

        /* 图片的宽高会生效 */
        img{
            width: 100px;
            height: 100px;
            /* 将行内块元素转换为块级别元素 */
            display: block;
        }
    </style>
</head>
<body>
    <!-- 块级别元素:独占一行 块元素宽度默认是父级的100% 添加宽高属性生效-->
    <div class="div1">div1 标签1</div>
    <div class="div2">div2 标签2</div>

    <!-- 行内元素:一行可以共存多个:尺寸由内容撑开,价款高不生效 -->
    <span class="span1">span111111111</span>
    <span class="span2">span1</span>

    <!-- 行内块元素:一行共存多个,默认尺寸由内容撑开,加宽高生效 -->
    <img src="./images/我始终相信.jpg" alt="">
    <img src="./images/我始终相信.jpg" alt="">

</body>
</html>
五、综合案例
综合案例一-热词
<!DOCTYPE html>
<html lang="zh-CN">
<head>
    <meta charset="UTF-8">
    <meta name="viewport" content="width=device-width, initial-scale=1.0">
    <title>综合案例一、热词</title>
    <style>
        /* a的默认效果 */
        a{
            /* 显示模式的转换效果 */
            display: block;
            /* 字体宽度 */
            width: 200px;
            /* 字体高度 */
            height: 80px;
            /* 背景颜色 */
            background-color: #3064bb;
            /* 字体颜色 */
            color:#fff;
            /* 取消下划线 */
            text-decoration: none;
            /* 标题居中 */
            text-align: center;
            /* 字体水平居中 */
            line-height: 80px;
            /* 字体大小 */
            font-size: 18px;
        }
        /* 鼠标悬停效果 */
        a:hover{
            /* 背景颜色 */
            background-color: #608dd9;
        }
    </style>
</head>
<body>
    <a href="#">HTML</a>
    <a href="#">CSS</a>
    <a href="#">JavaScript</a>
    <a href="#">Vue</a>
    <a href="#">React</a>
</body>
</html>
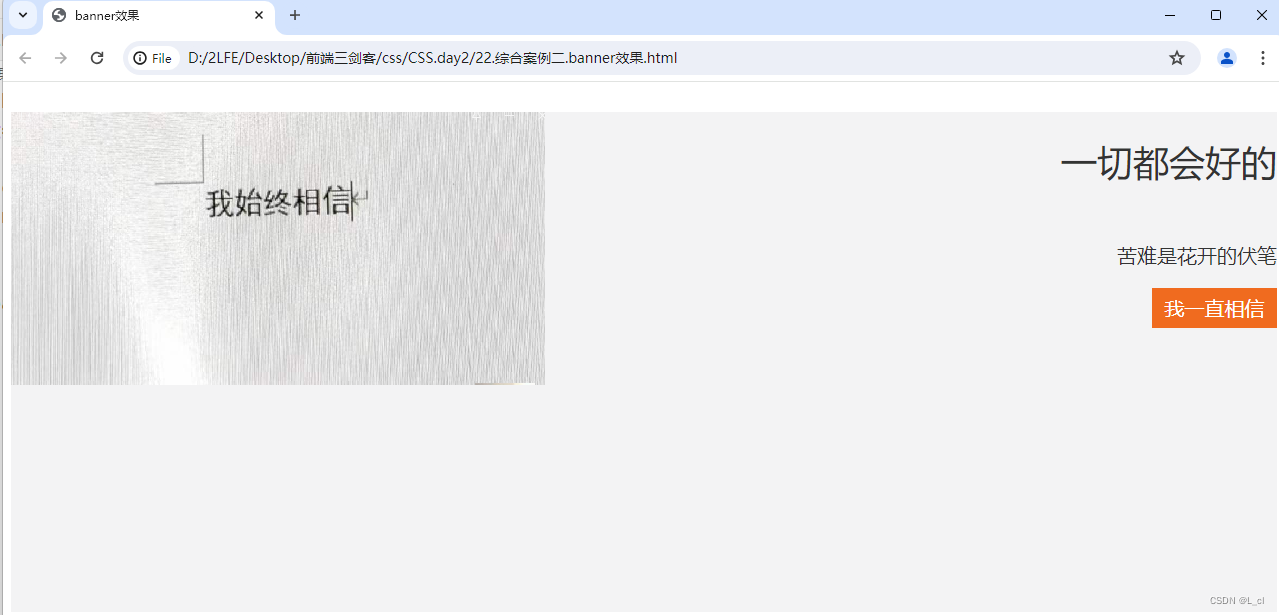
综合案例二-banner效果
<!DOCTYPE html>
<html lang="zh-CN">
<head>
    <meta charset="UTF-8">
    <meta name="viewport" content="width=device-width, initial-scale=1.0">
    <title>banner效果</title>
    <style>
        .banner{
            /* 字体高度 */
            height: 500px;
            /* 背景颜色 */
            background-color: #f3f3f4;
            /* 背景图 */
            background-image: url(./images/我始终相信.jpg);
            /* 取消平铺效果 */
            background-repeat: no-repeat;
            /* 将图像放在左下角 */
            border-spacing: left bottom;
            /* 将字体放在右边 可以继承给子集*/
            text-align: right;
            color: #333333;
        }

        .banner h2 {
            font-size: 36px;
            font-weight: 400;
            line-height: 100px;
        }

        .banner p {
            font-size: 20px;
        }

        .banner a {
            width: 125px;
            height: 40px;
            /* 背景颜色 */
            background-color: #f06b1f;
            /* 行内块模式 */
            display: inline-block;
            /* 块级无法右对齐 因为块级元素占一行 */
            /* 超链接文字位置 */
            text-align: center;
            /* 超链接文字高度 */
            line-height: 40px;
            /* 超链接文字颜色 */
            color:#fff;
            /* 超链接不要下划线 */
            text-decoration: none;
            /* 字体颜色 */
            font-size: 20px;
        }
    </style>
</head>
<body>
    <div class="banner">
        <h2>一切都会好的 </h2>
        <p>苦难是花开的伏笔</p>
        <a href="#">我一直相信</a>
    </div>
</body>
</html>


