Bootloader应用分析
一个嵌入式 Linux 系统从软件的角度看通常可以分为四个层次:
引导加载程序。包括固化在固件( firmware )中的 boot 代码(可选),和 Boot Loader 两大部分。
Linux 内核。特定于嵌入式板子的定制内核以及内核的启动参数。
文件系统。包括根文件系统 和 建立于 Flash 内存设备之上文件系统。通常用 ram disk 来作为 root fs。
用户应用程序。特定于用户的应用程序。有时在用户应用程序和内核层之间可能还会包括一个嵌入式图形用户界面。常用的嵌入式 GUI 有:MicroWindows 和 MiniGUI
而在嵌入式系统中,通常并没有像 BIOS 那样的固件程序(注,有的嵌入式 CPU 也会内嵌一段短小的启动程序),因此整个系统的加载启动任务就完全由 Boot Loader 来完成。比如在一个基于 ARM7TDMI core 的嵌入式系统中,系统在上电或复位时通常都从地址0x00000000 处开始执行,而在这个地址处安排的通常就是系统的 Boot Loader 程序。
Bootloader介绍
Bootloader中文解释为: 启动引导程序
Boot Loader 就是在操作系统内核运行之前运行的一段小程序。通过这段小程序,我们可以初始化硬件设备、建立内存空间的映射图,从而将系统的软硬件环境带到一个合适的状态,以便为最终调用操作系统内核准备好正确的环境。
通常,Boot Loader 是严重地依赖于硬件而实现的,特别是在嵌入式世界。因此,在嵌入式世界里建立一个通用的 Boot Loader 几乎是不可能的。尽管如此,我们仍然可以对Boot Loader 归纳出一些通用的概念来,以指导用户特定的 Boot Loader 设计与实现。
Boot Loader 所支持的 CPU 和嵌入式板
每种不同的 CPU 体系结构都有不同的 Boot Loader。有些 Boot Loader 也支持多种体系结构的 CPU,比如 U-Boot 就同时支持 ARM 体系结构和 MIPS 体系结构。 除了依赖于 CPU的体系结构外,Boot Loader 实际上也依赖于具体的嵌入式板级设备的配置。这也就是说,对于两块不同的嵌入式板而言,即使它们是基于同一种 CPU 而构建的,要想让运行在一块板子上的 Boot Loader 程序也能运行在另一块板子上,通常也都需要修改 Boot Loader 的源程序。
Boot Loader 的安装媒介(Installation Medium)
系统加电或复位后,所有的 CPU 通常都从某个由 CPU 制造商预先安排的地址上取指令。比如,基于 ARM7TDMI core 的 CPU 在复位时通常都从地址 0x00000000 取它的第一条指令。而基于 CPU 构建的嵌入式系统通常都有某种类型的固态存储设备(比如: ROM、 EEPROM或 FLASH 等)被映射到这个预先安排的地址上。因此在系统加电后,CPU 将首先执行 BootLoader 程序。
下图 1 就是一个同时装有 Boot Loader、内核的启动参数、内核映像和根文件系统映像的固态存储设备的典型空间分配结构图。
固态存储设备的典型空间分配结构

用来控制 Boot Loader 的设备或机制
Boot Loader 的启动过程是单阶段(Single Stage)还是多阶段(Multi-Stage)
Boot Loader 的操作模式 (Operation Mode)
BootLoader 与主机之间进行文件传输所用的通信设备及协议
Bootloader的种类繁多, 归纳如下 :
针对不同CPU架构
-
针对
X86架构的有LILO、GRUB、ntldr -
针对
ARM架构的有vivi、armboot -
针对
PPC架构的有ppcboot -
可以支持多种架构的
u-boot
针对不同操作系统
-
专门用来启动
Linux系统的vivi -
专门用来启动
WinCE系统的eboot -
基于
eCos系统的引导程序redboot -
可以启动多种操作系统的
u-boot
常用Bootloader做简单对比 :
| Bootloader | Monitor | 描述 | X86 | ARM |
|---|---|---|---|---|
| LILO | 否 | Linux磁盘引导程序 | 是 | 否 |
| GRUB | 否 | GNU的LILO替代程序 | 是 | 否 |
| ntldr | 否 | x86上引导windowsNT系列 | 是 | 否 |
| armboot | 是 | 专门为arm架构设计的boot | 否 | 是 |
| ppcboot | 是 | 引导ppc架构操作系统 | 否 | 是 |
| vivi | 是 | 韩国Mizi公司针对三星ARM架构CPU设计引导程序 | 否 | 是 |
| redboot | 是 | 基于eCos的引导程序 | 是 | 是 |
| u-boot | 是 | 通用引导程序,支持多种CPU架构、 多种操作系统 | 是 | 是 |
s5p6818启动过程
- 芯片选择启动
iROM设备 iROM选择启动下一阶段引导程序所在设备(p95)iROM启动UBOOT第一阶段BL1UBOOT第一阶段启动UBOOT第二阶段BL2UBOOT第二阶段启动内核
s5p6818支持多种启动方式, 但常见的BL0一般都来至固化在片内的Internal ROM , 以SD卡为例:
综上所述, 我们的user bootcode是从SD卡等外部设备上加载的, 这样iROM就会先找到能够启动的外部设备SD卡, 并从核心板上的EMMC上搬运user bootcode, 而搬运的这段代码就是我们常说的Bootloader。
ubootpak.bin主要就是一个包含了2ndboot和uboot.bin的完整Bootloader。
嵌入式Bootloader的启动过程可以分为以下两种:单阶段(Single-Stage)、 多阶段(Multi-Stage)
通常多阶段的Bootloader能够提供更复杂的功能, 及更好的可读性和移植性。
从外部存储设备上启动的Bootloader大多是两阶段的启动过程, 其功能如下:
s5p6818启动流程:
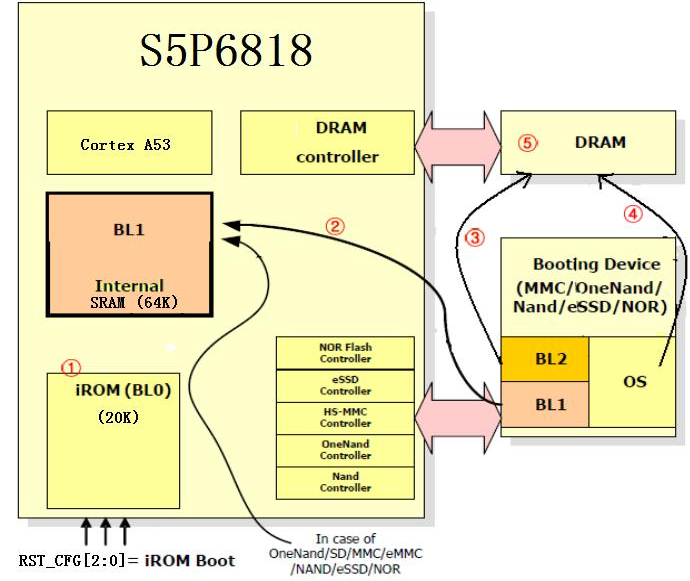
BL1 = 2ndboot + u-boot.bin( 0x7200 )
BL2 = u-boot.bin
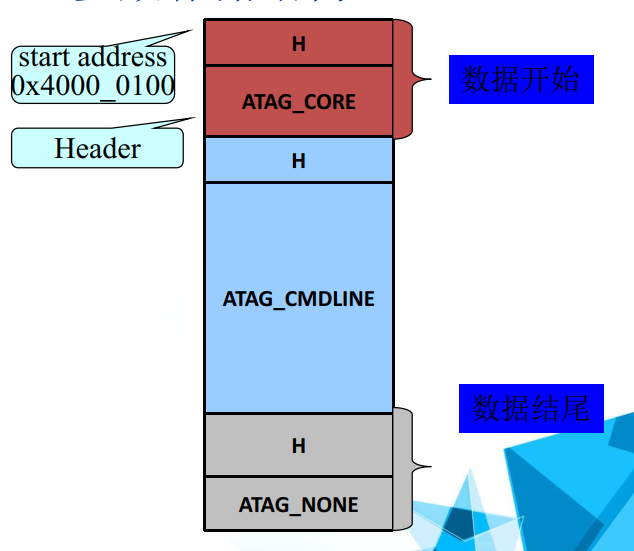
内核传参过程:
- 传递给内核的参数由多个结构体组成
- 各结构体放在一段连续的内存空间, 起始地址为
0x4000_0100(uboot中bi_boot_params成员记录) - 每一个结构体代表一条信息, 并首尾相连
- 内核引导起来以后, 将从指定内存按照同样的数据结构将数据取出
数据结构及存储结构 :
struct tag
{
    struct tag_header hdr;
    union
    {
        struct tag_core core;
        struct tag_mem32 mem;
        struct tag_videotext videotext;
        struct tag_ramdisk ramdisk;
        struct tag_initrd initrd;
        struct tag_serialnr serialnr;
        struct tag_revision revision;
        struct tag_videolfb videolfb;
        struct tag_cmdline cmdline;
        struct tag_acorn acorn;
        struct tag_memclk memclk;
    } u;
};
struct tag_header
{
    u32 size;
    u32 tag;
};
struct tag_mem32
{
    u32 size;
    u32 start;
    /*physical start address*/
};
u-boot介绍
简介:
u-boot最初是由PPCBoot发展而来的,目前已成为Armboot和PPCboot的替代品
特点:
- 主要支持操作系统:
Linux、NetBSD、VxWorks、QNX、RTEMS、ARTOS、LynxOS - 主要支持处理器架构:
PowerPC、MIPS、x86、ARM、NIOS、XScale
u-boot目前最新版本是:
http://git.denx.de/?p=u-boot.git;a=summary
目录结构介绍:

- api: 用于演示测试用的代码, 通常不参与工程编译
- arch: 体系结构相关, 按架构进行分类, 如当前架构
arch\arm\cpu\slsiap, 第一阶段启动代码start.S就在这里,官方源码会包含多种架构和cpu, 我们裁剪掉了(整个uboot的C语言起始函数board_init_r也在arch\arm\lib\board.c中) - board: 开发板相关, 根据厂商进行分类, 本平台裁剪成
board\s5p6818\x6818, 有的版本会包含初级初始化内容:lowlevel_init.S - common: 各种命令的实现, 通常一个命令就是一个C文件
- disk: 硬盘接口程序, disk驱动分区处理代码,嵌入式不常用
- doc: 开发使用文档, 主要介绍不同平台的配置编译方法
- drivers: 设备驱动, 如:网卡、 SD卡、 USB等
- examples: 一些独立运行的实例, 通常不参与工程编译
- fs: 所能支持的文件系统, 如
fat、ubifs等,用于访问带文件系统的存储设备 - include: 各种头文件和开发板配置文件, 如
include\configs\x6818.h - lib: 用于存放库和其他主要支持文件程序, 中断处理、 启动相关等
- net: 独立于网卡驱动的网络协议, 如用于下载传输的
TFTP协议, 网络文件系统中的NFS协议等 - post: 上电自检程序, 与旧的
PPC相关, 当前平台下未被编译到工程 - scripts: 用于生成指定的
config.mk配置文件, 以及一些检查工具 - tools: 工具软件, 如
mkimage用于制作内核镜像,mk6818用于生成6818专用uboot镜像, 还有支持GDB的调试工具等
prototype: 参与6818开发的三星协作厂商的一些code在这里
编译配置
u-boot的配置编译需要经过以下步骤:
在u-boot的根目录下执行:
make x6818_config //对应开发板配置
Makefile 会构建编译结构, 如: 架构、 cpu、 开发板、厂商、 芯片、 目录等, 为下一步真正编译链接做准备
修改include/configs/x6818.h配置文件
在根目录下执行: make
- 根据以上两步产生编译和连接所需文件的信息
- 最终make完成, 在根目录下将生成:
ubootpak.bin
u-boot.bin
u-boot.map
配置过程如下:
#169 Makefile
MKCONFIG	:= $(srctree)/mkconfig
export MKCONFIG
#468 Makefile
%_config:: outputmakefile
	@$(MKCONFIG) -A $(@:_config=)
Active arm slsiap s5p6818 s5p6818 x6818 x6818
$1 $2 $3 $4 $5 $6 $7
#mkconfig
if [ \( $# -eq 2 \) -a \( "$1" = "-A" \) ] ; then
	# Automatic mode
	line=`awk '($0 !~ /^#/ && $7 ~ /^'"$2"'$/) { print $1, $2, $3, $4, $5, $6, $7, $8 }' $srctree/boards.cfg`
	if [ -z "$line" ] ; then
		echo "make: *** No rule to make target \`$2_config'.  Stop." >&2
		exit 1
	fi

	set ${line}
	# add default board name if needed
	[ $# = 3 ] && set ${line} ${1}
fi
继续执行顶层目录mkconfig
创建新链接
#113 mkconfig
rm -f asm/arch

if [ "${soc}" ] ; then
	ln -s ${LNPREFIX}arch-${soc} asm/arch
elif [ "${cpu}" ] ; then
	ln -s ${LNPREFIX}arch-${cpu} asm/arch
fi

if [ -z "$KBUILD_SRC" ] ; then
	cd ${srctree}/include
fi
#
# Create include file for Make
# 125 mkconfig
( echo "ARCH   = ${arch}"
    if [ ! -z "$spl_cpu" ] ; then
	echo 'ifeq ($(CONFIG_SPL_BUILD),y)'
	echo "CPU    = ${spl_cpu}"
	echo "else"
	echo "CPU    = ${cpu}"
	echo "endif"
    else
	echo "CPU    = ${cpu}"
    fi
    echo "BOARD  = ${board}"

    [ "${vendor}" ] && echo "VENDOR = ${vendor}"
    [ "${soc}"    ] && echo "SOC    = ${soc}"
    exit 0 ) > config.mk
#476 Makefile
# load ARCH, BOARD, and CPU configuration
-include include/config.mk
include/config.mk :
#include/config.mk
ARCH   = arm
CPU    = slsiap
BOARD  = x6818
VENDOR = s5p6818
SOC    = s5p6818
#197 Makefile
# set default to nothing for native builds
ifeq ($(HOSTARCH),$(ARCH))
CROSS_COMPILE ?=
endif
CROSS_COMPILE ?= arm-linux-
环境变量的引用:
#27 config.mk
# Some architecture config.mk files need to know what CPUDIR is set to,
# so calculate CPUDIR before including ARCH/SOC/CPU config.mk files.
# Check if arch/$ARCH/cpu/$CPU exists, otherwise assume arch/$ARCH/cpu contains
# CPU-specific code.
CPUDIR=arch/$(ARCH)/cpu$(if $(CPU),/$(CPU),)

sinclude $(srctree)/arch/$(ARCH)/config.mk	# include architecture dependend rules
sinclude $(srctree)/$(CPUDIR)/config.mk		# include  CPU	specific rules

ifdef	SOC
sinclude $(srctree)/$(CPUDIR)/$(SOC)/config.mk	# include  SoC	specific rules
endif
ifneq ($(BOARD),)
ifdef	VENDOR
BOARDDIR = $(VENDOR)/$(BOARD)
else
BOARDDIR = $(BOARD)
endif
endif
ifdef	BOARD
sinclude $(srctree)/board/$(BOARDDIR)/config.mk	# include board specific rules
endif
添加平台头文件(x6818.h), 可以根据当前平台进行修改
#
# Create board specific header file
#151 mkconfig
if [ "$APPEND" = "yes" ]	# Append to existing config file
then
	echo >> config.h
else
	> config.h		# Create new config file
fi
echo "/* Automatically generated - do not edit */" >>config.h

for i in ${TARGETS} ; do
	i="`echo ${i} | sed '/=/ {s/=/	/;q; } ; { s/$/	1/; }'`"
	echo "#define CONFIG_${i}" >>config.h ;
done

echo "#define CONFIG_SYS_ARCH  \"${arch}\""  >> config.h
echo "#define CONFIG_SYS_CPU   \"${cpu}\""   >> config.h
echo "#define CONFIG_SYS_BOARD \"${board}\"" >> config.h

[ "${vendor}" ] && echo "#define CONFIG_SYS_VENDOR \"${vendor}\"" >> config.h

[ "${soc}"    ] && echo "#define CONFIG_SYS_SOC    \"${soc}\""    >> config.h

[ "${board}"  ] && echo "#define CONFIG_BOARDDIR board/$BOARDDIR" >> config.h
cat << EOF >> config.h
#include <config_cmd_defaults.h>
#include <config_defaults.h>
#include <configs/${CONFIG_NAME}.h>
#include <asm/config.h>
#include <config_fallbacks.h>
#include <config_uncmd_spl.h>
EOF

exit 0
//include\config.h
/* Automatically generated - do not edit */
#define CONFIG_SYS_ARCH  "arm"
#define CONFIG_SYS_CPU   "slsiap"
#define CONFIG_SYS_BOARD "x6818"
#define CONFIG_SYS_VENDOR "s5p6818"
#define CONFIG_SYS_SOC    "s5p6818"
#define CONFIG_BOARDDIR board/s5p6818/x6818
#include <config_cmd_defaults.h>
#include <config_defaults.h>
#include <configs/x6818.h>
#include <asm/config.h>
#include <config_fallbacks.h>
#include <config_uncmd_spl.h>
链接过程如下:
链接地址定义在include/autoconf.mk(编译时自动产生, 最初定义在include/configs/x6818.h中)
链接脚本定义在arch/arm/cpu/slsiap/uboot.lds
include/autoconf.mk被顶层Makefile包含并设置链接选项LDFLAGS_u-boot, 两者最终在编译u-boot时被包含
#744 Makefile
LDFLAGS_u-boot += $(LDFLAGS_FINAL)
ifneq ($(CONFIG_SYS_TEXT_BASE),)
LDFLAGS_u-boot += -Ttext $(CONFIG_SYS_TEXT_BASE)
endif
#983 Makefile
# Rule to link u-boot
# May be overridden by arch/$(ARCH)/config.mk
quiet_cmd_u-boot__ ?= LD      $@
      cmd_u-boot__ ?= $(LD) $(LDFLAGS) $(LDFLAGS_u-boot) -o $@ \
      -T u-boot.lds $(u-boot-init)                             \
      --start-group $(u-boot-main) --end-group                 \
      $(PLATFORM_LIBS) -Map u-boot.map

u-boot:	$(u-boot-init) $(u-boot-main) u-boot.lds
	$(call if_changed,u-boot__)
链接脚本由以下顶层Makefile中的语句选出
#503 Makfile
# If there is no specified link script, we look in a number of places for it
ifndef LDSCRIPT
	ifeq ($(wildcard $(LDSCRIPT)),)
		LDSCRIPT := $(srctree)/board/$(BOARDDIR)/u-boot.lds
	endif
	ifeq ($(wildcard $(LDSCRIPT)),)
		LDSCRIPT := $(srctree)/$(CPUDIR)/u-boot.lds
	endif
	ifeq ($(wildcard $(LDSCRIPT)),)
		LDSCRIPT := $(srctree)/arch/$(ARCH)/cpu/u-boot.lds
	endif
endif
LDSCRIPT将在顶层Makefile最终链接时发挥作用
#1131 Makefile
u-boot.lds: $(LDSCRIPT) prepare FORCE
	$(call if_changed_dep,cpp_lds)
# 989 Makefile
u-boot:	$(u-boot-init) $(u-boot-main) u-boot.lds
	$(call if_changed,u-boot__)
#	echo $(call if_changed,u-boot__)
ifeq ($(CONFIG_KALLSYMS),y)
	smap=`$(call SYSTEM_MAP,u-boot) | \
		awk '$$2 ~ /[tTwW]/ {printf $$1 $$3 "\\\\000"}'` ; \
	$(CC) $(c_flags) -DSYSTEM_MAP="\"$${smap}\"" \
		-c $(srctree)/common/system_map.c -o common/system_map.o
	$(call cmd,u-boot__) common/system_map.o
endif
链接过程部分强制打印

通过二进制工具去掉ELF格式信息, 得到下载可直接运行的二进制文件: u-boot.bin
u-boot.bin: u-boot FORCE
	$(call if_changed,objcopy)
	$(call DO_STATIC_RELA,$<,$@,$(CONFIG_SYS_TEXT_BASE))
	$(BOARD_SIZE_CHECK)
	./tools/mk6818 ubootpak.bin nsih.txt 2ndboot u-boot.bin
通过mk6818工具将u-boot.bin和2ndboot等必要文件一起组合成ubootpak.bin


s5p6818首先从iROM启动并搬运ubootpak.bin到iSRAM, 并执行ubootpak.bin中的2ndboot代码
2ndboot根据nsih.txt完成系统初始化, 跳转并执行u-boot.bin的BL1
BL1将u-boot.bin全部拷贝到外部DDR(0x43C0_0000)并跳转执行u-boot.bin的BL2。
具体地址可以参考tools/mk6818.c中的设置:
//282  tools/mk6818.c
int main()
{
    //....
	/* fix bootloader nsih */
	bi = (struct boot_info_t *)(&buffer[(BOOTLOADER_NSIH_POSITION - 1) * BLKSIZE]);
	bi->deviceaddr = 0x00008000;
	bi->loadsize = ((filelen + 512 + 512) >> 9) << 9;
	bi->loadaddr = 0x43C00000;
	bi->launchaddr = 0x43C00000;
    //....
}
控制命令
在启动过程中快速按下空格或回车键可进入下载模式, 否则会自动执行事先内置的一条命令引导启动系统。
进入下载模式:
输入help, 可显示所有支持的命令
详细可参见《 常用 U-boot命令详解.mht》
这里我们只介绍最常用的命令
u-boot的命令非常多, 且操作非常的灵活, 主要分为以下几类:
- 串口下载类指令
- 网络命令
- NAND FLASH操作类
- 环境变量类指令
- 系统引导指令
- 脚本运行指令
USB操作指令SD卡(MMC)指令FAT文件系统指令
环境变量设置命令
u-boot中采用环境变量来协调各命令工作时所需的参数及数据- 环境变量可以存储
Bootloader在运行过程中需要用到的可配置参数列表, 以及需要传递给内核的参数 - 用户可以通过
printenv、setenv、saveenv进行查看、设置、 保存这些参数
printenv 		#打印环境变量
setenv bootdelay 3 	#3秒内核启动等待
saveenv 		#保存环境变量
reset 			#软重新启动
u-boot提供的环境变量主要有:
bootdelay 	#执行自动启动的等候秒数
baudrate	#串口控制台的波特率
netmask		#以太网接口的掩码
ethaddr		#以太网卡的网卡物理地址
bootfile	#缺省的下载文件
bootargs	#传递给内核的启动参数
bootcmd		#自动启动时执行的命令
serverip	#服务器端的ip地址
ipaddr		#本地ip地址
下载命令
下载地址: 在系统更新时, 镜像被放在存储设备的什么位置
用户可以通过各种下载协议完成将系统镜像资源下载到磁盘指定位置的行为, 此举称之为更新
u-boot需要用户指定分区地址, 分区信息可以参考include/configs/x6818.h下载地址的定义:
#if defined(CONFIG_FASTBOOT) & defined(CONFIG_USB_GADGET)
#define CFG_FASTBOOT_TRANSFER_BUFFER        CONFIG_MEM_LOAD_ADDR
#define CFG_FASTBOOT_TRANSFER_BUFFER_SIZE	(CFG_MEM_PHY_SYSTEM_SIZE - CFG_FASTBOOT_TRANSFER_BUFFER)

#define	FASTBOOT_PARTS_DEFAULT		\
			"flash=mmc,2:ubootpak:2nd:0x200,0x78000;" \
			"flash=mmc,2:2ndboot:2nd:0x200,0x4000;"	\
			"flash=mmc,2:bootloader:boot:0x8000,0x70000;"	\
			"flash=mmc,2:boot:ext4:0x00100000,0x04000000;"		\
			"flash=mmc,2:system:ext4:0x04100000,0x2F200000;"	\
			"flash=mmc,2:cache:ext4:0x33300000,0x1AC00000;"		\
			"flash=mmc,2:misc:emmc:0x4E000000,0x00800000;"		\
			"flash=mmc,2:recovery:emmc:0x4E900000,0x01600000;"	\
			"flash=mmc,2:userdata:ext4:0x50000000,0x0c800000;"	\
			"flash=mmc,2:gtkfs:ext4:0x5c900000,0x1f400000;"	\
			"flash=mmc,2:reserve:ext4:0x7be00000,0x0;"
#endif
为了保证Bootloader将控制权交给内核以后, 内核能成功加载应用程序, 在Linux内核驱动中也有一张分区表, 但这张分区表是从MMC设备的前512字节中读取并且解读出来的, 我们平时对存储设备进行分区的时候也是主要对这一部分进行操作。
有的bootloader会规定固定的镜像下载地址, 这样的话如果存储设备分区发生变化, 可能会导致内核读取到的分区与实际镜像所在分区的首不相符, 导致启动失败。
还有一些固定分区bootloader会在下载镜像的同时更新分区, 将存储器分区设置为自己规定的分区内容
Loady/loadb命令通过y-modem、 kermit协议将文件通过串口下载到内存中
loady 0x48000000
loadb 0x48000000
使用USB命令下载( fastboot.exe, 需安装开发板驱动)
fastboot
使用网络命令下载( 使用网线连接电脑或接入同一局域网) 先下载到内存再写到mmc, 下载时需要借助一个PC端TFTP工具(TFTP+DHCP_Server/tftpd32.exe)
ping 10.220.5.x(电脑主机)
系统启动方式
方式一:
boot
方式二:
ext4load mmc 2:1 0x48000000 uImage
bootm 0x48000000
方式三:
fastboot flash app uImage	#PC端命令
bootm 0x48000000		#开发板u-boot命令行命令
命令实现
u-boot的每一个命令都是通过U_BOOT_CMD宏定义来实现的, 这个宏在include/command.h头文件中定义
#define U_BOOT_CMD_MKENT_COMPLETE(_name, _maxargs, _rep, _cmd,		\
				_usage, _help, _comp)			\
		{ #_name, _maxargs, _rep, _cmd, _usage,			\
			_CMD_HELP(_help) _CMD_COMPLETE(_comp) }

#define U_BOOT_CMD_MKENT(_name, _maxargs, _rep, _cmd, _usage, _help)	\
	U_BOOT_CMD_MKENT_COMPLETE(_name, _maxargs, _rep, _cmd,		\
					_usage, _help, NULL)

#define U_BOOT_CMD_COMPLETE(_name, _maxargs, _rep, _cmd, _usage, _help, _comp) \
	ll_entry_declare(cmd_tbl_t, _name, cmd) =			\
		U_BOOT_CMD_MKENT_COMPLETE(_name, _maxargs, _rep, _cmd,	\
						_usage, _help, _comp);

#define U_BOOT_CMD(_name, _maxargs, _rep, _cmd, _usage, _help)		\
	U_BOOT_CMD_COMPLETE(_name, _maxargs, _rep, _cmd, _usage, _help, NULL)
每一个命令定义了一个cmd_tbl_t结构体, 结构体包含的成员变量有:
命令名称、 最大参数个数、 重复次数、 命令执行函数、 用法、 帮助。
结构体包含命令的所有属性 :
/*
 * Monitor Command Table
 */

struct cmd_tbl_s {
	char		*name;		/* Command Name			*/
	int		maxargs;	/* maximum number of arguments	*/
	int		repeatable;	/* autorepeat allowed?		*/
					/* Implementation function	*/
	int		(*cmd)(struct cmd_tbl_s *, int, int, char * const []);
	char		*usage;		/* Usage message	(short)	*/
#ifdef	CONFIG_SYS_LONGHELP
	char		*help;		/* Help  message	(long)	*/
#endif
#ifdef CONFIG_AUTO_COMPLETE
	/* do auto completion on the arguments */
	int		(*complete)(int argc, char * const argv[], char last_char, int maxv, char *cmdv[]);
#endif
};
所有命令都通过U_BOOT_CMD宏进行命令结构体的定义和初始化
为了便于管理命令数据结构, 命令结构体被统一链接到一个数据段中:
/**
 * ll_entry_declare() - Declare linker-generated array entry
 * @_type:	Data type of the entry
 * @_name:	Name of the entry
 * @_list:	name of the list. Should contain only characters allowed
 *		in a C variable name!
 *
 * This macro declares a variable that is placed into a linker-generated
 * array. This is a basic building block for more advanced use of linker-
 * generated arrays. The user is expected to build their own macro wrapper
 * around this one.
 *
 * A variable declared using this macro must be compile-time initialized.
 *
 * Special precaution must be made when using this macro:
 *
 * 1) The _type must not contain the "static" keyword, otherwise the
 *    entry is generated and can be iterated but is listed in the map
 *    file and cannot be retrieved by name.
 *
 * 2) In case a section is declared that contains some array elements AND
 *    a subsection of this section is declared and contains some elements,
 *    it is imperative that the elements are of the same type.
 *
 * 4) In case an outer section is declared that contains some array elements
 *    AND an inner subsection of this section is declared and contains some
 *    elements, then when traversing the outer section, even the elements of
 *    the inner sections are present in the array.
 *
 * Example:
 * ll_entry_declare(struct my_sub_cmd, my_sub_cmd, cmd_sub, cmd.sub) = {
 *         .x = 3,
 *         .y = 4,
 * };
 */
/* include/linker_lists.h */
#define ll_entry_declare(_type, _name, _list)				\
	_type _u_boot_list_2_##_list##_2_##_name __aligned(4)		\
			__attribute__((unused,				\
			section(".u_boot_list_2_"#_list"_2_"#_name)))
从控制台输入的命令都被送到common/command.c中的find_cmd()函数解释执行, 根据匹配输入的命令,从列表中找出对应的命令结构体, 并调用其回调处理函数完成命令处理
命令响应的过程, 就是命令的查找与回调函数处理的过程如下:
board_init_r() -> main_loop()没有键按下时直接启动内核:
autoboot_command() -> run_command_list()->
parse_string_outer() -> setup_string_in_str()->
parse_stream_outer() -> parse_stream()->
run_list() -> run_list_real() ->
run_pipe_real() -> cmd_process()->
find_cmd()
board_init_r() -> main_loop()有键按下时从命令行接收命令并处理:
cli_loop() -> parse_file_outer()->
setup_file_in_str() -> parse_stream_outer()->
parse_stream() -> run_list() ->
run_list_real() -> run_pipe_real()->
cmd_process() -> find_cmd()
setup_xxx_in_str()内部函数接口有不同的实现
/***************************************************************************
 * find command table entry for a command
 */
cmd_tbl_t *find_cmd_tbl (const char *cmd, cmd_tbl_t *table, int table_len)
{
	cmd_tbl_t *cmdtp;
	cmd_tbl_t *cmdtp_temp = table;	/*Init value */
	const char *p;
	int len;
	int n_found = 0;

	if (!cmd)
		return NULL;
	/*
	 * Some commands allow length modifiers (like "cp.b");
	 * compare command name only until first dot.
	 */
	len = ((p = strchr(cmd, '.')) == NULL) ? strlen (cmd) : (p - cmd);

	for (cmdtp = table;
	     cmdtp != table + table_len;
	     cmdtp++) {
		if (strncmp (cmd, cmdtp->name, len) == 0) {
			if (len == strlen (cmdtp->name))
				return cmdtp;	/* full match */

			cmdtp_temp = cmdtp;	/* abbreviated command ? */
			n_found++;
		}
	}
	if (n_found == 1) {			/* exactly one match */
		return cmdtp_temp;
	}

	return NULL;	/* not found or ambiguous command */
}
执行命令代码
/**
 * Call a command function. This should be the only route in U-Boot to call
 * a command, so that we can track whether we are waiting for input or
 * executing a command.
 *
 * @param cmdtp		Pointer to the command to execute
 * @param flag		Some flags normally 0 (see CMD_FLAG_.. above)
 * @param argc		Number of arguments (arg 0 must be the command text)
 * @param argv		Arguments
 * @return 0 if command succeeded, else non-zero (CMD_RET_...)
 */
static int cmd_call(cmd_tbl_t *cmdtp, int flag, int argc, char * const argv[])
{
	int result;
	//真正调用命令函数的语句
	result = (cmdtp->cmd)(cmdtp, flag, argc, argv);
	if (result)
		debug("Command failed, result=%d", result);
	return result;
}
三步完成u-boot命令的添加:
在include/configs/x6818.h中增加一项宏定义:
#define CONFIG_CMD_HELLOWORLD 1
在common/文件夹下建立cmd_helloworld.c
#include <common.h>
#include <command.h>

#ifdef CONFIG_CMD_HELLOWORLD

void helloworld(cmd_tbl_t *cmdtp, int flag, int argc, char *argv[])
{
    int i = 0;

    for(i = 0; i < argc; i++)
    {
        printf("-------Hello world!\n");
        printf("argv[%d]=%s\n", i, argv[i]);
    }
}
U_BOOT_CMD(hello, 3, 2, helloworld, "hello command", "sunplusedu add u-boot command\n");

#endif
common/Makefile中增加一项
COBJS-y	+= cmd_movi.o
COBJS-y	+= cmd_android.o
COBJS-y	+= cmd_updateimage.o
COBJS-y	+= cmd_helloworld.o
make
重新下载ubootpak.bin
在命令行输入help和hello命令查看结果
启动过程
boot为标准的两阶段启动bootloader
第一阶段为汇编代码(2ndboot), 主要为初始化cpu硬件体系结构
第二阶段为c程序代码(u-boot.bin), 主要提供多种复杂命令并引导操作系统
u-boot阶段入口代码位置为:
arch/arm/cpu/slsiap/start.S
arch/arm/lib/board.c
boot第一阶段完成任务:
- 禁用看门狗、 初始化系统时钟
- 设置异常向量表(用到中断的情况下设置)
- 动态内存控制器初始化配置
- 初始化调试指示灯(可选)
- 初始化
UART, 用于开发调试(可选) - 从
NAND、NOR或SD卡中复制代码到DRAM - 跳转并进入
Bootloader第二阶段
boot第二阶段完成任务:
- 汇编阶段核心初始化
- 初始化
GPIO - 初始化
MMC等存储设备 MMU初始化- 各类通信设备相关驱动初始化
- 环境变量和参数的加载及初始化
- 倒计时监听串口(进入命令模式或启动内核)
- 启动内核(拷贝内核镜像并跳转到内核入口)
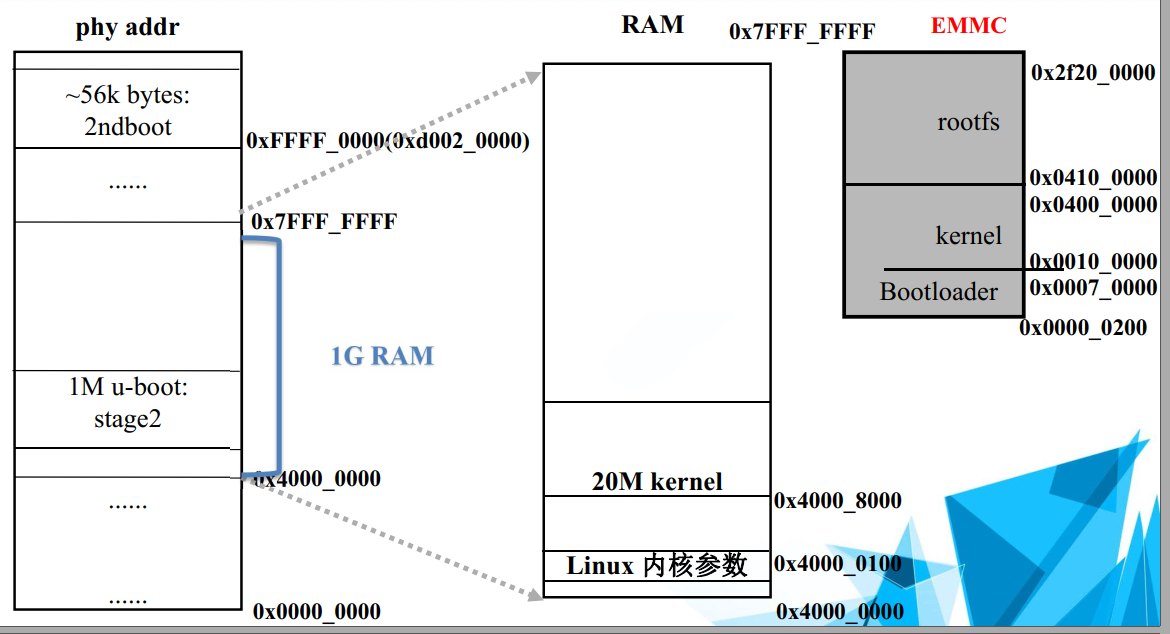
内核启动过程(无论什么启动方式最终都会汇聚到bootm命令接口来实现):
do_bootm() -> do_bootm_states() ->
bootm_os_get_boot_func() -> boot_os[] ->
do_bootm_linux() -> boot_jump_linux() ->
kernel_entry(int zero,int arch,uint params)
练习:
根据前面提到的方法, 添加一个自定义命令
设计自定义常用菜单, 实现sys_switch系统切换 和 q退出

