写这篇博客,刚好换了台电脑,那就借着这个demo复习下VUE环境的搭建。
一、前端项目搭建
1、安装node
官网下载安装即可。
2、安装脚手架
npm install -g vue-cli使用脚手架搭建一个demo前端项目
vue init webpack 项目名称3、安装依赖
这里安装了用到的element、jsonp等。
cnpm i element-ui -Snpm install vue-jsonp --savenpm install axiosnpm install nprogress --savenpm install js-cookie npm install --save vuex
完整的package.json依赖文件: (
{
  "name": "demo",
  "version": "1.0.0",
  "description": "A Vue.js project",
  "author": "wtyy",
  "private": true,
  "scripts": {
    "dev": "webpack-dev-server --inline --progress --config build/webpack.dev.conf.js",
    "start": "npm run dev",
    "build": "node build/build.js"
  },
  "dependencies": {
    "axios": "0.17.1",
    "crypto-js": "^4.0.0",
    "echarts": "^4.9.0",
    "element-ui": "2.3.4",
    "js-cookie": "2.2.0",
    "nprogress": "0.2.0",
    "vue": "2.5.10",
    "vue-bus": "^1.2.1",
    "vue-jsonp": "^0.1.8",
    "vue-router": "3.0.1",
    "vuedraggable": "^2.24.3",
    "vuex": "3.0.1",
    "vuex-persist": "^2.2.0"
  },
  "devDependencies": {
    "autoprefixer": "^7.1.2",
    "babel-core": "^6.22.1",
    "babel-helper-vue-jsx-merge-props": "^2.0.3",
    "babel-loader": "^7.1.1",
    "babel-plugin-syntax-jsx": "^6.18.0",
    "babel-plugin-transform-runtime": "^6.22.0",
    "babel-plugin-transform-vue-jsx": "^3.5.0",
    "babel-preset-env": "^1.3.2",
    "babel-preset-stage-2": "^6.22.0",
    "chalk": "^2.0.1",
    "copy-webpack-plugin": "^4.0.1",
    "css-loader": "^0.28.0",
    "extract-text-webpack-plugin": "^3.0.0",
    "file-loader": "^1.1.4",
    "friendly-errors-webpack-plugin": "^1.6.1",
    "html-webpack-plugin": "^2.30.1",
    "node-notifier": "^5.1.2",
    "optimize-css-assets-webpack-plugin": "^3.2.0",
    "ora": "^1.2.0",
    "portfinder": "^1.0.13",
    "postcss-import": "^11.0.0",
    "postcss-loader": "^2.0.8",
    "postcss-url": "^7.2.1",
    "rimraf": "^2.6.0",
    "semver": "^5.3.0",
    "shelljs": "^0.7.6",
    "uglifyjs-webpack-plugin": "^1.1.1",
    "url-loader": "^0.5.8",
    "vue-loader": "^13.3.0",
    "vue-style-loader": "^3.0.1",
    "vue-template-compiler": "2.5.10",
    "webpack": "^3.6.0",
    "webpack-bundle-analyzer": "^2.9.0",
    "webpack-dev-server": "^2.9.1",
    "webpack-merge": "^4.1.0"
  },
  "engines": {
    "node": ">= 6.0.0",
    "npm": ">= 3.0.0"
  },
  "browserslist": [
    "> 1%",
    "last 2 versions",
    "not ie <= 8"
  ]
}
二、项目代码
1、环境
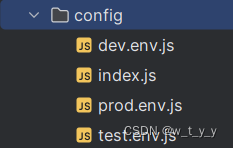
主要配置后端接口地址、前端端口号
(1)config/dev.env.js
'use strict'
const merge = require('webpack-merge')
const prodEnv = require('./prod.env')

module.exports = merge(prodEnv, {
  NODE_ENV: '"development"',
  BASE_API: '"http://localhost:2222/securityDemo/"',
})
(2)test.env.js
'use strict'
const merge = require('webpack-merge')
const prodEnv = require('./prod.env')

module.exports = merge(prodEnv, {
  NODE_ENV: '"development"',
  BASE_API: '"http://localhost:2222/securityDemo/"',
})
(3)prod.env.js
'use strict'
module.exports = {
  NODE_ENV: '"production"',
  BASE_API: '"http://xxx.com/mydemo/"',
}
(4)index
'use strict'
// Template version: 1.2.6
// see http://vuejs-templates.github.io/webpack for documentation.

const path = require('path')

module.exports = {
  dev: {

    // Paths
    assetsSubDirectory: 'static',
    assetsPublicPath: '/',
    proxyTable: {},

    // Various Dev Server settings
    host: 'localhost', // can be overwritten by process.env.HOST
    port: 9528, // can be overwritten by process.env.PORT, if port is in use, a free one will be determined
    autoOpenBrowser: true,
    errorOverlay: true,
    notifyOnErrors: false,
    poll: false, // https://webpack.js.org/configuration/dev-server/#devserver-watchoptions-

    // Use Eslint Loader?
    // If true, your code will be linted during bundling and
    // linting errors and warnings will be shown in the console.
    useEslint: true,
    // If true, eslint errors and warnings will also be shown in the error overlay
    // in the browser.
    showEslintErrorsInOverlay: false,

    /**
     * Source Maps
     */
    // https://webpack.js.org/configuration/devtool/#development
    devtool: 'cheap-source-map',

    // If you have problems debugging vue-files in devtools,
    // set this to false - it *may* help
    // https://vue-loader.vuejs.org/en/options.html#cachebusting
    cacheBusting: true,

    // CSS Sourcemaps off by default because relative paths are "buggy"
    // with this option, according to the CSS-Loader README
    // (https://github.com/webpack/css-loader#sourcemaps)
    // In our experience, they generally work as expected,
    // just be aware of this issue when enabling this option.
    cssSourceMap: false,
  },

  test: {
    env: require('./test.env'),
    // Template for index.html
    index: path.resolve(__dirname, '../dist/index.html'),

    // Paths
    assetsRoot: path.resolve(__dirname, '../dist'),
    assetsSubDirectory: 'static',

    /**
     * You can set by youself according to actual condition
     * You will need to set this if you plan to deploy your site under a sub path,
     * for example GitHub pages. If you plan to deploy your site to https://foo.github.io/bar/,
     * then assetsPublicPath should be set to "/bar/".
     * In most cases please use '/' !!!
     */
    assetsPublicPath: 'http://test.xxx.com/mydemo/', // If you are deployed on the root path, please use '/'

    /**
     * Source Maps
     */
    productionSourceMap: false,
    // https://webpack.js.org/configuration/devtool/#production
    devtool: '#source-map',

    // Gzip off by default as many popular static hosts such as
    // Surge or Netlify already gzip all static assets for you.
    // Before setting to `true`, make sure to:
    // npm install --save-dev compression-webpack-plugin
    productionGzip: false,
    productionGzipExtensions: ['js', 'css'],

    // Run the build command with an extra argument to
    // View the bundle analyzer report after build finishes:
    // `npm run build --report`
    // Set to `true` or `false` to always turn it on or off
    bundleAnalyzerReport: process.env.npm_config_report
  },
  build: {
    env: require('./prod.env'),
    // Template for index.html
    index: path.resolve(__dirname, '../dist/index.html'),

    // Paths
    assetsRoot: path.resolve(__dirname, '../dist'),
    assetsSubDirectory: 'static',

    /**
     * You can set by youself according to actual condition
     * You will need to set this if you plan to deploy your site under a sub path,
     * for example GitHub pages. If you plan to deploy your site to https://foo.github.io/bar/,
     * then assetsPublicPath should be set to "/bar/".
     * In most cases please use '/' !!!
     */
    assetsPublicPath: 'http://xxx.com/mydemo/',

    /**
     * Source Maps
     */
    productionSourceMap: false,
    // https://webpack.js.org/configuration/devtool/#production
    devtool: '#source-map',

    // Gzip off by default as many popular static hosts such as
    // Surge or Netlify already gzip all static assets for you.
    // Before setting to `true`, make sure to:
    // npm install --save-dev compression-webpack-plugin
    productionGzip: false,
    productionGzipExtensions: ['js', 'css'],

    // Run the build command with an extra argument to
    // View the bundle analyzer report after build finishes:
    // `npm run build --report`
    // Set to `true` or `false` to always turn it on or off
    bundleAnalyzerReport: process.env.npm_config_report
  }
}
2、util

src下新建utils目录,封装工具类
(1)auth.js封装token操作方法
import Cookies from 'js-cookie'

const TokenKey = 'Admin-Token'

export function getToken() {
  return Cookies.get(TokenKey)
}

export function setToken(token) {
  return Cookies.set(TokenKey, token)
}

export function removeToken() {
  return Cookies.remove(TokenKey)
}
(2)request.js封装axois请求
import axios from 'axios'
// 配置前端跨域
axios.defaults.withCredentials = true
import { Message, MessageBox } from 'element-ui'
import store from '../store'
import { getToken } from '@/utils/auth'

// 创建axios实例
const service = axios.create({
  baseURL: process.env.BASE_API, // api的base_url
  timeout: 5000 // 请求超时时间
})

// request拦截器
service.interceptors.request.use(config => {
  if (store.getters.token) {
    config.headers['token'] = getToken() // 让每个请求携带自定义token 请根据实际情况自行修改
  }
  return config
}, error => {
  // Do something with request error
  console.log(error) // for debug
  Promise.reject(error)
})

// respone拦截器
service.interceptors.response.use(
  response => {
    /**
     * code为非20000是抛错 可结合自己业务进行修改
     */
    const res = response.data
    if (res.code !== 200 && res.code !=300) {
      Message({
        message: res.message,
        type: 'error',
        duration: 5 * 1000
      })

      // 401 token失效
      if (res.code === 401) {
        // MessageBox.confirm('你已被登出,可以取消继续留在该页面,或者重新登录', '确定登出', {
        //   confirmButtonText: '重新登录',
        //   cancelButtonText: '取消',
        //   type: 'warning'
        // }).then(() => {
        //   store.dispatch('FedLogOut').then(() => {
        //     location.reload()// 为了重新实例化vue-router对象 避免bug
        //   })
        // })
        store.dispatch('FedLogOut').then(() => {
          location.reload()// 为了重新实例化vue-router对象 避免bug
        })
      }
      return Promise.reject('error')
    } else {
      return response.data
    }
  },
  error => {
    console.log('err' + error)// for debug
    Message({
      message: error.message,
      type: 'error',
      duration: 5 * 1000
    })
    return Promise.reject(error)
  }
)

export default service
3、api
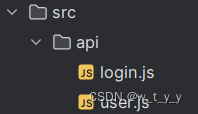
src下新增api目录,封装后台接口调用
(1)login.js
import request from '@/utils/request'

//获取验证码
export function getCode(){
  return request({
    url: '/code/getCode',
    method: 'get'
  })
}

//登录
export function login(user) {
  return request({
    url: '/login',
    method: 'post',
    datatype:'application/json',
    //data:user
    params:{
      "userName":user.userName,
      "passWord": user.password
    }
  })
}


//获取我的权限列表
export function getMyAuthorities() {
  return request({
    url: '/user/getCurrentUser',
    method: 'post'
  })
}


//退出登录
export function logout() {
  return request({
    url: '/user/logout',
    method: 'get'
  })
}
(2)user.js:
import request from '@/utils/request'

export function getAllUsers() {
  return request({
    url: '/user/getAllUsers',
    method: 'get'
  })
}
4、store
src下新增store目录,store下按照以下示例新建文件

(1)index.js:
import Vue from 'vue'
import Vuex from 'vuex'
import app from './modules/app'
import permission from './modules/permission'
import user from './modules/user'
import getters from './getters'

Vue.use(Vuex)

const store = new Vuex.Store({
  modules: {
    app,
    permission,
    user
  },
  getters
})

export default store
(2)getters.js:
const getters = {
  sidebar: state => state.app.sidebar,
  //token
  token: state => state.user.token,
  //用户名
  name: state => state.user.name,
  //角色
  roles: state => state.user.roles,
  //后台返回的权限code
  authorities:state =>state.user.authorities,
  //动态权限路由
  permission_routers: state => state.permission.routers,
  //固定权限路由
  addRouters: state => state.permission.addRouters
}
export default getters
(3)/mudules/app.js
import Cookies from 'js-cookie'

const app = {
  state: {
    sidebar: {
      opened: !+Cookies.get('sidebarStatus'),
      withoutAnimation: false
    },
    device: 'desktop'
  },
  mutations: {
    TOGGLE_SIDEBAR: state => {
      if (state.sidebar.opened) {
        Cookies.set('sidebarStatus', 1)
      } else {
        Cookies.set('sidebarStatus', 0)
      }
      state.sidebar.opened = !state.sidebar.opened
      state.sidebar.withoutAnimation = false
    },
    CLOSE_SIDEBAR: (state, withoutAnimation) => {
      Cookies.set('sidebarStatus', 1)
      state.sidebar.opened = false
      state.sidebar.withoutAnimation = withoutAnimation
    },
    TOGGLE_DEVICE: (state, device) => {
      state.device = device
    }
  },
  actions: {
    ToggleSideBar: ({ commit }) => {
      commit('TOGGLE_SIDEBAR')
    },
    CloseSideBar({ commit }, { withoutAnimation }) {
      commit('CLOSE_SIDEBAR', withoutAnimation)
    },
    ToggleDevice({ commit }, device) {
      commit('TOGGLE_DEVICE', device)
    }
  }
}

export default app
(4)/mudules/permission.js
import { asyncRouterMap, constantRouterMap } from '@/router/index'

/**
 * 通过meta.authority判断是否与当前用户权限匹配
 * @param authorities
 * @param route
 */
function hasPermission(authorities, route) {
  if (route.meta && route.meta.authority) {
    return authorities.some(authority => route.meta.authority.indexOf(authority) >= 0)
  } else {
    return true
  }
}

/**
 * 递归过滤异步路由表,返回符合用户角色权限的路由表
 * @param asyncRouterMap
 * @param authorities
 */
function filterAsyncRouter(asyncRouterMap, authorities) {
  const accessedRouters = asyncRouterMap.filter(route => {
    if (hasPermission(authorities, route)) {
      if (route.children && route.children.length) {
        route.children = filterAsyncRouter(route.children, authorities)
      }
      return true
    }
    return false
  })
  return accessedRouters
}

const permission = {
  state: {
    routers: constantRouterMap,
    addRouters: []
  },
  mutations: {
    SET_ROUTERS: (state, routers) => {
      state.addRouters = routers
      state.routers = constantRouterMap.concat(routers)
    }
  },
  actions: {
    GenerateRoutes({ commit }, data) {
      return new Promise(resolve => {
        const { authorities } = data
        let accessedRouters
        if (authorities.indexOf('admin') >= 0) {
          accessedRouters = asyncRouterMap
        } else {
          accessedRouters = filterAsyncRouter(asyncRouterMap, authorities)
        }
        commit('SET_ROUTERS', accessedRouters)
        resolve()
      })
    }
  }
}

export default permission
(5)/mudules/user.js
import { login, logout, getMyAuthorities } from '@/api/login'
import { getToken, setToken, removeToken } from '@/utils/auth'

const user = {
  state: {
    token: getToken(),
    name: '',
    authorities: [],
    roles: []
  },

  mutations: {
    SET_TOKEN: (state, token) => {
      state.token = token
    },
    SET_NAME: (state, name) => {
      state.name = name
    },
    SET_PERMISSION: (state, authorities) => {
      state.authorities = authorities
    },
    SET_ROLES: (state, roles) => {
      state.roles = roles
    }
  },

  actions: {
    // 登录
    Login({ commit }, user) {
      const userName = user.userName
      const pwd = user.password
      return new Promise((resolve, reject) => {
        login(user).then(response => {
          const data = response.data
          setToken(data)
          commit('SET_TOKEN', data)
          resolve()
        }).catch(error => {
          reject(error)
        })
      })
    },

    // 获取用户权限信息
    GetInfo({ commit, state }) {
      return new Promise((resolve, reject) => {
        getMyAuthorities().then(response => {
          console.info('res' + response)
          const data = response.data.menus
          var permissions = []
          data.forEach(item=>{
            permissions.push(item);
          })
          debugger
          commit('SET_PERMISSION', permissions)

          resolve(permissions)
        }).catch(error => {
          reject(error)
        })
      })
    },


    // 登出
    LogOut({ commit, state }) {
      return new Promise((resolve, reject) => {
        logout(state.token).then(() => {
          commit('SET_TOKEN', '')
          commit('SET_PERMISSION', [])
          removeToken()
          logout().then(response=>{})
          resolve()
        }).catch(error => {
          reject(error)
        })
      })
    },

    // 前端 登出
    FedLogOut({ commit }) {
      return new Promise(resolve => {
        commit('SET_TOKEN', '')
        removeToken()
        resolve()
      })
    }
  }
}

export default user
5、router
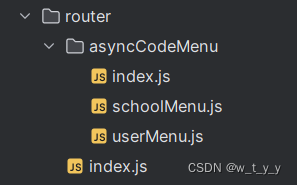
asyncCodeMenu暂时没有用到,是准备存放各模块及其详情页路由的(避免index写的过长)。这里只贴index.js代码:
import Vue from 'vue'
import Router from 'vue-router'

Vue.use(Router)


export const constantRouterMap = [
 // { path: '/404', component: () => import('@/views/404'), hidden: true },
  { path: '/login', component: () => import('@/views/login/index'), hidden: true },

      // {
      //   path: 'mytest41',
      //   name: 'mytest41',
      //   component: () => import('@/views/mytest/mytest4/mytest41')
      //
      // },
      // {
      //   path: 'mytest42',
      //   name: 'mytest42',
      //   component: () => import('@/views/mytest/mytest4/mytest42')
      //
      // },
      // {
      //   path: 'mytest51',
      //   name: 'mytest51',
      //   component: () => import('@/views/mytest/mytest5/mytest51')
      //
      // },
      // {
      //   path: 'mytest521',
      //   name: 'mytest521',
      //   component: () => import('@/views/mytest/mytest5/mytest521')
      //
      // },
      // {
      //   path: 'mytest522',
      //   name: 'mytest522',
      //   component: () => import('@/views/mytest/mytest5/mytest522')
      //
      // }


  // {
  //   path: '/',
  //   component: Layout,
  //   redirect: '/dashboard',
  //   name: '首页',
  //   icon: '首页',
  //   hidden: true,
  //   children: [{
  //     path: '/dashboard',
  //     component: () => import('@/views/dashboard/index')
  //   }]
  // }
]
/**
 * hidden: true                   if `hidden:true` will not show in the sidebar(default is false)
 * alwaysShow: true               if set true, will always show the root menu, whatever its child routes length
 *                                if not set alwaysShow, only more than one route under the children
 *                                it will becomes nested mode, otherwise not show the root menu
 * redirect: noredirect           if `redirect:noredirect` will no redirct in the breadcrumb
 * name:'router-name'             the name is used by <keep-alive> (must set!!!)
 * meta : {
 title: 'title'               the name show in submenu and breadcrumb (recommend set)
 icon: 'svg-name'             the icon show in the sidebar,
 }
 **/
export const asyncRouterMap = [
  {
    path: '/mytest',
    name: 'mytest',
    hidden:true,
    component: () => import('@/views/mytest/index'),
    children: [
      {
        path: '/main',
        redirect: 'main'
      },
      {
        path: '/mytest/main',
        name: 'main',
        component: () => import('@/views/mytest/main'),
      },

      {
        path: '/mytest/usermanage',
        name: 'userManage',
        component: () => import('@/views/mytest/usermanage'),
      },

      {
        path: '/mytest/rolemanage',
        name: 'rolemanage',
        component: () => import('@/views/mytest/rolemanage'),
        //meta: { title: '角色管理', authority: ['role_manage'] },
      },
      {
        path: '/mytest/menumanage',
        name: 'menumanage',
        component: () => import('@/views/mytest/menumanage'),
        //meta: { title: '角色管理', authority: ['role_manage'] },
      },
      {
        path: '/mytest/schoolmanage',
        name: 'schoolmanage',
        component: () => import('@/views/mytest/schoolmanage'),
        //meta: { title: '角色管理', authority: ['role_manage'] },
      },
  ]}

]

export default new Router({
  // mode: 'history', // 后端支持可开
  scrollBehavior: () => ({ y: 0 }),
  routes: constantRouterMap
})
6、页面
src下新增views目录,存放页面代码
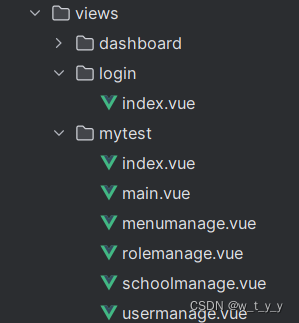
6.1、login/index
<template>
  <el-form label-width="500px" class="demo-ruleForm loginform" align="center">
    <el-form-item label="用户名">
      <el-input v-model="user.userName"></el-input>
    </el-form-item>

    <el-form-item label="密    码" prop="pass">
      <el-input v-model="user.password" type="password" auto-complete="off"></el-input>
    </el-form-item>

<!--    <el-form-item label="验证码" prop="pass">-->
<!--      <el-input v-model = "code" readonly="readonly"></el-input>-->
<!--      <el-input v-model="user.code" type="code" auto-complete="off"></el-input>-->

<!--    </el-form-item>-->

    <el-form-item size="large">
      <el-button type="primary" @click="login()">登录</el-button>
      <el-button>取消</el-button>
    </el-form-item>
  </el-form>
</template>


<script>
import { login,getCode } from '@/api/login'
import { getToken, setToken, removeToken } from '@/utils/auth'
//import { getDAes } from '@/utils/crypto';
export default {

  data() {
    return {
      code:'',
      user: {
        userName: '',
        password: '',
        code:''
      }

    }
  },

  created(){
    //this.getCode()
  },

  methods: {

    getCode(){
      getCode().then(res=>{
        this.code = res.data
      })
    },

    login() {
      //this.user.password = getDAes(this.user.password),
      this.$store.dispatch('Login', this.user).then(() => {

        this.$router.push({ path: '/mytest/main' })
      })
    }
  }
}
</script>


<style>
.loginform {
  float: left;
  margin: auto;
}
</style>
6.2、导航页面
(1)mytest/index菜单导航
<template>
<div>
<div>
<el-row class="tac" style="height:100%">
<el-col :span="4">
<el-menu
:default-active="$route.path"
router
class="el-menu-vertical-demo"
>
<el-menu-item index="/mytest/main" >
<i class="el-icon-menu">个人中心</i>
<router-link to="/mytest/main"></router-link>
</el-menu-item>
<el-menu-item index="/mytest/usermanage" v-if="authorities.includes('user_manage')">
<i class="el-icon-menu">用户管理</i>
<router-link to="/mytest/usermanage"></router-link>
</el-menu-item>
<el-menu-item index="/mytest/rolemanage" v-if="authorities.includes('role_manage')">
<i class="el-icon-menu">角色管理</i>
<router-link to="/mytest/mytest2"></router-link>
</el-menu-item>
<el-menu-item index="/mytest/menumanage" v-if="authorities.includes('menu_manage')">
<i class="el-icon-menu">菜单管理</i>
<router-link to="/mytest/menumanage"></router-link>
</el-menu-item>
<el-menu-item index="/mytest/schoolmanage" v-if="authorities.includes('school_manage')">
<i class="el-icon-menu">学校管理</i>
<router-link to="/mytest/schoolmanage"></router-link>
</el-menu-item>
<!-- <!–二级子菜单–>-->
<!-- <el-submenu index="1">-->
<!-- <template slot="title">-->
<!-- <i class="el-icon-location"></i>-->
<!-- <span>二级菜单</span>-->
<!-- </template>-->
<!-- <el-menu-item-group>-->
<!-- <el-menu-item index="/mytest/mytest41">-->
<!-- <i class="el-icon-menu"></i>-->
<!-- <router-link to="/mytest/mytest41">mytest41</router-link>-->
<!-- </el-menu-item>-->
<!-- <el-menu-item index="/mytest/mytest42">-->
<!-- <i class="el-icon-menu"></i>-->
<!-- <router-link to="/mytest/mytest42">mytest42</router-link>-->
<!-- </el-menu-item>-->
<!-- </el-menu-item-group>-->
<!-- </el-submenu>-->
<!-- <!–三级子菜单–>-->
<!-- <el-submenu index="2">-->
<!-- <template slot="title">-->
<!-- <i class="el-icon-location"></i>-->
<!-- <span>三级菜单</span>-->
<!-- </template>-->
<!-- <el-menu-item-group>-->
<!-- <el-menu-item index="/mytest/mytest51">-->
<!-- <i class="el-icon-menu"></i>-->
<!-- <router-link to="/mytest/mytest51">mytest51</router-link>-->
<!-- </el-menu-item>-->
<!-- <!–三级–>-->
<!-- <el-submenu index="3">-->
<!-- <template slot="title">-->
<!-- <i class="el-icon-location"></i>-->
<!-- <span>三级子菜单</span>-->
<!-- </template>-->
<!-- <el-menu-item-group>-->
<!-- <el-menu-item index="/mytest/mytest521">-->
<!-- <i class="el-icon-menu"></i>-->
<!-- <router-link to="/mytest/mytest521">mytest521</router-link>-->
<!-- </el-menu-item>-->
<!-- <el-menu-item index="/mytest/mytest522">-->
<!-- <i class="el-icon-menu"></i>-->
<!-- <router-link to="/mytest/mytest522">mytest522</router-link>-->
<!-- </el-menu-item>-->
<!-- </el-menu-item-group>-->
<!-- </el-submenu>-->
<!-- </el-menu-item-group>-->
<!-- </el-submenu>-->
</el-menu>
</el-col>
<el-col span="20">
<!--主体内容部分-->
<div class="main">
<router-view></router-view>
</div>
</el-col>
</el-row>
</div>
</div>
</template>
<script>
export default {
data(){
return {
}
},
computed: {
authorities() {
return this.$store.state.user.authorities
}
}
}
</script>
(2)mytest/main首页
<template>
  <div>this is main</div>
</template>
(3)/mytest/usermanage
<template>
  <div>this is user manage</div>
</template>
(4)/mytest/menumanage
<template>
  <div>this is menu manage</div>
</template>
其他两个同上
7、权限拦截permission.js
import router from './router'
import store from './store'
import NProgress from 'nprogress' // Progress 进度条
import 'nprogress/nprogress.css'// Progress 进度条样式
import { Message } from 'element-ui'
import { getToken } from '@/utils/auth' // 验权

const whiteList = ['/login'] // 不重定向白名单
router.beforeEach((to, from, next) => {
  NProgress.start()
  if (getToken()) {
    if (to.path === '/login') {
      next({ path: '/' })
      NProgress.done() // if current page is dashboard will not trigger	afterEach hook, so manually handle it
    } else {
      if (store.getters.authorities.length === 0) {
        // 拉取用户权限信息
        store.dispatch('GetInfo').then(res => {
          // 从后端获取的权限
          const authorities = res


          // 前端路由加载动态权限
          store.dispatch('GenerateRoutes', { authorities }).then(() => { // 生成可访问的路由表
            // alert('store.getters.addRouters' + store.getters.addRouters.length)
            router.addRoutes(store.getters.addRouters)// 添加动态路由

            next({ ...to })// hack方法 确保addRoutes已完成
          })
        }).catch((err) => {
          store.dispatch('FedLogOut').then(() => {
            Message.error(err || 'Verification failed, please login again')
            next({ path: '/' })
          })
        })
      } else {
        next()
      }
    }
  } else {
    if (whiteList.indexOf(to.path) !== -1) {
      next()
    } else {
      next('/login')
      NProgress.done()
    }
  }
})

router.afterEach(() => {
  NProgress.done() // 结束Progress
})
8、项目入口
(1)main.js
/*

import Vue from 'vue'
import App from './App'
import router from './router'

//引入依赖
import ElementUI from 'element-ui'
import 'element-ui/lib/theme-chalk/index.css'
import { VueJsonp }  from 'vue-jsonp'
//加载自定义文件
import '@/permission' // permission control


Vue.config.productionTip = false

//加载引入的依赖
Vue.use(VueJsonp)
Vue.use(ElementUI)

new Vue({
  el: '#app',
  router,
  components: { App },
  template: '<App/>'
})
*/
import Vue from 'vue'

//import 'normalize.css/normalize.css'// A modern alternative to CSS resets

import ElementUI from 'element-ui'
import 'element-ui/lib/theme-chalk/index.css'
import locale from 'element-ui/lib/locale/lang/zh-CN' // lang i18n

//import '@/styles/index.scss' // global css
import App from './App'
import router from './router'
import store from './store'
//import '@/icons' // icon
import '@/permission' // permission control
import VueJsonp from 'vue-jsonp'

Vue.use(VueJsonp)

Vue.use(ElementUI, { locale })

Vue.config.productionTip = false

new Vue({
  el: '#app',
  router,
  store,
  render: h => h(App)
})
(2)App.vue
<template>
  <div id="app">
    <router-view></router-view>
  </div>
</template>

<script>
export default {
  name: 'App'
}
</script>

<style>
#app {
  font-family: 'Avenir', Helvetica, Arial, sans-serif;
  -webkit-font-smoothing: antialiased;
  -moz-osx-font-smoothing: grayscale;
  text-align: center;
  color: #2c3e50;
  margin-top: 60px;
}
</style>
三、测试
1、登录
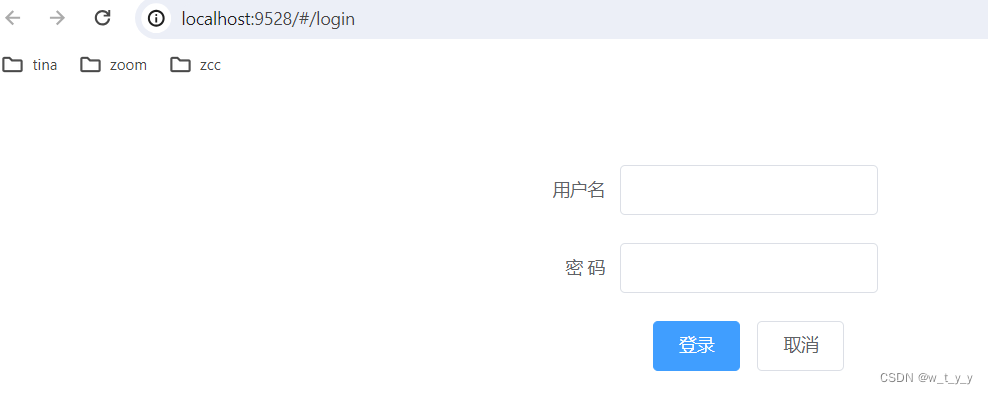
输入admin/123,f12查看控制台报错
Access to XMLHttpRequest at 'http://localhost:2222/securityDemo/login' from origin 'http://localhost:9528' has been blocked by CORS policy: No 'Access-Control-Allow-Origin' header is present on the requested resource.后端加上跨域配置即可
package com.demo.security.config;

import com.demo.security.filter.UrlTwoFilter;
import com.demo.security.interceptor.ParamInterceptor;
import com.demo.security.interceptor.ParamOneInterceptor;
import org.springframework.beans.factory.annotation.Autowired;
import org.springframework.boot.web.servlet.FilterRegistrationBean;
import org.springframework.context.annotation.Bean;
import org.springframework.context.annotation.Configuration;
import org.springframework.core.Ordered;
import org.springframework.security.config.annotation.web.configuration.WebSecurityCustomizer;
import org.springframework.web.cors.CorsConfiguration;
import org.springframework.web.cors.UrlBasedCorsConfigurationSource;
import org.springframework.web.filter.CorsFilter;
import org.springframework.web.servlet.config.annotation.CorsRegistry;
import org.springframework.web.servlet.config.annotation.InterceptorRegistry;
import org.springframework.web.servlet.config.annotation.WebMvcConfigurer;

import java.util.List;

@Configuration
public class WebMvcConfig implements WebMvcConfigurer {

    @Autowired
    private ParamInterceptor paramInterceptor;

    @Autowired
    private ParamOneInterceptor paramOneInterceptor;


    @Autowired
    private UrlTwoFilter twoFilter;

    //设置跨域
    @Bean
    public CorsFilter corsFilter() {
        UrlBasedCorsConfigurationSource source = new UrlBasedCorsConfigurationSource();
        CorsConfiguration config = new CorsConfiguration();
        config.setAllowCredentials(true);
        config.addAllowedOrigin("http://localhost:9528");
        config.addAllowedHeader("*");
        config.addAllowedMethod("*");
        source.registerCorsConfiguration("/**", config);
        return new CorsFilter(source);
    }


    @Override
    public void addInterceptors(InterceptorRegistry registry) {
        registry.addInterceptor(paramOneInterceptor);
        registry.addInterceptor(paramInterceptor).addPathPatterns("/**");
        //registry.addInterceptor(paramOneInterceptor);
    }

    @Bean
    public FilterRegistrationBean<UrlTwoFilter> getIpFilter() {
        FilterRegistrationBean<UrlTwoFilter> registrationBean = new FilterRegistrationBean<>();
        registrationBean.setFilter(twoFilter);
        registrationBean.setEnabled(true);
        registrationBean.setOrder(Ordered.HIGHEST_PRECEDENCE + 1);
        registrationBean.setUrlPatterns(List.of("/*"));
        return registrationBean;
    }
}
重启后端再次访问即可成功登录。
2、菜单权限
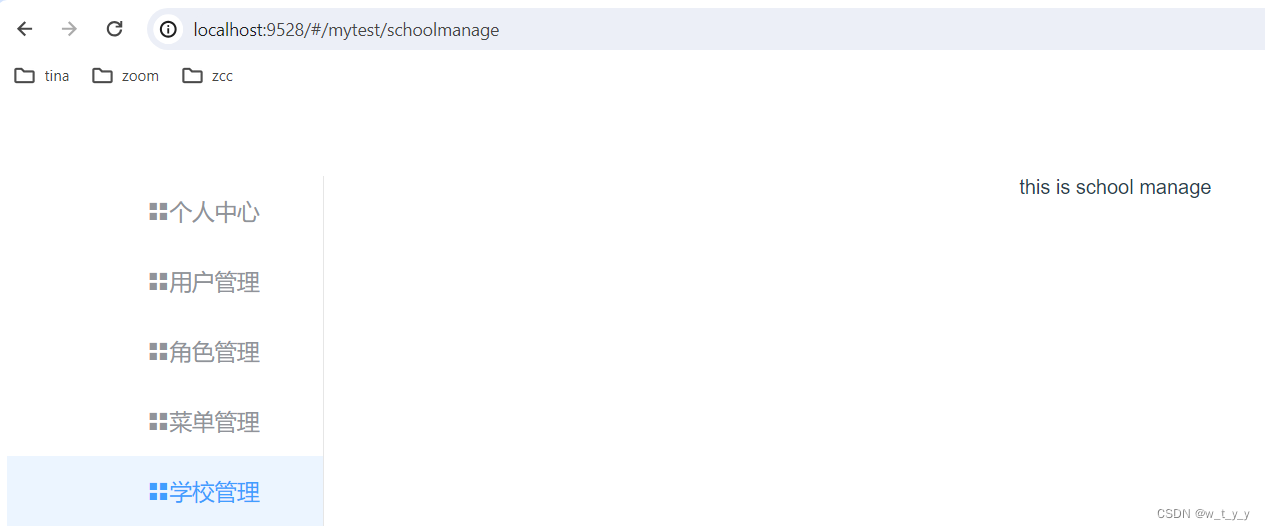
(1)admin登录:



(2)zs/123登录

(3)ls/123登录


