文章目录
- 前言
- 1. Arbotix使用流程
- 1.1 安装 Arbotix
- 1.2 创建新功能包,准备机器人 urdf、xacro 文件
- 1.3 添加 Arbotix 配置文件
- 1.4 编写 launch 文件配置 Arbotix
- 1.5 启动 launch 文件并控制机器人模型运动
- 2. URDF集成Gazebo
- 2.1 URDF与Gazebo基本集成流程
- 2.2 URDF集成Gazebo相关设置
- 2.2.1 collision
- 2.2.2 inertial
- 2.2.3 颜色设置
- 2.3 URDF集成Gazebo实操
- 2.3.1 编写封装惯性矩阵算法的 xacro 文件
- 2.3.2 底盘 Xacro 文件
- 2.3.3 摄像头 Xacro 文件
- 2.3.4 雷达 Xacro 文件
- 2.3.5 组合底盘、摄像头与雷达的 Xacro 文件
- 2.3.6 launch 文件
- PS
- 2.4 Gazebo仿真环境搭建
- 2.4.0 启动已有仿真环境
- 2.4.1 添加内置组件创建仿真环境
- 2.4.2 自定义仿真环境
前言
📢本系列将依托赵虚左老师的ROS课程,写下自己的一些心得与笔记。
📢课程链接:https://www.bilibili.com/video/BV1Ci4y1L7ZZ
📢讲义链接:http://www.autolabor.com.cn/book/ROSTutorials/index.html
📢 文章可能存在疏漏的地方,恳请大家指出。
1. Arbotix使用流程
Arbotix:Arbotix 是一款控制电机、舵机的控制板,并提供相应的 ros 功能包,这个功能包的功能不仅可以驱动真实的 Arbotix 控制板,它还提供一个差速控制器,通过接受速度控制指令更新机器人的 joint 状态,从而帮助我们实现机器人在 rviz 中的运动。
实现流程:
- 安装 Arbotix
- 创建新功能包,准备机器人 urdf、xacro 文件
- 添加 Arbotix 配置文件
- 编写 launch 文件配置 Arbotix
- 启动 launch 文件并控制机器人模型运动
1.1 安装 Arbotix
sudo apt-get install ros-melodic-arbotix
1.2 创建新功能包,准备机器人 urdf、xacro 文件
参考上一讲.【ROS】—— 机器人系统仿真 —URDF优化_xacro (十四)
1.3 添加 Arbotix 配置文件
config文件夹中放置
# 该文件是控制器配置,一个机器人模型可能有多个控制器,比如: 底盘、机械臂、夹持器(机械手)....
# 因此,根 name 是 controller
controllers: {
   # 单控制器设置
   base_controller: {
          #类型: 差速控制器
       type: diff_controller,
       #参考坐标
       base_frame_id: base_footprint,
       #两个轮子之间的间距
       base_width: 0.2,
       #控制频率
       ticks_meter: 2000,
       #PID控制参数,使机器人车轮快速达到预期速度
       Kp: 12,
       Kd: 12,
       Ki: 0,
       Ko: 50,
       #加速限制
       accel_limit: 1.0
    }
}
1.4 编写 launch 文件配置 Arbotix
<launch>
    <param name="robot_description" command="$(find xacro)/xacro $(find  urdf01_rviz)/urdf/xacro/car.urdf.xacro" />
    <!--启动rviz -->
    <node pkg = "rviz" type = "rviz" name="rviz" args="-d $(find urdf01_rviz)/config/demo01.rviz"/>
    <!-- 添加关节状态发布节点 -->
    <node pkg="joint_state_publisher" type="joint_state_publisher" name="joint_state_publisher" />
    <!-- 添加机器人状态发布节点 -->
    <node pkg="robot_state_publisher" type="robot_state_publisher" name="robot_state_publisher" />
    <!-- arbotix运动控制节点,并且加载相关参数-->
    <node pkg="arbotix_python" type="arbotix_driver" name="driver" output="screen">
        <rosparam command="load" file="$(find urdf01_rviz)/config/control.yaml"/>
        <param name="sim" value="true"/>
    </node>
</launch>
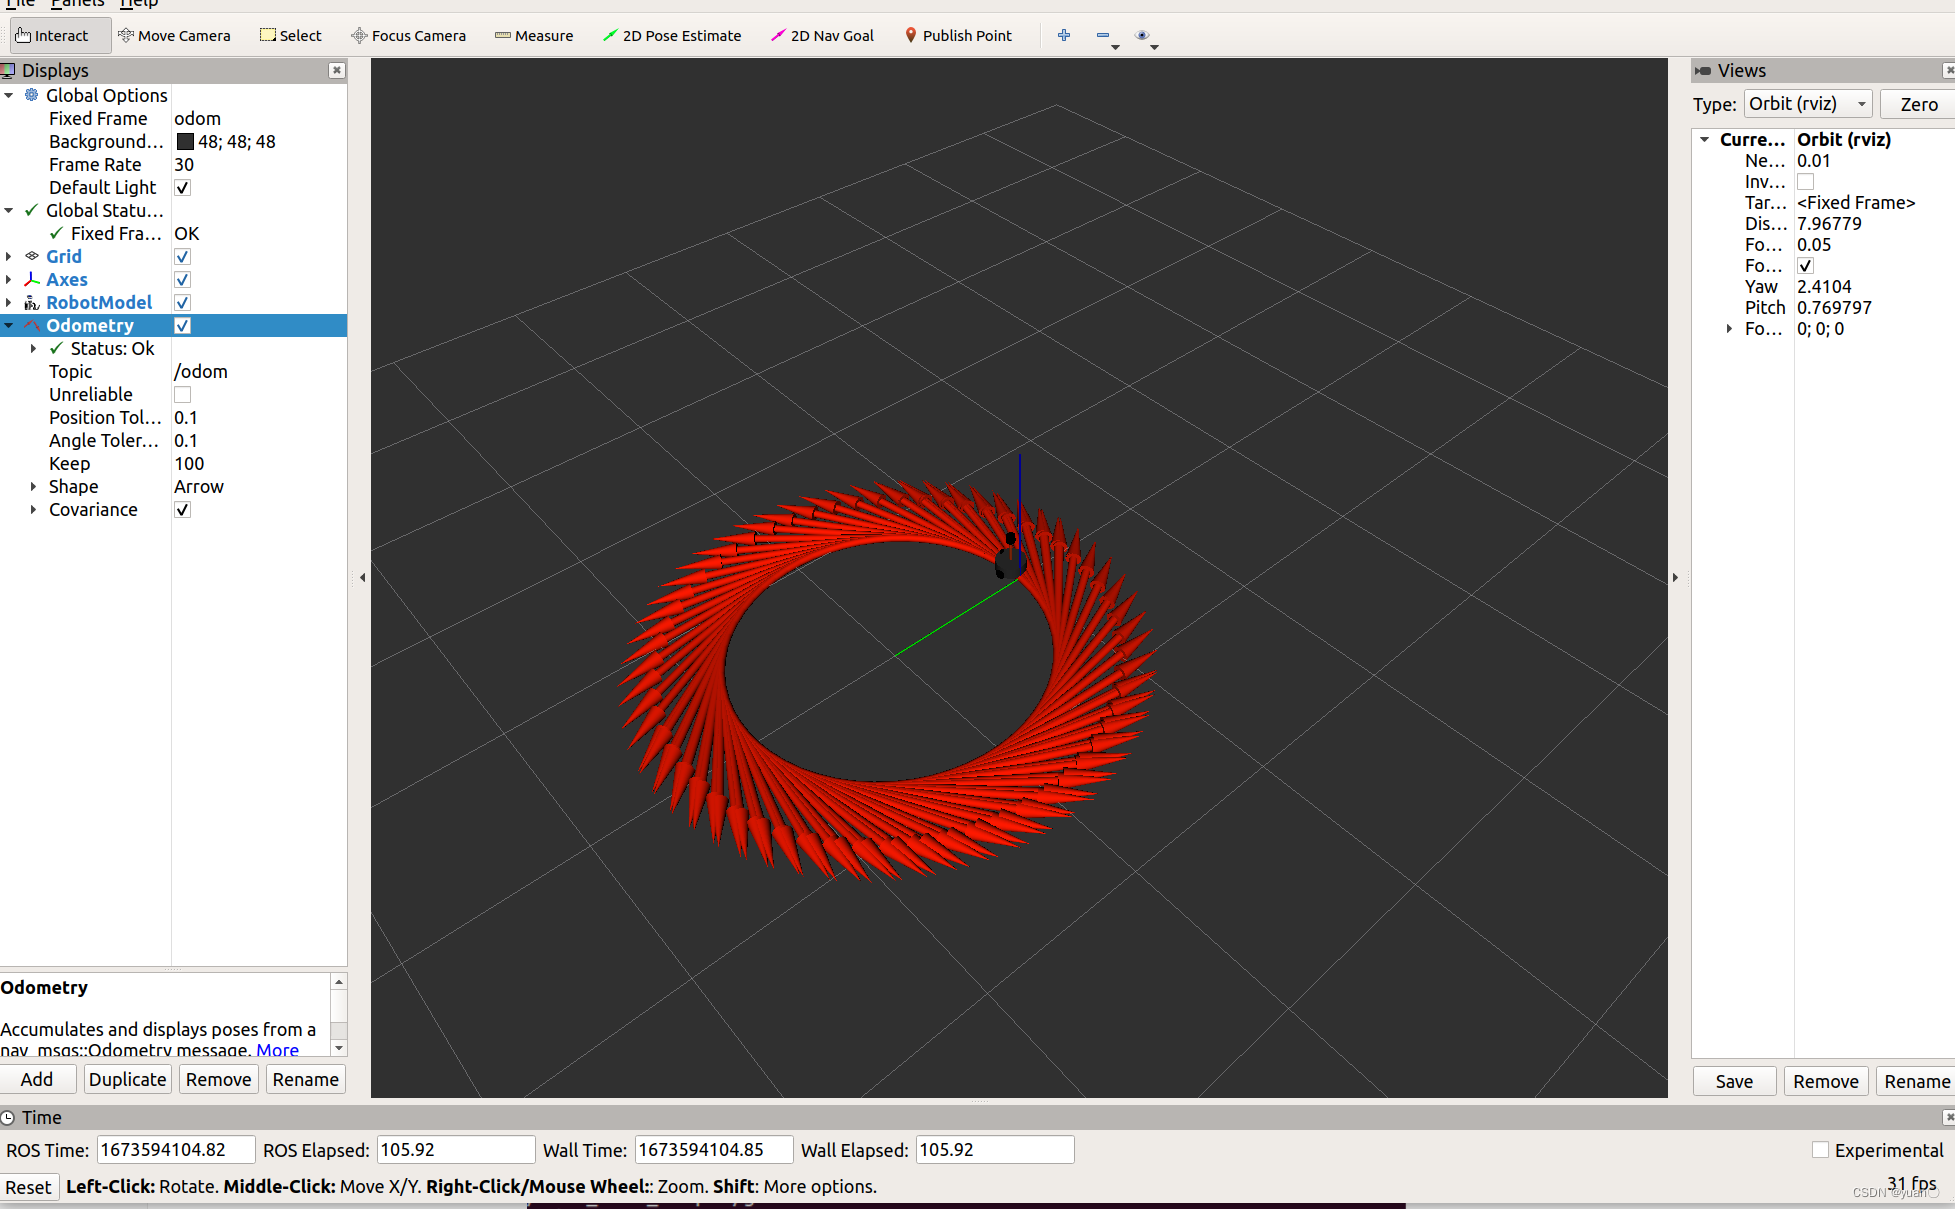
1.5 启动 launch 文件并控制机器人模型运动
运行出现以下warning,将joint的名称修改即可,不过不影响下面演示.
[ WARN] [1673593397.380279247]: Joint state with name: “base_l_wheel_joint” was received but not found in URDF
发布运动消息
yuan@yuan-Legion-Y9000P-IAH7H:~$ rostopic pub -r 10 /cmd_vel geometry_msgs/Twist “linear:
x: 1.0
y: 0.0
z: 0.0
angular:
x: 0.0
y: 0.0
z: 1.0”
2. URDF集成Gazebo
- 创建功能包,导入依赖项
urdf、xacro、gazebo_ros、gazebo_ros_control、gazebo_plugins - 编写 URDF 或 Xacro 文件
- 启动 Gazebo 并显示机器人模型
2.1 URDF与Gazebo基本集成流程
注意, 当 URDF 需要与 Gazebo 集成时,和 Rviz 有明显区别:
1.必须使用 collision 标签,因为既然是仿真环境,那么必然涉及到碰撞检测,collision 提供碰撞检测的依据。
2.必须使用 inertial 标签,此标签标注了当前机器人某个刚体部分的惯性矩阵,用于一些力学相关的仿真计算。
3.颜色设置,也需要重新使用 gazebo 标签标注,因为之前的颜色设置为了方便调试包含透明度,仿真环境下没有此选项。
    <gazebo reference="base_link">
        <material>Gazebo/Black</material>
    </gazebo>
demo01_helloworld.urdf
<robot name="mycar">
    <link name="base_link">
        <visual>
            <geometry>
                <box size="0.5 0.2 0.1" />
            </geometry>
            <origin xyz="0.0 0.0 0.0" rpy="0.0 0.0 0.0" />
            <material name="yellow">
                <color rgba="0.5 0.3 0.0 1" />
            </material>
        </visual>
        <collision>
            <geometry>
                <box size="0.5 0.2 0.1" />
            </geometry>
            <origin xyz="0.0 0.0 0.0" rpy="0.0 0.0 0.0" />
        </collision>
        <inertial>
            <origin xyz="0 0 0" />
            <mass value="6" />
            <inertia ixx="1" ixy="0" ixz="0" iyy="1" iyz="0" izz="1" />
        </inertial>
    </link>
    <gazebo reference="base_link">
        <material>Gazebo/Black</material>
    </gazebo>

</robot>
注意inertial和inertia
        <inertial>
            <origin xyz="0 0 0" />
            <mass value="6" />
            <inertia ixx="1" ixy="0" ixz="0" iyy="1" iyz="0" izz="1" />
        </inertial>
gazebo运行出现以下问题
[Err] [REST.cc:205] Error in REST request

libcurl: (51) SSL: no alternative certificate subject name matches target host name 'api.ignitionfuel.org'
解决
sudo gedit ~/.ignition/fuel/config.yaml
将https://api.ignitionfuel.org替换为https://fuel.ignitionrobotics.org
参考https://blog.csdn.net/qq_39531155/article/details/114678795
运行launch
<launch>

    <!-- 将 Urdf 文件的内容加载到参数服务器 -->
    <param name="robot_description" textfile="$(find urdf02_gazebo)/urdf/demo01_helloworld.urdf" />

    <!-- 启动 gazebo -->
    <include file="$(find gazebo_ros)/launch/empty_world.launch" />
终端中运行如下为成功(rosrun gazebo_ros spawn_model -urdf -model mycar -param robot_description)
[INFO] [1673598852.373215, 0.000000]: Loading model XML from ros parameter robot_description
[INFO] [1673598852.374878, 0.000000]: Waiting for service /gazebo/spawn_urdf_model
[INFO] [1673598852.390063, 0.000000]: Calling service /gazebo/spawn_urdf_model
[INFO] [1673598852.465687, 7.973000]: Spawn status: SpawnModel: Successfully spawned entity
demo01_helloworld.launch
<launch>

    <!-- 将 Urdf 文件的内容加载到参数服务器 -->
    <param name="robot_description" textfile="$(find urdf02_gazebo)/urdf/demo01_helloworld.urdf" />

    <!-- 启动 gazebo -->
    <include file="$(find gazebo_ros)/launch/empty_world.launch" />
    <!-- 启动 Gazebo 的仿真环境,当前环境为空环境 -->
    <!-- 在 gazebo 中显示机器人模型 -->
    <node pkg="gazebo_ros" type="spawn_model" name="model" args="-urdf -model mycar -param robot_description"  />
</launch>

<!--
    在 Gazebo 中加载一个机器人模型,该功能由 gazebo_ros 下的 spawn_model 提供:
    -urdf 加载的是 urdf 文件
    -model mycar 模型名称是 mycar
    -param robot_description 从参数 robot_description 中载入模型
    -x 模型载入的 x 坐标
    -y 模型载入的 y 坐标
    -z 模型载入的 z 坐标
-->
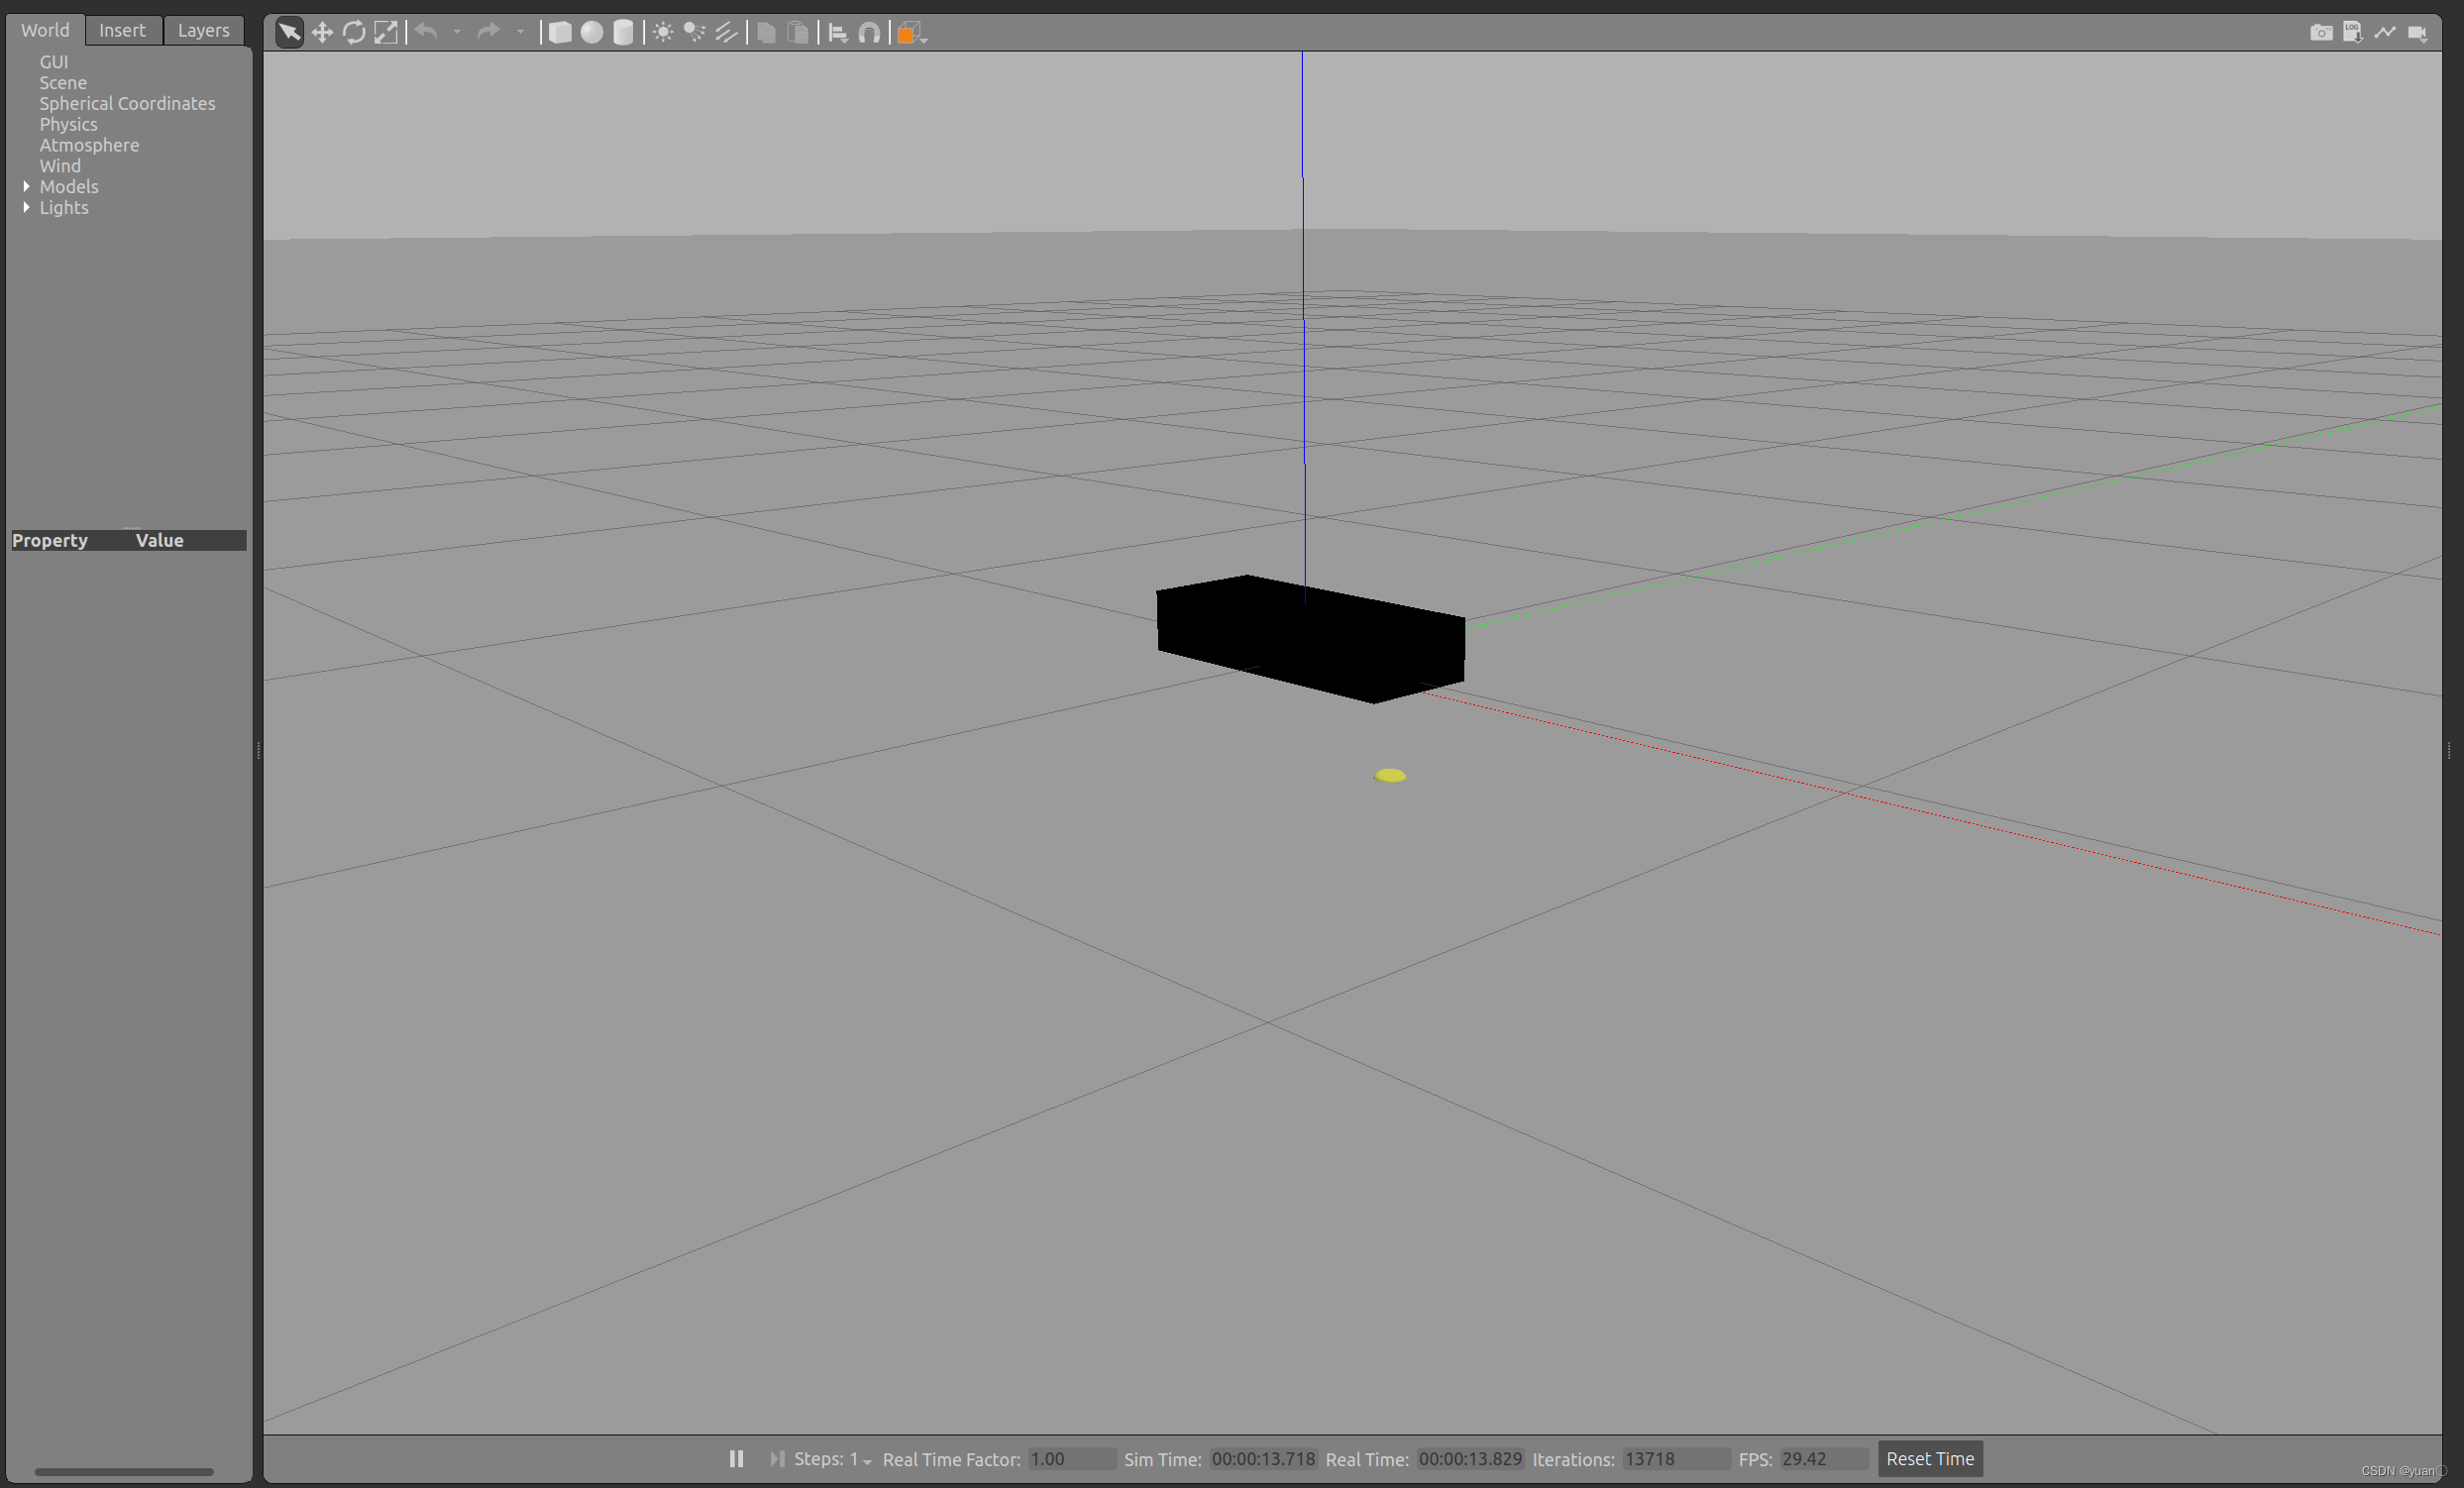
运行成功如下
2.2 URDF集成Gazebo相关设置
2.2.1 collision
如果机器人link是标准的几何体形状,和link的 visual 属性设置一致即可。
2.2.2 inertial
惯性矩阵的设置需要结合link的质量与外形参数动态生成,标准的球体、圆柱与立方体的惯性矩阵公式如下(已经封装为 xacro 实现):
球体惯性矩阵
<!-- Macro for inertia matrix -->
    <xacro:macro name="sphere_inertial_matrix" params="m r">
        <inertial>
            <mass value="${m}" />
            <inertia ixx="${2*m*r*r/5}" ixy="0" ixz="0"
                iyy="${2*m*r*r/5}" iyz="0"
                izz="${2*m*r*r/5}" />
        </inertial>
    </xacro:macro>
圆柱惯性矩阵
<xacro:macro name="cylinder_inertial_matrix" params="m r h">
        <inertial>
            <mass value="${m}" />
            <inertia ixx="${m*(3*r*r+h*h)/12}" ixy = "0" ixz = "0"
                iyy="${m*(3*r*r+h*h)/12}" iyz = "0"
                izz="${m*r*r/2}" />
        </inertial>
    </xacro:macro>
立方体惯性矩阵
 <xacro:macro name="Box_inertial_matrix" params="m l w h">
       <inertial>
               <mass value="${m}" />
               <inertia ixx="${m*(h*h + w*w)/12}" ixy = "0" ixz = "0"
                   iyy="${m*(h*h + l*l)/12}" iyz= "0"
                   izz="${m*(w*w +l*l)/12}" />
       </inertial>
   </xacro:macro>
需要注意的是,原则上,除了 base_footprint 外,机器人的每个刚体部分都需要设置惯性矩阵,且惯性矩阵必须经计算得出,如果随意定义刚体部分的惯性矩阵,那么可能会导致机器人在 Gazebo 中出现抖动,移动等现象。
更多的可以自行计算转动惯量
常见几何体的转动惯量
2.2.3 颜色设置
在 gazebo 中显示 link 的颜色,必须要使用指定的标签:
<gazebo reference="link节点名称">
     <material>Gazebo/Blue</material>
</gazebo>
PS: material 标签中,设置的值区分大小写,颜色可以设置为 Red Blue Green Black …
2.3 URDF集成Gazebo实操
2.3.1 编写封装惯性矩阵算法的 xacro 文件
head.xacro
<robot name="base" xmlns:xacro="http://wiki.ros.org/xacro">
    <!-- Macro for inertia matrix -->
    <xacro:macro name="sphere_inertial_matrix" params="m r">
        <inertial>
            <mass value="${m}" />
            <inertia ixx="${2*m*r*r/5}" ixy="0" ixz="0"
                iyy="${2*m*r*r/5}" iyz="0"
                izz="${2*m*r*r/5}" />
        </inertial>
    </xacro:macro>

    <xacro:macro name="cylinder_inertial_matrix" params="m r h">
        <inertial>
            <mass value="${m}" />
            <inertia ixx="${m*(3*r*r+h*h)/12}" ixy = "0" ixz = "0"
                iyy="${m*(3*r*r+h*h)/12}" iyz = "0"
                izz="${m*r*r/2}" />
        </inertial>
    </xacro:macro>

    <xacro:macro name="Box_inertial_matrix" params="m l w h">
       <inertial>
               <mass value="${m}" />
               <inertia ixx="${m*(h*h + w*w)/12}" ixy = "0" ixz = "0"
                   iyy="${m*(h*h + l*l)/12}" iyz= "0"
                   izz="${m*(w*w +l*l)/12}" />
       </inertial>
   </xacro:macro>
</robot>
2.3.2 底盘 Xacro 文件
<!--
    使用 xacro 优化 URDF 版的小车底盘实现:

    实现思路:
    1.将一些常量、变量封装为 xacro:property
      比如:PI 值、小车底盘半径、离地间距、车轮半径、宽度 ....
    2.使用 宏 封装驱动轮以及支撑轮实现,调用相关宏生成驱动轮与支撑轮

-->
<robot name="my_base" xmlns:xacro="http://www.ros.org/wiki/xacro">

    <xacro:property name="PI" value="3.1415926"/>

    <material name="black">
        <color rgba="0.0 0.0 0.0 1.0" />
    </material>

    <xacro:property name="base_footprint_radius" value="0.001" />
    <xacro:property name="base_link_radius" value="0.1" />
    <xacro:property name="base_link_length" value="0.08" />
    <xacro:property name="earth_space" value="0.015" />
    <xacro:property name="base_link_m" value="0.5" />


    <link name="base_footprint">
      <visual>
        <geometry>
          <sphere radius="${base_footprint_radius}" />
        </geometry>
      </visual>
    </link>

    <link name="base_link">
      <visual>
        <geometry>
          <cylinder radius="${base_link_radius}" length="${base_link_length}" />
        </geometry>
        <origin xyz="0 0 0" rpy="0 0 0" />
        <material name="yellow">
          <color rgba="0.5 0.3 0.0 0.5" />
        </material>
      </visual>
      <collision>
        <geometry>
          <cylinder radius="${base_link_radius}" length="${base_link_length}" />
        </geometry>
        <origin xyz="0 0 0" rpy="0 0 0" />
      </collision>
      <xacro:cylinder_inertial_matrix m="${base_link_m}" r="${base_link_radius}" h="${base_link_length}" />

    </link>


    <joint name="base_link2base_footprint" type="fixed">
      <parent link="base_footprint" />
      <child link="base_link" />
      <origin xyz="0 0 ${earth_space + base_link_length / 2 }" />
    </joint>
    <gazebo reference="base_link">
        <material>Gazebo/Yellow</material>
    </gazebo>


    <xacro:property name="wheel_radius" value="0.0325" />
    <xacro:property name="wheel_length" value="0.015" />
    <xacro:property name="wheel_m" value="0.05" />


    <xacro:macro name="add_wheels" params="name flag">
      <link name="${name}_wheel">
        <visual>
          <geometry>
            <cylinder radius="${wheel_radius}" length="${wheel_length}" />
          </geometry>
          <origin xyz="0.0 0.0 0.0" rpy="${PI / 2} 0.0 0.0" />
          <material name="black" />
        </visual>
        <collision>
          <geometry>
            <cylinder radius="${wheel_radius}" length="${wheel_length}" />
          </geometry>
          <origin xyz="0.0 0.0 0.0" rpy="${PI / 2} 0.0 0.0" />
        </collision>
        <xacro:cylinder_inertial_matrix m="${wheel_m}" r="${wheel_radius}" h="${wheel_length}" />

      </link>

      <joint name="${name}_wheel2base_link" type="continuous">
        <parent link="base_link" />
        <child link="${name}_wheel" />
        <origin xyz="0 ${flag * base_link_radius} ${-(earth_space + base_link_length / 2 - wheel_radius) }" />
        <axis xyz="0 1 0" />
      </joint>

      <gazebo reference="${name}_wheel">
        <material>Gazebo/Red</material>
      </gazebo>

    </xacro:macro>
    <xacro:add_wheels name="left" flag="1" />
    <xacro:add_wheels name="right" flag="-1" />

    <xacro:property name="support_wheel_radius" value="0.0075" />
    <xacro:property name="support_wheel_m" value="0.03" />


    <xacro:macro name="add_support_wheel" params="name flag" >
      <link name="${name}_wheel">
        <visual>
            <geometry>
                <sphere radius="${support_wheel_radius}" />
            </geometry>
            <origin xyz="0 0 0" rpy="0 0 0" />
            <material name="black" />
        </visual>
        <collision>
            <geometry>
                <sphere radius="${support_wheel_radius}" />
            </geometry>
            <origin xyz="0 0 0" rpy="0 0 0" />
        </collision>
        <xacro:sphere_inertial_matrix m="${support_wheel_m}" r="${support_wheel_radius}" />
      </link>

      <joint name="${name}_wheel2base_link" type="continuous">
          <parent link="base_link" />
          <child link="${name}_wheel" />
          <origin xyz="${flag * (base_link_radius - support_wheel_radius)} 0 ${-(base_link_length / 2 + earth_space / 2)}" />
          <axis xyz="1 1 1" />
      </joint>
      <gazebo reference="${name}_wheel">
        <material>Gazebo/Red</material>
      </gazebo>
    </xacro:macro>

    <xacro:add_support_wheel name="front" flag="1" />
    <xacro:add_support_wheel name="back" flag="-1" />

</robot>
2.3.3 摄像头 Xacro 文件
<robot name="my_camera" xmlns:xacro="http://wiki.ros.org/xacro">

    <xacro:property name="camera_length" value="0.01" />
    <xacro:property name="camera_width" value="0.025" />
    <xacro:property name="camera_height" value="0.025" />
    <xacro:property name="camera_x" value="0.08" />
    <xacro:property name="camera_y" value="0.0" />
    <xacro:property name="camera_z" value="${base_link_length / 2 + camera_height / 2}" />

    <xacro:property name="camera_m" value="0.01" />

    <link name="camera">
        <visual>
            <geometry>
                <box size="${camera_length} ${camera_width} ${camera_height}" />
            </geometry>
            <origin xyz="0.0 0.0 0.0" rpy="0.0 0.0 0.0" />
            <material name="black" />
        </visual>
        <collision>
            <geometry>
                <box size="${camera_length} ${camera_width} ${camera_height}" />
            </geometry>
            <origin xyz="0.0 0.0 0.0" rpy="0.0 0.0 0.0" />
        </collision>
        <xacro:Box_inertial_matrix m="${camera_m}" l="${camera_length}" w="${camera_width}" h="${camera_height}" />
    </link>

    <joint name="camera2base_link" type="fixed">
        <parent link="base_link" />
        <child link="camera" />
        <origin xyz="${camera_x} ${camera_y} ${camera_z}" />
    </joint>
    <gazebo reference="camera">
        <material>Gazebo/Blue</material>
    </gazebo>
</robot>
2.3.4 雷达 Xacro 文件
<robot name="my_laser" xmlns:xacro="http://wiki.ros.org/xacro">


    <xacro:property name="support_length" value="0.15" />
    <xacro:property name="support_radius" value="0.01" />
    <xacro:property name="support_x" value="0.0" />
    <xacro:property name="support_y" value="0.0" />
    <xacro:property name="support_z" value="${base_link_length / 2 + support_length / 2}" />


    <xacro:property name="support_m" value="0.02" />

    <link name="support">
        <visual>
            <geometry>
                <cylinder radius="${support_radius}" length="${support_length}" />
            </geometry>
            <origin xyz="0.0 0.0 0.0" rpy="0.0 0.0 0.0" />
            <material name="red">
                <color rgba="0.8 0.2 0.0 0.8" />
            </material>
        </visual>

        <collision>
            <geometry>
                <cylinder radius="${support_radius}" length="${support_length}" />
            </geometry>
            <origin xyz="0.0 0.0 0.0" rpy="0.0 0.0 0.0" />
        </collision>

        <xacro:cylinder_inertial_matrix m="${support_m}" r="${support_radius}" h="${support_length}" />

    </link>

    <joint name="support2base_link" type="fixed">
        <parent link="base_link" />
        <child link="support" />
        <origin xyz="${support_x} ${support_y} ${support_z}" />
    </joint>

    <gazebo reference="support">
        <material>Gazebo/White</material>
    </gazebo>

    <xacro:property name="laser_length" value="0.05" />
    <xacro:property name="laser_radius" value="0.03" />
    <xacro:property name="laser_x" value="0.0" />
    <xacro:property name="laser_y" value="0.0" />
    <xacro:property name="laser_z" value="${support_length / 2 + laser_length / 2}" />

    <xacro:property name="laser_m" value="0.1" />

    <link name="laser">
        <visual>
            <geometry>
                <cylinder radius="${laser_radius}" length="${laser_length}" />
            </geometry>
            <origin xyz="0.0 0.0 0.0" rpy="0.0 0.0 0.0" />
            <material name="black" />
        </visual>
        <collision>
            <geometry>
                <cylinder radius="${laser_radius}" length="${laser_length}" />
            </geometry>
            <origin xyz="0.0 0.0 0.0" rpy="0.0 0.0 0.0" />
        </collision>
        <xacro:cylinder_inertial_matrix m="${laser_m}" r="${laser_radius}" h="${laser_length}" />
    </link>

    <joint name="laser2support" type="fixed">
        <parent link="support" />
        <child link="laser" />
        <origin xyz="${laser_x} ${laser_y} ${laser_z}" />
    </joint>
    <gazebo reference="laser">
        <material>Gazebo/Black</material>
    </gazebo>
</robot>
2.3.5 组合底盘、摄像头与雷达的 Xacro 文件
<robot name="mycar" xmlns:xacro="http://wiki.ros.org/xacro">
    <xacro:include filename="head.urdf.xacro" />
    <xacro:include filename="demo06_base_footprint.urdf.xacro" />
    <xacro:include filename="demo07_car_camera.urdf.xacro" />
    <xacro:include filename="demo08_car_lidar.urdf.xacro" />
</robot>
2.3.6 launch 文件
<launch>
    <!-- 将 Urdf 文件的内容加载到参数服务器 -->
    <param name="robot_description" command="$(find xacro)/xacro $(find urdf02_gazebo)/urdf/xacro/car.urdf.xacro" />
    <!-- 启动 gazebo -->
    <include file="$(find gazebo_ros)/launch/empty_world.launch" />

    <!-- 在 gazebo 中显示机器人模型 -->
    <node pkg="gazebo_ros" type="spawn_model" name="model" args="-urdf -model mycar -param robot_description"  />
</launch>
PS
之前摸索的时候遇到了以下问题:
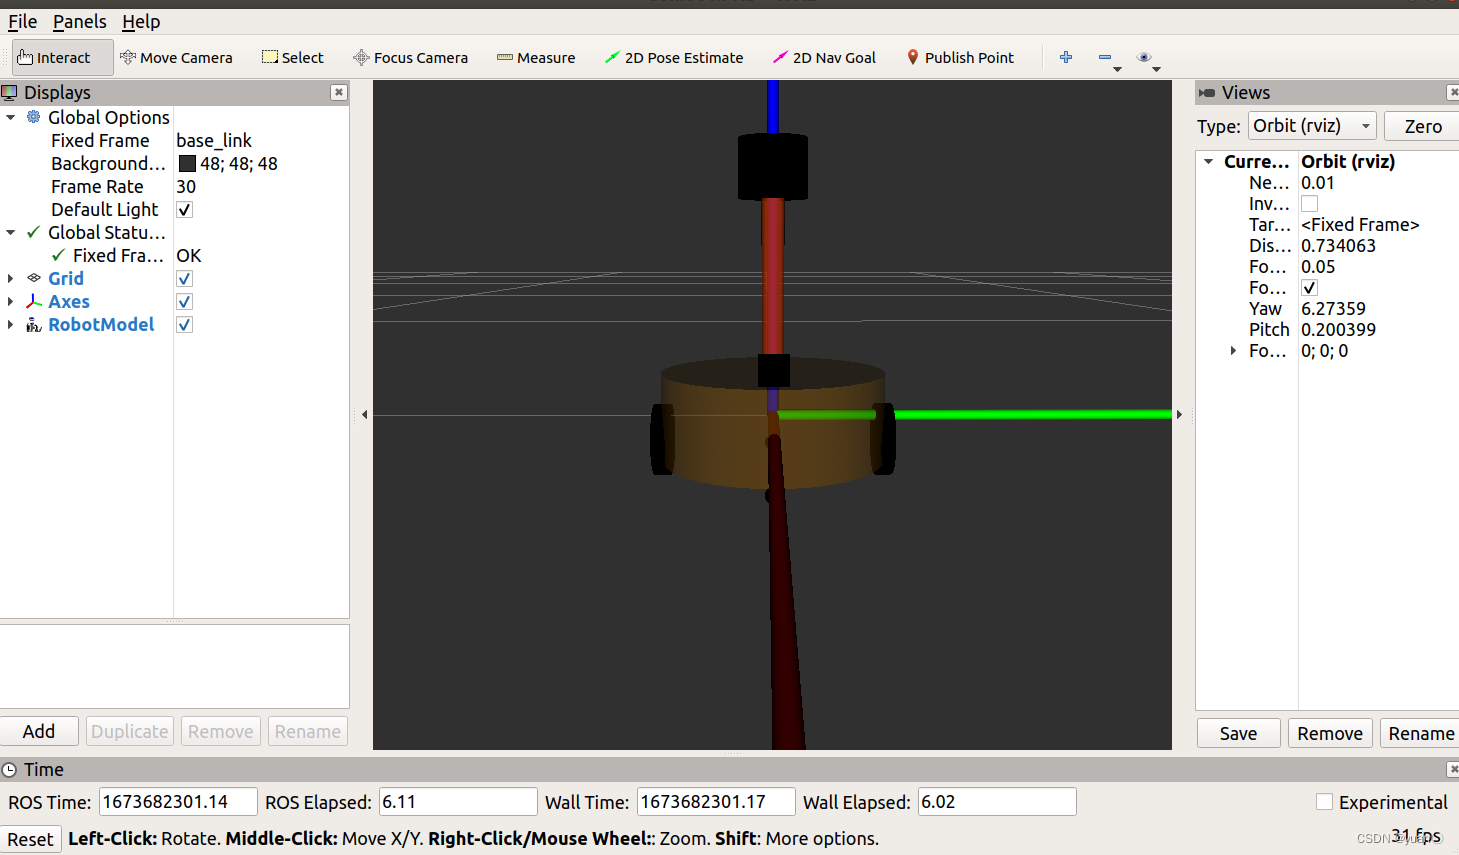
首先启动rviz文件,其运行正常:
 之后启动gazebo,出现以下报错
Error:   No link elements found in urdf file
         at line 179 in /build/urdfdom-YMMa9X/urdfdom-1.0.0/urdf_parser/src/model.cpp
Error [parser_urdf.cc:3166] Unable to call parseURDF on robot model
Error [parser.cc:406] parse as old deprecated model file failed.
关闭gazebo,再启动rviz,出现ROS No transform from [sth] to [sth]的问题,只有将roscore重启才恢复正常.后来发现是xacro文件以及launch文件有写错的地方,更正后再次启动就不会出现问题了.
2.4 Gazebo仿真环境搭建
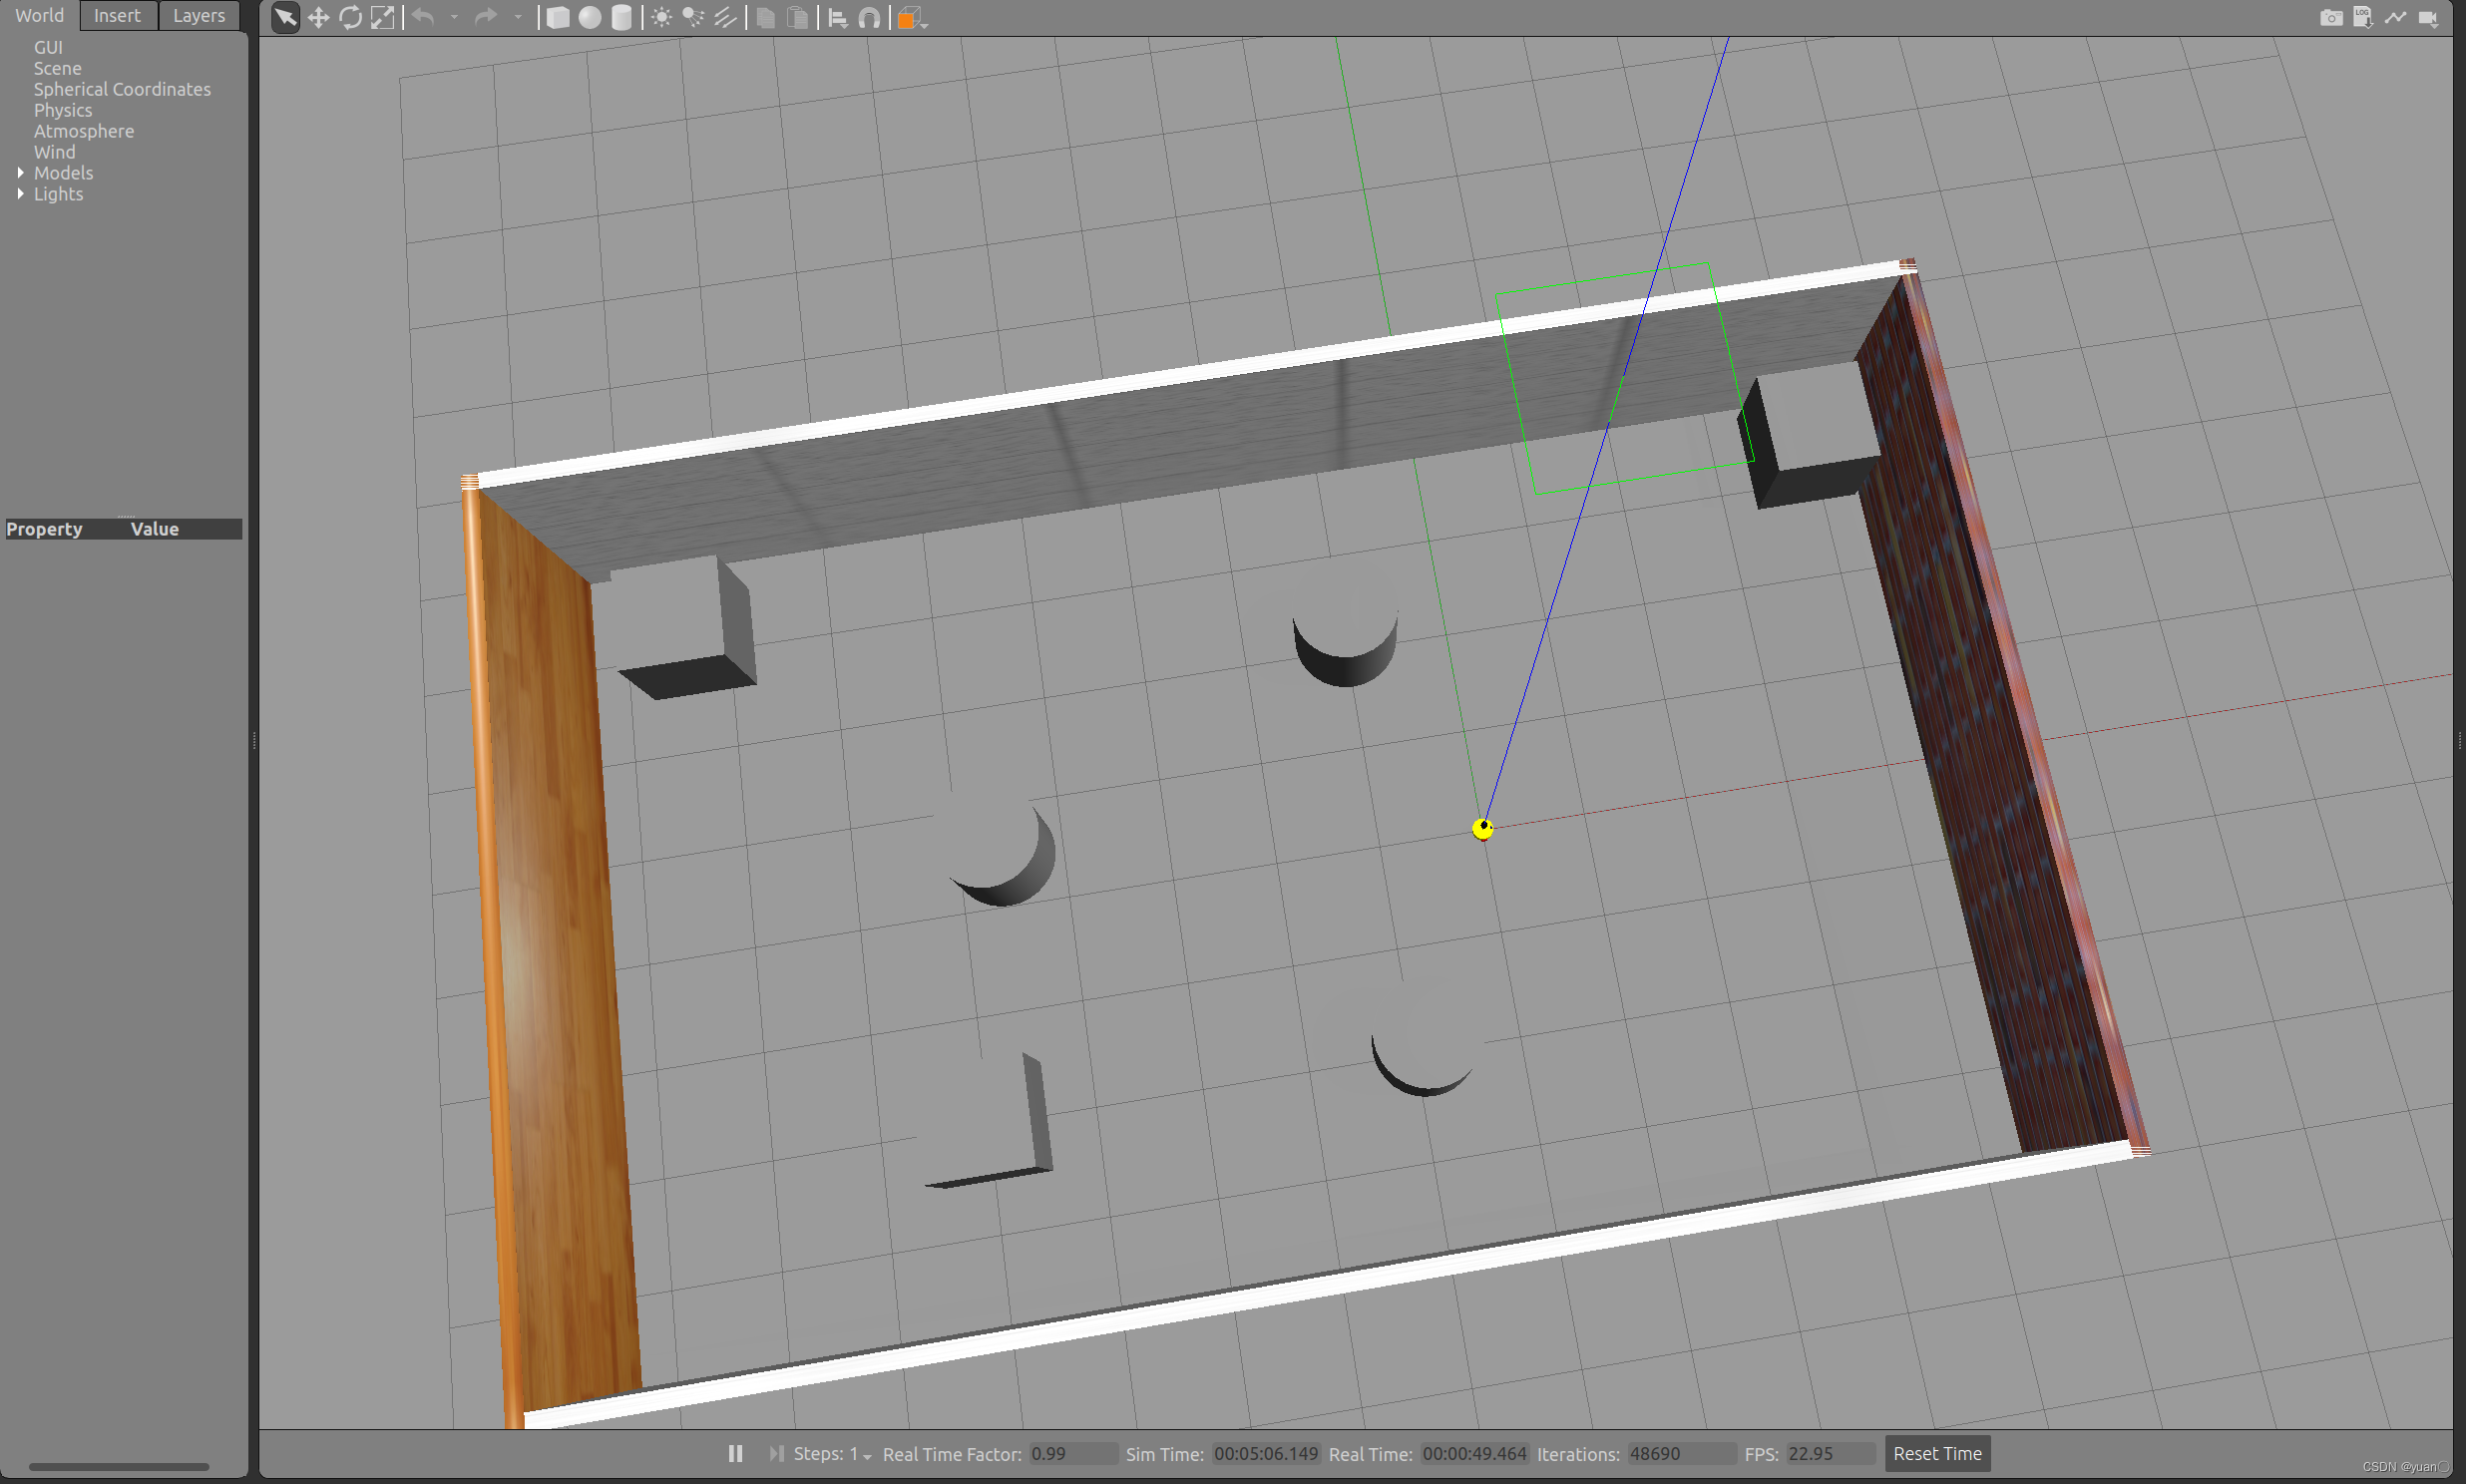
2.4.0 启动已有仿真环境
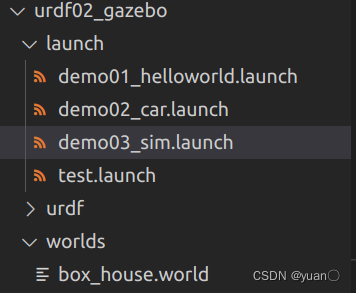
将已有world文件移到功能包的worlds目录下
编写launch文件
<launch>
    <!-- 将 Urdf 文件的内容加载到参数服务器 -->
    <param name="robot_description" command="$(find xacro)/xacro $(find urdf02_gazebo)/urdf/xacro/car.urdf.xacro" />
    <!-- 启动 gazebo -->
    <include file="$(find gazebo_ros)/launch/empty_world.launch" >
        <arg name="world_name" value="$(find urdf02_gazebo)/worlds/box_house.world"/>
    </include>
    <!-- 在 gazebo 中显示机器人模型 -->
    <node pkg="gazebo_ros" type="spawn_model" name="model" args="-urdf -model mycar -param robot_description"  />
</launch>
注意: <arg name="world_name" value="$(find urdf02_gazebo)/worlds/box_house.world"/>中的world_name是固定的.
2.4.1 添加内置组件创建仿真环境
启动 Gazebo 并添加组件
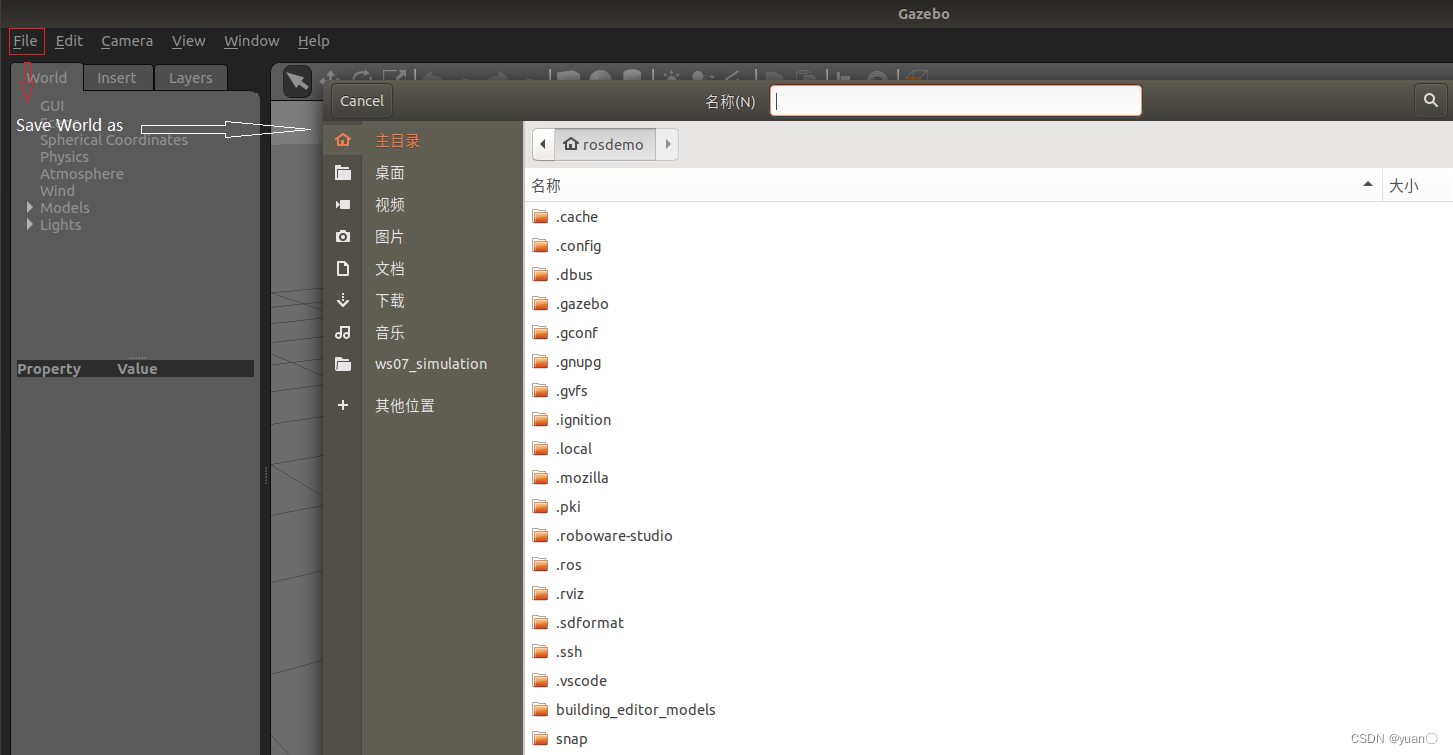
 添加完毕后,选择 file —> Save World as 选择保存路径(功能包下: worlds 目录),文件名自定义,后缀名设置为 .world
 之后就和2.4.0中一样运行就行了
2.4.2 自定义仿真环境
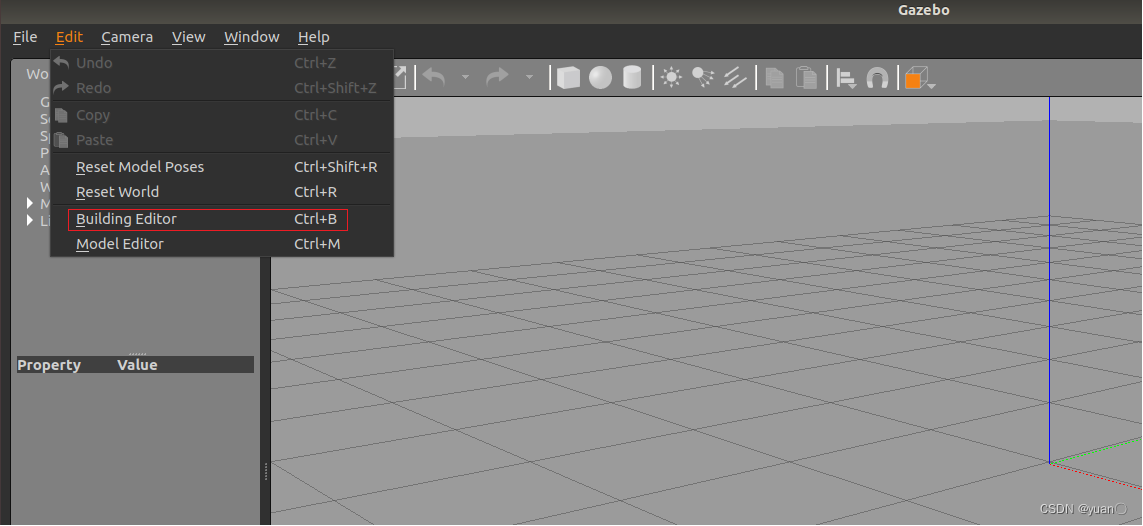
启动 gazebo 打开构建面板,绘制仿真环境
保存构建的环境
点击: 左上角 file —> Save (保存路径功能包下的: models)
然后 file —> Exit Building Editor
保存为 world 文件
可以像方式1一样再添加一些插件,然后保存为 world 文件(保存路径功能包下的: worlds)








![[LCTF]bestphp2022安洵杯 babyphp](https://img-blog.csdnimg.cn/98d257bb00534a9796c442cb1cd0a2ad.png)
![[极客大挑战 2019]Secret File](https://img-blog.csdnimg.cn/526ac40f7e97411aa1dc2c499a263214.png)