在进行adb调试的时候,有时候需要使用wifi连接,或者wifi连接较为方便,早些的Android上,需要设置端口等操作,
adb tcpip 6666参考android wifi adb 调试 - 简书 (jianshu.com)
好几步操作,
在Android13上,无线adb连接更加方便了,
手机和电脑连接同一个wifi后,在手机的开发者选项中,可以看到无线调试选项

打开无线调试选项,
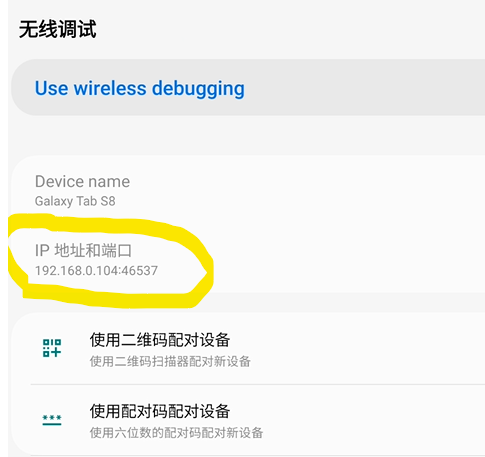
可以看到,已经设置了默认的端口,不需要我们设置了,
输入命令,连接这个IP和端口
adb connect 192.168.0.104:46537
就可以连接了
connected to 192.168.0.104:46537
就可以adb调试了
dumpsys ethernet
Current Ethernet state:
EthernetTracker
Ethernet State: enabled
Ethernet interface name filter: eth\d
Default interface: null
Default interface mode: 1
Tethered interface requests: 0
Listeners: 1
可以在通知栏上关闭连接,跳转到开发者模式的关闭选项


![[acwing周赛复盘] 第 86 场周赛20230114](https://img-blog.csdnimg.cn/82cf94fe746b4b4ab41e8c01aaed2f46.png)