目录
综合梯度
设置
综合梯度算法
可视化渐变和集成渐变的辅助类
让我们试一试
政安晨的个人主页:政安晨
欢迎 👍点赞✍评论⭐收藏
收录专栏: TensorFlow与Keras机器学习实战
希望政安晨的博客能够对您有所裨益,如有不足之处,欢迎在评论区提出指正!
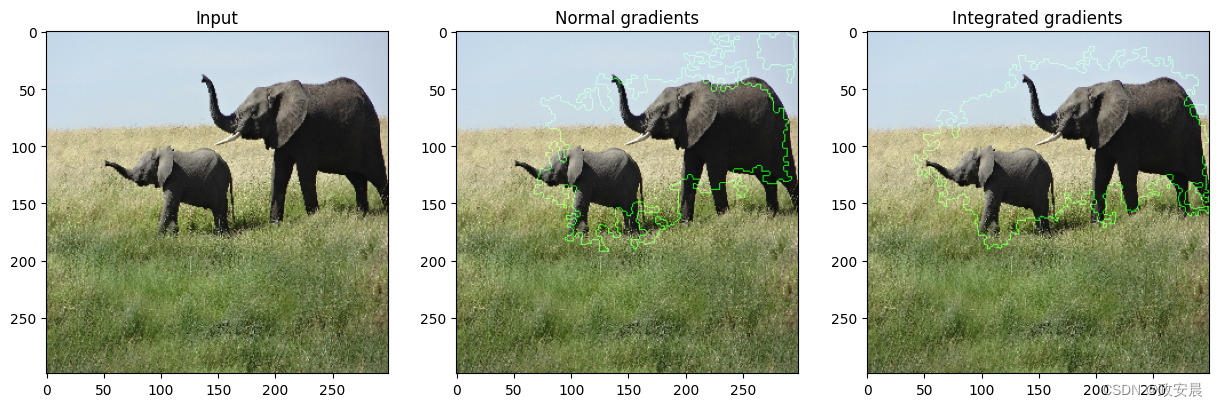
本文目标:如何获得分类模型的综合梯度。
综合梯度
集成梯度是一种将分类模型的预测归因于其输入特征的技术。它是一种模型可解释性技术:您可以用它来直观显示输入特征与模型预测之间的关系。
综合梯度是计算预测输出与输入特征之间梯度的一种变体。要计算综合梯度,我们需要执行以下步骤:
1. 识别输入和输出。在我们的例子中,输入是图像,输出是模型的最后一层(具有 softmax 激活的密集层)。
2. 在对特定数据点进行预测时,计算哪些特征对神经网络很重要。要确定这些特征,我们需要选择一个基线输入。基线输入可以是黑色图像(所有像素值均设为零)或随机噪音。基线输入的形状必须与我们的输入图像相同,例如 (299, 299, 3)。
3. 按照给定的步数对基线进行插值。步数代表我们对给定输入图像进行梯度逼近时所需的步数。步数是一个超参数。作者建议使用 20 到 1000 步。
4. 预处理这些插值图像并进行前向传递。
5. 获取这些插值图像的梯度。6. 使用梯形法则对梯度积分进行近似计算。
要深入了解综合梯度以及这种方法的工作原理。
设置
import numpy as np
import matplotlib.pyplot as plt
from scipy import ndimage
from IPython.display import Image, display

import tensorflow as tf
import keras
from keras import layers
from keras.applications import xception


# Size of the input image
img_size = (299, 299, 3)

# Load Xception model with imagenet weights
model = xception.Xception(weights="imagenet")

# The local path to our target image
img_path = keras.utils.get_file("elephant.jpg", "https://i.imgur.com/Bvro0YD.png")
display(Image(img_path))
综合梯度算法
def get_img_array(img_path, size=(299, 299)):
    # `img` is a PIL image of size 299x299
    img = keras.utils.load_img(img_path, target_size=size)
    # `array` is a float32 Numpy array of shape (299, 299, 3)
    array = keras.utils.img_to_array(img)
    # We add a dimension to transform our array into a "batch"
    # of size (1, 299, 299, 3)
    array = np.expand_dims(array, axis=0)
    return array


def get_gradients(img_input, top_pred_idx):
    """Computes the gradients of outputs w.r.t input image.

    Args:
        img_input: 4D image tensor
        top_pred_idx: Predicted label for the input image

    Returns:
        Gradients of the predictions w.r.t img_input
    """
    images = tf.cast(img_input, tf.float32)

    with tf.GradientTape() as tape:
        tape.watch(images)
        preds = model(images)
        top_class = preds[:, top_pred_idx]

    grads = tape.gradient(top_class, images)
    return grads


def get_integrated_gradients(img_input, top_pred_idx, baseline=None, num_steps=50):
    """Computes Integrated Gradients for a predicted label.

    Args:
        img_input (ndarray): Original image
        top_pred_idx: Predicted label for the input image
        baseline (ndarray): The baseline image to start with for interpolation
        num_steps: Number of interpolation steps between the baseline
            and the input used in the computation of integrated gradients. These
            steps along determine the integral approximation error. By default,
            num_steps is set to 50.

    Returns:
        Integrated gradients w.r.t input image
    """
    # If baseline is not provided, start with a black image
    # having same size as the input image.
    if baseline is None:
        baseline = np.zeros(img_size).astype(np.float32)
    else:
        baseline = baseline.astype(np.float32)

    # 1. Do interpolation.
    img_input = img_input.astype(np.float32)
    interpolated_image = [
        baseline + (step / num_steps) * (img_input - baseline)
        for step in range(num_steps + 1)
    ]
    interpolated_image = np.array(interpolated_image).astype(np.float32)

    # 2. Preprocess the interpolated images
    interpolated_image = xception.preprocess_input(interpolated_image)

    # 3. Get the gradients
    grads = []
    for i, img in enumerate(interpolated_image):
        img = tf.expand_dims(img, axis=0)
        grad = get_gradients(img, top_pred_idx=top_pred_idx)
        grads.append(grad[0])
    grads = tf.convert_to_tensor(grads, dtype=tf.float32)

    # 4. Approximate the integral using the trapezoidal rule
    grads = (grads[:-1] + grads[1:]) / 2.0
    avg_grads = tf.reduce_mean(grads, axis=0)

    # 5. Calculate integrated gradients and return
    integrated_grads = (img_input - baseline) * avg_grads
    return integrated_grads


def random_baseline_integrated_gradients(
    img_input, top_pred_idx, num_steps=50, num_runs=2
):
    """Generates a number of random baseline images.

    Args:
        img_input (ndarray): 3D image
        top_pred_idx: Predicted label for the input image
        num_steps: Number of interpolation steps between the baseline
            and the input used in the computation of integrated gradients. These
            steps along determine the integral approximation error. By default,
            num_steps is set to 50.
        num_runs: number of baseline images to generate

    Returns:
        Averaged integrated gradients for `num_runs` baseline images
    """
    # 1. List to keep track of Integrated Gradients (IG) for all the images
    integrated_grads = []

    # 2. Get the integrated gradients for all the baselines
    for run in range(num_runs):
        baseline = np.random.random(img_size) * 255
        igrads = get_integrated_gradients(
            img_input=img_input,
            top_pred_idx=top_pred_idx,
            baseline=baseline,
            num_steps=num_steps,
        )
        integrated_grads.append(igrads)

    # 3. Return the average integrated gradients for the image
    integrated_grads = tf.convert_to_tensor(integrated_grads)
    return tf.reduce_mean(integrated_grads, axis=0)
可视化渐变和集成渐变的辅助类
class GradVisualizer:
    """Plot gradients of the outputs w.r.t an input image."""

    def __init__(self, positive_channel=None, negative_channel=None):
        if positive_channel is None:
            self.positive_channel = [0, 255, 0]
        else:
            self.positive_channel = positive_channel

        if negative_channel is None:
            self.negative_channel = [255, 0, 0]
        else:
            self.negative_channel = negative_channel

    def apply_polarity(self, attributions, polarity):
        if polarity == "positive":
            return np.clip(attributions, 0, 1)
        else:
            return np.clip(attributions, -1, 0)

    def apply_linear_transformation(
        self,
        attributions,
        clip_above_percentile=99.9,
        clip_below_percentile=70.0,
        lower_end=0.2,
    ):
        # 1. Get the thresholds
        m = self.get_thresholded_attributions(
            attributions, percentage=100 - clip_above_percentile
        )
        e = self.get_thresholded_attributions(
            attributions, percentage=100 - clip_below_percentile
        )

        # 2. Transform the attributions by a linear function f(x) = a*x + b such that
        # f(m) = 1.0 and f(e) = lower_end
        transformed_attributions = (1 - lower_end) * (np.abs(attributions) - e) / (
            m - e
        ) + lower_end

        # 3. Make sure that the sign of transformed attributions is the same as original attributions
        transformed_attributions *= np.sign(attributions)

        # 4. Only keep values that are bigger than the lower_end
        transformed_attributions *= transformed_attributions >= lower_end

        # 5. Clip values and return
        transformed_attributions = np.clip(transformed_attributions, 0.0, 1.0)
        return transformed_attributions

    def get_thresholded_attributions(self, attributions, percentage):
        if percentage == 100.0:
            return np.min(attributions)

        # 1. Flatten the attributions
        flatten_attr = attributions.flatten()

        # 2. Get the sum of the attributions
        total = np.sum(flatten_attr)

        # 3. Sort the attributions from largest to smallest.
        sorted_attributions = np.sort(np.abs(flatten_attr))[::-1]

        # 4. Calculate the percentage of the total sum that each attribution
        # and the values about it contribute.
        cum_sum = 100.0 * np.cumsum(sorted_attributions) / total

        # 5. Threshold the attributions by the percentage
        indices_to_consider = np.where(cum_sum >= percentage)[0][0]

        # 6. Select the desired attributions and return
        attributions = sorted_attributions[indices_to_consider]
        return attributions

    def binarize(self, attributions, threshold=0.001):
        return attributions > threshold

    def morphological_cleanup_fn(self, attributions, structure=np.ones((4, 4))):
        closed = ndimage.grey_closing(attributions, structure=structure)
        opened = ndimage.grey_opening(closed, structure=structure)
        return opened

    def draw_outlines(
        self,
        attributions,
        percentage=90,
        connected_component_structure=np.ones((3, 3)),
    ):
        # 1. Binarize the attributions.
        attributions = self.binarize(attributions)

        # 2. Fill the gaps
        attributions = ndimage.binary_fill_holes(attributions)

        # 3. Compute connected components
        connected_components, num_comp = ndimage.label(
            attributions, structure=connected_component_structure
        )

        # 4. Sum up the attributions for each component
        total = np.sum(attributions[connected_components > 0])
        component_sums = []
        for comp in range(1, num_comp + 1):
            mask = connected_components == comp
            component_sum = np.sum(attributions[mask])
            component_sums.append((component_sum, mask))

        # 5. Compute the percentage of top components to keep
        sorted_sums_and_masks = sorted(component_sums, key=lambda x: x[0], reverse=True)
        sorted_sums = list(zip(*sorted_sums_and_masks))[0]
        cumulative_sorted_sums = np.cumsum(sorted_sums)
        cutoff_threshold = percentage * total / 100
        cutoff_idx = np.where(cumulative_sorted_sums >= cutoff_threshold)[0][0]
        if cutoff_idx > 2:
            cutoff_idx = 2

        # 6. Set the values for the kept components
        border_mask = np.zeros_like(attributions)
        for i in range(cutoff_idx + 1):
            border_mask[sorted_sums_and_masks[i][1]] = 1

        # 7. Make the mask hollow and show only the border
        eroded_mask = ndimage.binary_erosion(border_mask, iterations=1)
        border_mask[eroded_mask] = 0

        # 8. Return the outlined mask
        return border_mask

    def process_grads(
        self,
        image,
        attributions,
        polarity="positive",
        clip_above_percentile=99.9,
        clip_below_percentile=0,
        morphological_cleanup=False,
        structure=np.ones((3, 3)),
        outlines=False,
        outlines_component_percentage=90,
        overlay=True,
    ):
        if polarity not in ["positive", "negative"]:
            raise ValueError(
                f""" Allowed polarity values: 'positive' or 'negative'
                                    but provided {polarity}"""
            )
        if clip_above_percentile < 0 or clip_above_percentile > 100:
            raise ValueError("clip_above_percentile must be in [0, 100]")

        if clip_below_percentile < 0 or clip_below_percentile > 100:
            raise ValueError("clip_below_percentile must be in [0, 100]")

        # 1. Apply polarity
        if polarity == "positive":
            attributions = self.apply_polarity(attributions, polarity=polarity)
            channel = self.positive_channel
        else:
            attributions = self.apply_polarity(attributions, polarity=polarity)
            attributions = np.abs(attributions)
            channel = self.negative_channel

        # 2. Take average over the channels
        attributions = np.average(attributions, axis=2)

        # 3. Apply linear transformation to the attributions
        attributions = self.apply_linear_transformation(
            attributions,
            clip_above_percentile=clip_above_percentile,
            clip_below_percentile=clip_below_percentile,
            lower_end=0.0,
        )

        # 4. Cleanup
        if morphological_cleanup:
            attributions = self.morphological_cleanup_fn(
                attributions, structure=structure
            )
        # 5. Draw the outlines
        if outlines:
            attributions = self.draw_outlines(
                attributions, percentage=outlines_component_percentage
            )

        # 6. Expand the channel axis and convert to RGB
        attributions = np.expand_dims(attributions, 2) * channel

        # 7.Superimpose on the original image
        if overlay:
            attributions = np.clip((attributions * 0.8 + image), 0, 255)
        return attributions

    def visualize(
        self,
        image,
        gradients,
        integrated_gradients,
        polarity="positive",
        clip_above_percentile=99.9,
        clip_below_percentile=0,
        morphological_cleanup=False,
        structure=np.ones((3, 3)),
        outlines=False,
        outlines_component_percentage=90,
        overlay=True,
        figsize=(15, 8),
    ):
        # 1. Make two copies of the original image
        img1 = np.copy(image)
        img2 = np.copy(image)

        # 2. Process the normal gradients
        grads_attr = self.process_grads(
            image=img1,
            attributions=gradients,
            polarity=polarity,
            clip_above_percentile=clip_above_percentile,
            clip_below_percentile=clip_below_percentile,
            morphological_cleanup=morphological_cleanup,
            structure=structure,
            outlines=outlines,
            outlines_component_percentage=outlines_component_percentage,
            overlay=overlay,
        )

        # 3. Process the integrated gradients
        igrads_attr = self.process_grads(
            image=img2,
            attributions=integrated_gradients,
            polarity=polarity,
            clip_above_percentile=clip_above_percentile,
            clip_below_percentile=clip_below_percentile,
            morphological_cleanup=morphological_cleanup,
            structure=structure,
            outlines=outlines,
            outlines_component_percentage=outlines_component_percentage,
            overlay=overlay,
        )

        _, ax = plt.subplots(1, 3, figsize=figsize)
        ax[0].imshow(image)
        ax[1].imshow(grads_attr.astype(np.uint8))
        ax[2].imshow(igrads_attr.astype(np.uint8))

        ax[0].set_title("Input")
        ax[1].set_title("Normal gradients")
        ax[2].set_title("Integrated gradients")
        plt.show()
让我们试一试
# 1. Convert the image to numpy array
img = get_img_array(img_path)

# 2. Keep a copy of the original image
orig_img = np.copy(img[0]).astype(np.uint8)

# 3. Preprocess the image
img_processed = tf.cast(xception.preprocess_input(img), dtype=tf.float32)

# 4. Get model predictions
preds = model.predict(img_processed)
top_pred_idx = tf.argmax(preds[0])
print("Predicted:", top_pred_idx, xception.decode_predictions(preds, top=1)[0])

# 5. Get the gradients of the last layer for the predicted label
grads = get_gradients(img_processed, top_pred_idx=top_pred_idx)

# 6. Get the integrated gradients
igrads = random_baseline_integrated_gradients(
    np.copy(orig_img), top_pred_idx=top_pred_idx, num_steps=50, num_runs=2
)

# 7. Process the gradients and plot
vis = GradVisualizer()
vis.visualize(
    image=orig_img,
    gradients=grads[0].numpy(),
    integrated_gradients=igrads.numpy(),
    clip_above_percentile=99,
    clip_below_percentile=0,
)

vis.visualize(
    image=orig_img,
    gradients=grads[0].numpy(),
    integrated_gradients=igrads.numpy(),
    clip_above_percentile=95,
    clip_below_percentile=28,
    morphological_cleanup=True,
    outlines=True,
)
演绎展示:
 1/1 ━━━━━━━━━━━━━━━━━━━━ 5s 5s/step

WARNING: All log messages before absl::InitializeLog() is called are written to STDERR
I0000 00:00:1699486705.534012   86541 device_compiler.h:187] Compiled cluster using XLA!  This line is logged at most once for the lifetime of the process.

Predicted: tf.Tensor(386, shape=(), dtype=int64) [('n02504458', 'African_elephant', 0.8871446)]
