一、获取 Git 仓库
通常有两种获取 Git 项目仓库的方式:
1. 将尚未进行版本控制的本地目录转换为 Git 仓库;
2. 从其它服务器克隆 一个已存在的 Git 仓库。 两种方式都会在你的本地机器上得到一个工作就绪的 Git 仓库。
1.1 git init(本地初始化仓库)
如果你有一个尚未进行版本控制的项目目录,想要用 Git 来控制它,那么首先需要进入该项目目录中
[root@localhost /]# cd /home/morant/git_study/之后执行以下命令重命名分支:
[root@localhost git_study]# git branch -m mian再初始化:
[root@localhost git_study]# git init
该命令将创建一个名为 .git 的子目录,这个子目录含有你初始化的 Git 仓库中所有的必须文件,这些文件是 Git 仓库的骨干:
[root@localhost git_study]# ls -al
总用量 4
drwxr-xr-x.  3 root root     18  4月 15 19:48 .
drwx------. 15 1000 morant 4096  4月 15 19:47 ..
drwxr-xr-x.  7 root root    119  4月 15 19:50 .git
[root@localhost git_study]#
1.2 git clone(克隆现有的仓库)
如果你想获得一份已经存在了的 Git 仓库的拷贝,比如说,你想为某个开源项目贡献自己的一份力,这时就要用 到 git clone 命令
克隆仓库的命令是 git clone
[root@localhost git_study]# git clone https://gitee.com/god-bless-the-pill/MySQL.git二、记录每次更新
请记住,你工作目录下的每一个文件都不外乎这两种状态:已跟踪 或 未跟踪
2.1 git status(检查当前文件状态)
可以用 git status 命令查看哪些文件处于什么状态。 如果在克隆仓库后立即使用此命令,会看到类似这样的 输出:
[root@localhost git_study]# git status
位于分支 mian

尚无提交

未跟踪的文件:
  (使用 "git add <文件>..." 以包含要提交的内容)
	MySQL/

提交为空,但是存在尚未跟踪的文件(使用 "git add" 建立跟踪)
[root@localhost git_study]#
现在,让我们在项目下创建一个新的 test.txt 文件
[root@localhost git_study]# echo 'git_test' > test.txt
[root@localhost git_study]# ls
MySQL  test.txt
[root@localhost git_study]# git status
位于分支 mian

尚无提交

未跟踪的文件:
  (使用 "git add <文件>..." 以包含要提交的内容)
	MySQL/
	test.txt

提交为空,但是存在尚未跟踪的文件(使用 "git add" 建立跟踪)
[root@localhost git_study]#
可以发现 test.txt 文件位于 MySQL 下方
未跟踪的文件意味着 Git 在之前 的快照(提交)中没有这些文件;Git 不会自动将之纳入跟踪范围,除非你明明白白地告诉它
2.2 git add file(跟踪新文件)
使用命令 git add 开始跟踪一个文件
[root@localhost git_study]# git add test.txt 此时再运行 git status 命令,会看到 test.txt 文件已被跟踪,并处于暂存状态:
[root@localhost git_study]# git status
位于分支 mian

尚无提交

要提交的变更:
  (使用 "git rm --cached <文件>..." 以取消暂存)
	新文件:   test.txt

未跟踪的文件:
  (使用 "git add <文件>..." 以包含要提交的内容)
	MySQL/

[root@localhost git_study]#
git add 命令使用文件或目录的路径作为参数;如果参 数是目录的路径,该命令将递归地跟踪该目录下的所有文件
2.3 暂存已修改的文件
现在我们来修改一个已被跟踪的文件。 如果你修改了一个名为 test.txt 的已被跟踪的文件,然后运 行 git status 命令,会看到下面内容:
[root@localhost git_study]# git status
位于分支 mian

尚无提交

要提交的变更:
  (使用 "git rm --cached <文件>..." 以取消暂存)
	新文件:   test.txt

尚未暂存以备提交的变更:
  (使用 "git add <文件>..." 更新要提交的内容)
  (使用 "git restore <文件>..." 丢弃工作区的改动)
	修改:     test.txt

未跟踪的文件:
  (使用 "git add <文件>..." 以包含要提交的内容)
	MySQL/

[root@localhost git_study]#
文件 test.txt 出现在尚未暂存以备提交的变更这行下面,说明已跟踪文件的内容发生了变化,但还没有放到暂存区。 要暂存这次更新,需要运行 git add 命令
现在让 我们运行 git add 将“test.txt”放到暂存区,然后再看看 git status 的输出:
[root@localhost git_study]# git add test.txt
[root@localhost git_study]# git status
位于分支 mian

尚无提交

要提交的变更:
  (使用 "git rm --cached <文件>..." 以取消暂存)
	新文件:   test.txt

未跟踪的文件:
  (使用 "git add <文件>..." 以包含要提交的内容)
	MySQL/

[root@localhost git_study]#
现在文件都已暂存,下次提交时就会记录到仓库
2.4 git status -s(状态简览)
如果你使用 git status -s 命令或 git status --short 命令,你将得到一种格式更为紧凑的输出
[root@localhost git_study]# git status -s
AM love.txt
A  test.txt
?? MySQL/

A:表示新文件第一次被添加进版本管理。如果后面还跟着一个M,则表示该文件被添加到了暂存区,但之后又被修改过,且修改后的文件还没有被重新添加到暂存区。
M:表示文件被修改过。如果出现在第一列,表示文件在工作区被修改但还未添加到暂存区;如果出现在第二列,表示文件在暂存区有修改,即文件已经被git add命令添加到了暂存区。如果两个M连续出现(MM),则表示文件在工作区被修改后添加到了暂存区,但之后在工作区又被修改了,所以暂存区和工作区都有该文件的修改记录。
D:表示文件被删除。
R:表示文件被重命名。
C:表示文件被复制。
?:表示新添加的未跟踪文件。
2.5 .gitignore(忽略文件)
一般我们总会有些文件无需纳入 Git 的管理,也不希望它们总出现在未跟踪文件列表
在这种情况下,我们可以创建一个名为 .gitignore 的文件,列出要忽略的文件的模式。 来看一个实际的 .gitignore 例子:
[root@localhost git_study]# echo '*.[ab]' > .gitignore
[root@localhost git_study]# touch a.a
[root@localhost git_study]# touch b.b
[root@localhost git_study]# git status -s
AM love.txt
A  test.txt
?? .gitignore
?? MySQL/
?? dream.txt
这行告诉 Git 忽略所有以 .o 或 .a 结尾的文件
文件 .gitignore 的格式规范如下:
1. 所有空行或者以 # 开头的行都会被 Git 忽略
2. 可以使用标准的 glob 模式匹配,它会递归地应用在整个工作区中
3. 匹配模式可以以(/)开头防止递归
4. 匹配模式可以以(/)结尾指定目录
5. 要忽略指定模式以外的文件或目录,可以在模式前加上叹号(!)取反
# 忽略所有的 .a 文件
*.a

# 但跟踪所有的 lib.a,即便你在前面忽略了 .a 文件
!lib.a

# 只忽略当前目录下的 TODO 文件,而不忽略 subdir/TODO
/TODO

# 忽略任何目录下名为 build 的文件夹
build/

# 忽略 doc/notes.txt,但不忽略 doc/server/arch.txt
doc/*.txt

# 忽略 doc/ 目录及其所有子目录下的 .pdf 文件
doc/**/*.pdf
GitHub 有一个十分详细的针对数十种项目及语言的 .gitignore 文件列表
官网链接![]() https://github.com/github/gitignore
https://github.com/github/gitignore
2.6 git diff --staged(查看已暂存和未暂存的修改)
如果 git status 命令的输出对于你来说过于简略,而你想知道具体修改了什么地方,可以用 git diff 命令
假如再次修改 test.txt 文件后暂存,然后编辑 love.txt 文件后先不暂存, 运行 status 命令将会看 到:
[root@localhost git_study]# vim test.txt
[root@localhost git_study]# git add test.txt
[root@localhost git_study]# vim love.txt
[root@localhost git_study]# git status
位于分支 mian

尚无提交

要提交的变更:
  (使用 "git rm --cached <文件>..." 以取消暂存)
	新文件:   love.txt
	新文件:   test.txt

尚未暂存以备提交的变更:
  (使用 "git add <文件>..." 更新要提交的内容)
  (使用 "git restore <文件>..." 丢弃工作区的改动)
	修改:     love.txt

未跟踪的文件:
  (使用 "git add <文件>..." 以包含要提交的内容)
	.gitignore
	MySQL/
	dream.txt

[root@localhost git_study]#
要查看尚未暂存的文件更新了哪些部分,不加参数直接输入 git diff:
[root@localhost git_study]# git diff
diff --git a/love.txt b/love.txt
index 00e6690..bd5cd4c 100644
--- a/love.txt
+++ b/love.txt
@@ -1 +1,2 @@
-love
+love yourself
+ok?
此命令比较的是工作目录中当前文件和暂存区域快照之间的差异。 也就是修改之后还没有暂存起来的变化内容
若要查看已暂存的将要添加到下次提交里的内容,可以用 git diff --staged 命令。 这条命令将比对已暂存 文件与最后一次提交的文件差异:
[root@localhost git_study]# git diff --staged
diff --git a/love.txt b/love.txt
new file mode 100644
index 0000000..00e6690
--- /dev/null
+++ b/love.txt
@@ -0,0 +1 @@
+love
diff --git a/test.txt b/test.txt
new file mode 100644
index 0000000..578c4a1
--- /dev/null
+++ b/test.txt
@@ -0,0 +1,6 @@
+git_test
+
+new_git_tes
+
+come on!
+man!
该命令执行结果显示了两个文件的差异,分别是love.txt和test.txt。
对于love.txt文件的差异显示如下:
- 在/dev/null下,表示该文件是一个新文件。
- 在b/love.txt下,表示该文件是修改后的文件。
- 在索引index中,显示了文件的模式、原始的文件索引和新的文件索引。
- 在+++行下,显示了修改后的文件的内容,新增了一行"love"。
对于test.txt文件的差异显示如下:
- 在/dev/null下,表示该文件是一个新文件。
- 在b/test.txt下,表示该文件是修改后的文件。
- 在索引index中,显示了文件的模式、原始的文件索引和新的文件索引。
- 在+++行下,显示了修改后的文件的内容,新增了多行内容,分别是"git_test"、"new_git_test"、"come on!"和"man!"。
因此,该命令执行结果显示了两个文件的差异,分别是love.txt新增了一行"love",test.txt新增了四行内容
请注意,git diff 本身只显示尚未暂存的改动,而不是自上次提交以来所做的所有改动
2.7 git commit -m "string"(提交更新)
现在的暂存区已经准备就绪,可以提交了。 在此之前,请务必确认还有什么已修改或新建的文件还没有 git add 过, 否则提交的时候不会记录这些尚未暂存的变化。 这些已修改但未暂存的文件只会保留在本地磁盘
git commit这样会启动你选择的文本编辑器来输入提交说明
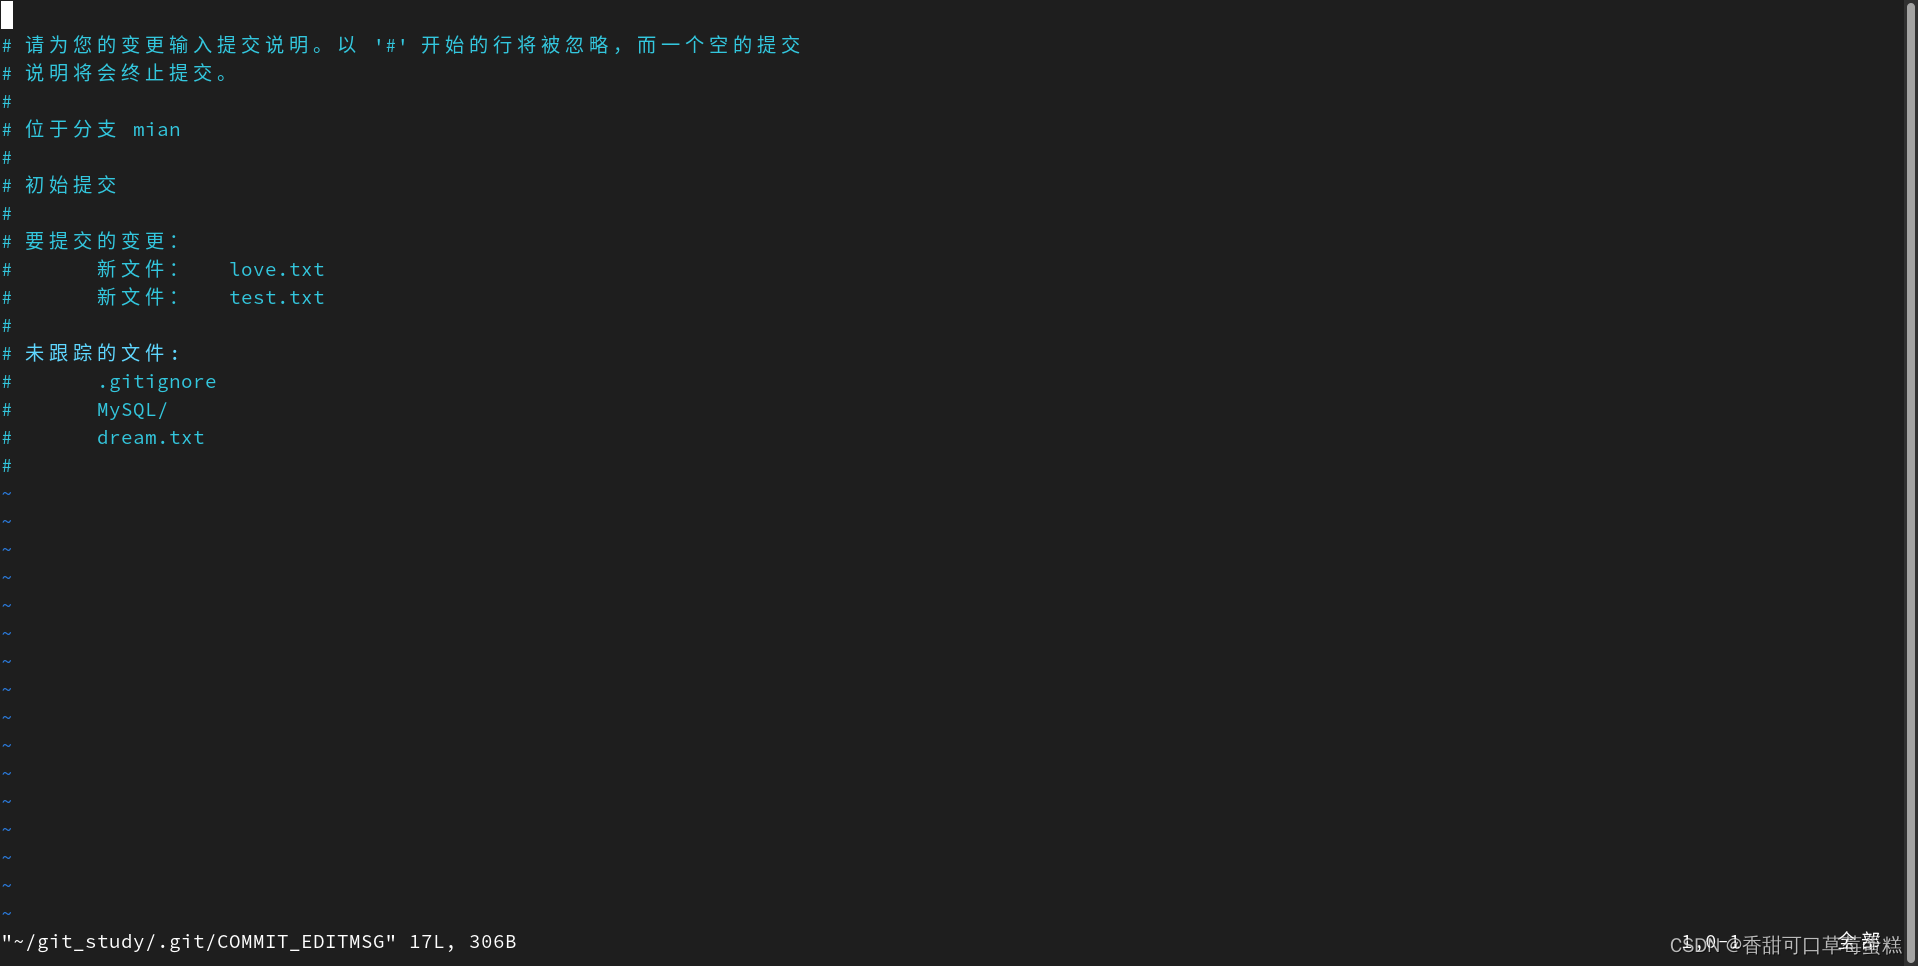
root@localhost git_study]# git commit
[mian(根提交) bdd3afc] basic-2.7(gitcommit)
 2 files changed, 8 insertions(+)
 create mode 100644 love.txt
 create mode 100644 test.txt
另外,你也可以在 commit 命令后添加 -m 选项,将提交信息与命令放在同一行,如下所示:
[root@localhost git_study]# git commit -m "basic-2.7(git commit -m)"
[mian bb2a7f8] basic-2.7(git commit -m)
 1 file changed, 1 insertion(+)
 create mode 100644 dream.txt
提交后它会告诉你,当前是在哪个分支(mian)提交的,本 次提交的完整 SHA-1 校验和是什么(bb2a7f8),以及在本次提交中,有多少文件修订过,多少行添加和删改过
请记住,提交时记录的是放在暂存区域的快照
2.8 git commit -a(跳过使用暂存区域)
只要在提交的时候,给 git commit 加上 -a 选项,Git 就会自动把所有已经跟踪过的文件暂存 起来一并提交,从而跳过 git add 步骤:
[root@localhost git_study]# git status -s
AM target.txt
?? .gitignore
?? MySQL/
[root@localhost git_study]# git commit -a -m "basic-2.8(git commit -a)"
[mian 03f8d1d] basic-2.8(git commit -a)
 1 file changed, 1 insertion(+)
 create mode 100644 target.txt
[root@localhost git_study]#
2.9 git rm -f / --cached file(移除文件)
简单地从工作目录中手工删除文件:
[root@localhost git_study]# rm love.txt
[root@localhost git_study]# git status -s
 D love.txt
?? .gitignore
?? MySQL/
然后再运行 git rm 记录此次移除文件的操作:
[root@localhost git_study]# git rm love.txt
rm 'love.txt'
[root@localhost git_study]# git status -s
D  love.txt
?? .gitignore
?? MySQL/
[root@localhost git_study]# git status
位于分支 mian
要提交的变更:
  (使用 "git restore --staged <文件>..." 以取消暂存)
	删除:     love.txt

未跟踪的文件:
  (使用 "git add <文件>..." 以包含要提交的内容)
	.gitignore
	MySQL/
下一次提交时,该文件就不再纳入版本管理了
如果要删除之前修改过或已经放到暂存区的文件,则必须使用强制删除选项 -f(译注:即 force 的首字母)。 这是一种安全特性,用于防止误删尚未添加到快照的数据,这 样的数据不能被 Git 恢复
[root@localhost git_study]# touch rm-f.txt
[root@localhost git_study]# git add rm-f.txt
[root@localhost git_study]# git status -s
D  love.txt
A  rm-f.txt
?? .gitignore
?? MySQL/
[root@localhost git_study]# git rm -f rm-f.txt
rm 'rm-f.txt'
[root@localhost git_study]# git status -s
D  love.txt
?? .gitignore
?? MySQL/
[root@localhost git_study]# ls
a.a  b.b  dream.txt  MySQL  target.txt  test.txt
你想让文件保留在磁盘,但是并不想让 Git 继续跟踪,可以使用 --cached 选项:
[root@localhost git_study]# touch rm-f.txt
[root@localhost git_study]# git add rm-f.txt
[root@localhost git_study]# git status -s
D  love.txt
A  rm-f.txt
?? .gitignore
?? MySQL/
[root@localhost git_study]# git rm --cached rm-f.txt
rm 'rm-f.txt'
[root@localhost git_study]# ls
a.a  b.b  dream.txt  MySQL  rm-f.txt  target.txt  test.txt
git rm 命令后面可以列出文件或者目录的名字,也可以使用 glob 模式
[root@localhost git_study]# git rm -f *.log2.10 git mv old_file new_file(重命名文件)
要在 Git 中对文件改名,可以这么做:
[root@localhost git_study]# ls
a.a  b.b  dream.txt  MySQL  rm-f.txt  target.txt  test.txt
[root@localhost git_study]# git mv test.txt tese01.txt
[root@localhost git_study]# ls
a.a  b.b  dream.txt  MySQL  rm-f.txt  target.txt  tese01.txt
[root@localhost git_study]# git status
位于分支 mian
要提交的变更:
  (使用 "git restore --staged <文件>..." 以取消暂存)
	删除:     love.txt
	重命名:   test.txt -> tese01.txt

未跟踪的文件:
  (使用 "git add <文件>..." 以包含要提交的内容)
	.gitignore
	MySQL/
	rm-f.txt
三、git log(查看提交历史)
在提交了若干更新,又或者克隆了某个项目之后,你也许想回顾下提交历史。 完成这个任务最简单而又有效的工具是 git log 命令
[root@localhost git_study]# git log
commit 03f8d1d3321a7bff8ba68cfa940d9272cf86e74e (HEAD -> mian)
Author: clc <ydd3327026244@163.com>
Date:   Tue Apr 16 20:15:02 2024 +0800

    basic-2.8(git commit -a)

commit bb2a7f8bf701f8dfb1e784729f2362e7ca405c95
Author: clc <ydd3327026244@163.com>
Date:   Tue Apr 16 20:03:57 2024 +0800

    basic-2.7(git commit -m)

commit bdd3afc9adb63b1c4e7489227aaa6ea6c6750aa6
Author: clc <ydd3327026244@163.com>
Date:   Tue Apr 16 20:00:56 2024 +0800

    basic-2.7(gitcommit)
不传入任何参数的默认情况下,git log 会按时间先后顺序列出所有的提交,最近的更新排在最上面
选项 -p 它会显示每次提交所引入的差异(按 补丁 的格式输出)。 你也可以限制显示的日志条目数量,例如使用 -2 选项来只显示最近的两次提交:
[root@localhost git_study]# git log -p -2
commit 03f8d1d3321a7bff8ba68cfa940d9272cf86e74e (HEAD -> mian)
Author: clc <ydd3327026244@163.com>
Date:   Tue Apr 16 20:15:02 2024 +0800

    basic-2.8(git commit -a)

diff --git a/target.txt b/target.txt
new file mode 100644
index 0000000..f53d35b
--- /dev/null
+++ b/target.txt
@@ -0,0 +1 @@
+CET-4 and CET-6

commit bb2a7f8bf701f8dfb1e784729f2362e7ca405c95
Author: clc <ydd3327026244@163.com>
Date:   Tue Apr 16 20:03:57 2024 +0800

    basic-2.7(git commit -m)

diff --git a/dream.txt b/dream.txt
new file mode 100644
index 0000000..1999f97
--- /dev/null
+++ b/dream.txt
@@ -0,0 +1 @@
+Win the CTF
你也可以为 git log 附带一系列的总结性选项。 比如你想看到每 次提交的简略统计信息,可以使用 --stat 选项:
root@localhost git_study]# git log --stat
commit 03f8d1d3321a7bff8ba68cfa940d9272cf86e74e (HEAD -> mian)
Author: clc <ydd3327026244@163.com>
Date:   Tue Apr 16 20:15:02 2024 +0800

    basic-2.8(git commit -a)

 target.txt | 1 +
 1 file changed, 1 insertion(+)

commit bb2a7f8bf701f8dfb1e784729f2362e7ca405c95
Author: clc <ydd3327026244@163.com>
Date:   Tue Apr 16 20:03:57 2024 +0800

    basic-2.7(git commit -m)

 dream.txt | 1 +
 1 file changed, 1 insertion(+)

commit bdd3afc9adb63b1c4e7489227aaa6ea6c6750aa6
Author: clc <ydd3327026244@163.com>
Date:   Tue Apr 16 20:00:56 2024 +0800

    basic-2.7(gitcommit)

 love.txt | 2 ++
 test.txt | 6 ++++++
 2 files changed, 8 insertions(+)
另一个非常有用的选项是 --pretty。 这个选项可以使用不同于默认格式的方式展示提交历史。 这个选项有一 些内建的子选项供你使用。 比如 oneline 会将每个提交放在一行显示,在浏览大量的提交时非常有用。 另外还 有 short,full 和 fuller 选项,它们展示信息的格式基本一致,但是详尽程度不一:
[root@localhost git_study]# git log --pretty=oneline
03f8d1d3321a7bff8ba68cfa940d9272cf86e74e (HEAD -> mian) basic-2.8(git commit -a)
bb2a7f8bf701f8dfb1e784729f2362e7ca405c95 basic-2.7(git commit -m)
bdd3afc9adb63b1c4e7489227aaa6ea6c6750aa6 basic-2.7(gitcommit)
git log --pretty=format 常用的选项 列出了 format 接受的常用格式占位符的写法及其代表的意义
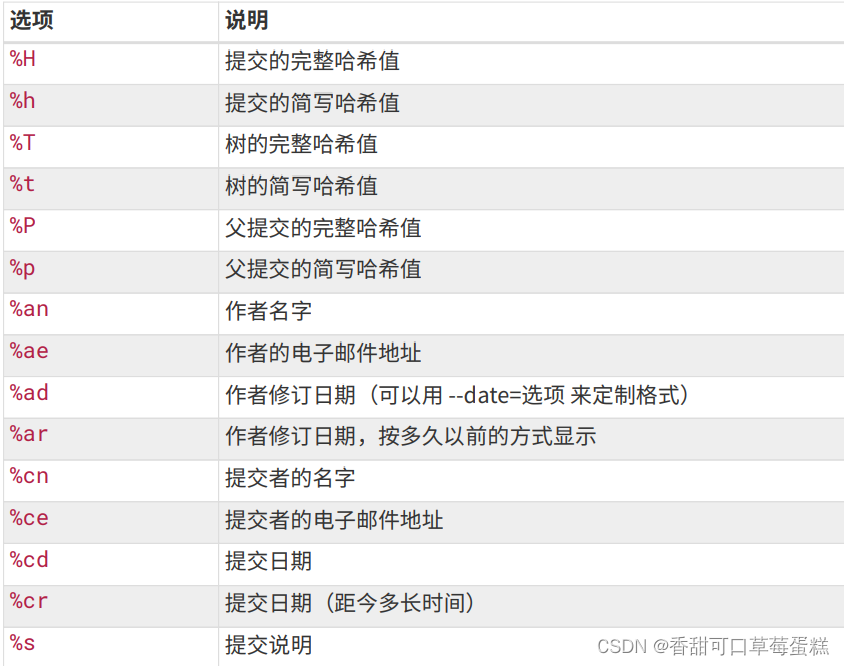
表格 3. git log 的常用选项:

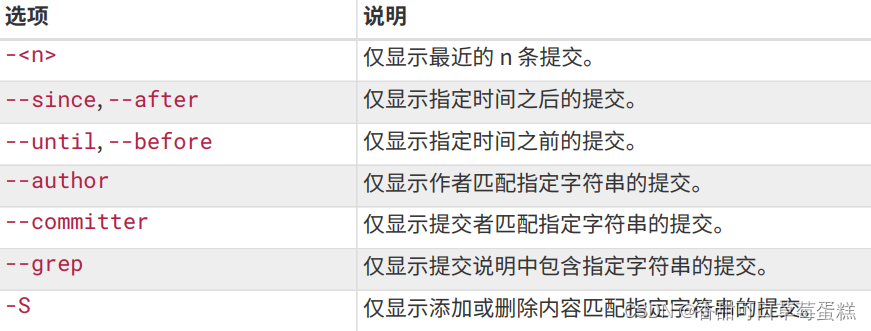
3.1 --since & --until(限制输出长度)
类似 --since 和 --until 这种按照时间作限制的选项很有用。 例如,下面的命令会列出最近两周的所 有提交:
[root@localhost git_study]# git log --since=2.weeks
commit 03f8d1d3321a7bff8ba68cfa940d9272cf86e74e (HEAD -> mian)
Author: clc <ydd3327026244@163.com>
Date:   Tue Apr 16 20:15:02 2024 +0800

    basic-2.8(git commit -a)

commit bb2a7f8bf701f8dfb1e784729f2362e7ca405c95
Author: clc <ydd3327026244@163.com>
Date:   Tue Apr 16 20:03:57 2024 +0800

    basic-2.7(git commit -m)

commit bdd3afc9adb63b1c4e7489227aaa6ea6c6750aa6
Author: clc <ydd3327026244@163.com>
Date:   Tue Apr 16 20:00:56 2024 +0800

    basic-2.7(gitcommit)
表格 4. 限制 git log 输出的选项:
四、撤销操作
运行带有 --amend 选 项的提交命令来重新提交:
root@localhost git_study]# git status
位于分支 mian
要提交的变更:
  (使用 "git restore --staged <文件>..." 以取消暂存)
	删除:     love.txt
	重命名:   test.txt -> tese01.txt

未跟踪的文件:
  (使用 "git add <文件>..." 以包含要提交的内容)
	.gitignore
	MySQL/
	rm-f.txt

[root@localhost git_study]# git commit -m "--amend"
[mian e4bab65] --amend
 2 files changed, 2 deletions(-)
 delete mode 100644 love.txt
 rename test.txt => tese01.txt (100%)
[root@localhost git_study]# git status
位于分支 mian
未跟踪的文件:
  (使用 "git add <文件>..." 以包含要提交的内容)
	.gitignore
	MySQL/
	rm-f.txt

提交为空,但是存在尚未跟踪的文件(使用 "git add" 建立跟踪)
[root@localhost git_study]# git mv tese01.txt tese02.txt
[root@localhost git_study]# git commit --amend
[mian 550e697] --amend 55
 Date: Tue Apr 16 23:40:29 2024 +0800
 2 files changed, 2 deletions(-)
 delete mode 100644 love.txt
 rename test.txt => tese02.txt (100%)
[root@localhost git_study]# git status
位于分支 mian
未跟踪的文件:
  (使用 "git add <文件>..." 以包含要提交的内容)
	.gitignore
	MySQL/
	rm-f.txt

提交为空,但是存在尚未跟踪的文件(使用 "git add" 建立跟踪)
[root@localhost git_study]# ls
a.a  b.b  dream.txt  MySQL  rm-f.txt  target.txt  tese02.txt
最终你只会有一个提交——第二次提交将代替第一次提交的结果
4.1 git restore --staged file(取消暂存的文件)
[root@localhost git_study]# git status
位于分支 mian
要提交的变更:
  (使用 "git restore --staged <文件>..." 以取消暂存)
	重命名:   tese02.txt -> test01.txt
	新文件:   test02.txt

未跟踪的文件:
  (使用 "git add <文件>..." 以包含要提交的内容)
	.gitignore
	MySQL/

[root@localhost git_study]# git restore --staged test02.txt
[root@localhost git_study]# git status
位于分支 mian
要提交的变更:
  (使用 "git restore --staged <文件>..." 以取消暂存)
	重命名:   tese02.txt -> test01.txt

未跟踪的文件:
  (使用 "git add <文件>..." 以包含要提交的内容)
	.gitignore
	MySQL/
	test02.txt
4.2 git restore file(撤消对文件的修改)
[root@localhost git_study]# git status
位于分支 mian
尚未暂存以备提交的变更:
  (使用 "git add <文件>..." 更新要提交的内容)
  (使用 "git restore <文件>..." 丢弃工作区的改动)
	修改:     target.txt

未跟踪的文件:
  (使用 "git add <文件>..." 以包含要提交的内容)
	.gitignore
	MySQL/
	test02.txt

修改尚未加入提交(使用 "git add" 和/或 "git commit -a")
[root@localhost git_study]# git restore target.txt
[root@localhost git_study]# git status
位于分支 mian
未跟踪的文件:
  (使用 "git add <文件>..." 以包含要提交的内容)
	.gitignore
	MySQL/
	test02.txt

提交为空,但是存在尚未跟踪的文件(使用 "git add" 建立跟踪)
五、远程仓库的使用
5.1 git remote -v(查看远程仓库)
如果想查看你已经配置的远程仓库服务器,可以运行 git remote 命令
[root@localhost ~]# git clone https://github.com/schacon/ticgit
正克隆到 'ticgit'...
remote: Enumerating objects: 1857, done.
remote: Total 1857 (delta 0), reused 0 (delta 0), pack-reused 1857
接收对象中: 100% (1857/1857), 334.06 KiB | 693.00 KiB/s, 完成.
处理 delta 中: 100% (837/837), 完成.
[root@localhost ~]# cd ticgit/
[root@localhost ticgit]# git remote
origin
你也可以指定选项 -v,会显示需要读写远程仓库使用的 Git 保存的简写与其对应的 URL:
[root@localhost ticgit]# git remote -v
origin	https://github.com/schacon/ticgit (fetch)
origin	https://github.com/schacon/ticgit (push)
5.2 git remote add name url(添加远程仓库并指定简写)
运行 git remote add 添加一个新的远程 Git 仓库,同时指定一个方便使用的简写:
[root@localhost ticgit]# git remote add clc https://github.com/paulboone/ticgit
[root@localhost ticgit]# git remote -v
clc	https://github.com/paulboone/ticgit (fetch)
clc	https://github.com/paulboone/ticgit (push)
origin	https://github.com/schacon/ticgit (fetch)
origin	https://github.com/schacon/ticgit (push)
5.3 git fetch server(从远程仓库中抓取与拉取)
如果你想拉取 clc 的仓库中有但你没有的信息,可以运行 git fetch clc:
[root@localhost ticgit]# git fetch clc
remote: Enumerating objects: 43, done.
remote: Counting objects: 100% (22/22), done.
remote: Total 43 (delta 22), reused 22 (delta 22), pack-reused 21
展开对象中: 100% (43/43), 5.99 KiB | 437.00 KiB/s, 完成.
来自 https://github.com/paulboone/ticgit
 * [新分支]          master     -> clc/master
 * [新分支]          ticgit     -> clc/ticgit
这个命令会访问远程仓库,从中拉取所有你还没有的数据。 执行完成后,你将会拥有那个远程仓库中所有分支 的引用,可以随时合并或查看
5.4 git push server(推送到远程仓库)
当你想分享你的项目时,必须将其推送到上游。 这个命令很简单:git push 服务器 分支
[root@localhost ~]# git push clc master5.5 git remote show server(查看某个远程仓库)
它同样会列出远程仓库的 URL 与跟踪分支的信息
$ git remote show origin
* remote origin
  URL: https://github.com/my-org/complex-project
  Fetch URL: https://github.com/my-org/complex-project
  Push URL: https://github.com/my-org/complex-project
  HEAD branch: master
  Remote branches:
  master tracked
  dev-branch tracked
  markdown-strip tracked
  issue-43 new (next fetch will store in
remotes/origin)
  issue-45 new (next fetch will store in
remotes/origin)
  refs/remotes/origin/issue-11 stale (use 'git remote prune' to
remove)
  Local branches configured for 'git pull':
  dev-branch merges with remote dev-branch
  master merges with remote master
  Local refs configured for 'git push':
  dev-branch pushes to dev-branch
(up to date)
  markdown-strip pushes to markdown-strip
(up to date)
  master pushes to master
(up to date)
5.6 git remote rename server(远程仓库的重命名)
你可以运行 git remote rename 来修改一个远程仓库的简写名
[root@localhost ticgit]# git remote rename clc james
[root@localhost ticgit]# git remote
james
origin
值得注意的是这同样也会修改你所有远程跟踪的分支名字。 那些过去引用 clc/master 的现在会引用 paul/master
5.7 git remote rm server(远程仓库的移除)
[root@localhost ticgit]# git remote rm james
[root@localhost ticgit]# git remote
origin
六、打标签
像其他版本控制系统(VCS)一样,Git 可以给仓库历史中的某一个提交打上标签,以示重要
6.1 git tag -l(列出标签)
$ git tag
v1.0
v2.0
如果只对 1.8.5 系列感兴趣,可以运行:
$ git tag -l "v1.8.5*"
v1.8.5
v1.8.5-rc0
v1.8.5-rc1
v1.8.5-rc2
v1.8.5-rc3
v1.8.5.1
v1.8.5.2
v1.8.5.3
v1.8.5.4
v1.8.5.5
6.2 创建标签
Git 支持两种标签:轻量标签(lightweight)与附注标签(annotated)
6.3 git tag -a tagname -m "string"(附注标签)
在 Git 中创建附注标签十分简单。 最简单的方式是当你在运行 tag 命令时指定 -a 选项:
[root@localhost git_study]# git tag -a v1.0 -m "version 1.0"
[root@localhost git_study]# git tag
v1.0
-m 选项指定了一条将会存储在标签中的信息。 如果没有为附注标签指定一条信息,Git 会启动编辑器要求你输入信息
通过使用 git show 命令可以看到标签信息和与之对应的提交信息:
root@localhost git_study]# git show v1.0
tag v1.0
Tagger: clc <ydd3327026244@163.com>
Date:   Wed Apr 17 14:00:51 2024 +0800

version 1.0

commit 2abbca3b47e29bc11396f7fdd0334c5f1903efd6 (HEAD -> mian, tag: v1.0)
Author: clc <ydd3327026244@163.com>
Date:   Tue Apr 16 23:59:13 2024 +0800

    belive youself

diff --git a/tese02.txt b/test01.txt
similarity index 100%
rename from tese02.txt
rename to test01.txt
[root@localhost git_study]#
6.4 git tag tagname(轻量标签)
轻量标签本质上是将提交校验和存储到一个文件中——没有保存任何其他信息:
创建轻量标签,不需要使用 -a、-s 或 -m 选项,只需要提供标签名字:
[root@localhost git_study]# git tag v1.1
[root@localhost git_study]# git tag
v1.0
v1.1
这时,如果在标签上运行 git show,你不会看到额外的标签信息
[root@localhost git_study]# git show v1.1
commit 2abbca3b47e29bc11396f7fdd0334c5f1903efd6 (HEAD -> mian, tag: v1.1, tag: v1.0)
Author: clc <ydd3327026244@163.com>
Date:   Tue Apr 16 23:59:13 2024 +0800

    belive youself

diff --git a/tese02.txt b/test01.txt
similarity index 100%
rename from tese02.txt
rename to test01.txt
6.5 后期打标签
假设提交历史是这样的:
[root@localhost git_study]# git log --pretty=oneline
2abbca3b47e29bc11396f7fdd0334c5f1903efd6 (HEAD -> mian, tag: v1.1, tag: v1.0) belive youself
550e6979179fb715062a519f5e169f377587ce49 --amend 55
03f8d1d3321a7bff8ba68cfa940d9272cf86e74e basic-2.8(git commit -a)
bb2a7f8bf701f8dfb1e784729f2362e7ca405c95 basic-2.7(git commit -m)
bdd3afc9adb63b1c4e7489227aaa6ea6c6750aa6 basic-2.7(gitcommit)
要在那个提交上打标签,你需要在命令的末尾指定提交的校验和(或部分校验和):
[root@localhost git_study]# git tag -a v0.1 -m "Don't wait" bdd3afc9
[root@localhost git_study]# git show v0.1
tag v0.1
Tagger: clc <ydd3327026244@163.com>
Date:   Wed Apr 17 14:21:07 2024 +0800

Don't wait

commit bdd3afc9adb63b1c4e7489227aaa6ea6c6750aa6 (tag: v0.1)
Author: clc <ydd3327026244@163.com>
Date:   Tue Apr 16 20:00:56 2024 +0800

    ………………………………
6.6 git push sevrer tagname(共享标签)
在创建完标签后你必须显式地推送标签到共享服务器上。 这个过程就像共享远程分支一样——你可以运行 git push 服务器 <tagname>
$ git push origin v1.5
Counting objects: 14, done.
Delta compression using up to 8 threads.
Compressing objects: 100% (12/12), done.
Writing objects: 100% (14/14), 2.05 KiB | 0 bytes/s, done.
Total 14 (delta 3), reused 0 (delta 0)
To git@github.com:schacon/simplegit.git
 * [new tag] v1.5 -> v1.5
如果想要一次性推送全部标签,也可以使用带有 --tags 选项的 git push 命令
$ git push origin --tags
Counting objects: 1, done.
Writing objects: 100% (1/1), 160 bytes | 0 bytes/s, done.
Total 1 (delta 0), reused 0 (delta 0)
To git@github.com:schacon/simplegit.git
 * [new tag] v1.4 -> v1.4
 * [new tag] v1.4-lw -> v1.4-lw
6.7 git tag -d tagname(删除标签)
要删除掉你本地仓库上的标签,可以使用命令 git tag -d
[root@localhost git_study]# git tag -d v0.1
已删除标签 'v0.1'(曾为 0732c27)
删除远程仓库的标签使用如下命令:
$ git push origin :refs/tags/v1.4-lw
To /git@github.com:schacon/simplegit.git
 - [deleted] v1.4-lw
上面这种操作的含义是,将冒号前面的空值推送到远程标签名,从而高效地删除它
第二种更直观的删除远程标签的方式是:
$ git push origin --delete <tagname>6.8 git checkout tagname(检出标签)
如果你想查看某个标签所指向的文件版本,可以使用 git checkout 命令
[root@localhost git_study]# git checkout v1.0
注意:正在切换到 'v1.0'。

您正处于分离头指针状态。您可以查看、做试验性的修改及提交,并且您可以在切换
回一个分支时,丢弃在此状态下所做的提交而不对分支造成影响。

如果您想要通过创建分支来保留在此状态下所做的提交,您可以通过在 switch 命令
中添加参数 -c 来实现(现在或稍后)。例如:

  git switch -c <新分支名>

或者撤销此操作:

  git switch -

通过将配置变量 advice.detachedHead 设置为 false 来关闭此建议

HEAD 目前位于 2abbca3 belive youself
七、Git 别名
如果不想每次都输入完整的 Git 命令,可以通过 git config 文件来轻松地为每一个命令设置一个别名
$ git config --global alias.co checkout
$ git config --global alias.br branch
$ git config --global alias.ci commit
$ git config --global alias.st status
这意味着,当要输入 git commit 时,只需要输入 git ci
