发文章是为了证明自己真的掌握了一个知识,同时给他人带来帮助,如有问题,欢迎指正,祝大家万事胜意!
目录
前言
openGauss数据库安全指导
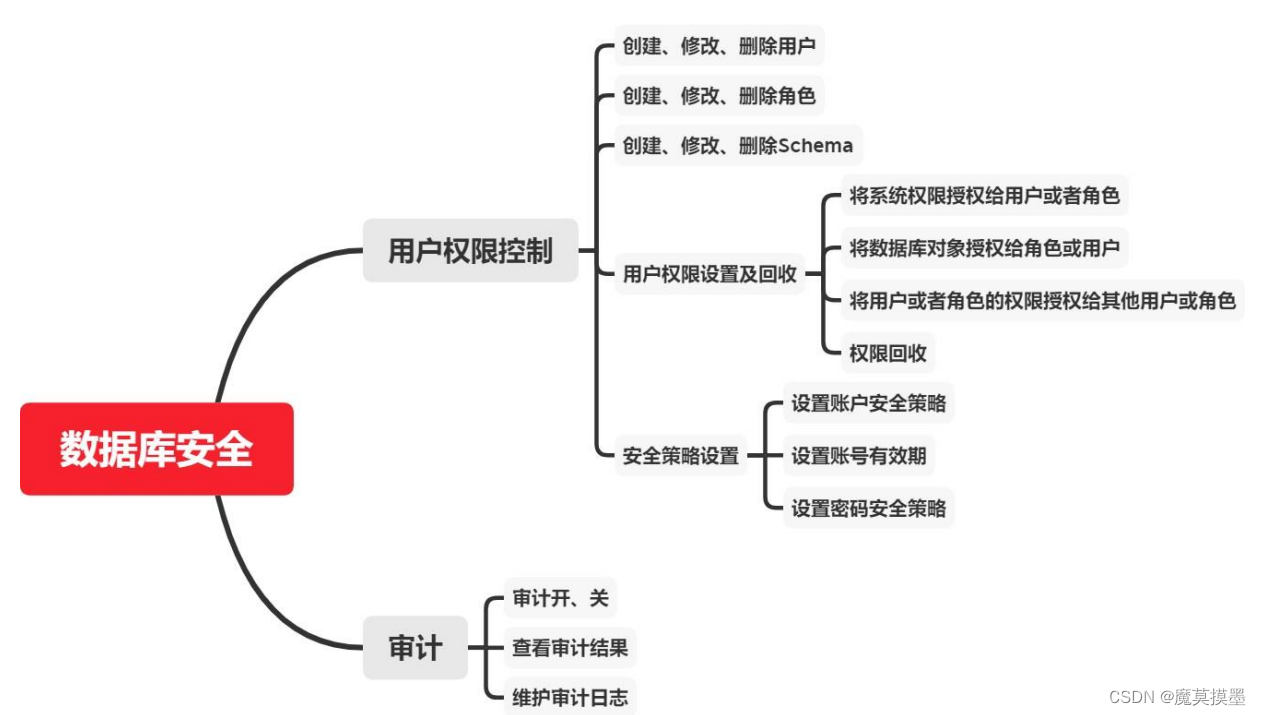
1 用户权限控制
1.1 实验介绍
1.1.1 关于本实验
1.1.2 实验目的
1.2 用户
1.2.1 创建、修改、删除用户
1.3 角色
1.3.1 创建、修改、删除角色
1.4 Schema
1.4.1 创建、修改、删除 Schema
1.5 用户权限设置及回收
1.5.1 将系统权限授权给用户或者角色
1.5.2 将数据库对象授权给角色或用户
1.5.4 权限回收
1.6 安全策略设置
1.6.1 设置账户安全策略
1.6.2 设置账号有效期
1.6.3 设置密码安全策略
2 审计
2.1 实验介绍
2.1.1 关于本实验
2.1.2 实验目的
2.2 审计开、关
2.3 查看审计结果
2.4 维护审计日志
前言
本实验主要内容为操作系统参数检查、 openGauss 健康状态检查、数据库性能检查、日志检查
和清理、时间一致性检查、应用连接数检查、例行维护表等
我的环境:
| 设备名称 | 设备型号 | 软件版本 |
| 虚拟机 | VMware | VMware-workstation-full-17.5.1 |
| 操作系统 | openEuler | openEuler 22.3LTS |
| 数据库 | openGauss | openGauss 5.0.0 |
需要的工具,大家不用现在下,后面用到了再下也可以,如果需要相关文件,可以评论,其实大多数都是可以去官网下的哈,因为我只能通过网盘给大家,文件又有点大,网盘的速度大家都是清楚的哈哈,所以还是推荐大家去官网,如果实在找不到可以找我
openGauss数据库安全指导
1 用户权限控制
1.1 实验介绍
1.1.1 关于本实验
1.1.2 实验目的
1.2 用户
1.2.1 创建、修改、删除用户
[omm@node0 ~]$ gsql -d postgres -p 26000 -r
failed to connect /opt/huawei/tmp:26000.
[omm@node0 ~]$ gsql -d postgres -p 15400 -r
gsql ((openGauss 5.0.0 build a07d57c3) compiled at 2023-03-29 03:37:13 commit 0 last mr  )
Non-SSL connection (SSL connection is recommended when requiring high-security)
Type "help" for help.
openGauss=# CREATE USER jim PASSWORD 'Bigdata@123';
CREATE ROLE
openGauss=#
openGauss=#  SELECT * FROM pg_user;
 usename | usesysid | usecreatedb | usesuper | usecatupd | userepl |  passwd  | valbegin | valuntil |   respool    | parent | spacelimit | useconfig | nodegroup | tempspacelimit |
spillspacelimit | usemonitoradmin | useoperatoradmin | usepolicyadmin
---------+----------+-------------+----------+-----------+---------+----------+----------+----------+--------------+--------+------------+-----------+-----------+----------------+-
----------------+-----------------+------------------+----------------
 omm     |       10 | t           | t        | t         | t       | ******** |          |          | default_pool |      0 |            |           |           |                |
                | t               | t                | t
 lucy    |    49478 | f           | f        | f         | f       | ******** |          |          | default_pool |      0 |            |           |           |                |
                | f               | f                | f
 jim     |    82240 | f           | f        | f         | f       | ******** |          |          | default_pool |      0 |            |           |           |                |
                | f               | f                | f
(3 rows)
openGauss=# CREATE USER dim CREATEDB PASSWORD 'Bigdata@123';
CREATE ROLE
openGauss=#
openGauss=#  ALTER USER jim IDENTIFIED BY 'Abcd@123' REPLACE 'Bigdata@123';
ALTER ROLE
openGauss=#
openGauss=#  ALTER USER jim CREATEROLE;
ALTER ROLE
openGauss=#
openGauss=# ALTER USER jim ACCOUNT LOCK;
ALTER ROLE
openGauss=#
openGauss=#  ALTER USER jim ACCOUNT UNLOCK;
ALTER ROLE
openGauss=#
openGauss=# DROP USER jim CASCADE;
DROP ROLE
openGauss=#
1.3 角色
1.3.1 创建、修改、删除角色
[omm@node0 ~]$ gsql -d postgres -p 15400 -r
gsql ((openGauss 5.0.0 build a07d57c3) compiled at 2023-03-29 03:37:13 commit 0 last mr  )
Non-SSL connection (SSL connection is recommended when requiring high-security)
Type "help" for help.

openGauss=#
openGauss=# CREATE ROLE manager IDENTIFIED BY 'Bigdata@123';
CREATE ROLE
openGauss=#
openGauss=# CREATE ROLE miriam WITH LOGIN PASSWORD 'Bigdata@123' VALID BEGIN '2020-07-01' VALID UNTIL '2020-12-01';
CREATE ROLE
openGauss=#
openGauss=# ALTER ROLE manager IDENTIFIED BY 'abcd@123' REPLACE 'Bigdata@123';
ALTER ROLE
openGauss=#
openGauss=#  ALTER ROLE manager SYSADMIN;
ALTER ROLE
步骤 6 删除角色 manager。
openGauss=# DROP ROLE manager;
DROP ROLE
openGauss=#  SELECT * FROM PG_ROLES;
         rolname          | rolsuper | rolinherit | rolcreaterole | rolcreatedb | rolcatupdate | rolcanlogin | rolreplication | rolauditadmin | rolsystemadmin | rolconnlimit | rolp
assword |     rolvalidbegin      |     rolvaliduntil      |  rolrespool  | rolparentid | roltabspace | rolconfig |  oid  | roluseft | rolkind | nodegroup | roltempspace | rolspills
pace | rolmonitoradmin | roloperatoradmin | rolpolicyadmin
--------------------------+----------+------------+---------------+-------------+--------------+-------------+----------------+---------------+----------------+--------------+-----
--------+------------------------+------------------------+--------------+-------------+-------------+-----------+-------+----------+---------+-----------+--------------+----------
-----+-----------------+------------------+----------------
 dim                      | f        | t          | f             | t           | f            | t           | f              | f             | f              |           -1 | ****
****    |                        |                        | default_pool |           0 |             |           | 82244 | f        | n       |           |              |
     | f               | f                | f
 lucy                     | f        | t          | f             | f           | f            | t           | f              | f             | f              |           -1 | ****
****    |                        |                        | default_pool |           0 |             |           | 49478 | f        | n       |           |              |
     | f               | f                | f
 miriam                   | f        | t          | f             | f           | f            | t           | f              | f             | f              |           -1 | ****
****    | 2020-07-01 00:00:00+08 | 2020-12-01 00:00:00+08 | default_pool |           0 |             |           | 82252 | f        | n       |           |              |
     | f               | f                | f
 omm                      | t        | t          | t             | t           | t            | t           | t              | t             | t              |           -1 | ****
****    |                        |                        | default_pool |           0 |             |           |    10 | t        | n       |           |              |
     | t               | t                | t
 gs_role_directory_drop   | f        | t          | f             | f           | f            | f           | f              | f             | f              |           -1 | ****
****    |                        |                        | default_pool |           0 |             |           |  1059 | f        | n       |           |              |
     | f               | f                | f
 gs_role_directory_create | f        | t          | f             | f           | f            | f           | f              | f             | f              |           -1 | ****
****    |                        |                        | default_pool |           0 |             |           |  1056 | f        | n       |           |              |
     | f               | f                | f
 gs_role_pldebugger       | f        | t          | f             | f           | f            | f           | f              | f             | f              |           -1 | ****
****    |                        |                        | default_pool |           0 |             |           |  1055 | f        | n       |           |              |
     | f               | f                | f
 gs_role_account_lock     | f        | t          | f             | f           | f            | f           | f              | f             | f              |           -1 | ****
****    |                        |                        | default_pool |           0 |             |           |  1048 | f        | n       |           |              |
     | f               | f                | f
 gs_role_replication      | f        | t          | f             | f           | f            | f           | f              | f             | f              |           -1 | ****
****    |                        |                        | default_pool |           0 |             |           |  1047 | f        | n       |           |              |
     | f               | f                | f
 gs_role_tablespace       | f        | t          | f             | f           | f            | f           | f              | f             | f              |           -1 | ****
****    |                        |                        | default_pool |           0 |             |           |  1046 | f        | n       |           |              |
     | f               | f                | f
 gs_role_signal_backend   | f        | t          | f             | f           | f            | f           | f              | f             | f              |           -1 | ****
****    |                        |                        | default_pool |           0 |             |           |  1045 | f        | n       |           |              |
     | f               | f                | f
 gs_role_copy_files       | f        | t          | f             | f           | f            | f           | f              | f             | f              |           -1 | ****
****    |                        |                        | default_pool |           0 |             |           |  1044 | f        | n       |           |              |
     | f               | f                | f
(12 rows)
1.4 Schema
1.4.1 创建、修改、删除 Schema
openGauss=# CREATE SCHEMA ds;
CREATE SCHEMA
openGauss=#
openGauss=#  ALTER SCHEMA ds RENAME TO ds_new;
ALTER SCHEMA
openGauss=#
步骤 5 将 DS_NEW 的所有者修改为 jack。步骤 5 将 DS_NEW 的所有者修改为 jack。
openGauss=# ALTER SCHEMA ds_new OWNER TO jack;
ALTER SCHEMA
openGauss=# SELECT s.nspname,u.usename AS nspowner FROM pg_namespace s, pg_user u WHERE s.nspowner = u.usesysid;
      nspname       | nspowner
--------------------+----------
 pg_toast           | omm
 cstore             | omm
 pkg_service        | omm
 dbe_perf           | omm
 snapshot           | omm
 blockchain         | omm
 pg_catalog         | omm
 sqladvisor         | omm
 dbe_pldebugger     | omm
 dbe_pldeveloper    | omm
 dbe_sql_util       | omm
 information_schema | omm
 db4ai              | omm
 public             | omm
 tpcds              | omm
 pmk                | omm
 lucy               | lucy
 dim                | dim
 jack               | jack
 ds_new             | jack
openGauss=# DROP SCHEMA ds_new;
DROP SCHEMA
openGauss=#  DROP USER jack;
DROP ROLE
1.5 用户权限设置及回收
1.5.1 将系统权限授权给用户或者角色
[omm@node0 ~]$ gsql -d postgres -p 15400 -r
gsql ((openGauss 5.0.0 build a07d57c3) compiled at 2023-03-29 03:37:13 commit 0 last mr  )
Non-SSL connection (SSL connection is recommended when requiring high-security)
Type "help" for help.
openGauss=# CREATE USER joe PASSWORD 'Bigdata@123';
CREATE ROLE
openGauss=# GRANT ALL PRIVILEGES TO joe;
ALTER ROLE
1.5.2 将数据库对象授权给角色或用户
openGauss=# REVOKE ALL PRIVILEGES FROM joe;
ALTER ROLE
openGauss=# CREATE SCHEMA tpcds;
CREATE SCHEMA
openGauss=#  CREATE TABLE tpcds.reason
openGauss-# (
openGauss(#  r_reason_sk INTEGER NOT NULL,
openGauss(#  r_reason_id CHAR(16) NOT NULL,
openGauss(#  r_reason_desc VARCHAR(20)
openGauss(# );
CREATE TABLE
openGauss=#
openGauss=# GRANT USAGE ON SCHEMA tpcds TO joe;
GRANT
openGauss=# GRANT ALL PRIVILEGES ON tpcds.reason TO joe;
GRANT
openGauss=#
openGauss=# GRANT select (r_reason_sk,r_reason_id,r_reason_desc),update (r_reason_desc) ON tpcds.reason TO joe;
GRANT
openGauss=#
openGauss=# GRANT create,connect on database postgres TO joe WITH GRANT OPTION;
GRANT
openGauss=#
openGauss=# CREATE ROLE tpcds_manager PASSWORD 'Bigdata@123';
CREATE ROLE
openGauss=#  GRANT USAGE,CREATE ON SCHEMA tpcds TO tpcds_manager;
GRANT
openGauss=#
openGauss=# CREATE ROLE manager PASSWORD 'Bigdata@123';
CREATE ROLE
openGauss=#  GRANT joe TO manager WITH ADMIN OPTION;
GRANT ROLE
openGauss=#
openGauss=#  CREATE ROLE senior_manager PASSWORD 'Bigdata@123';
CREATE ROLE
openGauss=#
1.5.4 权限回收
openGauss=# REVOKE joe FROM manager;
REVOKE ROLE
openGauss=# REVOKE manager FROM senior_manager;
WARNING:  role "senior_manager" is not a member of role "manager"
REVOKE ROLE
openGauss=# DROP USER manager;
DROP ROLE
openGauss=# REVOKE ALL PRIVILEGES ON tpcds.reason FROM joe;
REVOKE
openGauss=# REVOKE ALL PRIVILEGES ON SCHEMA tpcds FROM joe;
REVOKE
openGauss=# REVOKE USAGE,CREATE ON SCHEMA tpcds FROM tpcds_manager;
REVOKE
openGauss=# DROP ROLE tpcds_manager;
DROP ROLE
openGauss=# DROP ROLE senior_manager;
DROP ROLE
openGauss=# DROP USER joe CASCADE;
DROP ROLE
1.6 安全策略设置
1.6.1 设置账户安全策略
[omm@node0 ~]$ gsql -d postgres -p 15400 -r
gsql ((openGauss 5.0.0 build a07d57c3) compiled at 2023-03-29 03:37:13 commit 0 last mr  )
Non-SSL connection (SSL connection is recommended when requiring high-security)
Type "help" for help.
openGauss=# SHOW failed_login_attempts;
 failed_login_attempts
-----------------------
 10
(1 row)
gs_guc reload -D /gaussdb/data/dbnode -c "failed_login_attempts=10"
openGauss=# SHOW failed_login_attempts;
failed_login_attempts
-----------------------
10
(1 row)
openGauss=# \q
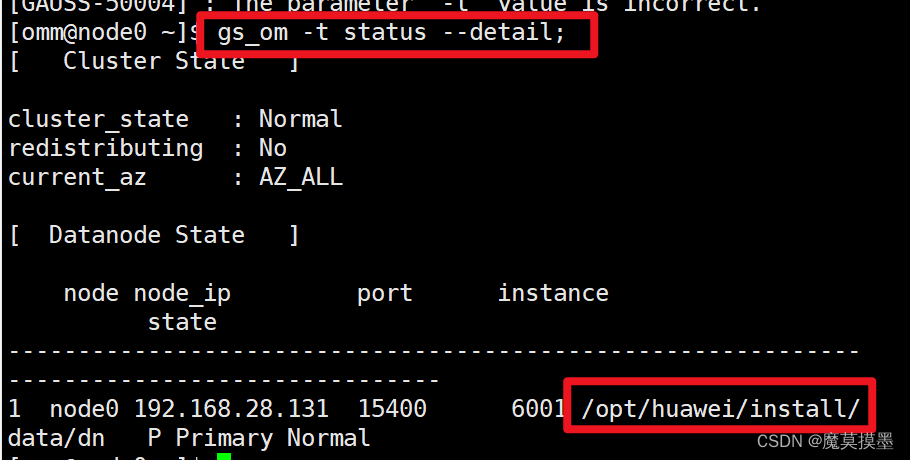
[omm@node0 ~]$ gs_om -t status --detail;
[ Cluster State ]
cluster_state : Normal
redistributing : No
current_az : AZ_ALL
[ Datanode State ]
node node_ip port instance state
--------------------------------------------------------------------------------------------
1 node0 192.168.28.131 15400 6001 /opt/huawei/install/data/dn P Primary Normal
[omm@node0 ~]$ gs_guc reload -D /opt/huawei/install/data/dn -c "failed_login_attempts=10" ;
The gs_guc run with the following arguments: [gs_guc -D /opt/huawei/install/data/dn -c failed_login_attempts=10 reload ].
expected instance path: [/opt/huawei/install/data/dn/postgresql.conf]
gs_guc reload: failed_login_attempts=10: [/opt/huawei/install/data/dn/postgresql.conf]
server signaled
Total instances: 1. Failed instances: 0.
Success to perform gs_guc!
[omm@node0 ~]$ gsql -d postgres -p 15400 -r
gsql ((openGauss 5.0.0 build a07d57c3) compiled at 2023-03-29 03:37:13 commit 0 last mr  )
Non-SSL connection (SSL connection is recommended when requiring high-security)
Type "help" for help.

openGauss=# SHOW password_lock_time;
 password_lock_time
--------------------
 1d
(1 row)
openGauss=# \q
[omm@node0 ~]$ gs_guc reload -N all -I all -c "password_lock_time=1"
The gs_guc run with the following arguments: [gs_guc -N all -I all -c password_lock_time=1 reload ].
NOTICE: password_lock_time and failed_login_attempts must have positive for lock and unlock functions to work as.
Begin to perform the total nodes: 1.
Popen count is 1, Popen success count is 1, Popen failure count is 0.
Begin to perform gs_guc for datanodes.
Command count is 1, Command success count is 1, Command failure count is 0.

Total instances: 1. Failed instances: 0.
ALL: Success to perform gs_guc!
1.6.2 设置账号有效期
[omm@node0 ~]$ gsql -d postgres -p 15400 -r
gsql ((openGauss 5.0.0 build a07d57c3) compiled at 2023-03-29 03:37:13 commit 0 last mr  )
Non-SSL connection (SSL connection is recommended when requiring high-security)
Type "help" for help.
openGauss=#  CREATE USER joe WITH PASSWORD 'Bigdata@123' VALID BEGIN '2020-07-10 08:00:00' VALID UNTIL '2022-10-10 08:00:00';
CREATE ROLE
openGauss=# ALTER USER joe WITH VALID BEGIN '2020-11-10 08:00:00' VALID UNTIL '2021-11-10 08:00:00';
ALTER ROLE
1.6.3 设置密码安全策略
[omm@node0 ~]$ gsql -d postgres -p 15400 -r
gsql ((openGauss 5.0.0 build a07d57c3) compiled at 2023-03-29 03:37:13 commit 0 last mr  )
Non-SSL connection (SSL connection is recommended when requiring high-security)
Type "help" for help.
openGauss=#  SHOW password_encryption_type;
 password_encryption_type
--------------------------
 2
(1 row)
openGauss=#  SHOW password_encryption_type;
 password_encryption_type
--------------------------
 2
(1 row)

openGauss=# \q
[omm@node0 ~]$ gs_guc reload -N all -I all -c "password_encryption_type=2"
The gs_guc run with the following arguments: [gs_guc -N all -I all -c password_encryption_type=2 reload ].
Begin to perform the total nodes: 1.
Popen count is 1, Popen success count is 1, Popen failure count is 0.
Begin to perform gs_guc for datanodes.
Command count is 1, Command success count is 1, Command failure count is 0.

Total instances: 1. Failed instances: 0.
ALL: Success to perform gs_guc!
[omm@node0 ~]$ gsql -d postgres -p 15400 -r
gsql ((openGauss 5.0.0 build a07d57c3) compiled at 2023-03-29 03:37:13 commit 0 last mr  )
Non-SSL connection (SSL connection is recommended when requiring high-security)
Type "help" for help.

openGauss=#  SHOW password_policy;
 password_policy
-----------------
 1
(1 row)
openGauss=# \q
[omm@node0 ~]$ gs_guc reload -N all -I all -c "password_policy=1"
The gs_guc run with the following arguments: [gs_guc -N all -I all -c password_policy=1 reload ].
Begin to perform the total nodes: 1.
Popen count is 1, Popen success count is 1, Popen failure count is 0.
Begin to perform gs_guc for datanodes.
Command count is 1, Command success count is 1, Command failure count is 0.

Total instances: 1. Failed instances: 0.
ALL: Success to perform gs_guc!
[omm@node0 ~]$ gsql -d postgres -p 15400 -r
gsql ((openGauss 5.0.0 build a07d57c3) compiled at 2023-03-29 03:37:13 commit 0 last mr  )
Non-SSL connection (SSL connection is recommended when requiring high-security)
Type "help" for help.

openGauss=# SHOW password_reuse_time;
 password_reuse_time
---------------------
 60
(1 row)
openGauss=# \q
[omm@node0 ~]$ gs_guc reload -N all -I all -c "password_reuse_time=60"
The gs_guc run with the following arguments: [gs_guc -N all -I all -c password_reuse_time=60 reload ].
NOTICE: Checks the configuration parameters password_reuse_time and password_reuse_max when modifying password, as long as either one, can be considered the password can be reused.
Begin to perform the total nodes: 1.
Popen count is 1, Popen success count is 1, Popen failure count is 0.
Begin to perform gs_guc for datanodes.
Command count is 1, Command success count is 1, Command failure count is 0.

Total instances: 1. Failed instances: 0.
ALL: Success to perform gs_guc!
[omm@node0 ~]$ gsql -d postgres -p 15400 -r;
gsql ((openGauss 5.0.0 build a07d57c3) compiled at 2023-03-29 03:37:13 commit 0 last mr  )
Non-SSL connection (SSL connection is recommended when requiring high-security)
Type "help" for help.

openGauss=# SHOW password_reuse_max;
 password_reuse_max
--------------------
 0
(1 row)
openGauss=# \q
[omm@node0 ~]$ gs_guc reload -N all -I all -c "password_reuse_max = 0"
The gs_guc run with the following arguments: [gs_guc -N all -I all -c password_reuse_max = 0 reload ].
Begin to perform the total nodes: 1.
Popen count is 1, Popen success count is 1, Popen failure count is 0.
Begin to perform gs_guc for datanodes.
Command count is 1, Command success count is 1, Command failure count is 0.

Total instances: 1. Failed instances: 0.
ALL: Success to perform gs_guc!
openGauss=# SHOW password_effect_time;
 password_effect_time
----------------------
 90
(1 row)

openGauss=#
openGauss=# \q
[omm@node0 ~]$ gs_guc reload -N all -I all -c "password_effect_time = 90"
The gs_guc run with the following arguments: [gs_guc -N all -I all -c password_effect_time = 90 reload ].
Begin to perform the total nodes: 1.
Popen count is 1, Popen success count is 1, Popen failure count is 0.
Begin to perform gs_guc for datanodes.
Command count is 1, Command success count is 1, Command failure count is 0.

Total instances: 1. Failed instances: 0.
ALL: Success to perform gs_guc!
[omm@node0 ~]$ gsql -d postgres -p 15400 -r;
gsql ((openGauss 5.0.0 build a07d57c3) compiled at 2023-03-29 03:37:13 commit 0 last mr  )
Non-SSL connection (SSL connection is recommended when requiring high-security)
Type "help" for help.

openGauss=# SHOW password_notify_time;
 password_notify_time
----------------------
 7
(1 row)
openGauss=# \q
[omm@node0 ~]$ gs_guc reload -N all -I all -c "password_notify_time = 7"
The gs_guc run with the following arguments: [gs_guc -N all -I all -c password_notify_time = 7 reload ].
Begin to perform the total nodes: 1.
Popen count is 1, Popen success count is 1, Popen failure count is 0.
Begin to perform gs_guc for datanodes.
Command count is 1, Command success count is 1, Command failure count is 0.

Total instances: 1. Failed instances: 0.
ALL: Success to perform gs_guc!
用户权限控制实验结束。
2 审计
2.1 实验介绍
2.1.1 关于本实验
2.1.2 实验目的
2.2 审计开、关
[omm@node0 ~]$ gsql -d postgres -p 15400 -r
gsql ((openGauss 5.0.0 build a07d57c3) compiled at 2023-03-29 03:37:13 commit 0 last mr  )
Non-SSL connection (SSL connection is recommended when requiring high-security)
Type "help" for help.
openGauss=# show audit_enabled;
 audit_enabled
---------------
 on
(1 row)
openGauss=# \q
[omm@node0 ~]$ gs_guc reload -N all -I all -c "audit_enabled = on"The gs_guc run with the following arguments: [gs_guc -N all -I all -c audit_enabled = on reload ].
Begin to perform the total nodes: 1.
Popen count is 1, Popen success count is 1, Popen failure count is 0.
Begin to perform gs_guc for datanodes.
Command count is 1, Command success count is 1, Command failure count is 0.

Total instances: 1. Failed instances: 0.
ALL: Success to perform gs_guc!
openGauss=# show audit_database_process;
 audit_database_process
------------------------
 1
(1 row)
openGauss=# \q
[omm@node0 ~]$ gs_guc reload -N all -I all -c " audit_database_process = 1"
The gs_guc run with the following arguments: [gs_guc -N all -I all -c  audit_database_process = 1 reload ].
Begin to perform the total nodes: 1.
Popen count is 1, Popen success count is 1, Popen failure count is 0.
Begin to perform gs_guc for datanodes.
Command count is 1, Command success count is 1, Command failure count is 0.

Total instances: 1. Failed instances: 0.
ALL: Success to perform gs_guc!
注意说明:
用户登录、注销审计。
参数:audit_login_logout。
默认值为 7,表示开启用户登录、退出的审计功能。设置为 0 表示关闭用户登录、退出的审计
功能。不推荐设置除 0 和 7 之外的值。
数据库启动、停止、恢复和切换审计。
参数:audit_database_process。
默认值为 1,表示开启数据库启动、停止、恢复和切换的审计功能。
用户锁定和解锁审计。
参数:audit_user_locked。
默认值为 1,表示开启审计用户锁定和解锁功能。
用户访问越权审计。
参数:audit_user_violation。
默认值为 0,表示关闭用户越权操作审计功能。
授权和回收权限审计。
参数:audit_grant_revoke。
默认值为 1,表示开启审计用户权限授予和回收功能。
数据库对象的 CREATE,ALTER,DROP 操作审计。
参数:audit_system_object。
默认值为 12295,表示只对 DATABASE、SCHEMA、USER、DATA SOURCE 这四类数据库对
象的 CREATE、ALTER、DROP 操作进行审计。
具体表的 INSERT、UPDATE 和 DELETE 操作审计。
参数:audit_dml_state。
默认值为 0,表示关闭具体表的 DML 操作(SELECT 除外)审计功能。
SELECT 操作审计。
参数:audit_dml_state_select。
默认值为 0,表示关闭 SELECT 操作审计功能。
COPY 审计。
参数:audit_copy_exec。
默认值为 0,表示关闭 copy 操作审计功能。
存储过程和自定义函数的执行审计。
参数:audit_function_exec。
默认值为 0,表示不记录存储过程和自定义函数的执行审计日志。
SET 审计 参数:audit_set_parameter。
默认值为 1,表示记录 set 操作审计日志。
2.3 查看审计结果
步骤 1 启动服务器,再使用 gsql 客户端以管理员用户身份连接 postgres 数据库,假设端口号为15400。
[omm@node0 ~]$ gsql -d postgres -p 15400 -r
gsql ((openGauss 5.0.0 build a07d57c3) compiled at 2023-03-29 03:37:13 commit 0 last mr  )
Non-SSL connection (SSL connection is recommended when requiring high-security)
Type "help" for help.
openGauss=# SELECT time,type,result,username,object_name FROM pg_query_audit('2020-07-10 10:00:00','2020-08-15 09:47:33');
 time | type | result | username | object_name
------+------+--------+----------+-------------
(0 rows)

openGauss=#
2.4 维护审计日志
[omm@node0 ~]$ gsql -d postgres -p 15400 -r
gsql ((openGauss 5.0.0 build a07d57c3) compiled at 2023-03-29 03:37:13 commit 0 last mr  )
Non-SSL connection (SSL connection is recommended when requiring high-security)
Type "help" for help.
openGauss=# SHOW audit_space_limit;
 audit_space_limit
-------------------
 1GB
(1 row)
openGauss=# \q
[omm@node0 ~]$ gs_guc reload -N all -I all -c "audit_space_limit=1024MB"
The gs_guc run with the following arguments: [gs_guc -N all -I all -c audit_space_limit=1024MB reload ].
Begin to perform the total nodes: 1.
Popen count is 1, Popen success count is 1, Popen failure count is 0.
Begin to perform gs_guc for datanodes.
Command count is 1, Command success count is 1, Command failure count is 0.

Total instances: 1. Failed instances: 0.
ALL: Success to perform gs_guc!
openGauss=# SHOW audit_file_remain_threshold;
 audit_file_remain_threshold
-----------------------------
 1048576
(1 row)
如果显示结果不为 1048576,执行“\q”命令退出数据库。
openGauss=# \q
[omm@node0 ~]$ gs_guc reload -N all -I all -c "audit_file_remain_threshold=1048576"
The gs_guc run with the following arguments: [gs_guc -N all -I all -c audit_file_remain_threshold=1048576 reload ].
Begin to perform the total nodes: 1.
Popen count is 1, Popen success count is 1, Popen failure count is 0.
Begin to perform gs_guc for datanodes.
Command count is 1, Command success count is 1, Command failure count is 0.

Total instances: 1. Failed instances: 0.
ALL: Success to perform gs_guc!
[omm@node0 ~]$ gsql -d postgres -p 15400 -r
gsql ((openGauss 5.0.0 build a07d57c3) compiled at 2023-03-29 03:37:13 commit 0 last mr  )
Non-SSL connection (SSL connection is recommended when requiring high-security)
Type "help" for help.

openGauss=# ^C
openGauss=# SELECT pg_delete_audit('2020-07-10 ','2020-07-20');
 pg_delete_audit
-----------------

(1 row)


![[数据结构]——排序——插入排序](https://img-blog.csdnimg.cn/direct/61bff07359554a18b281a6a5d5bb0850.png)