目录
1、ansible模块
1.1 ansible常用模块
1.2 ansible-doc -l 列出当前anisble服务所支持的所有模块信息,按q退出
1.3 ansible-doc 模块名称 随机查看一个模块信息
2、运行临时命令
2.1 ansible命令常用的语法格式
3、常用模块详解与配置实例
3.1命令与脚本类模块
3.1 .1 command模块
3.1.2 scripts模块-传输脚本到被管理端并执行脚本
3.2 文件与目录管理模块
3.2.1 file模块
实例1-创建/shcool目录
实例2-创建文件/shcool/test.txt
实例3-创建软连接/shcool/test.txt到/tmp/test.txt.soft编辑
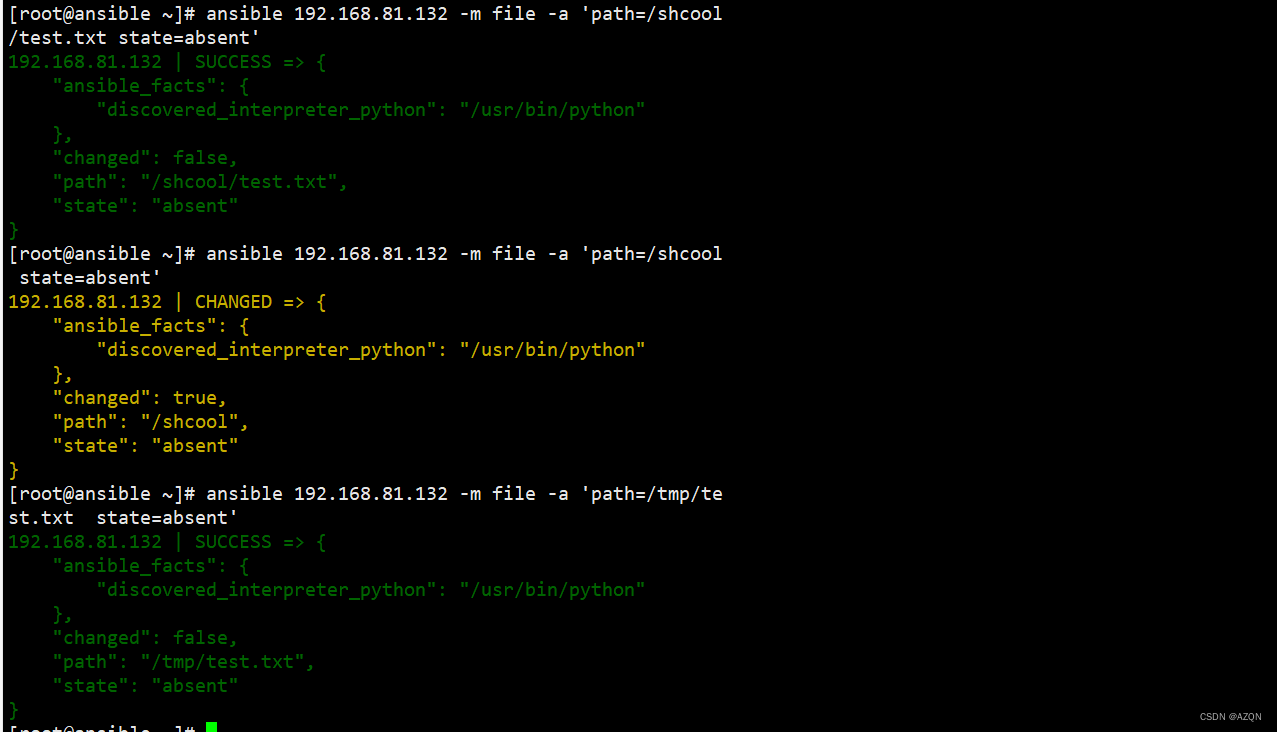
实例4-删除文件/目录、软连接
实例5-创建文件/tmp/test.txt ,所有者root,用户组root,权限为755
3.2.2 copy远程传输模块
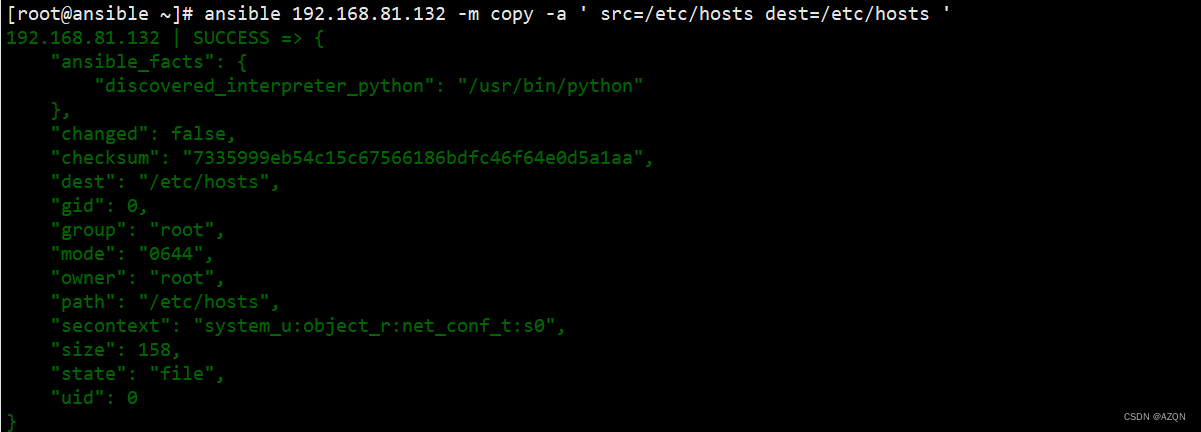
实例1-传输/etc/hosts文件到/etc/hosts
案例02-传输/etc/hosts⽂件到/etc/hosts-先备份然后修改
3.3服务管理模块
3.3.1 systemd
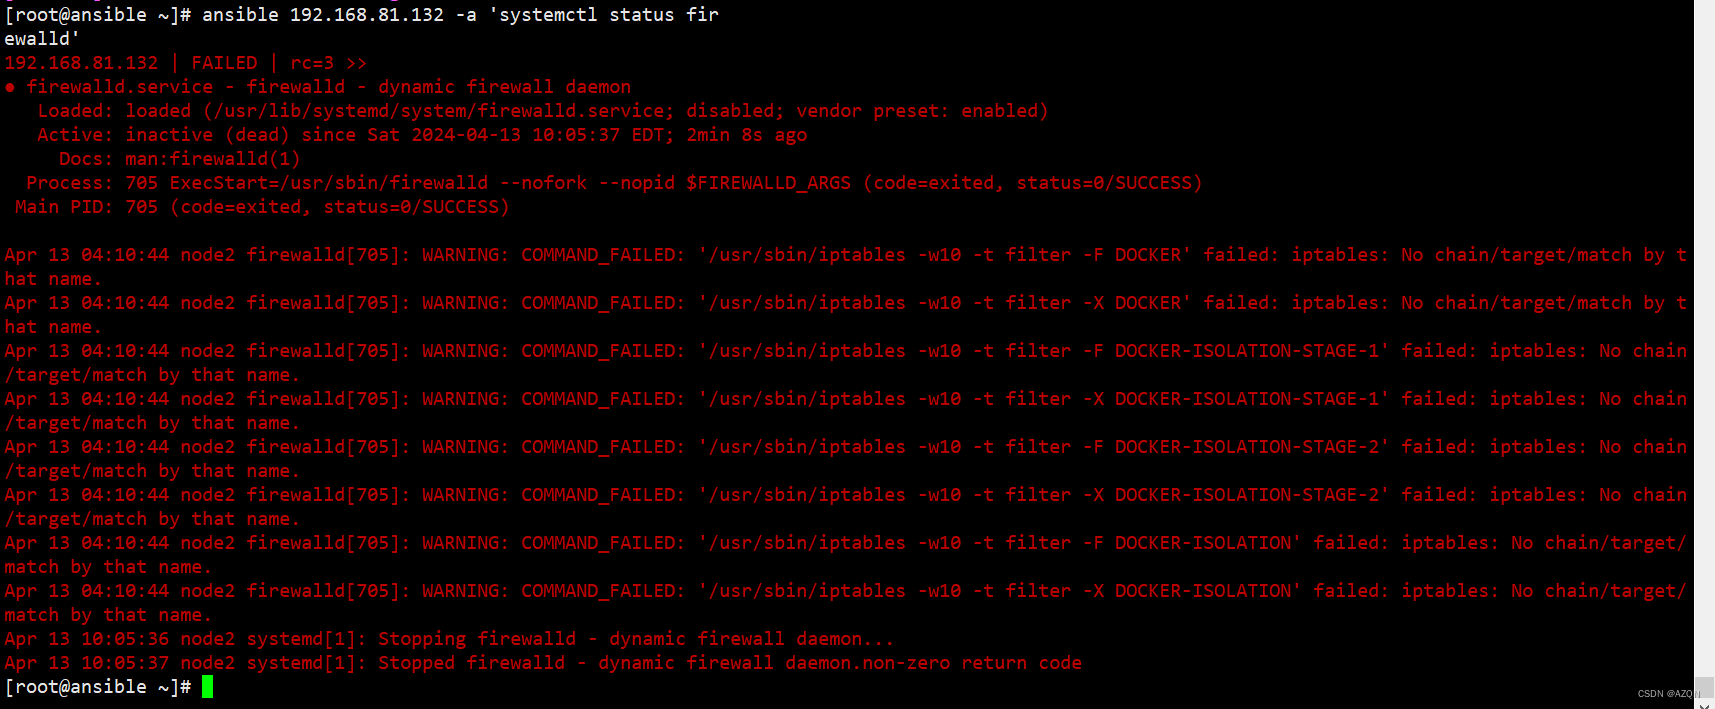
实例1-关闭firewalld
实例2-重启firewalld
3.4 软件包管理模块
3.4.1 yum源配置管理模块
实例1-批量增加nginx-yum源
3.4.2 yum模块
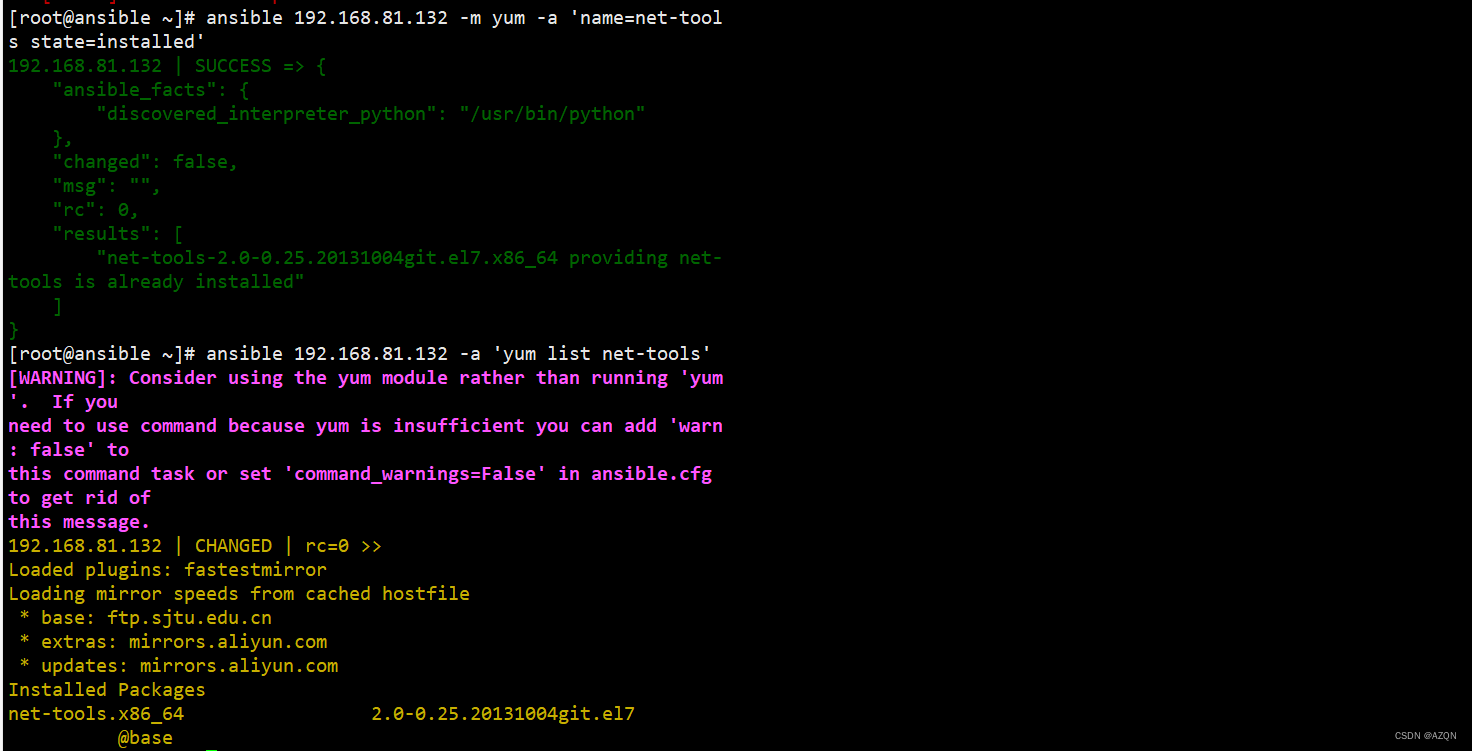
实例1-安装net-tools
3.4.3 get_url模块(wegt)
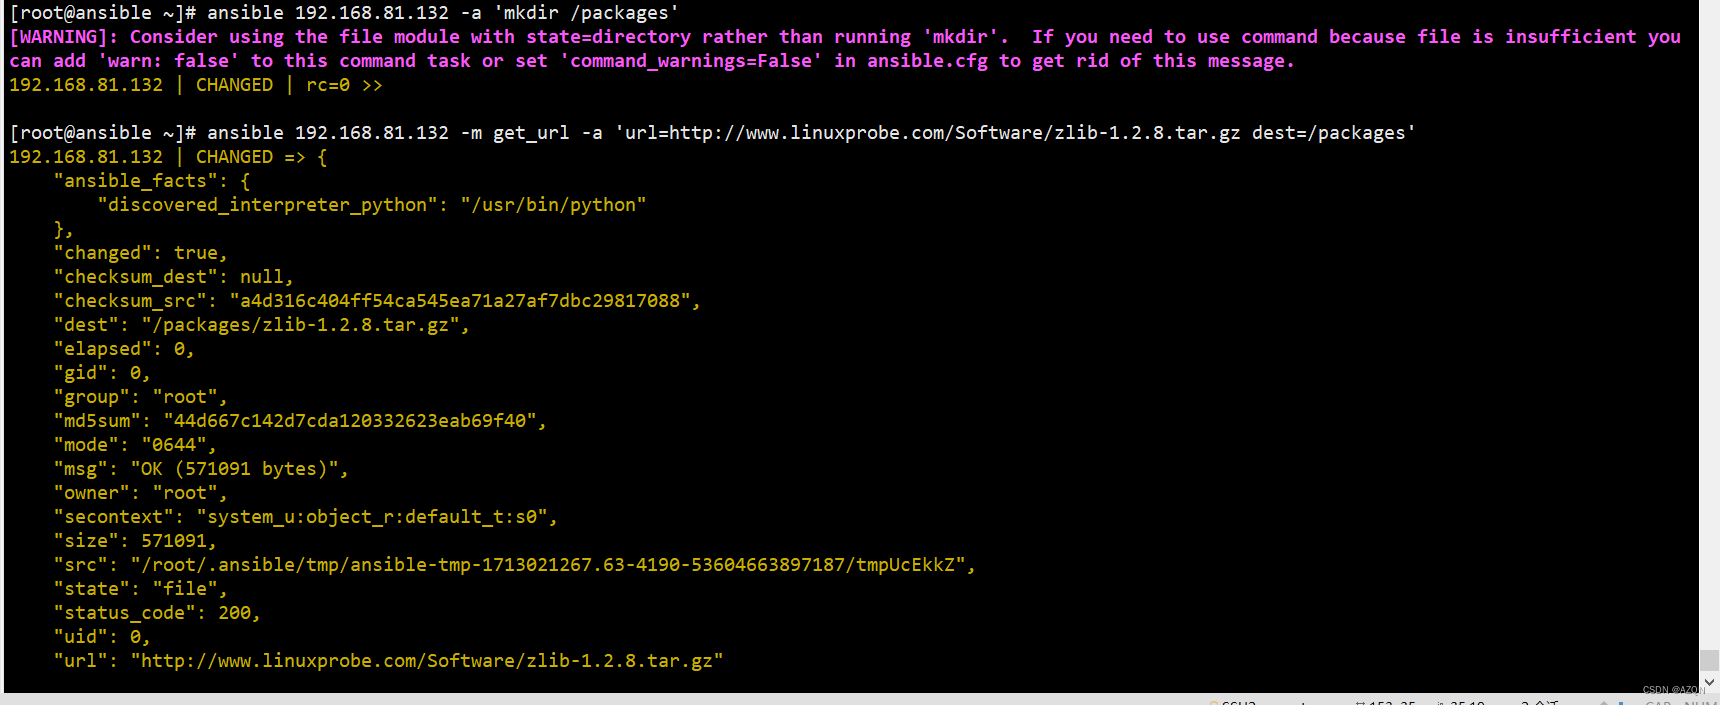
实例1-下载源码包到/packages目录下
3.5 系统管理模块
3.5.1 mount模块
3.5.2 cron模块
实例1-添加自动同步时间的定时任务
3.6 用户管理模块
3.6.1 user模块user
实例1-创建用户ami
3.5.2 group模块
实例1-创建用户kmi,gid为10088
官网:Ansible.Posix — Ansible Community Documentation![]() https://docs.ansible.com/ansible/latest/collections/ansible/posix/
https://docs.ansible.com/ansible/latest/collections/ansible/posix/
1、ansible模块
Ansible服务实际上只是一个框架,能够完成工作的是模块化功能代码。
1.1 ansible常用模块
| 模块名称 | 模块作用 |
| ping | 检查ansible与受控节点的连通性 |
| yum | 安装、更新及卸载软件 |
| yum_repository | 管理主机的软件仓库配置文件。 |
| template | 复制模板文件到受管节点主机。 |
| copy | 新建、修改及复制文件。 |
| user | 创建、修改及删除用户。 |
| group | 创建、修改及删除用户组。 |
| service | 启动、关闭及查看服务状态。 |
| get_url | 从网络中下载文件。 |
| file | 设置文件权限及创建快捷方式。 |
| cron | 添加、修改及删除计划任务。 |
| command | 直接执行用户指定的命令。 |
| shell | 直接执行用户指定的命令(支持特殊字符)。 |
| debug | 输出调试或报错信息。 |
| mount | 挂载硬盘设备文件。 |
| filesystem | 格式化硬盘设备文件。 |
| lineinfile | 通过正则表达式修改文件内容。 |
| setup | 收集受管节点主机上的系统及变量信息。 |
| firewalld | 添加、修改及删除防火墙策略。 |
| lvg | 管理主机的物理卷及卷组设备。 |
| lvol | 管理主机的逻辑卷设备。 |
1.2 ansible-doc -l 列出当前anisble服务所支持的所有模块信息,按q退出
如果要实现某个功能,但是不知道用什么模块,或者知道模块名称但是不清楚模块使用,可以使用ansible-doc命令查找。1.3

1.3 ansible-doc 模块名称 随机查看一个模块信息
会在屏幕上显示出这个模块的作用、可用参数及实例
[root@localhost ~]# ansible-doc ping
> PING    (/usr/lib/python2.7/site-packages/ansible/modules/syste

        A trivial test module, this module always returns `pong'
        successful contact. It does not make sense in playbooks,
        it is useful from `/usr/bin/ansible' to verify the abilit
        login and that a usable Python is configured. This is NOT
        ping, this is just a trivial test module that requires Py
        on the remote-node. For Windows targets, use the [win_pin
        module instead. For Network targets, use the [net_ping] m
        instead.

  * This module is maintained by The Ansible Core Team
OPTIONS (= is mandatory):

- data
        Data to return for the `ping' return value.
        If this parameter is set to `crash', the module will caus
        exception.
        [Default: pong]
        type: str


SEE ALSO:
      * Module net_ping
           The official documentation on the net_ping module.
           https://docs.ansible.com/ansible/2.9/modules/net_ping
        _module.html
      * Module win_ping
           The official documentation on the win_ping module.
           https://docs.ansible.com/ansible/2.9/modules/win_ping
        _module.html


AUTHOR: Ansible Core Team, Michael DeHaan
:

> PING    (/usr/lib/python2.7/site-packages/ansible/modules/system/ping.py)

        A trivial test module, this module always returns `pong' on
        successful contact. It does not make sense in playbooks, but
        it is useful from `/usr/bin/ansible' to verify the ability to
        login and that a usable Python is configured. This is NOT ICMP
        ping, this is just a trivial test module that requires Python
        on the remote-node. For Windows targets, use the [win_ping]
        module instead. For Network targets, use the [net_ping] module
        instead.

  * This module is maintained by The Ansible Core Team
OPTIONS (= is mandatory):

- data
        Data to return for the `ping' return value.
        If this parameter is set to `crash', the module will cause an
        exception.
        [Default: pong]
        type: str


SEE ALSO:
      * Module net_ping
           The official documentation on the net_ping module.
           https://docs.ansible.com/ansible/2.9/modules/net_ping
        _module.html
      * Module win_ping
           The official documentation on the win_ping module.
           https://docs.ansible.com/ansible/2.9/modules/win_ping
        _module.html


AUTHOR: Ansible Core Team, Michael DeHaan
        METADATA:
          status:
          - stableinterface
          supported_by: core


EXAMPLES:

# Test we can logon to 'webservers' and execute python with json lib.
# ansible webservers -m ping

# Example from an Ansible Playbook
- ping:

# Induce an exception to see what happens
- ping:
    data: crash


RETURN VALUES:

ping:
    description: value provided with the data parameter
    returned: success
    type: str
    sample: pong

(END)
2、运行临时命令
在ansible服务中,ansible是用于执行临时任务的命令,执行后结束(与基本文件的可重复执行不同)。在使用ansible命令时,必须指明受管主机信息。
2.1 ansible命令常用的语法格式
ansible受管主机节点 -m模块名称[-a模块参数]
其中,-a是要传递给模块的参数,只有功能极其简单的模块才不需要额外参数
ansible命令常用参数列表
| 参数 | 作用 |
| -k | 手动输入ssh协议密码 |
| -i | 指定主机清单文件 |
| -m | 指定要使用的模块名 |
| -M | 指定要使用的模块路径 |
| -S | 使用su命令 |
| -T | 设置SSH协议连接超时时间 |
| -a | 设置传递给模块的参数 |
| --version | 查看版本信息 |
| -h | 帮助信息 |
3、常用模块详解与配置实例
3.1命令与脚本类模块
3.1 .1 command模块
仅⽀持简单命令,不⽀持特殊符号,管道....
⚠ 这个模块是默认模块,ansible不加上模块,默认就使⽤这个模块.
ansible all   -m command -a '命令'
ansible all  -a 'hostname' #相当于省略 -m command
3.1.2 scripts模块-传输脚本到被管理端并执行脚本
传输脚本
执行脚本
[root@ansible ~]# mkdir -p /server/scripts
[root@ansible ~]# vi /server/scripts/yum.sh
[root@ansible ~]# cat /server/scripts/yum.sh
yum install ipvsadm
[root@ansible ~]# ansible dev -m script -a '/server/scripts/yum.sh'
192.168.81.132 | CHANGED => {
    "changed": true,
    "rc": 0,
    "stderr": "Shared connection to 192.168.81.132 closed.\r\n",
    "stderr_lines": [
        "Shared connection to 192.168.81.132 closed."
    ],
    "stdout": "Loaded plugins: fastestmirror\r\nLoading mirror speeds from cached hostfile\r\n * base: ftp.sjtu.edu.cn\r\n * extras: mirrors.aliyun.com\r\n * updates: mirrors.aliyun.com\r\n\rbase                                                     | 3.6 kB     00:00     \r\n\rdocker-ce-stable                                         | 3.5 kB     00:00     \r\n\rextras                                                   | 2.9 kB     00:00     \r\n\rupdates                                                  | 2.9 kB     00:00     \r\nPackage ipvsadm-1.27-8.el7.x86_64 already installed and latest version\r\nNothing to do\r\n",
    "stdout_lines": [
        "Loaded plugins: fastestmirror",
        "Loading mirror speeds from cached hostfile",
        " * base: ftp.sjtu.edu.cn",
        " * extras: mirrors.aliyun.com",
        " * updates: mirrors.aliyun.com",
        "",
        "base                                                     | 3.6 kB     00:00     ",
        "",
        "docker-ce-stable                                         | 3.5 kB     00:00     ",
        "",
        "extras                                                   | 2.9 kB     00:00     ",
        "",
        "updates                                                  | 2.9 kB     00:00     ",
        "Package ipvsadm-1.27-8.el7.x86_64 already installed and latest version",
        "Nothing to do"
    ]
}

[root@ansible ~]#
查看受管主机,验证!!!

3.2 文件与目录管理模块
file 创建/删除 文件、目录、软连接
copy 远程分发文件、目录、软件包、压缩包
3.2.1 file模块
管理⽂件或⽬录,软连接
| file模块中的选项 | |
| path | 路径(⽬录,⽂件) 必须要写 |
| src(source源) | 源⽂件⼀般⽤于link(创建软连接模式) ⽤于指定源⽂件 |
| state | 状态(模式) state=directory 创建⽬录 state=file (默认) 更新⽂件,如果⽂件不存在也不创建. state=link 创建软连接 state-hard 创建硬链接 state=touch 创建⽂件 state=absent 删除 |
实例1-创建/shcool目录

在192.168.81.132主机上验证!!!

实例2-创建文件/shcool/test.txt

在192.168.81.132主机上验证!!!

实例3-创建软连接/shcool/test.txt到/tmp/test.txt.soft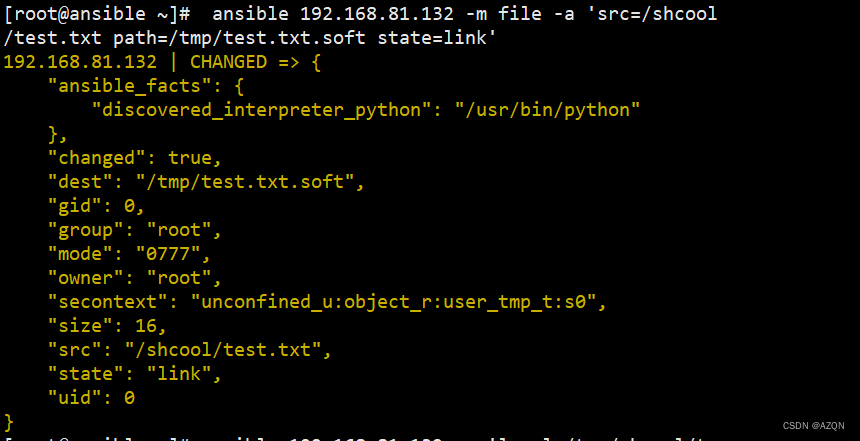
验证!!!

实例4-删除文件/目录、软连接
实例5-创建文件/tmp/test.txt ,所有者root,用户组root,权限为755

3.2.2 copy远程传输模块
| copy模块 | |
| src | source源文件 |
| dest | destination ⽬标 |
| backup | backup=yes 则会在覆盖前进⾏备份 |
| mode | 修改权限 |
| owner | 修改为指定所有者 |
| group | 修改为指定⽤户组 |
实例1-传输/etc/hosts文件到/etc/hosts
案例02-传输/etc/hosts⽂件到/etc/hosts-先备份然后修改

3.3服务管理模块
systemctl命令
启动/关闭/重启服务.
开机⾃启动/开机不⾃启动.
3.3.1 systemd
| systemd模块 | |
| name | ⽤于指定服务名称 |
| enabled | 控制服务的开机⾃启动 enabled=yes /enabled=no |
| state | 表示服务开,关,重启... state=started 开启 state=stopped 关闭 state=reloaded 重读配置⽂件(服务⽀持) sshd,nfs state=restarted 重启(关闭再开启) |
| daemon-reload | yes是否重新加载对应的服务的管理配置⽂件(讲解了systemctl配置⽂件.) |
实例1-关闭firewalld

实例2-重启firewalld


3.4 软件包管理模块
3.4.1 yum源配置管理模块
| yum源模块 yum_repository | yum源配置⽂件内 容 | |
| name | [epel] | yum源中名字(中括号⾥⾯的名字即可.) |
| description | name=xxxxxx | yum源的注释说明 |
| baseurl | baseurl= | yum源中下载软件包的地址(可以访问到repodata⽬录) |
| enabled=yes 或no | enabled=1或0 | 是否启动这个源 |
| gpgcheck=yes或no | gpgcheck=0 | 是否启动gpgcheck功能 |
| file (可以不加) | ⽆ | 指定yum源的⽂件 ⾃动添加.repo file=lidao 默认与模块名字⼀致. |
实例1-批量增加nginx-yum源
.
[nginx]
name=nginx stable repo
baseurl=http://nginx.org/packages/centos/$releasever/$basearch/
gpgcheck=1
enabled=1
gpgkey=https://nginx.org/keys/nginx_signing.key
ansible web -m yum_repository -a 'name=nginx description="nginx stable repo" baseurl="http://nginx.org/packages/centos/$releasever/$basearch/" gpgcheck=no enabled=yes'3.4.2 yum模块
| yum模块 | |
| name | 指定软件包的名字 |
| state | installed 安装(present) removed 删除 (absent) latest安装或更新 |
实例1-安装net-tools
方法一:ansible 192.168.81.132 -m yum -a 'name=net-tools state=installed'
方法二:ansible 192.168.81.132 -a 'yum install net-tools -y'
3.4.3 get_url模块(wegt)
| get_url下载功能 | |
| url | 指定要下载的地址 |
| dest | 下载到哪个目录 |
实例1-下载源码包到/packages目录下
验证!!!
3.5 系统管理模块
mount挂载nfs模块
cron 管理定时任务
3.5.1 mount模块
| mount | |
| fstyps | 指定文件系统(nfs) |
| src | 源地址(nfs)服务端地址 |
| path | 挂载点(要把源挂载点到哪里) |
| state | state=absent 卸载(umount)并修改fstab(清理配置) atate=unmounted 卸载不修改/etc/fstab state=present 仅修改/etc/fstab 不挂载 mounted 挂载(⽤mount命令)并修改/etc/fstab(永久挂载) remounted 重新挂载 |
实例1-挂载
192.168.81.132把nfs共享的⽬录/data⽬录挂载到/upload_video
步骤01_192.168.81.132上⾯创建挂载点/upload_video
ansible 192.168.81.132  -m file  -a 'path=/upload_video   state=directory'
步骤02_挂载nfs
 ansible 192.168.81.132 -m mount   -a 'fstype=nfs src="192.168.81.132:/data" path=/upload_video
state=mounted '
 ansible web -a 'df -h'
 ansible web -a 'tail -2 /etc/fstab'
3.5.2 cron模块
| cron模块 定时任 务模块 | 定时任务配置中 的内容 | |
| name | #及后⾯的内容 | 定时任务名字(⼀定要加上), 对应下⾯注释的内容 |
| minute | */2 | 分钟 minute="*/2",如果没有⽤到不⽤填写即可 |
| hour | ⼩时 | |
| day | ⽇期 | |
| month | ⽉份 | |
| week | 周⼏ | |
| job | 指定命令或脚本(定向到空) job="/sbin/ntpdate ntp1.aliyun.com &>/dev/null" | |
| state | present 默认是添加 添加定时任务 absent 删除 |
实例1-添加自动同步时间的定时任务
#1. sync time lidao996
*/2 * * * * /sbin/ntpdate ntp1.aliyun.com &>/dev/null
步骤01_备份数据
ansible all  -a  'cp /var/spool/cron/root /tmp/'
ansible all  -a  'ls -l /tmp/root'
ansible all  -a  'crontab -r'
步骤02_书写定时任务
ansible all  -m cron -a 'name="sync time by lidao996 20221111" minute="*/2"
job="/sbin/ntpdate ntp1.aliyun.com &>/dev/null" state=present'
3.6 用户管理模块
group 创建组模块
user 创建用户模块
3.6.1 user模块user
| user模块 | |
| name | www用户名 |
| uid | 指定uid |
| group | 指定用户组 |
| shell | 指定命令解释器 |
| create_home | 是否创建家目录(yes/no) |
| state | present 添加 absent 删除 |
实例1-创建用户ami

实例2-创建虚拟用户virtual ,指定uid为888
命令解释器: /sbin/nologin
不创建用户家目录
方法一: useradd -u 888 -s /sbin/nologin -M virtual
方法二:ansible 192.168.81.132 -m user -a 'name=virtual uid=888 shell=/sbin/nologin create_home=no state=present'

3.5.2 group模块
| group | |
| name | 指定用户组名字 |
| gid | 指定组的gid |
| state | present 添加 absent 删除 |
’
实例1-创建用户kmi,gid为10088

#为美好的开源世界贡献一份力量


