文章目录
- 一、文章详情-实现思路
- 1.1 传统实现方式
- 1.2 静态模版+分布式文件系统
- 二、FreeMaker模板引擎
- 2.1 FreeMaker 介绍
- 2.2 环境搭建&&快速入门
- 2.2.1 创建测试工程
- 2.2.2 配置文件
- 2.2.3 创建模型类
- 2.2.4 创建模板
- 2.2.5 创建controller
- 2.2.6 创建启动类
- 2.2.7 测试
- 2.3 FreeMaker基础
- 2.3.1 基础语法种类
- 2.3.2 集合指令(`List`和`Map`)
- 2.3.3 if指令
- 2.3.4 运算符
- 2.3.5 空值处理
- 2.3.6 内建函数
- 2.4 使用Freemarker生成静态文件
- 2.4.1 需求分析
- 2.4.2 静态化测试
- 三、MinIO分布式文件系统
- 3.1 分布式文件系统介绍
- 3.2 MinIO简介
- 3.3 MinIO特点
- 3.4 开箱使用
- 3.4.1 安装启动
- 3.4.2 管理控制台
- 3.5 快速入门
- 3.5.1 创建工程,导入pom依赖
- 3.6 封装MinIO为starter【目的是供其它微服务使用】
- 3.6.1 创建模块heima-file-starter
- 3.6.2 配置类
- 3.6.3 封装操作minIO类
- 3.6.4 对外加入自动配置
- 3.6.5 其他微服务使用
- 四、文章详情
一、文章详情-实现思路
1.1 传统实现方式

1.2 静态模版+分布式文件系统
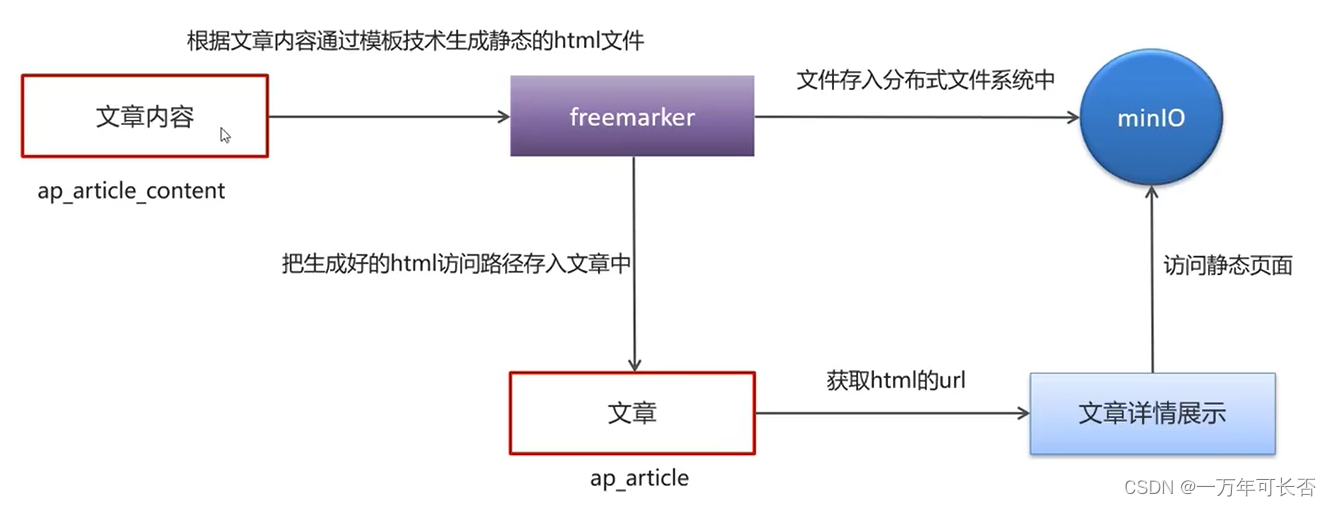
二、FreeMaker模板引擎
2.1 FreeMaker 介绍
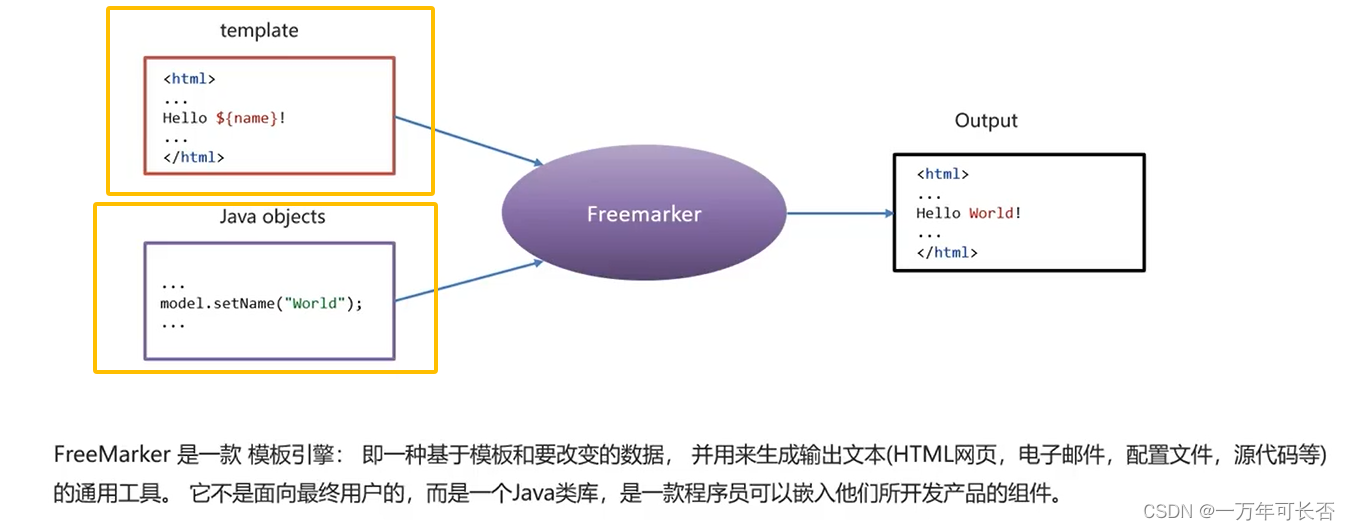
FreeMarker 是一款 模板引擎: 即一种基于模板和要改变的数据, 并用来生成输出文本(HTML网页,电子邮件,配置文件,源代码等)的通用工具。 它不是面向最终用户的,而是一个Java类库,是一款程序员可以嵌入他们所开发产品的组件。
模板编写为FreeMarker Template Language (FTL)。它是简单的,专用的语言, 不是 像PHP那样成熟的编程语言。 那就意味着要准备数据在真实编程语言中来显示,比如数据库查询和业务运算, 之后模板显示已经准备好的数据。在模板中,你可以专注于如何展现数据, 而在模板之外可以专注于要展示什么数据。
常用的java模板引擎还有哪些?
Jsp、Freemarker、Thymeleaf 、Velocity 等。
1.Jsp 为 Servlet 专用,不能单独进行使用。
2.Thymeleaf 为新技术,功能较为强大,但是执行的效率比较低。
3.Velocity从2010年更新完 2.0 版本后,便没有在更新。Spring Boot 官方在 1.4 版本后对此也不在支持,虽然 Velocity 在 2017 年版本得到迭代,但为时已晚。
2.2 环境搭建&&快速入门
freemarker作为springmvc一种视图格式,默认情况下SpringMVC支持freemarker视图格式。
需要创建Spring Boot+Freemarker工程用于测试模板。
2.2.1 创建测试工程
创建一个freemarker-demo 的测试工程专门用于freemarker的功能测试与模板的测试。
pom.xml如下
<?xml version="1.0" encoding="UTF-8"?>
<project xmlns="http://maven.apache.org/POM/4.0.0"
         xmlns:xsi="http://www.w3.org/2001/XMLSchema-instance"
         xsi:schemaLocation="http://maven.apache.org/POM/4.0.0 http://maven.apache.org/xsd/maven-4.0.0.xsd">
    <parent>
        <artifactId>heima-leadnews-test</artifactId>
        <groupId>com.heima</groupId>
        <version>1.0-SNAPSHOT</version>
    </parent>
    <modelVersion>4.0.0</modelVersion>

    <artifactId>freemarker-demo</artifactId>

    <properties>
        <maven.compiler.source>8</maven.compiler.source>
        <maven.compiler.target>8</maven.compiler.target>
    </properties>

    <dependencies>
        <dependency>
            <groupId>org.springframework.boot</groupId>
            <artifactId>spring-boot-starter-web</artifactId>
        </dependency>
        <dependency>
            <groupId>org.springframework.boot</groupId>
            <artifactId>spring-boot-starter-freemarker</artifactId>
        </dependency>

        <dependency>
            <groupId>org.springframework.boot</groupId>
            <artifactId>spring-boot-starter-test</artifactId>
        </dependency>
        <!-- lombok -->
        <dependency>
            <groupId>org.projectlombok</groupId>
            <artifactId>lombok</artifactId>
        </dependency>

        <!-- apache 对 java io 的封装工具库 -->
        <dependency>
            <groupId>org.apache.commons</groupId>
            <artifactId>commons-io</artifactId>
            <version>1.3.2</version>
        </dependency>
    </dependencies>

</project>
2.2.2 配置文件
配置application.yml
server:
  port: 8881 #服务端口
spring:
  application:
    name: freemarker-demo #指定服务名
  freemarker:
    cache: false  #关闭模板缓存,方便测试
    settings:
      template_update_delay: 0 #检查模板更新延迟时间,设置为0表示立即检查,如果时间大于0会有缓存不方便进行模板测试
    suffix: .ftl               #指定Freemarker模板文件的后缀名
    template-loader-path: classpath:/templates  # 模板文件的路径
2.2.3 创建模型类
在freemarker的测试工程下创建模型类型用于测试
package com.heima.freemarker.entity;

import lombok.Data;

import java.util.Date;

@Data
public class Student {
    private String name;//姓名
    private int age;//年龄
    private Date birthday;//生日
    private Float money;//钱包
}
2.2.4 创建模板
在resources下创建templates,此目录为freemarker的默认模板存放目录。
在templates下创建模板文件 01-basic.ftl ,模板中的插值表达式最终会被freemarker替换成具体的数据。
<!DOCTYPE html>
<html>
<head>
    <meta charset="utf-8">
    <title>Hello World!</title>
</head>
<body>
<b>普通文本 String 展示:</b><br><br>
Hello ${name} <br>
<hr>
<b>对象Student中的数据展示:</b><br/>
姓名:${stu.name}<br/>
年龄:${stu.age}
<hr>
</body>
</html>
2.2.5 创建controller
创建Controller类,向Map中添加name,最后返回模板文件。
package com.xuecheng.test.freemarker.controller;

import org.springframework.beans.factory.annotation.Autowired;
import org.springframework.stereotype.Controller;
import org.springframework.web.bind.annotation.RequestMapping;
import org.springframework.web.client.RestTemplate;

import java.util.Map;

@Controller
public class HelloController {

    @GetMapping("/basic")
    public String test(Model model) {


        //1.纯文本形式的参数
        model.addAttribute("name", "freemarker");
        //2.实体类相关的参数

        Student student = new Student();
        student.setName("小明");
        student.setAge(18);
        model.addAttribute("stu", student);

        return "01-basic";
    }
}
2.2.6 创建启动类
package com.heima.freemarker;

import org.springframework.boot.SpringApplication;
import org.springframework.boot.autoconfigure.SpringBootApplication;

@SpringBootApplication
public class FreemarkerDemotApplication {
    public static void main(String[] args) {
        SpringApplication.run(FreemarkerDemotApplication.class,args);
    }
}
2.2.7 测试
请求:http://localhost:8881/basic

2.3 FreeMaker基础
2.3.1 基础语法种类
1、注释,即<#-- -->,介于其之间的内容会被freemarker忽略
<#--我是一个freemarker注释-->
2、插值(Interpolation):即 ${..} 部分,freemarker会用真实的值代替**${..}**
Hello ${name}
3、FTL指令:和HTML标记类似,名字前加#予以区分,Freemarker会解析标签中的表达式或逻辑。
<# >FTL指令</#>
4、文本,仅文本信息,这些不是freemarker的注释、插值、FTL指令的内容会被freemarker忽略解析,直接输出内容。
<#--freemarker中的普通文本-->
我是一个普通的文本
2.3.2 集合指令(List和Map)
1、数据模型:
在HelloController中新增如下方法:
@GetMapping("/list")
public String list(Model model){

    //------------------------------------
    Student stu1 = new Student();
    stu1.setName("小强");
    stu1.setAge(18);
    stu1.setMoney(1000.86f);
    stu1.setBirthday(new Date());

    //小红对象模型数据
    Student stu2 = new Student();
    stu2.setName("小红");
    stu2.setMoney(200.1f);
    stu2.setAge(19);

    //将两个对象模型数据存放到List集合中
    List<Student> stus = new ArrayList<>();
    stus.add(stu1);
    stus.add(stu2);

    //向model中存放List集合数据
    model.addAttribute("stus",stus);

    //------------------------------------

    //创建Map数据
    HashMap<String,Student> stuMap = new HashMap<>();
    stuMap.put("stu1",stu1);
    stuMap.put("stu2",stu2);
    // 3.1 向model中存放Map数据
    model.addAttribute("stuMap", stuMap);

    return "02-list";
}
2、空模板:
在templates中新增02-list.ftl文件
<!DOCTYPE html>
<html>
<head>
    <meta charset="utf-8">
    <title>Hello World!</title>
</head>
<body>

<#-- list 数据的展示 -->
<b>展示list中的stu数据:</b>
<br>
<br>
<table>
    <tr>
        <td>序号</td>
        <td>姓名</td>
        <td>年龄</td>
        <td>钱包</td>
    </tr>
</table>
<hr>

<#-- Map 数据的展示 -->
<b>map数据的展示:</b>
<br/><br/>
<a href="###">方式一:通过map['keyname'].property</a><br/>
输出stu1的学生信息:<br/>
姓名:<br/>
年龄:<br/>
<br/>
<a href="###">方式二:通过map.keyname.property</a><br/>
输出stu2的学生信息:<br/>
姓名:<br/>
年龄:<br/>

<br/>
<a href="###">遍历map中两个学生信息:</a><br/>
<table>
    <tr>
        <td>序号</td>
        <td>姓名</td>
        <td>年龄</td>
        <td>钱包</td>
    </tr>
</table>
<hr>

</body>
</html>
实例代码:
<!DOCTYPE html>
<html>
<head>
    <meta charset="utf-8">
    <title>Hello World!</title>
</head>
<body>

<#-- list 数据的展示 -->
<b>展示list中的stu数据:</b>
<br>
<br>
<table>
    <tr>
        <td>序号</td>
        <td>姓名</td>
        <td>年龄</td>
        <td>钱包</td>
    </tr>
    <#list stus as stu>
        <tr>
            <td>${stu_index+1}</td>  <#-- ***_index获取下标 -->
            <td>${stu.name}</td>
            <td>${stu.age}</td>
            <td>${stu.money}</td>
        </tr>
    </#list>

</table>
<hr>

<#-- Map 数据的展示 -->
<b>map数据的展示:</b>
<br/><br/>
<a href="###">方式一:通过map['keyname'].property</a><br/>
输出stu1的学生信息:<br/>
姓名:${stuMap['stu1'].name}<br/>
年龄:${stuMap['stu1'].age}<br/>
<br/>
<a href="###">方式二:通过map.keyname.property</a><br/>
输出stu2的学生信息:<br/>
姓名:${stuMap.stu2.name}<br/>
年龄:${stuMap.stu2.age}<br/>

<br/>
<a href="###">遍历map中两个学生信息:</a><br/>
<table>
    <tr>
        <td>序号</td>
        <td>姓名</td>
        <td>年龄</td>
        <td>钱包</td>
    </tr>
    <#list stuMap?keys as key >
        <tr>
            <td>${key_index}</td>
            <td>${stuMap[key].name}</td>
            <td>${stuMap[key].age}</td>
            <td>${stuMap[key].money}</td>
        </tr>
    </#list>
</table>
<hr>

</body>
</html>
👆上面代码解释:
${k_index}:index:得到循环的下标,使用方法是在stu后边加"_index",它的值是从0开始

2.3.3 if指令
if 指令即判断指令,是常用的FTL指令,freemarker在解析时遇到if会进行判断,条件为真则输出if中间的内容,否则跳过内容不再输出。
- 指令格式
<#if > <#else > </#if>
1、数据模型:
使用list指令中测试数据模型,判断名称为小红的数据字体显示为红色。
2、模板:
<table>
    <tr>
        <td>姓名</td>
        <td>年龄</td>
        <td>钱包</td>
    </tr>
    <#list stus as stu>
        <tr>
            <td >${stu.name}</td>
            <td>${stu.age}</td>
            <td >${stu.mondy}</td>
        </tr>
    </#list>

</table>
实例代码:
<table>
    <tr>
        <td>姓名</td>
        <td>年龄</td>
        <td>钱包</td>
    </tr>
    <#list stus as stu >
        <#if stu.name='小红'>
            <tr style="color: red">
                <td>${stu_index}</td>
                <td>${stu.name}</td>
                <td>${stu.age}</td>
                <td>${stu.money}</td>
            </tr>
            <#else >
            <tr>
                <td>${stu_index}</td>
                <td>${stu.name}</td>
                <td>${stu.age}</td>
                <td>${stu.money}</td>
            </tr>
        </#if>
    </#list>
</table>
3、输出:
姓名为“小强”则字体颜色显示为红色。

2.3.4 运算符
1、算数运算符
FreeMarker表达式中完全支持算术运算,FreeMarker支持的算术运算符包括:
- 加法:
+ - 减法:
- - 乘法:
* - 除法:
/ - 求模 (求余):
%
模板代码
<b>算数运算符</b>
<br/><br/>
    100+5 运算:  ${100 + 5 }<br/>
    100 - 5 * 5运算:${100 - 5 * 5}<br/>
    5 / 2运算:${5 / 2}<br/>
    12 % 10运算:${12 % 10}<br/>
<hr>
除了 + 运算以外,其他的运算只能和 number 数字类型的计算。
2、比较运算符
=或者==:判断两个值是否相等.!=:判断两个值是否不等.>或者gt:判断左边值是否大于右边值>=或者gte:判断左边值是否大于等于右边值<或者lt:判断左边值是否小于右边值<=或者lte:判断左边值是否小于等于右边值
= 和 == 模板代码
<!DOCTYPE html>
<html>
<head>
    <meta charset="utf-8">
    <title>Hello World!</title>
</head>
<body>

    <b>比较运算符</b>
    <br/>
    <br/>

    <dl>
        <dt> =/== 和 != 比较:</dt>
        <dd>
            <#if "xiaoming" == "xiaoming">
                字符串的比较 "xiaoming" == "xiaoming"
            </#if>
        </dd>
        <dd>
            <#if 10 != 100>
                数值的比较 10 != 100
            </#if>
        </dd>
    </dl>


    <dl>
        <dt>其他比较</dt>
        <dd>
            <#if 10 gt 5 >
                形式一:使用特殊字符比较数值 10 gt 5
            </#if>
        </dd>
        <dd>
            <#-- 日期的比较需要通过?date将属性转为data类型才能进行比较 -->
            <#if (date1?date >= date2?date)>
                形式二:使用括号形式比较时间 date1?date >= date2?date
            </#if>
        </dd>
    </dl>

    <br/>
<hr>
</body>
</html>
Controller 的 数据模型代码
@GetMapping("operation")
public String testOperation(Model model) {
    //构建 Date 数据
    Date now = new Date();
    model.addAttribute("date1", now);
    model.addAttribute("date2", now);

    return "03-operation";
}
比较运算符注意
- **
=和!=**可以用于字符串、数值和日期来比较是否相等 - **
=和!=**两边必须是相同类型的值,否则会产生错误 - 字符串
"x"、"x "、**"X"**比较是不等的.因为FreeMarker是精确比较 - 其它的运行符可以作用于数字和日期,但不能作用于字符串
- 使用
gt等字母运算符代替>会有更好的效果,因为 FreeMarker会>解释成FTL标签的结束字符,可以使用括号来避免这种情况,如:<#if (x>y)>
3、逻辑运算符
- 逻辑与:&&
- 逻辑或:||
- 逻辑非:!
逻辑运算符只能作用于布尔值,否则将产生错误 。
模板代码
<b>逻辑运算符</b>
    <br/>
    <br/>
    <#if (10 lt 12 )&&( 10  gt  5 )  >
        (10 lt 12 )&&( 10  gt  5 )  显示为 true
    </#if>
    <br/>
    <br/>
    <#if !false>
        false 取反为true
    </#if>
<hr>
2.3.5 空值处理
1、判断某变量是否存在使用 “??”
用法为:variable??,如果该变量存在,返回true,否则返回false
例:为防止stus为空报错可以加上判断如下:
    <#if stus??>
    <#list stus as stu>
    	......
    </#list>
    </#if>
2、缺失变量默认值使用 “!”
-
使用!要以指定一个默认值,当变量为空时显示默认值
例: ${name!‘’}表示如果name为空显示空字符串。
例: ${name!‘nihao’}表示如果name为空显示nihao字符串。 -
如果是嵌套对象则建议使用()括起来
例: ${(stu.bestFriend.name)!‘’}表示,如果stu或bestFriend或name为空默认显示空字符串。
2.3.6 内建函数
内建函数语法格式: 变量+?+函数名称
1、某个集合的大小
${集合名?size}
2、日期格式化
显示年月日: ${today?date}
显示时分秒:${today?time}
显示日期+时间:${today?datetime}
自定义格式化: ${today?string("yyyy年MM月")}
3、内建函数c
model.addAttribute(“point”, 102920122);
point是数字型,使用${point}会显示这个数字的值,每三位使用逗号分隔。
如果不想显示为每三位分隔的数字,可以使用c函数将数字型转成字符串输出
${point?c}
4、将json字符串转成对象
一个例子:
其中用到了 assign标签,assign的作用是定义一个变量。
<#assign text="{'bank':'工商银行','account':'10101920201920212'}" />
<#assign data=text?eval />
开户行:${data.bank}  账号:${data.account}
内建函数模板页面:
<!DOCTYPE html>
<html>
<head>
    <meta charset="utf-8">
    <title>inner Function</title>
</head>
<body>

    <b>获得集合大小</b><br>

    集合大小:${stus?size}
    <hr>


    <b>获得日期</b><br>

    显示年月日: ${today?date}       <br>

    显示时分秒:${today?time}<br>

    显示日期+时间:${today?datetime}<br>

    自定义格式化:  ${today?string("yyyy年MM月")}<br>

    <hr>

    <b>内建函数C</b><br>
    没有C函数显示的数值:${point} <br>

    有C函数显示的数值:${point?c}

    <hr>

    <b>声明变量assign</b><br>
    <#assign text="{'bank':'工商银行','account':'10101920201920212'}" />
    <#assign data=text?eval />
    开户行:${data.bank}  账号:${data.account}

<hr>
</body>
</html>
内建函数Controller数据模型:
@GetMapping("innerFunc")
public String testInnerFunc(Model model) {
    //1.1 小强对象模型数据
    Student stu1 = new Student();
    stu1.setName("小强");
    stu1.setAge(18);
    stu1.setMoney(1000.86f);
    stu1.setBirthday(new Date());
    //1.2 小红对象模型数据
    Student stu2 = new Student();
    stu2.setName("小红");
    stu2.setMoney(200.1f);
    stu2.setAge(19);
    //1.3 将两个对象模型数据存放到List集合中
    List<Student> stus = new ArrayList<>();
    stus.add(stu1);
    stus.add(stu2);
    model.addAttribute("stus", stus);
    // 2.1 添加日期
    Date date = new Date();
    model.addAttribute("today", date);
    // 3.1 添加数值
    model.addAttribute("point", 102920122);
    return "04-innerFunc";
}
2.4 使用Freemarker生成静态文件
之前的测试都是SpringMVC将Freemarker作为视图解析器(ViewReporter)来集成到项目中,工作中,有的时候需要使用Freemarker原生Api来生成静态内容,下面一起来学习下原生Api生成文本文件。
2.4.1 需求分析
使用freemarker原生Api将页面生成html文件,本节测试html文件生成的方法:

2.4.2 静态化测试
根据模板文件生成html文件
①:修改application.yml文件,添加以下模板存放位置的配置信息,完整配置如下:
server:
  port: 8881 #服务端口
spring:
  application:
    name: freemarker-demo #指定服务名
  freemarker:
    cache: false  #关闭模板缓存,方便测试
    settings:
      template_update_delay: 0 #检查模板更新延迟时间,设置为0表示立即检查,如果时间大于0会有缓存不方便进行模板测试
    suffix: .ftl               #指定Freemarker模板文件的后缀名
    template-loader-path: classpath:/templates   #模板存放位置
②:在test下创建测试类
package com.heima.freemarker.test;


import com.heima.freemarker.FreemarkerDemoApplication;
import com.heima.freemarker.entity.Student;
import freemarker.template.Configuration;
import freemarker.template.Template;
import freemarker.template.TemplateException;
import org.junit.Test;
import org.junit.runner.RunWith;
import org.springframework.beans.factory.annotation.Autowired;
import org.springframework.boot.test.context.SpringBootTest;
import org.springframework.test.context.junit4.SpringRunner;

import java.io.FileWriter;
import java.io.IOException;
import java.util.*;

@SpringBootTest(classes = FreemarkerDemoApplication.class)
@RunWith(SpringRunner.class)
public class FreemarkerTest {

    @Autowired
    private Configuration configuration;

    @Test
    public void test() throws IOException, TemplateException {
        //freemarker的模板对象,获取模板
        Template template = configuration.getTemplate("02-list.ftl");
        Map params = getData();
        //合成
        //第一个参数 数据模型
        //第二个参数  输出流
        template.process(params, new FileWriter("d:/list.html"));
    }

    private Map getData() {
        Map<String, Object> map = new HashMap<>();

        //小强对象模型数据
        Student stu1 = new Student();
        stu1.setName("小强");
        stu1.setAge(18);
        stu1.setMoney(1000.86f);
        stu1.setBirthday(new Date());

        //小红对象模型数据
        Student stu2 = new Student();
        stu2.setName("小红");
        stu2.setMoney(200.1f);
        stu2.setAge(19);

        //将两个对象模型数据存放到List集合中
        List<Student> stus = new ArrayList<>();
        stus.add(stu1);
        stus.add(stu2);

        //向map中存放List集合数据
        map.put("stus", stus);


        //创建Map数据
        HashMap<String, Student> stuMap = new HashMap<>();
        stuMap.put("stu1", stu1);
        stuMap.put("stu2", stu2);
        //向map中存放Map数据
        map.put("stuMap", stuMap);

        //返回Map
        return map;
    }
}
三、MinIO分布式文件系统
3.1 分布式文件系统介绍
各种对象存储方式对比如下:

两款分布式文件系统对比:

3.2 MinIO简介
MinIO基于Apache License v2.0开源协议的对象存储服务,可以做为云存储的解决方案用来保存海量的图片,视频,文档。
-
由于采用Golang实现,服务端可以工作在Windows,Linux, OS X和FreeBSD上。配置简单,基本是复制可执行程序,单行命令可以运行起来。
-
MinIO兼容亚马逊S3云存储服务接口,非常适合于存储大容量非结构化的数据,例如图片、视频、日志文件、备份数据和容器/虚拟机镜像等,而一个对象文件可以是任意大小,从几kb到最大5T不等。
S3 ( Simple Storage Service简单存储服务) 基本概念:1)bucket – 类比于文件系统的目录;2)Object – 类比文件系统的文件;3)Keys – 类比文件名 -
官网文档:http://docs.minio.org.cn/docs/
3.3 MinIO特点
-
数据保护
Minio使用Minio Erasure Code(纠删码)来防止硬件故障。即便损坏一半以上的driver,但是仍然可以从中恢复。
-
高性能
作为高性能对象存储,在标准硬件条件下它能达到55GB/s的读、35GB/s的写速率
-
可扩容
不同MinIO集群可以组成联邦,并形成一个全局的命名空间,并跨越多个数据中心
-
SDK支持
基于Minio轻量的特点,它得到类似Java、Python或Go等语言的sdk支持
-
有操作页面
面向用户友好的简单操作界面,非常方便的管理Bucket及里面的文件资源
-
功能简单
这一设计原则让MinIO不容易出错、更快启动
-
丰富的API
支持文件资源的分享连接及分享链接的过期策略、存储桶操作、文件列表访问及文件上传下载的基本功能等。
-
文件变化主动通知
存储桶(Bucket)如果发生改变,比如上传对象和删除对象,可以使用存储桶事件通知机制进行监控,并通过以下方式发布出去:AMQP、MQTT、Elasticsearch、Redis、NATS、MySQL、Kafka、Webhooks等。
3.4 开箱使用
3.4.1 安装启动
我们提供的镜像中已经有minio的环境
docker pull minio/minio
我们可以使用docker进行环境部署和启动
 docker run \
--name minio \
-p 9000:9000  \
-p 9090:9090  \
-d --restart=always \
-e "MINIO_ROOT_USER=minio" \
-e "MINIO_ROOT_PASSWORD=minio123" \
-v /home/data:/data \
-v /home/config:/root/.minio \
minio/minio server  /data --console-address ":9090" --address ":9000"
现在需要增加额外一个端口号用于web管理 --console-address “:9090” ;API管理地址 --console-address “:9000”
3.4.2 管理控制台
假设我们的服务器地址为http://192.168.200.130:9000,我们在地址栏输入:http://http://192.168.200.130:9000/ 即可进入登录界面。
Access Key为minio,Secret_key 为minio123 进入系统后可以看到主界面

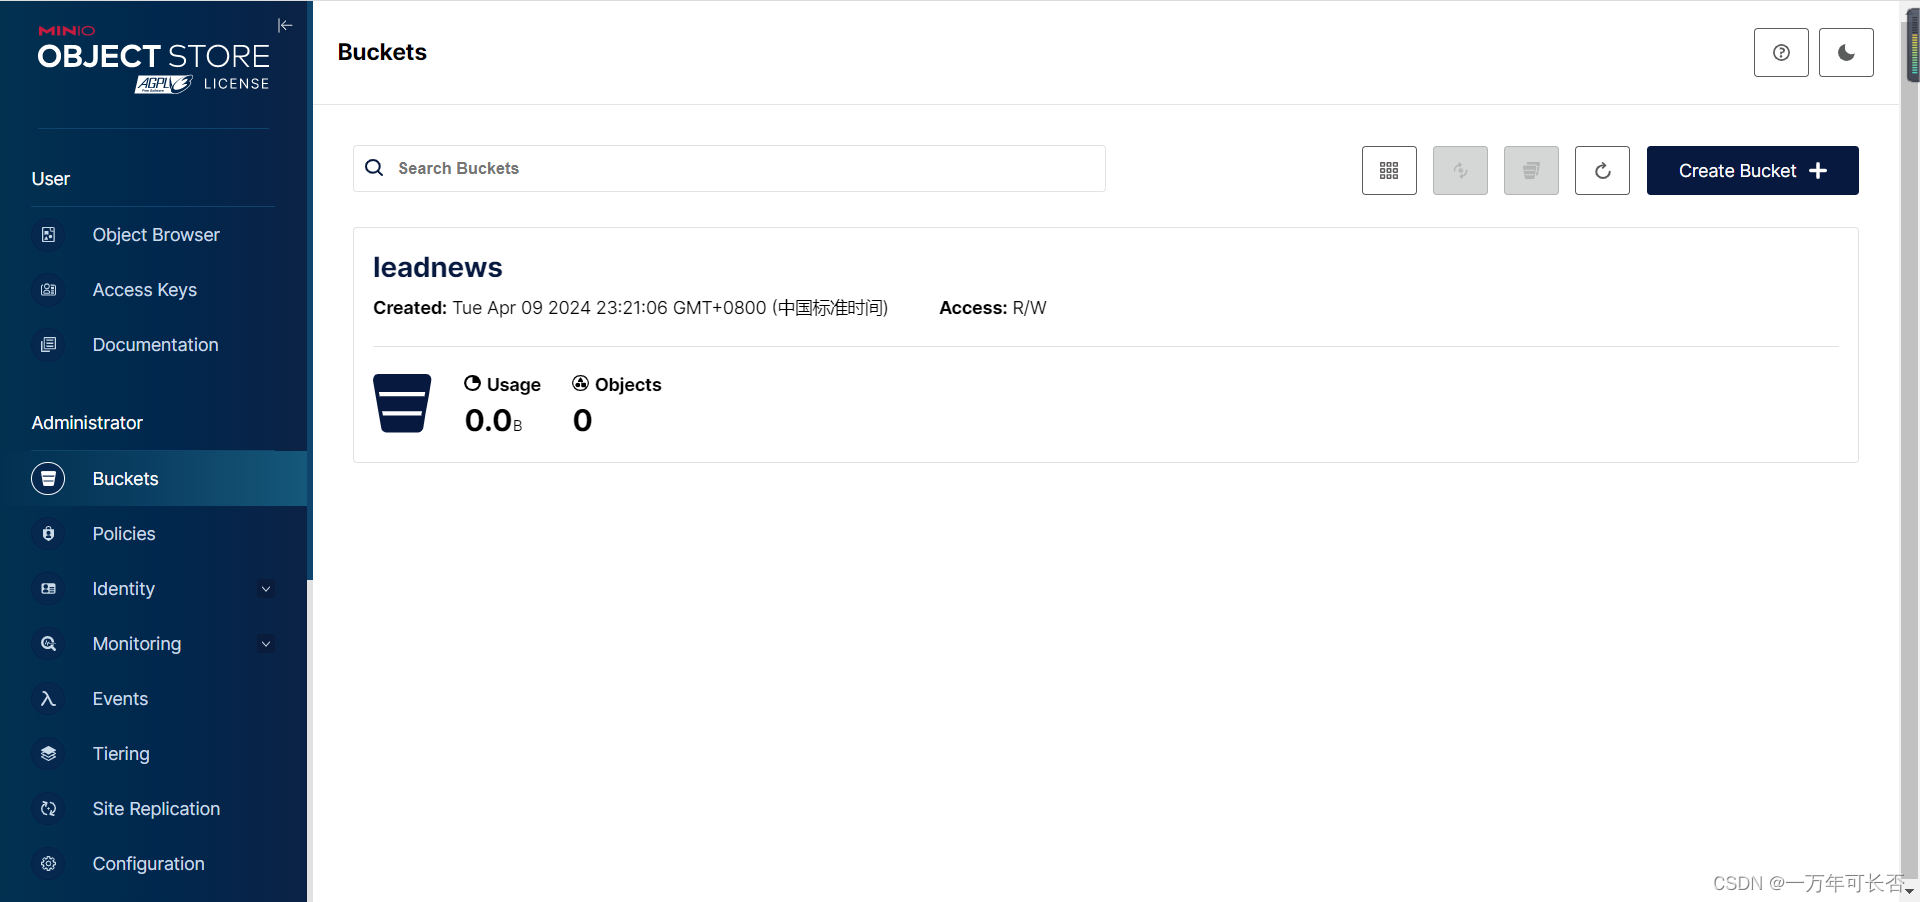
点击右下角的“+”号 ,点击下面的图标,创建一个桶leadnews
- bucket-类比于文件系统的目录
- Object-类比文件系统的文件
- Keys-类比文件名
3.5 快速入门
3.5.1 创建工程,导入pom依赖
创建minio-demo,对应pom如下
<?xml version="1.0" encoding="UTF-8"?>
<project xmlns="http://maven.apache.org/POM/4.0.0"
         xmlns:xsi="http://www.w3.org/2001/XMLSchema-instance"
         xsi:schemaLocation="http://maven.apache.org/POM/4.0.0 http://maven.apache.org/xsd/maven-4.0.0.xsd">
    <parent>
        <artifactId>heima-leadnews-test</artifactId>
        <groupId>com.heima</groupId>
        <version>1.0-SNAPSHOT</version>
    </parent>
    <modelVersion>4.0.0</modelVersion>

    <artifactId>minio-demo</artifactId>

    <properties>
        <maven.compiler.source>8</maven.compiler.source>
        <maven.compiler.target>8</maven.compiler.target>
    </properties>

    <dependencies>

        <dependency>
            <groupId>io.minio</groupId>
            <artifactId>minio</artifactId>
            <version>7.1.0</version>
        </dependency>
        <dependency>
            <groupId>org.springframework.boot</groupId>
            <artifactId>spring-boot-starter-web</artifactId>
        </dependency>

        <dependency>
            <groupId>org.springframework.boot</groupId>
            <artifactId>spring-boot-starter-test</artifactId>
        </dependency>
    </dependencies>

</project>
引导类:
package com.heima.minio;

import org.springframework.boot.SpringApplication;
import org.springframework.boot.autoconfigure.SpringBootApplication;


@SpringBootApplication
public class MinIOApplication {

    public static void main(String[] args) {
        SpringApplication.run(MinIOApplication.class,args);
    }
}
创建测试类,上传html文件
package com.heima.minio.test;

import io.minio.MinioClient;
import io.minio.PutObjectArgs;

import java.io.FileInputStream;

public class MinIOTest {


    public static void main(String[] args) {

        FileInputStream fileInputStream = null;
        try {

            fileInputStream =  new FileInputStream("D:\\list.html");;

            //1.创建minio链接客户端
            MinioClient minioClient = MinioClient.builder().credentials("minio", "minio123").endpoint("http://192.168.200.130:9000").build();
            //2.上传
            PutObjectArgs putObjectArgs = PutObjectArgs.builder()
                    .object("list.html")//文件名
                    .contentType("text/html")//文件类型
                    .bucket("leadnews")//桶名词  与minio创建的名词一致
                    .stream(fileInputStream, fileInputStream.available(), -1) //文件流
                    .build();
            minioClient.putObject(putObjectArgs);

            System.out.println("http://192.168.200.130:9000/leadnews/list.html");

        } catch (Exception ex) {
            ex.printStackTrace();
        }
    }

}
注意要设置buckets的access policy为public,anonymous添加规则读写,才可以访问下面的网址
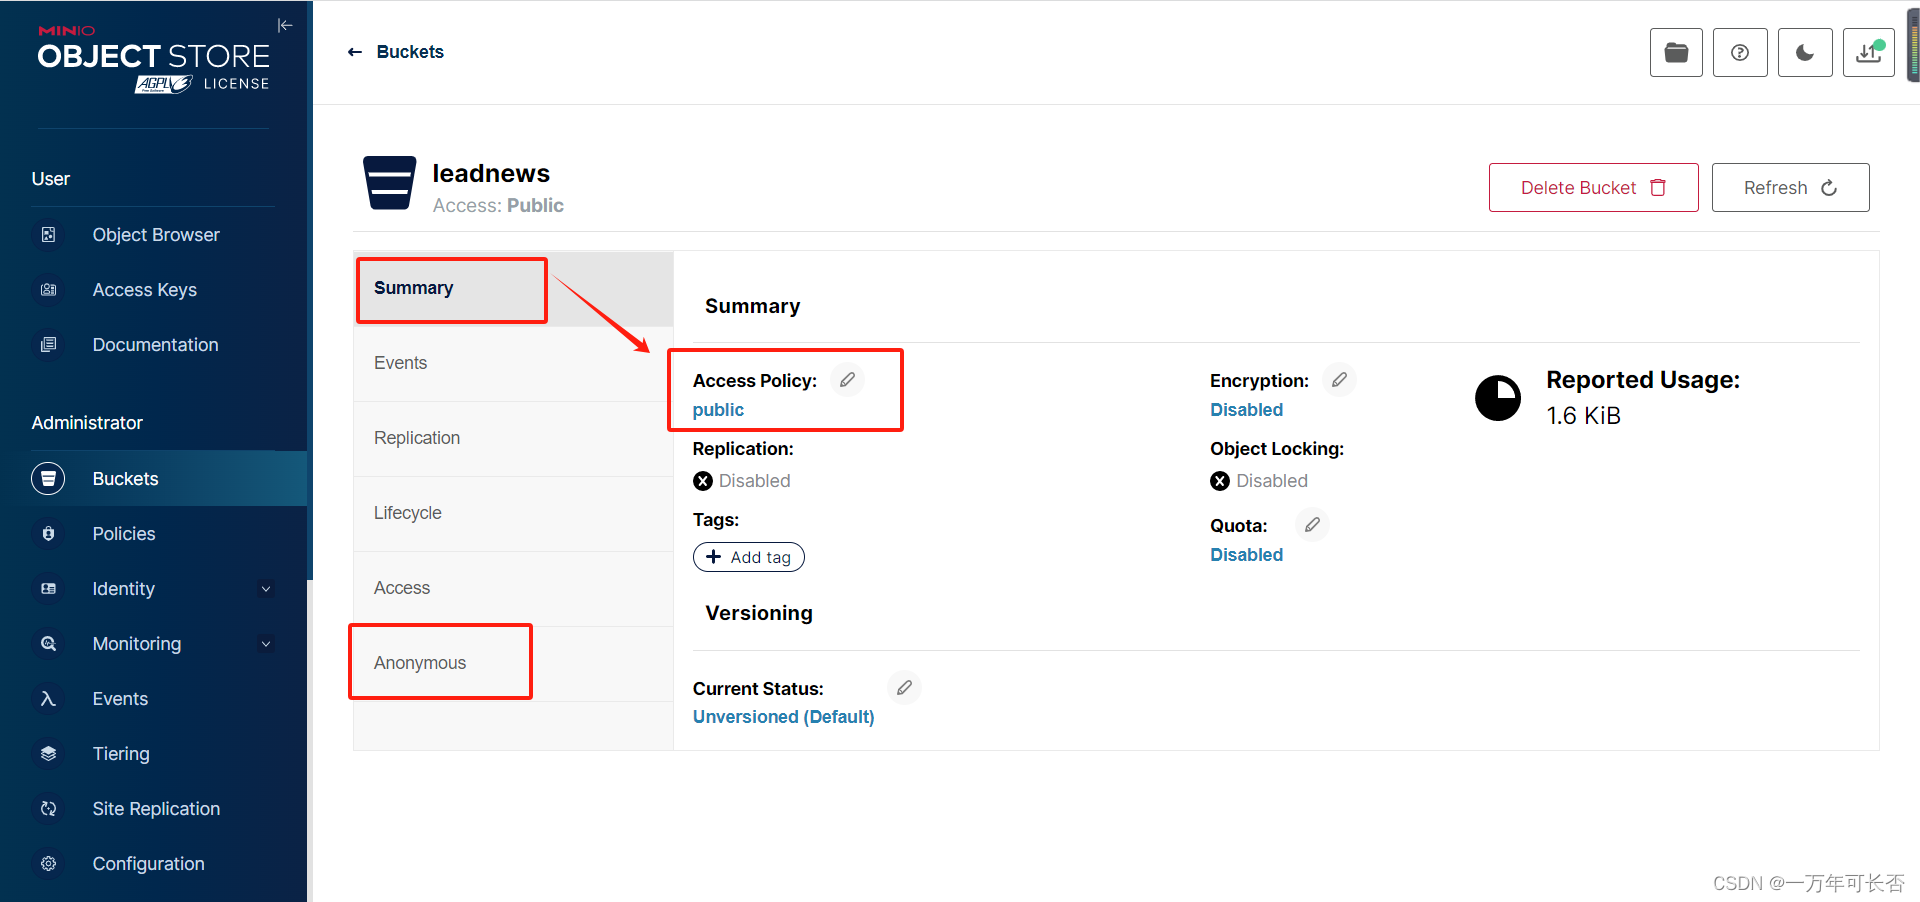
然后访问上面的网址:http://192.168.200.130:9000/leadnews/list.html,就可以看到上传的html文件
3.6 封装MinIO为starter【目的是供其它微服务使用】

3.6.1 创建模块heima-file-starter
导入依赖
<dependencies>
    <dependency>
        <groupId>org.springframework.boot</groupId>
        <artifactId>spring-boot-autoconfigure</artifactId>
    </dependency>
    <dependency>
        <groupId>io.minio</groupId>
        <artifactId>minio</artifactId>
        <version>7.1.0</version>
    </dependency>
    <dependency>
        <groupId>org.springframework.boot</groupId>
        <artifactId>spring-boot-starter</artifactId>
    </dependency>
    <dependency>
        <groupId>org.springframework.boot</groupId>
        <artifactId>spring-boot-configuration-processor</artifactId>
        <optional>true</optional>
    </dependency>
    <dependency>
        <groupId>org.springframework.boot</groupId>
        <artifactId>spring-boot-starter-actuator</artifactId>
    </dependency>
</dependencies>
3.6.2 配置类
MinIOConfigProperties
package com.heima.file.config;


import lombok.Data;
import org.springframework.boot.context.properties.ConfigurationProperties;

import java.io.Serializable;

@Data
@ConfigurationProperties(prefix = "minio")  // 文件上传 配置前缀file.oss
public class MinIOConfigProperties implements Serializable {

    private String accessKey;
    private String secretKey;
    private String bucket;
    private String endpoint;
    private String readPath;
}
MinIOConfig
package com.heima.file.config;

import com.heima.file.service.FileStorageService;
import io.minio.MinioClient;
import lombok.Data;
import org.springframework.beans.factory.annotation.Autowired;
import org.springframework.boot.autoconfigure.condition.ConditionalOnClass;
import org.springframework.boot.context.properties.EnableConfigurationProperties;
import org.springframework.context.annotation.Bean;
import org.springframework.context.annotation.Configuration;


@Data
@Configuration
@EnableConfigurationProperties({MinIOConfigProperties.class})
//当引入FileStorageService接口时
@ConditionalOnClass(FileStorageService.class)
public class MinIOConfig {

   @Autowired
   private MinIOConfigProperties minIOConfigProperties;

    @Bean
    public MinioClient buildMinioClient(){
        return MinioClient
                .builder()
                .credentials(minIOConfigProperties.getAccessKey(), minIOConfigProperties.getSecretKey())
                .endpoint(minIOConfigProperties.getEndpoint())
                .build();
    }
}
3.6.3 封装操作minIO类
FileStorageService
package com.heima.file.service;

import java.io.InputStream;

/**
 * @author itheima
 */
public interface FileStorageService {


    /**
     *  上传图片文件
     * @param prefix  文件前缀
     * @param filename  文件名
     * @param inputStream 文件流
     * @return  文件全路径
     */
    public String uploadImgFile(String prefix, String filename,InputStream inputStream);

    /**
     *  上传html文件
     * @param prefix  文件前缀
     * @param filename   文件名
     * @param inputStream  文件流
     * @return  文件全路径
     */
    public String uploadHtmlFile(String prefix, String filename,InputStream inputStream);

    /**
     * 删除文件
     * @param pathUrl  文件全路径
     */
    public void delete(String pathUrl);

    /**
     * 下载文件
     * @param pathUrl  文件全路径
     * @return
     *
     */
    public byte[]  downLoadFile(String pathUrl);

}
MinIOFileStorageService
package com.heima.file.service.impl;


import com.heima.file.config.MinIOConfig;
import com.heima.file.config.MinIOConfigProperties;
import com.heima.file.service.FileStorageService;
import io.minio.GetObjectArgs;
import io.minio.MinioClient;
import io.minio.PutObjectArgs;
import io.minio.RemoveObjectArgs;
import lombok.extern.slf4j.Slf4j;
import org.springframework.beans.factory.annotation.Autowired;
import org.springframework.boot.context.properties.EnableConfigurationProperties;
import org.springframework.context.annotation.Import;
import org.springframework.util.StringUtils;

import java.io.ByteArrayOutputStream;
import java.io.IOException;
import java.io.InputStream;
import java.text.SimpleDateFormat;
import java.util.Date;

@Slf4j
@EnableConfigurationProperties(MinIOConfigProperties.class)
@Import(MinIOConfig.class)
public class MinIOFileStorageService implements FileStorageService {

    @Autowired
    private MinioClient minioClient;

    @Autowired
    private MinIOConfigProperties minIOConfigProperties;

    private final static String separator = "/";

    /**
     * @param dirPath
     * @param filename  yyyy/mm/dd/file.jpg
     * @return
     */
    public String builderFilePath(String dirPath,String filename) {
        StringBuilder stringBuilder = new StringBuilder(50);
        if(!StringUtils.isEmpty(dirPath)){
            stringBuilder.append(dirPath).append(separator);
        }
        SimpleDateFormat sdf = new SimpleDateFormat("yyyy/MM/dd");
        String todayStr = sdf.format(new Date());
        stringBuilder.append(todayStr).append(separator);
        stringBuilder.append(filename);
        return stringBuilder.toString();
    }

    /**
     *  上传图片文件
     * @param prefix  文件前缀
     * @param filename  文件名
     * @param inputStream 文件流
     * @return  文件全路径
     */
    @Override
    public String uploadImgFile(String prefix, String filename,InputStream inputStream) {
        String filePath = builderFilePath(prefix, filename);
        try {
            PutObjectArgs putObjectArgs = PutObjectArgs.builder()
                    .object(filePath)
                    .contentType("image/jpg")
                    .bucket(minIOConfigProperties.getBucket()).stream(inputStream,inputStream.available(),-1)
                    .build();
            minioClient.putObject(putObjectArgs);
            StringBuilder urlPath = new StringBuilder(minIOConfigProperties.getReadPath());
            urlPath.append(separator+minIOConfigProperties.getBucket());
            urlPath.append(separator);
            urlPath.append(filePath);
            return urlPath.toString();
        }catch (Exception ex){
            log.error("minio put file error.",ex);
            throw new RuntimeException("上传文件失败");
        }
    }

    /**
     *  上传html文件
     * @param prefix  文件前缀
     * @param filename   文件名
     * @param inputStream  文件流
     * @return  文件全路径
     */
    @Override
    public String uploadHtmlFile(String prefix, String filename,InputStream inputStream) {
        String filePath = builderFilePath(prefix, filename);
        try {
            PutObjectArgs putObjectArgs = PutObjectArgs.builder()
                    .object(filePath)
                    .contentType("text/html")
                    .bucket(minIOConfigProperties.getBucket()).stream(inputStream,inputStream.available(),-1)
                    .build();
            minioClient.putObject(putObjectArgs);
            StringBuilder urlPath = new StringBuilder(minIOConfigProperties.getReadPath());
            urlPath.append(separator+minIOConfigProperties.getBucket());
            urlPath.append(separator);
            urlPath.append(filePath);
            return urlPath.toString();
        }catch (Exception ex){
            log.error("minio put file error.",ex);
            ex.printStackTrace();
            throw new RuntimeException("上传文件失败");
        }
    }

    /**
     * 删除文件
     * @param pathUrl  文件全路径
     */
    @Override
    public void delete(String pathUrl) {
        String key = pathUrl.replace(minIOConfigProperties.getEndpoint()+"/","");
        int index = key.indexOf(separator);
        String bucket = key.substring(0,index);
        String filePath = key.substring(index+1);
        // 删除Objects
        RemoveObjectArgs removeObjectArgs = RemoveObjectArgs.builder().bucket(bucket).object(filePath).build();
        try {
            minioClient.removeObject(removeObjectArgs);
        } catch (Exception e) {
            log.error("minio remove file error.  pathUrl:{}",pathUrl);
            e.printStackTrace();
        }
    }


    /**
     * 下载文件
     * @param pathUrl  文件全路径
     * @return  文件流
     *
     */
    @Override
    public byte[] downLoadFile(String pathUrl)  {
        String key = pathUrl.replace(minIOConfigProperties.getEndpoint()+"/","");
        int index = key.indexOf(separator);
        String bucket = key.substring(0,index);
        String filePath = key.substring(index+1);
        InputStream inputStream = null;
        try {
            inputStream = minioClient.getObject(GetObjectArgs.builder().bucket(minIOConfigProperties.getBucket()).object(filePath).build());
        } catch (Exception e) {
            log.error("minio down file error.  pathUrl:{}",pathUrl);
            e.printStackTrace();
        }

        ByteArrayOutputStream byteArrayOutputStream = new ByteArrayOutputStream();
        byte[] buff = new byte[100];
        int rc = 0;
        while (true) {
            try {
                if (!((rc = inputStream.read(buff, 0, 100)) > 0)) break;
            } catch (IOException e) {
                e.printStackTrace();
            }
            byteArrayOutputStream.write(buff, 0, rc);
        }
        return byteArrayOutputStream.toByteArray();
    }
}
3.6.4 对外加入自动配置
在resources中新建META-INF/spring.factories
org.springframework.boot.autoconfigure.EnableAutoConfiguration=\
  com.heima.file.service.impl.MinIOFileStorageService
3.6.5 其他微服务使用
第一,导入heima-file-starter的依赖
        <dependency>
            <groupId>com.heima</groupId>
            <artifactId>heima-file-starter</artifactId>
            <version>1.0-SNAPSHOT</version>
        </dependency>
第二,在微服务中添加minio所需要的配置
minio:
  accessKey: minio
  secretKey: minio123
  bucket: leadnews
  endpoint: http://192.168.200.130:9000
  readPath: http://192.168.200.130:9000
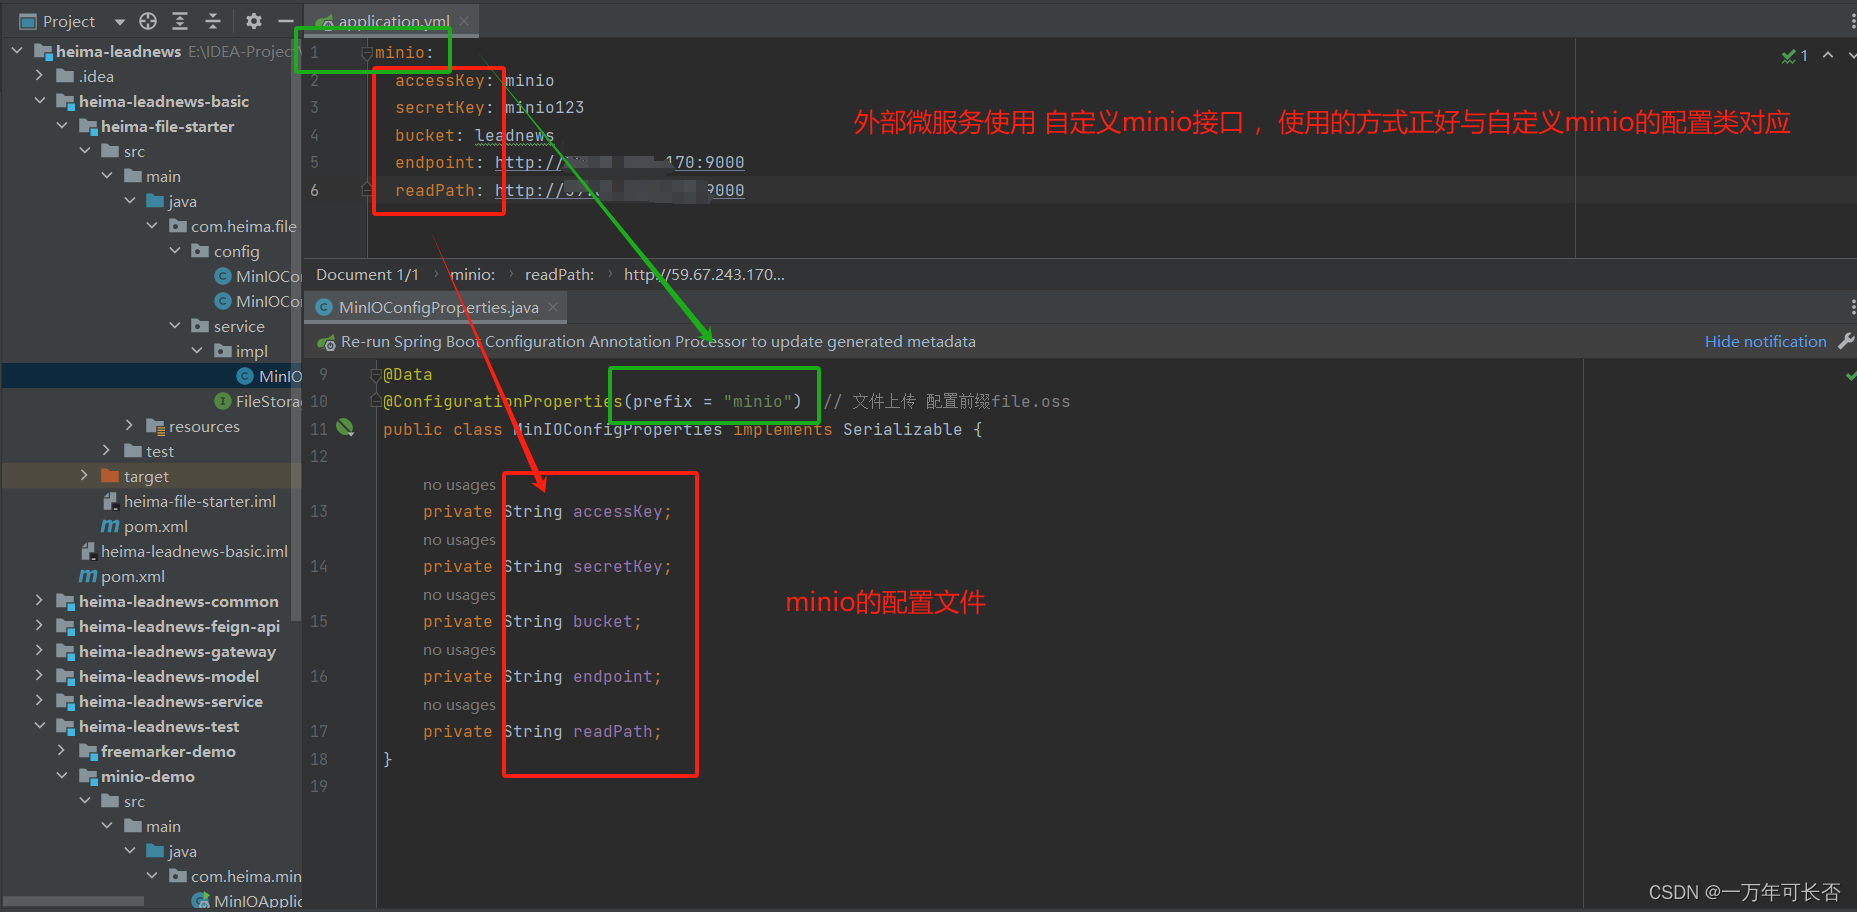
第三,在对应使用的业务类中注入FileStorageService,上传一个图片到minio中,并打印出访问路径,样例如下:
package com.heima.minio.test;


import com.heima.file.service.FileStorageService;
import com.heima.minio.MinioApplication;
import org.junit.Test;
import org.junit.runner.RunWith;
import org.springframework.beans.factory.annotation.Autowired;
import org.springframework.boot.test.context.SpringBootTest;
import org.springframework.test.context.junit4.SpringRunner;

import java.io.FileInputStream;
import java.io.FileNotFoundException;

@SpringBootTest(classes = MinioApplication.class)
@RunWith(SpringRunner.class)
public class MinioTest {

    @Autowired
    private FileStorageService fileStorageService;

    @Test
    public void testUpdateImgFile() {
        try {
            FileInputStream fileInputStream = new FileInputStream("E:\\tmp\\ak47.jpg");
            String filePath = fileStorageService.uploadImgFile("", "ak47.jpg", fileInputStream);
            System.out.println(filePath);
        } catch (FileNotFoundException e) {
            e.printStackTrace();
        }
    }
}
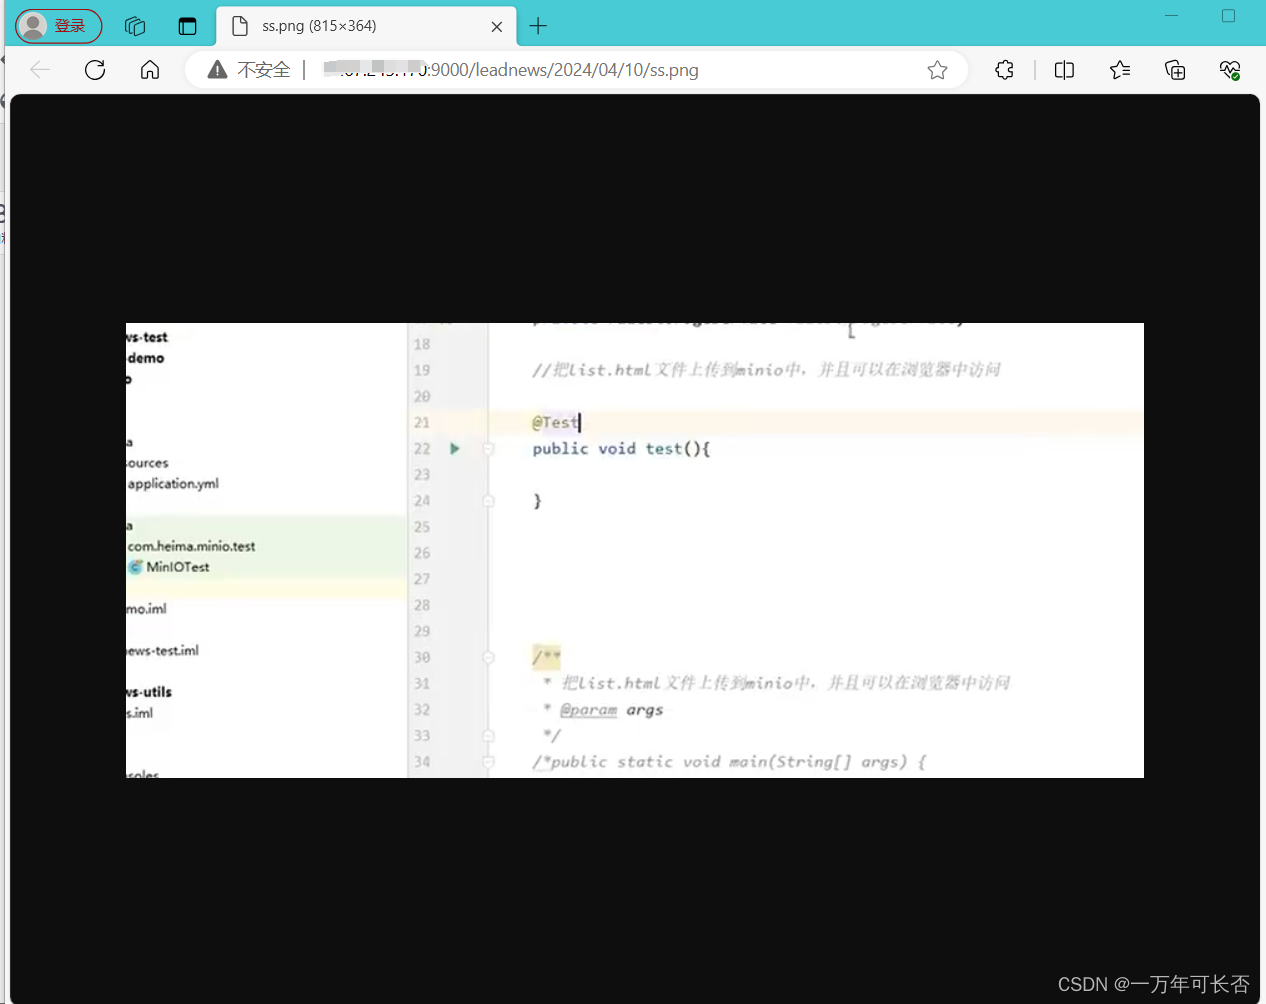
第四、访问上面代码输出的路径:http://192.168.200.130:9000/leadnews/2024/04/10/ss.png
四、文章详情
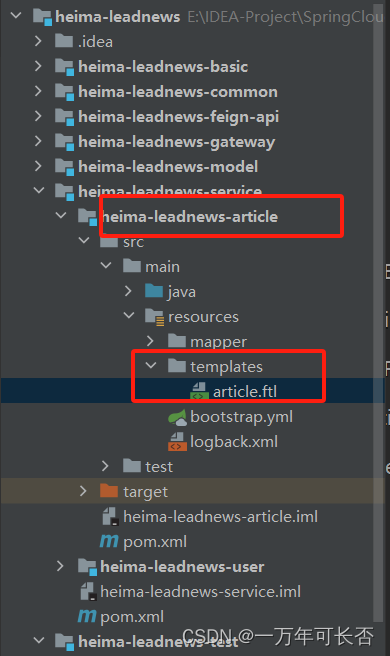
1.在artile微服务中添加MinIO和freemarker的支持,参考测试项目
2.资料中找到模板文件(article.ftl)拷贝到article微服务下
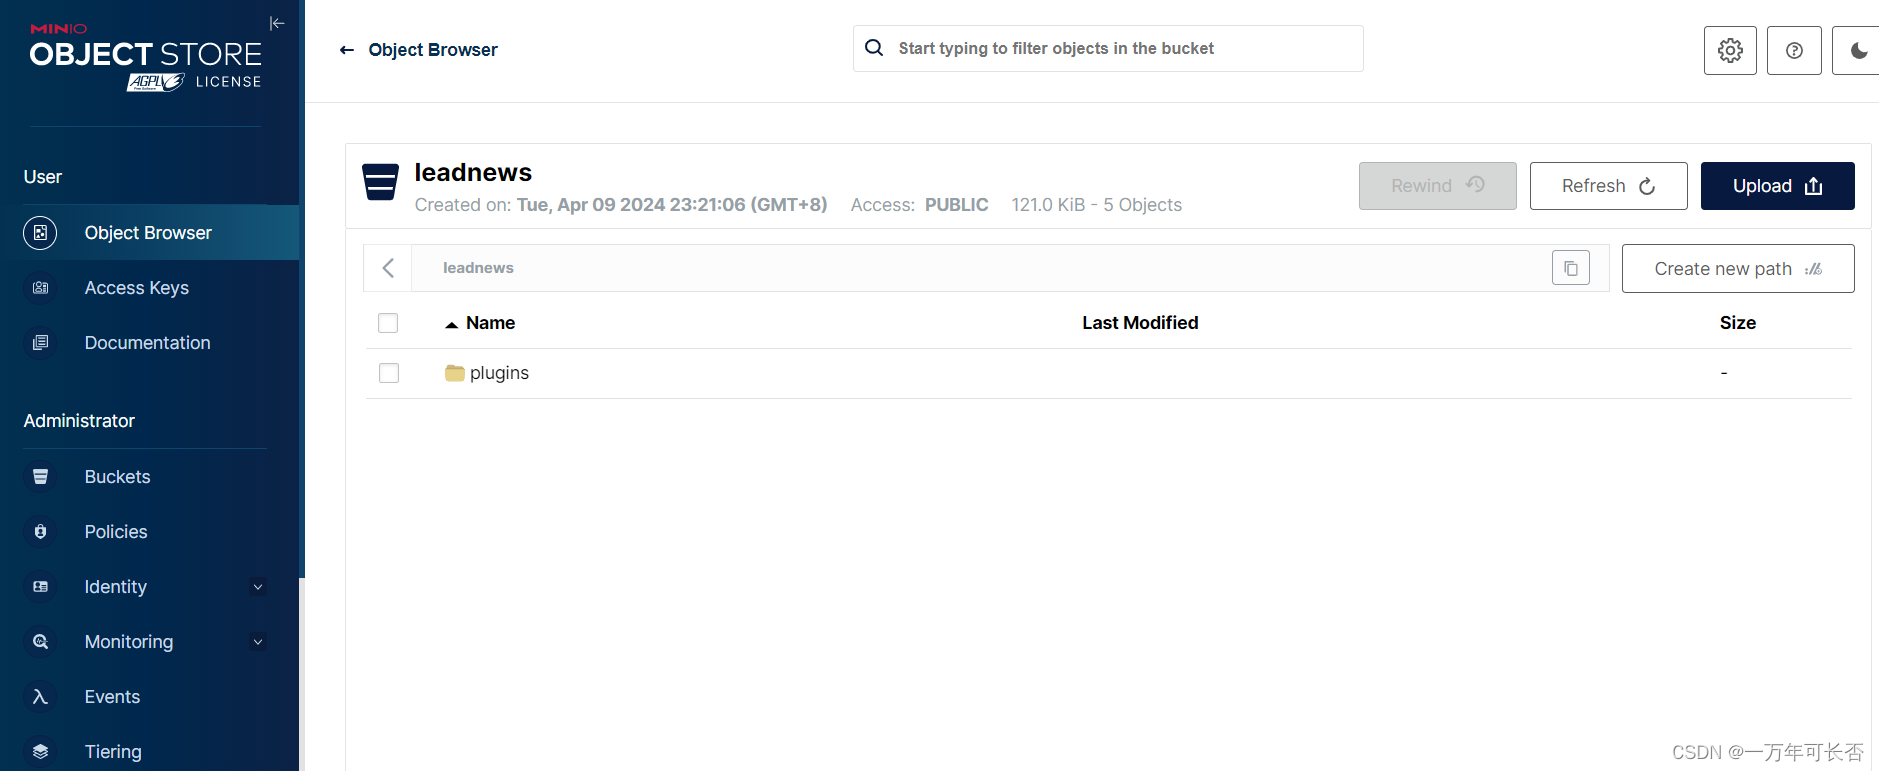
3.资料中找到index.js和index.css两个文件手动上传到MinIO中
4.在文章微服务中导入依赖,freemarker官方库中就有heima-file-starter,minio是自定义的heima-file-starter
<dependencies>
    <dependency>
        <groupId>org.springframework.boot</groupId>
        <artifactId>spring-boot-starter-freemarker</artifactId>
    </dependency>
    <dependency>
        <groupId>com.heima</groupId>
        <artifactId>heima-file-starter</artifactId>
        <version>1.0-SNAPSHOT</version>
    </dependency>
</dependencies>
并且把minnio的配置加到application.yaml中
minio:
  accessKey: minio
  secretKey: minio123
  bucket: leadnews
  endpoint: http://192.168.200.130:9000
  readPath: http://192.168.200.130:9000
5.新建ApArticleContentMapper
package com.heima.article.mapper;

import com.baomidou.mybatisplus.core.mapper.BaseMapper;
import com.heima.model.article.pojos.ApArticleContent;
import org.apache.ibatis.annotations.Mapper;

@Mapper
public interface ApArticleContentMapper extends BaseMapper<ApArticleContent> {
}
6.在artile微服务中新增测试类(后期新增文章的时候创建详情静态页,目前暂时手动生成)
package com.heima.article.test;


import com.alibaba.fastjson.JSONArray;
import com.baomidou.mybatisplus.core.toolkit.Wrappers;
import com.heima.article.ArticleApplication;
import com.heima.article.mapper.ApArticleContentMapper;
import com.heima.article.mapper.ApArticleMapper;
import com.heima.file.service.FileStorageService;
import com.heima.model.article.pojos.ApArticle;
import com.heima.model.article.pojos.ApArticleContent;
import freemarker.template.Configuration;
import freemarker.template.Template;
import org.apache.commons.lang3.StringUtils;
import org.junit.Test;
import org.junit.runner.RunWith;
import org.springframework.beans.factory.annotation.Autowired;
import org.springframework.boot.test.context.SpringBootTest;
import org.springframework.test.context.junit4.SpringRunner;

import java.io.ByteArrayInputStream;
import java.io.InputStream;
import java.io.StringWriter;
import java.util.HashMap;
import java.util.Map;

@SpringBootTest(classes = ArticleApplication.class)
@RunWith(SpringRunner.class)
public class ArticleFreemarkerTest {

    @Autowired
    private Configuration configuration;

    @Autowired
    private FileStorageService fileStorageService;


    @Autowired
    private ApArticleMapper apArticleMapper;

    @Autowired
    private ApArticleContentMapper apArticleContentMapper;

    @Test
    public void createStaticUrlTest() throws Exception {
        //1.获取文章内容
        ApArticleContent apArticleContent = apArticleContentMapper.selectOne(Wrappers.<ApArticleContent>lambdaQuery().eq(ApArticleContent::getArticleId, 1390536764510310401L));
        if(apArticleContent != null && StringUtils.isNotBlank(apArticleContent.getContent())){
            //2.文章内容通过freemarker生成html文件
            StringWriter out = new StringWriter();
            Template template = configuration.getTemplate("article.ftl");

            Map<String, Object> params = new HashMap<>();
            params.put("content", JSONArray.parseArray(apArticleContent.getContent()));

            template.process(params, out);
            InputStream is = new ByteArrayInputStream(out.toString().getBytes());

            //3.把html文件上传到minio中
            String path = fileStorageService.uploadHtmlFile("", apArticleContent.getArticleId() + ".html", is);

            //4.修改ap_article表,保存static_url字段
            ApArticle article = new ApArticle();
            article.setId(apArticleContent.getArticleId());
            article.setStaticUrl(path);
            apArticleMapper.updateById(article);

        }
    }
}
7.测试









![[入门]测试层级-ApiHug准备-测试篇-005](https://img-blog.csdnimg.cn/img_convert/016ed28023b501ad5080767a14c9e45c.gif)