提示:文章写完后,目录可以自动生成,如何生成可参考右边的帮助文档
Transformer学习
- 1 位置编码模块
- 1.1 PE代码
- 1.2 测试PE
- 1.3 原文代码
- 2 多头自注意力模块
- 2.1 多头自注意力代码
- 2.2 测试多头注意力
- 3 未来序列掩码矩阵
- 3.1 代码
- 3.2 测试掩码
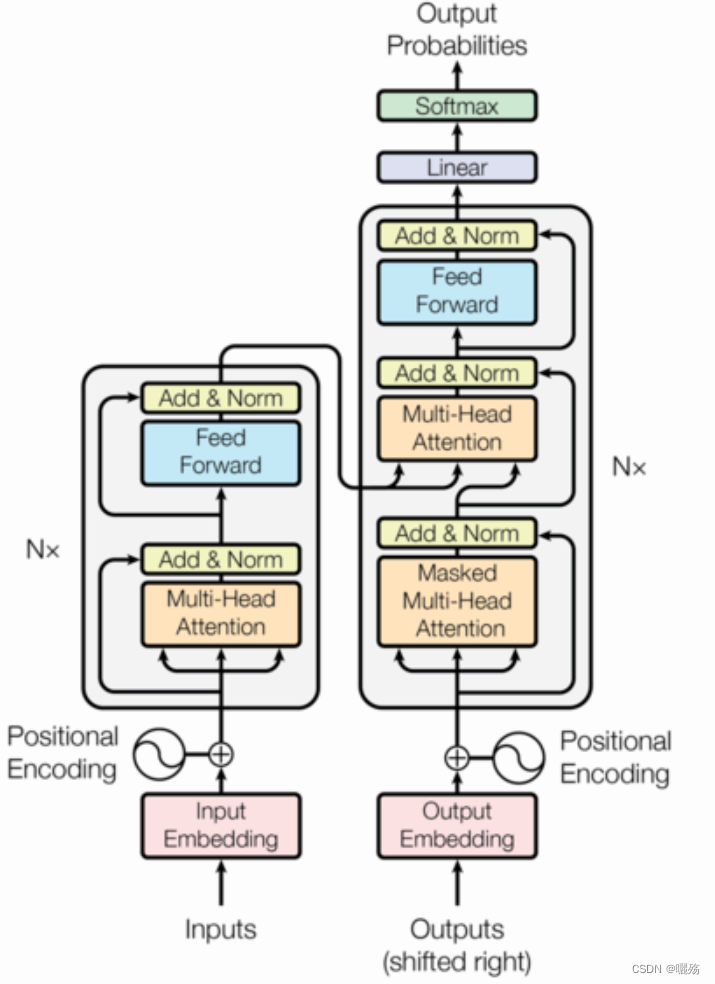
1 位置编码模块
P E ( p o s , 2 i ) = sin ( p o s / 1000 0 2 i / d m o d e l ) PE(pos,2i)=\sin(pos/10000^{2i/d_{\mathrm{model}}}) PE(pos,2i)=sin(pos/100002i/dmodel)
P E ( p o s , 2 i + 1 ) = cos ( p o s / 1000 0 2 i / d m o d e l ) PE(pos,2i+1)=\cos(pos/10000^{2i/d_\mathrm{model}}) PE(pos,2i+1)=cos(pos/100002i/dmodel)
pos 是序列中每个对象的索引, p o s ∈ [ 0 , m a x s e q l e n ] pos\in [0,max_seq_len] pos∈[0,maxseqlen], i i i 向量维度序号, i ∈ [ 0 , e m b e d d i m / 2 ] i\in [0,embed_dim/2] i∈[0,embeddim/2], d m o d e l d_{model} dmodel是模型的embedding维度
1.1 PE代码
import numpy as np
import matplotlib.pyplot as plt
import math
import torch
import seaborn as sns

def get_pos_ecoding(max_seq_len,embed_dim):
	# 初始化位置矩阵 [max_seq_len,embed_dim]
	pe = torch.zeros(max_seq_len,embed_dim])
	position = torch.arange(0,max_seq_len).unsqueeze(1) # [max_seq_len,1]
	print("位置:", position,position.shape)
	div_term = torch.exp(torch.arange(0,embed_dim,2)*-(math.log(10000.0)/embed_dim))   # 除项维度为embed_dim的一半,因为对矩阵分奇数和偶数位置进行填充。
	pe[:,0::2] = torch.sin(position/div_term)
	pe[:,1::2] = torch.cos(position/div_term)
	return pe
1.2 测试PE
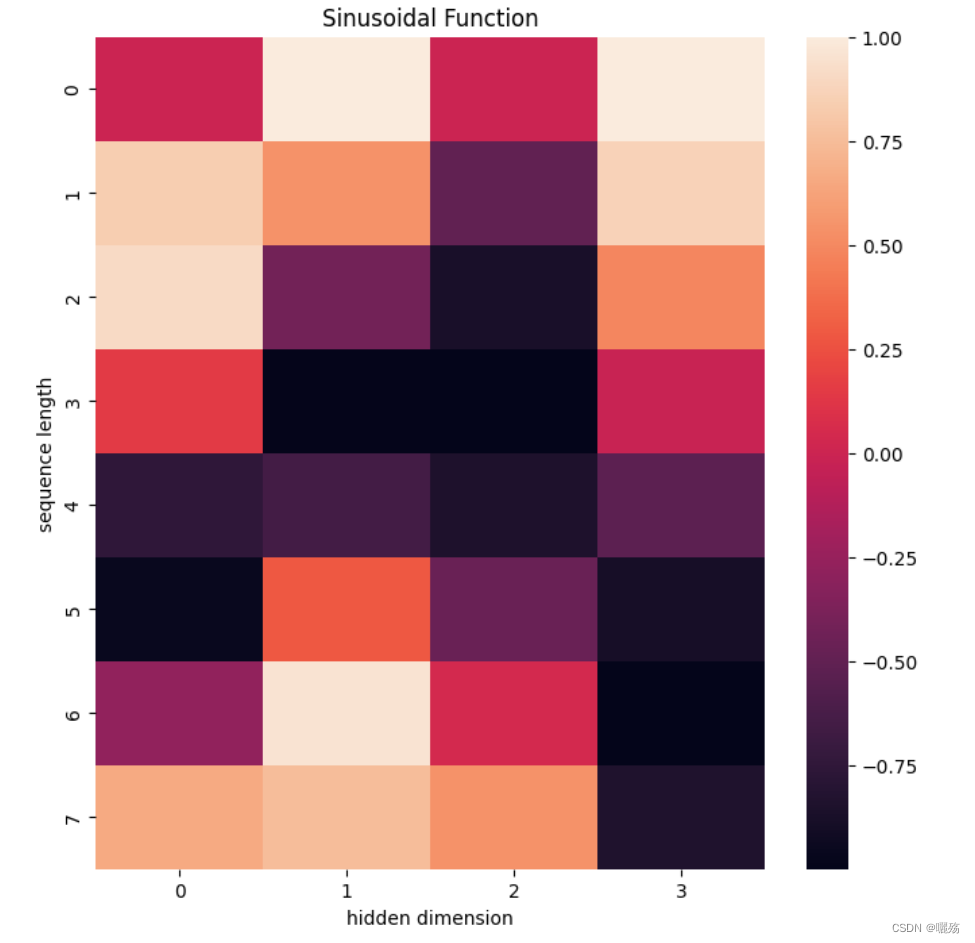
pe = get_pos_ecoding(8,4)
plt.figure(figsize=(8,8))
sns.heatmap(pe)
plt.title("Sinusoidal Function")
plt.xlabel("hidden dimension")
plt.ylabel("sequence length")
输出:
位置: tensor([[0],
[1],
[2],
[3],
[4],
[5],
[6],
[7]]) torch.Size([8, 1])
除项: tensor([1.0000, 0.0100]) torch.Size([2])
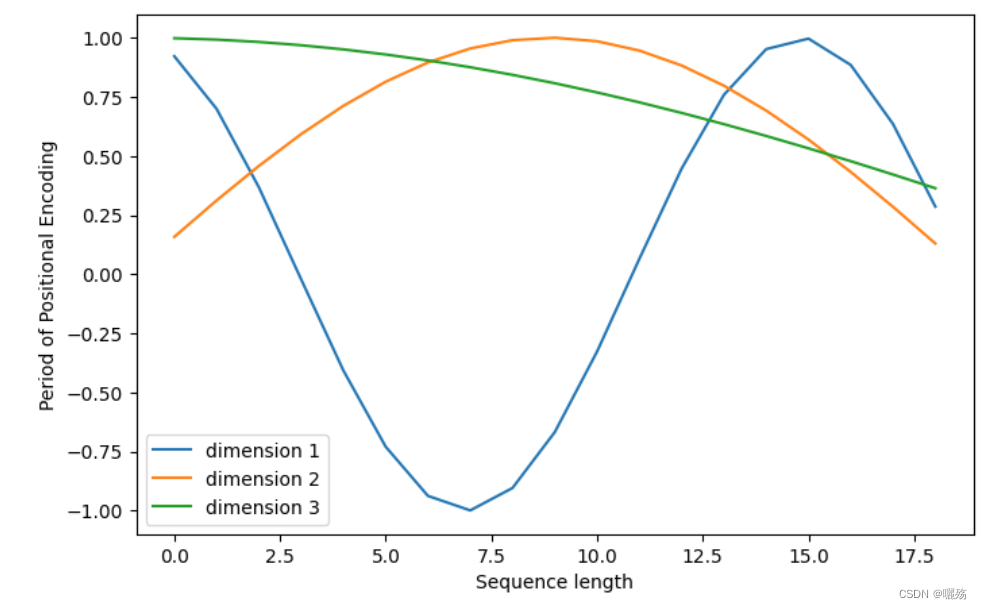
plt.figure(figsize=(8, 5))
plt.plot(positional_encoding[1:, 1], label="dimension 1")
plt.plot(positional_encoding[1:, 2], label="dimension 2")
plt.plot(positional_encoding[1:, 3], label="dimension 3")
plt.legend()
plt.xlabel("Sequence length")
plt.ylabel("Period of Positional Encoding")
1.3 原文代码
class PositionalEncoding(nn.Module):
    "Implement the PE function."
    def __init__(self, d_model, dropout, max_len=5000):
    	# max_len 序列最大长度,自定义的,不是真正的最大长度
    	# d_model 模型嵌入维度
        super(PositionalEncoding, self).__init__()
        # 实例化dropout层
        self.dropout = nn.Dropout(p=dropout)

        # Compute the positional encodings once in log space.
        # 初始化一个位置编码矩阵, shape: (max_len, d_model)
        pe = torch.zeros(max_len, d_model)
        position = torch.arange(0, max_len).unsqueeze(1)
        div_term = torch.exp(torch.arange(0, d_model, 2) * -(math.log(10000.0) / d_model))
        pe[:, 0::2] = torch.sin(position * div_term)
        pe[:, 1::2] = torch.cos(position * div_term)
        #二维张量扩充为三维张量 shape: (1,max_len, d_model)
        pe = pe.unsqueeze(0)

        # 将位置编码注册为模型的buffer,注册为buffer之后,不会进行更新
        # 注册为buffer后可以再模型保存后重新加载时候将这个位置编码器和模型参数加载进来
        self.register_buffer('pe', pe)  # 注册的名字pe,变量也是pe

    def forward(self, x):
    	# x 序列的嵌入表示
    	# pe是按max_len进行注册的,太长了,将第二个维度(max_len对应的维度)缩小为真正的序列x的最大长度
    	# Variable(self.pe[:, :x.size(1)], requires_grad=False) 即位置编码
        x = x + Variable(self.pe[:, :x.size(1)], requires_grad=False)
        return self.dropout(x)
2 多头自注意力模块
2.1 多头自注意力代码
import torch
import torch.nn as nn
import torch.nn.functional as F
import copy

# 复制网络,即使用几层网络就改变N的数量
# 如 4层线性层  clones(nn.Linear(model_dim,model_dim),4)
def clones(module, N):
    "Produce N identical layers."
    return nn.ModuleList([copy.deepcopy(module) for _ in range(N)])

# 计算注意力
def attention(q, k, v, mask=None, dropout=None):
	# q,k,v [bs,-1,head,embed_dim//head], q.size(-1) = embed_dim//head
    d_k = q.size(-1)
    # (head,embed_dim//head)*(embed_dim//head,head)
    scores = torch.matmul(q, k.transpose(-2, -1)) / math.sqrt(d_k)
    if mask is not None:
    	# 如果使用mask, 0的位置用-1e9填充
        scores = scores.masked_fill(mask == 0, -1e9)
    # 对scores的最后一个维度进行softmax
    p_attn = F.softmax(scores, dim = -1)
	# 判断是否需要进行dorpout处理
    if dropout is not None:
        p_attn = dropout(p_attn)
    # 返回添加注意力后的结果,注意力系数
    return torch.matmul(p_attn, v), p_attn

# 计算多头注意力
class Multi_Head_Self_Att(nn.Module):
    def __init__(self,head,model_dim,dropout=0.1):
        super(Multi_Head_Self_Att,self).__init__()+
        # 判断嵌入维度能否被head整除,不能整除抛出异常
        assert model_dim % head == 0
        self.d_k = model_dim//head
        self.head = head
        self.linears = clones(nn.Linear(model_dim,model_dim),4)
        self.att = None
        self.dropout = nn.Dropout(p=dropout)
    def forward(self,q,k,v,mask=None):
        if mask is not None:
        	# 掩码非空,扩充维度,代表多头中的第n个头
            mask = mask.unsqueeze(1)
        nbatches = q.size(0)

        # zip函数 将线性层与q,k,v分别对应(self.linears,q),(self.linears,k),(self.linears,v)
        # q,k,v [bs,-1,head,embed_dim/head]
        # 使用线性层l处理x,把处理后的x形状view成(nbatches,-1,int(self.head),int(self.d_k)).transpose(1,2)) 第二个维度自适应维度大小
        # transpose(1,2) 让代表序列长度的维度与词向量的维度相邻
        q,k,v = [l(x).view(nbatches,-1,int(self.head),int(self.d_k)).transpose(1,2) for l,x in zip(self.linears,(q,k,v))]

        # 返回计算注意力之后的值作为x和注意力分数
        x, self.attn = attention(q, k, v, mask=mask, dropout=self.dropout)
        # 通过多头注意力计算后,得到了每个头计算结果组成的4维张量,需要将其转换成与输入一样的维度
        # 将第2个维度和第三个维度换回来,维度组成(nbatches,-1,model_dim)
        # contiguous()使得转置之后的张量能够运用view方法
        x = x.transpose(1, 2).contiguous().view(nbatches, -1, int(self.head * self.d_k))
        # 之前建立了四个线性层,前面q,k,v用了三个线性层,最后一个现成层对注意力结果进行一次线性变换
        return self.linears[-1](x),self.attn
2.2 测试多头注意力
# 模型参数
head = 4
model_dim = 128
seq_len = 10
dropout = 0.1

# 生成示例输入
q = torch.randn(seq_len, model_dim)
k = torch.randn(seq_len, model_dim)
v = torch.randn(seq_len, model_dim)

# 创建多头自注意力模块
att = Multi_Head_Self_Att(head, model_dim, dropout=dropout)

# 运行模块
output,att = att(q, k, v)

# 输出形状
print("Output shape:", output.shape)
print(att.shape())
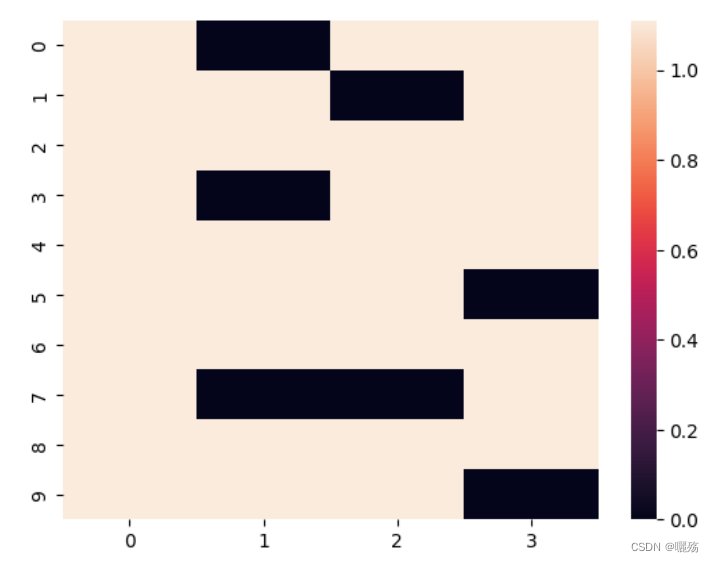
sns.heatmap(att.squeeze().detach().cpu())
输出
Output shape: torch.Size([10, 1, 128])
torch.Size([10, 4, 1, 1])
3 未来序列掩码矩阵
作用:
- 解码器中的掩码是防止泄露未来要预测的部分,掩码矩阵是一个除对角线的上三角矩阵
- 序列填充部分的掩码是判断哪些部位是填充的部位,填充的部位在计算注意力时保证期注意力分数为0【以添加一个负无穷的小数,使得其softmax值为0】
3.1 代码
def subsequent_mask(size):
    "Mask out subsequent positions."
    attn_shape = (1, size, size)
    subsequent_mask = np.triu(np.ones(attn_shape), k=1).astype('uint8')
    print("掩码矩阵:",subsequent_mask)
    return torch.from_numpy(subsequent_mask) == 0
测试掩码
plt.figure(figsize=(5,5))
print(subsequent_mask(8),subsequent_mask(8).shape)
plt.imshow(subsequent_mask(8)[0])
掩码矩阵:
[[[0 1 1 1 1 1 1 1]
[0 0 1 1 1 1 1 1]
[0 0 0 1 1 1 1 1]
[0 0 0 0 1 1 1 1]
[0 0 0 0 0 1 1 1]
[0 0 0 0 0 0 1 1]
[0 0 0 0 0 0 0 1]
[0 0 0 0 0 0 0 0]]]
tensor([[[ True, False, False, False, False, False, False, False],
[ True, True, False, False, False, False, False, False],
[ True, True, True, False, False, False, False, False],
[ True, True, True, True, False, False, False, False],
[ True, True, True, True, True, False, False, False],
[ True, True, True, True, True, True, False, False],
[ True, True, True, True, True, True, True, False],
[ True, True, True, True, True, True, True, True]]]) torch.Size([1, 8, 8])
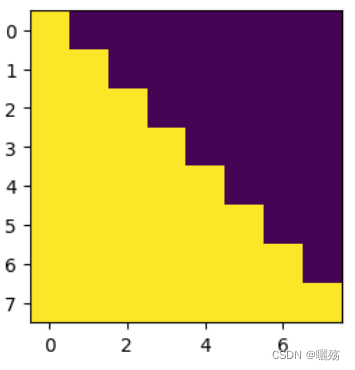
紫色部分为添加掩码的部分
3.2 测试掩码
import torch
from torch.autograd import Variable


# 函数接受两个参数 tgt 和 pad,其中 tgt 是目标序列的张量,pad 是表示填充的值
def make_std_mask(tgt, pad):
    "Create a mask to hide padding and future words."
    # 首先,创建一个掩码 tgt_mask,其形状与 tgt 的形状相同,用于指示哪些位置不是填充位置。
    # 这是通过将 tgt 张量中不等于 pad 的位置设置为 True(1),其余位置设置为 False(0)来实现的。
    # unsqueeze(-2) 的作用是在倒数第二个维度上添加一个维度,以便后续的逻辑运算。
    tgt_mask = (tgt != pad).unsqueeze(-2)
    # 调用 subsequent_mask 函数,生成一个用于遮挡未来词的掩码。这个掩码是一个上三角矩阵,
    # 其对角线及其以下的元素为 True(1),其余元素为 False(0)。

    # tgt_mask = tgt_mask & Variable(subsequent_mask(tgt.size(-1)).type_as(tgt_mask.data)):
    # 将 tgt_mask 和生成的未来词掩码进行逻辑与操作,将未来词位置的掩码设置为 False,即遮挡掉未来词。
    tgt_mask = tgt_mask & Variable(
        subsequent_mask(tgt.size(-1)).type_as(tgt_mask.data))
    return tgt_mask

def subsequent_mask(size):
    "Mask out subsequent positions."
    attn_shape = (1, size, size)
    subsequent_mask = torch.triu(torch.ones(*attn_shape), diagonal=1)
    return subsequent_mask == 0

# 示例数据
tgt = torch.tensor([[1, 2, 3, 0, 0], [4, 5, 0, 0, 0], [6, 7, 8, 9, 10]])  # 目标序列,假设填充值为 0
pad = 0  # 填充值

# 创建掩码
tgt_mask = make_std_mask(tgt, pad)

# 打印结果
print("目标序列:")
print(tgt)
print("\n生成的掩码:")
print(tgt_mask)
输出:
目标序列:
tensor([[ 1, 2, 3, 0, 0],
[ 4, 5, 0, 0, 0],
[ 6, 7, 8, 9, 10]])
生成的掩码:
tensor([[[ True, False, False, False, False],
[ True, True, False, False, False],
[ True, True, True, False, False],
[ True, True, True, False, False],
[ True, True, True, False, False]],
[[ True, False, False, False, False],
[ True, True, False, False, False],
[ True, True, False, False, False],
[ True, True, False, False, False],
[ True, True, False, False, False]],
[[ True, False, False, False, False],
[ True, True, False, False, False],
[ True, True, True, False, False],
[ True, True, True, True, False],
[ True, True, True, True, True]]])
