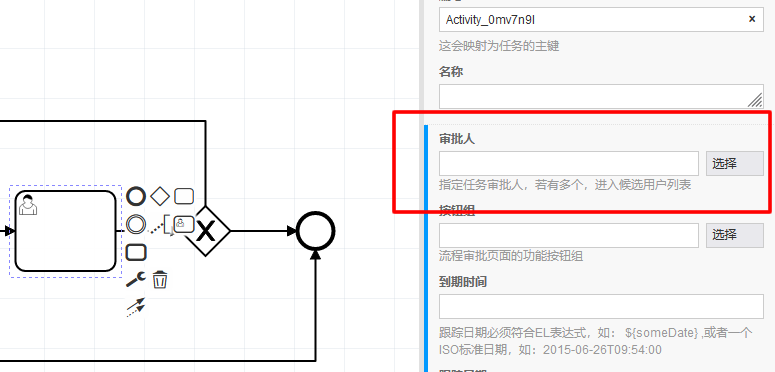
默认的设计器有代理人、候选用户和候选组,但是并不能满足实际的业务需求,我们需要对它进行改造,使得我们能够按照自定义的规则来生成用户任务节点的审批人。
1、在bpmnjs里面加一个审批人的输入部件
打开resources/properties-panel/provider/activiti/parts/UserTaskProps.js,加入
module.exports = function(group, element, translate) {
if (is(element, 'activiti:Assignable')) {
// Approver
group.entries.push(entryFactory.textField({
id : 'approver',
description : translate('Specify approvers. If there are multiple approvers, enter the candidate user list.'),
label : translate('Approver'),
modelProperty : 'approver'
}));
红字是我加入的内容,一个输入框。
打开resources/activiti.json,搜索”assignee“,然后照着它抄一个在上面:
{
"name": "approver",
"isAttr": true,
"type": "String"
},
接着打开resources/factory/TextInputEntryFactory.js,加入:
if(resource.id == 'approver'){ //如果为审批人
resource.html =
'<label for="camunda-' + escapeHTML(resource.id) + '" ' +
(canBeDisabled ? 'data-disable="isDisabled" ' : '') +
(canBeHidden ? 'data-show="isHidden" ' : '') +
(dataValueLabel ? 'data-value="' + escapeHTML(dataValueLabel) + '"' : '') + '>'+ escapeHTML(label) +'</label>' +
'<div class="bpp-field-wrapper" ' +
(canBeDisabled ? 'data-disable="isDisabled"' : '') +
(canBeHidden ? 'data-show="isHidden"' : '') +
'>' +
'<div class="left-input-disabled">' +
'<input id="camunda-' + escapeHTML(resource.id) + '" type="text" name="' + escapeHTML(options.modelProperty) + '" ' +
(canBeDisabled ? 'data-disable="isDisabled"' : '') +
(canBeHidden ? 'data-show="isHidden"' : '') +
' style="width:80%;float:left"/>' +
'</div>'+
'<input type="button" class="candidate-select" value="选择" οnclick="taskApproverSelect(this)" style="width:18%;float:right"/>' + //点击方法
'</div>';
}
判断当生成审批人的对象时候,在后面给它加一个按钮。打开translationsGerman.js,把英文对应着转换一下。
在打开bpmnjs目录下打开cmd,输入grunt,等待编译完成,然后在浏览器打开设计器,弄一个用户节点过去,可以看到一个新的属性在里面了,大概长这样。
