目录
1.如何在Mask R-CNN中读取有关COCO数据集的内容(my_dataset_coco.py)
1.1 CocoDetection类
1.1.1 初始化方法__init__
1.1.2 __getitem__方法
1.1.3 parse_targets
2.如何在Mask R-CNN中读取有关Pascal VOC数据集的内容(my_dataset_voc.py)
2.1 VOCInstances类
2.1.1 初始化方法__init__
2.1.2 parse_xml_to_dict
2.1.3 parse_objects
2.1.4 __getitem__
2.1.5parse_mask
1.如何在Mask R-CNN中读取有关COCO数据集的内容(my_dataset_coco.py)
1.1 CocoDetection类
1.1.1 初始化方法__init__
我们先了解一下COCO数据集的目录结构:
## 数据集,本例程使用的有COCO2017数据集和Pascal VOC2012数据集
### COCO2017数据集
* COCO官网地址:https://cocodataset.org/
* 这里以下载coco2017数据集为例,主要下载三个文件:
    * `2017 Train images [118K/18GB]`:训练过程中使用到的所有图像文件
    * `2017 Val images [5K/1GB]`:验证过程中使用到的所有图像文件
    * `2017 Train/Val annotations [241MB]`:对应训练集和验证集的标注json文件
* 都解压到`coco2017`文件夹下,可得到如下文件夹结构:
```
├── coco2017: 数据集根目录
     ├── train2017: 所有训练图像文件夹(118287张)
     ├── val2017: 所有验证图像文件夹(5000张)
     └── annotations: 对应标注文件夹
              ├── instances_train2017.json: 对应目标检测、分割任务的训练集标注文件
              ├── instances_val2017.json: 对应目标检测、分割任务的验证集标注文件
              ├── captions_train2017.json: 对应图像描述的训练集标注文件
              ├── captions_val2017.json: 对应图像描述的验证集标注文件
              ├── person_keypoints_train2017.json: 对应人体关键点检测的训练集标注文件
              └── person_keypoints_val2017.json: 对应人体关键点检测的验证集标注文件夹
```
def __init__(self, root, dataset="train", transforms=None, years="2017"): super(CocoDetection, self).__init__() assert dataset in ["train", "val"], 'dataset must be in ["train", "val"]' anno_file = f"instances_{dataset}{years}.json" assert os.path.exists(root), "file '{}' does not exist.".format(root) self.img_root = os.path.join(root, f"{dataset}{years}") assert os.path.exists(self.img_root), "path '{}' does not exist.".format(self.img_root) self.anno_path = os.path.join(root, "annotations", anno_file) assert os.path.exists(self.anno_path), "file '{}' does not exist.".format(self.anno_path) self.mode = dataset self.transforms = transforms self.coco = COCO(self.anno_path) # 获取coco数据索引与类别名称的关系 # 注意在object80中的索引并不是连续的,虽然只有80个类别,但索引还是按照stuff91来排序的 data_classes = dict([(v["id"], v["name"]) for k, v in self.coco.cats.items()]) max_index = max(data_classes.keys()) # 90 # 将缺失的类别名称设置成N/A coco_classes = {} for k in range(1, max_index + 1): if k in data_classes: coco_classes[k] = data_classes[k] else: coco_classes[k] = "N/A" if dataset == "train": json_str = json.dumps(coco_classes, indent=4) with open("coco91_indices.json", "w") as f: f.write(json_str) self.coco_classes = coco_classes ids = list(sorted(self.coco.imgs.keys())) if dataset == "train": # 移除没有目标,或者目标面积非常小的数据 valid_ids = coco_remove_images_without_annotations(self.coco, ids) self.ids = valid_ids else: self.ids = ids这里传入的参数:
@root:指向COCO数据集的根目录(指向coco2017:数据集根目录)
@dataset:表明我们要读取训练集还是验证集
@transforms:指定数据变换/增强的形式
@year:指定读取哪年的数据集
用anno_file构建标注文件的名称(对于训练集就是instances_train2017.json,对于验证集就是instances_val2017.json)。
用img_root拼接图片的根目录,对于训练集来说,就是“./coco2017/train2017”。
用anno_path拼接标注文件,对于训练集来说,就是“./coco2017/annotations/instances_train2017.json”。
实例化COCO类:self.coco = COCO(self.anno_path)
获取coco数据索引与类别名称的关系:注意在object80中的索引并不是连续的,虽然只有80个类别,但索引还是按照stuff91来排序的。
我们看一下调试的data_classes:
max_index = max(data_classes.keys()) # 90将缺失的类别名称设置成N/A:我们看看json文件
获取数据集中所有图片的ID:ids = list(sorted(self.coco.imgs.keys()))
如果是训练集的话,我们还需做一步,移除没有目标,或者目标面积非常小的数据。保留筛选之后的图片的ID。
验证集不做任何处理。
1.1.2 __getitem__方法
    def __getitem__(self, index):
        """
        Args:
            index (int): Index

        Returns:
            tuple: Tuple (image, target). target is the object returned by ``coco.loadAnns``.
        """
        coco = self.coco
        img_id = self.ids[index]
        ann_ids = coco.getAnnIds(imgIds=img_id)
        coco_target = coco.loadAnns(ann_ids)

        path = coco.loadImgs(img_id)[0]['file_name']
        img = Image.open(os.path.join(self.img_root, path)).convert('RGB')

        w, h = img.size
        target = self.parse_targets(img_id, coco_target, w, h)
        if self.transforms is not None:
            img, target = self.transforms(img, target)

        return img, target
这里传入的参数:
@index:传入的索引
根据索引获取图片的ID img_id,根据图片的ID能获得当前图片标注信息的ID ann_ids,我们通过coco的loadAnns方法就能获得关于该图片的所有标注信息。
segmentation:分割信息
area:面积信息
iscrowd:是否为重叠目标
image_id:图片的ID
bbox:bndbox信息
caregory_id:bndbox的类别ID
id:annotation对应的ID
根据img_id获取图片的file_name,读取图片转化成RGB形式存放在img中。
通过parse_target方法对数据进行处理。(1.1.3节)
返回图像和标注信息的字典。
1.1.3 parse_targets
def parse_targets(self, img_id: int, coco_targets: list, w: int = None, h: int = None): assert w > 0 assert h > 0 # 只筛选出单个对象的情况 anno = [obj for obj in coco_targets if obj['iscrowd'] == 0] boxes = [obj["bbox"] for obj in anno] # guard against no boxes via resizing boxes = torch.as_tensor(boxes, dtype=torch.float32).reshape(-1, 4) # [xmin, ymin, w, h] -> [xmin, ymin, xmax, ymax] boxes[:, 2:] += boxes[:, :2] boxes[:, 0::2].clamp_(min=0, max=w) boxes[:, 1::2].clamp_(min=0, max=h) classes = [obj["category_id"] for obj in anno] classes = torch.tensor(classes, dtype=torch.int64) area = torch.tensor([obj["area"] for obj in anno]) iscrowd = torch.tensor([obj["iscrowd"] for obj in anno]) segmentations = [obj["segmentation"] for obj in anno] masks = convert_coco_poly_mask(segmentations, h, w) # 筛选出合法的目标,即x_max>x_min且y_max>y_min keep = (boxes[:, 3] > boxes[:, 1]) & (boxes[:, 2] > boxes[:, 0]) boxes = boxes[keep] classes = classes[keep] masks = masks[keep] area = area[keep] iscrowd = iscrowd[keep] target = {} target["boxes"] = boxes target["labels"] = classes target["masks"] = masks target["image_id"] = torch.tensor([img_id]) # for conversion to coco api target["area"] = area target["iscrowd"] = iscrowd return target我们只只筛选出单个对象的情况,将其标注信息anno筛选出来。将这些单目标的bndbox取出来存放在boxes中。
在COCO数据集中,我们的box信息是[xmin, ymin, w, h](左上角的坐标信息和框体的高和宽),但在我们实际训练的过程中我们需要框体四个点的信息[xmin, ymin, xmax, ymax],因此我们要对其进行处理:
将w,h分别加上xmin和ymin得到框体的右下角信息:
boxes[:, 2:] += boxes[:, :2]对数值进行裁剪(没什么用)。
获取每一个目标的类别ID存放在classes中。
获取每一个目标的面积存放在area中。
获取每一个目标的重叠信息存放在iscrowded中。
将每个目标的分割信息提取出来存放在segmentations中,通过convert_coco_poly_mask方法将每个目标的多边形信息转化成我们需要的mask蒙版的形式。
def convert_coco_poly_mask(segmentations, height, width): masks = [] for polygons in segmentations: rles = coco_mask.frPyObjects(polygons, height, width) mask = coco_mask.decode(rles) if len(mask.shape) < 3: mask = mask[..., None] mask = torch.as_tensor(mask, dtype=torch.uint8) mask = mask.any(dim=2) masks.append(mask) if masks: masks = torch.stack(masks, dim=0) else: # 如果mask为空,则说明没有目标,直接返回数值为0的mask masks = torch.zeros((0, height, width), dtype=torch.uint8) return masks这里通过for循环遍历每一个目标的多边形的信息,通过frPyObjects方法可以将多边形信息以及图片的高宽得到构建目标rles,构建的这个目标要通过decode方法解码成我们需要的mask信息。
最后将我们的信息构建成target字典。
2.如何在Mask R-CNN中读取有关Pascal VOC数据集的内容(my_dataset_voc.py)
2.1 VOCInstances类
2.1.1 初始化方法__init__
    def __init__(self, voc_root, year="2012", txt_name: str = "train.txt", transforms=None):
        super().__init__()
        if isinstance(year, int):
            year = str(year)
        assert year in ["2007", "2012"], "year must be in ['2007', '2012']"
        if "VOCdevkit" in voc_root:
            root = os.path.join(voc_root, f"VOC{year}")
        else:
            root = os.path.join(voc_root, "VOCdevkit", f"VOC{year}")
        assert os.path.exists(root), "path '{}' does not exist.".format(root)
        image_dir = os.path.join(root, 'JPEGImages')
        xml_dir = os.path.join(root, 'Annotations')
        mask_dir = os.path.join(root, 'SegmentationObject')

        txt_path = os.path.join(root, "ImageSets", "Segmentation", txt_name)
        assert os.path.exists(txt_path), "file '{}' does not exist.".format(txt_path)
        with open(os.path.join(txt_path), "r") as f:
            file_names = [x.strip() for x in f.readlines() if len(x.strip()) > 0]

        # read class_indict
        json_file = 'pascal_voc_indices.json'
        assert os.path.exists(json_file), "{} file not exist.".format(json_file)
        with open(json_file, 'r') as f:
            idx2classes = json.load(f)
            self.class_dict = dict([(v, k) for k, v in idx2classes.items()])

        self.images_path = []     # 存储图片路径
        self.xmls_path = []       # 存储xml文件路径
        self.xmls_info = []       # 存储解析的xml字典文件
        self.masks_path = []      # 存储SegmentationObject图片路径
        self.objects_bboxes = []  # 存储解析的目标boxes等信息
        self.masks = []           # 存储读取的SegmentationObject图片信息

        # 检查图片、xml文件以及mask是否都在
        images_path = [os.path.join(image_dir, x + ".jpg") for x in file_names]
        xmls_path = [os.path.join(xml_dir, x + '.xml') for x in file_names]
        masks_path = [os.path.join(mask_dir, x + ".png") for x in file_names]
        for idx, (img_path, xml_path, mask_path) in enumerate(zip(images_path, xmls_path, masks_path)):
            assert os.path.exists(img_path), f"not find {img_path}"
            assert os.path.exists(xml_path), f"not find {xml_path}"
            assert os.path.exists(mask_path), f"not find {mask_path}"

            # 解析xml中bbox信息
            with open(xml_path) as fid:
                xml_str = fid.read()
            xml = etree.fromstring(xml_str)
            obs_dict = parse_xml_to_dict(xml)["annotation"]  # 将xml文件解析成字典
            obs_bboxes = parse_objects(obs_dict, xml_path, self.class_dict, idx)  # 解析出目标信息
            num_objs = obs_bboxes["boxes"].shape[0]

            # 读取SegmentationObject并检查是否和bboxes信息数量一致
            instances_mask = Image.open(mask_path)
            instances_mask = np.array(instances_mask)
            instances_mask[instances_mask == 255] = 0  # 255为背景或者忽略掉的地方,这里为了方便直接设置为背景(0)

            # 需要检查一下标注的bbox个数是否和instances个数一致
            num_instances = instances_mask.max()
            if num_objs != num_instances:
                print(f"warning: num_boxes:{num_objs} and num_instances:{num_instances} do not correspond. "
                      f"skip image:{img_path}")
                continue

            self.images_path.append(img_path)
            self.xmls_path.append(xml_path)
            self.xmls_info.append(obs_dict)
            self.masks_path.append(mask_path)
            self.objects_bboxes.append(obs_bboxes)
            self.masks.append(instances_mask)

        self.transforms = transforms
        self.coco = convert_to_coco_api(self)
首先我们了解一下VOC的目录结构:
VOCdevkit
    └── VOC2012
         ├── Annotations               所有的图像标注信息(XML文件)
         ├── ImageSets
         │   ├── Action                人的行为动作图像信息
         │   ├── Layout                人的各个部位图像信息
         │   │
         │   ├── Main                  目标检测分类图像信息
         │   │     ├── train.txt       训练集(5717)
         │   │     ├── val.txt         验证集(5823)
         │   │     └── trainval.txt    训练集+验证集(11540)
         │   │
         │   └── Segmentation          目标分割图像信息
         │         ├── train.txt       训练集(1464)  记录文件名称,不包含后缀
         │         ├── val.txt         验证集(1449)
         │         └── trainval.txt    训练集+验证集(2913)
         │
         ├── JPEGImages                所有图像文件
         ├── SegmentationClass         语义分割png图(基于类别)
         └── SegmentationObject        实例分割png图(基于目标)
我们看看初始化的参数:
@voc_root:VOC数据集的根目录,这里是“./VOCdevkit”目录
@year:哪年的数据集
@txt_name: str = "train.txt"
@transforms :图像变化方法
这里主要思想如下:首先在Segmentarion文件中,读取对应的txt文件。比如使用
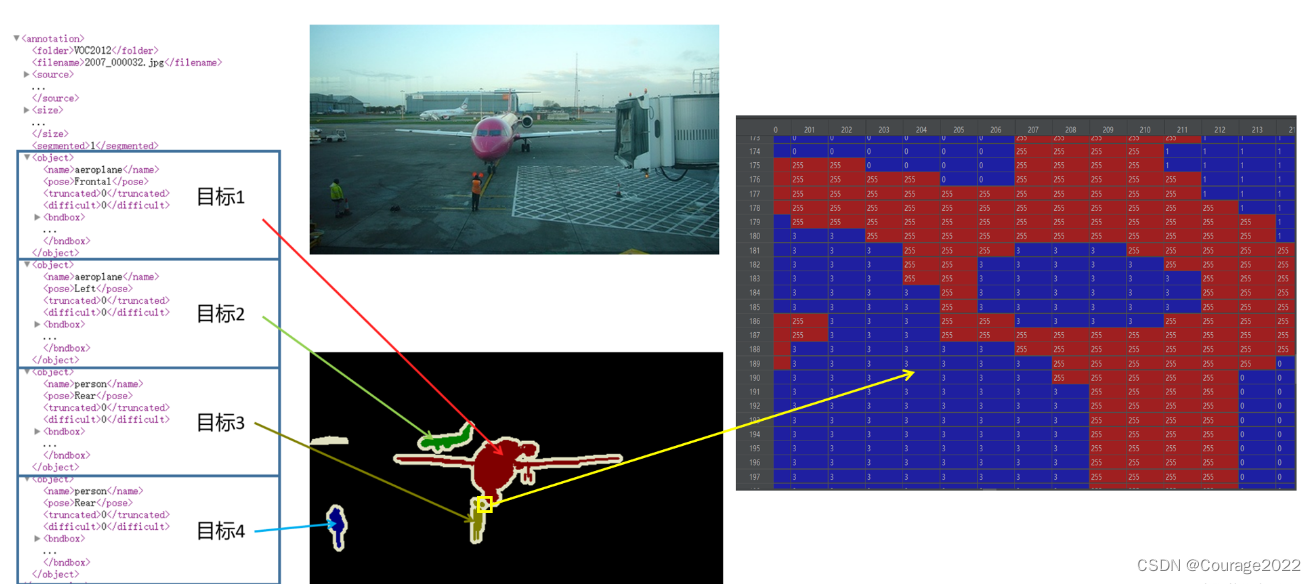
train.txt中的数据进行训练,那么读取该txt文件,解析每一行,每一行对应一个图像的索引。根据索引在JPEGImages文件夹中找到对应的图片。这里以2007_000032为例,可以找到2007_000032.jpg文件,如下图所示:
再根据索引在
SegmentationObject文件夹中找到相应的标注图像(.png)。还是以2007_000032为例,可以找到2007_000032.png文件。
注意,在实例分割中对应的标注图像(.png)用PIL的Image.open()函数读取时,默认是P模式,即一个单通道的图像。在背景处的像素值为0,目标边缘处或需要忽略的区域用的像素值为255(训练时一般会忽略像素值为255的区域)。然后在Annotations文件夹中找到对应的xml文件,解析xml文件后会得到每个目标的信息,而对应的标注文件(.png)的每个目标处的像素值是按照xml文件中目标顺序排列的。如下图所示,xml文件中每个目标的序号是与标注文件(.png)中目标像素值是对应的。(255对应的是目标边界或者忽略掉的目标)
我们回归代码:
先判断数据集的年份是否在指定的年份内:assert year in.....,不同年份数据格式不一样,我们无法处理除了这两个年份外的数据。
判断voc_root文件夹内是否有VOCdevkit文件夹,如果在这个路径中,拼接完成后的root目录是:“./VOCdevkit/VOC2012”
拼接图片路径image_dir :“./VOCdevkit/VOC2012/JPEGImages”
拼接xml标注文件路径xml_dir:“./VOCdevkit/VOC2012/Annotations”
拼接mask信息的路径mask_dir:“./VOCdevkit/VOC2012/SegmentationObject”
拼接txt文件的路径txt_path:“./VOCdevkit/VOC2012/ImageSets/Segmentation/train.txt”
按行读取这个txt文件存入file_names中。
读取类别文件json_file,将它的key和value颠倒重新构造字典class_dict,这个字典的key就是每个类别的名称,它的value就是每个类别对应的ID。即把下图反过来:
定义一些字典变量存储每个图片对应信息:
self.images_path = [] # 存储图片路径 self.xmls_path = [] # 存储xml文件路径 self.xmls_info = [] # 存储解析的xml字典文件 self.masks_path = [] # 存储SegmentationObject图片路径 self.objects_bboxes = [] # 存储解析的目标boxes等信息 self.masks = [] # 存储读取的SegmentationObject图片信息images_path存储的是每一张图片名称的字典:
“./VOCdevkit/VOC2012/JPEGImages/xxxxxxx.jpg”
xmls_path存储的是每一张图片的标注信息对应的xml文件:
“./VOCdevkit/VOC2012/Annotations/xxxxxx.xml”
masks_path存储的是每一张图片的mask信息:
“./VOCdevkit/VOC2012/SegmentationObject/xxxxxx.png”
判断是否存在这些文件,若不存在抛出错误,若存在,解析xml中bbox信息:通过parse_xml_to_dict(2.1.2节)方法将xml文件解析成字典存放在obs_dict中,再通过parse_objects方法将解析到的字典信息obs_dict中的每个目标的bndbox的信息提取出来(2.1.3节)存放在obs_bboxes中。
用num_objs存储该张图片有多少的目标边界框。
读取SegmentationObject并检查是否和bboxes信息数量一致,instances_mask.max()存放的是最大像素值即目标的数目。下图是解释:这里是防止漏标记(虽然离谱但真的存在这种情况!)
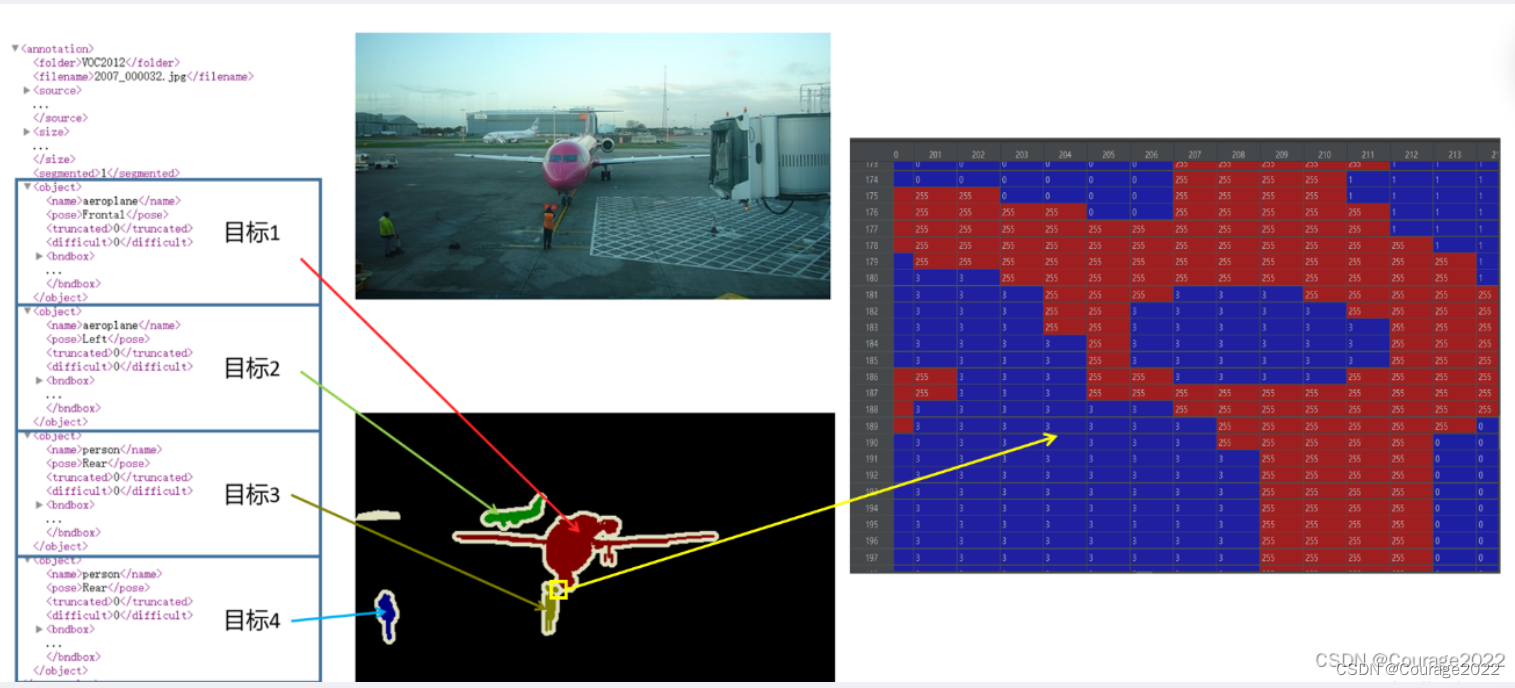
比如说目标4在SegmentationObject文件中的掩码部分的像素值都是4,目标3在SegmentationObject文件中的掩码部分的像素值都是3.....因此instances_mask.max()存放的是目标的数目 检查通过,则添加此张图片的信息:
            self.images_path.append(img_path)
            self.xmls_path.append(xml_path)
            self.xmls_info.append(obs_dict)
            self.masks_path.append(mask_path)
            self.objects_bboxes.append(obs_bboxes)
            self.masks.append(instances_mask)
2.1.2 parse_xml_to_dict
def parse_xml_to_dict(xml):
    """
    将xml文件解析成字典形式,参考tensorflow的recursive_parse_xml_to_dict
    Args:
        xml: xml tree obtained by parsing XML file contents using lxml.etree

    Returns:
        Python dictionary holding XML contents.
    """

    if len(xml) == 0:  # 遍历到底层,直接返回tag对应的信息
        return {xml.tag: xml.text}

    result = {}
    for child in xml:
        child_result = parse_xml_to_dict(child)  # 递归遍历标签信息
        if child.tag != 'object':
            result[child.tag] = child_result[child.tag]
        else:
            if child.tag not in result:  # 因为object可能有多个,所以需要放入列表里
                result[child.tag] = []
            result[child.tag].append(child_result[child.tag])
    return {xml.tag: result}
这个在Faster R-CNN部分讲过,此处不再赘述!
Faster RCNN网络源码解读(Ⅲ) --- 如何搭建自己的数据集
https://blog.csdn.net/qq_41694024/article/details/128491300
2.1.3 parse_objects
def parse_objects(data: dict, xml_path: str, class_dict: dict, idx: int):
    """
    解析出bboxes、labels、iscrowd以及ares等信息
    Args:
        data: 将xml解析成dict的Annotation数据
        xml_path: 对应xml的文件路径
        class_dict: 类别与索引对应关系
        idx: 图片对应的索引

    Returns:

    """
    boxes = []
    labels = []
    iscrowd = []
    assert "object" in data, "{} lack of object information.".format(xml_path)
    for obj in data["object"]:
        xmin = float(obj["bndbox"]["xmin"])
        xmax = float(obj["bndbox"]["xmax"])
        ymin = float(obj["bndbox"]["ymin"])
        ymax = float(obj["bndbox"]["ymax"])

        # 进一步检查数据,有的标注信息中可能有w或h为0的情况,这样的数据会导致计算回归loss为nan
        if xmax <= xmin or ymax <= ymin:
            print("Warning: in '{}' xml, there are some bbox w/h <=0".format(xml_path))
            continue

        boxes.append([xmin, ymin, xmax, ymax])
        labels.append(int(class_dict[obj["name"]]))
        if "difficult" in obj:
            iscrowd.append(int(obj["difficult"]))
        else:
            iscrowd.append(0)

    # convert everything into a torch.Tensor
    boxes = torch.as_tensor(boxes, dtype=torch.float32)
    labels = torch.as_tensor(labels, dtype=torch.int64)
    iscrowd = torch.as_tensor(iscrowd, dtype=torch.int64)
    image_id = torch.tensor([idx])
    area = (boxes[:, 3] - boxes[:, 1]) * (boxes[:, 2] - boxes[:, 0])

    return {"boxes": boxes,
            "labels": labels,
            "iscrowd": iscrowd,
            "image_id": image_id,
            "area": area}
就是遍历该张图片的object信息,将bndbox信息提取出来。
boxes存放的是该张图片的每个目标的边界框信息(xmin,xmax,ymin,ymax)。
labels存放的是该张图片的每个目标的每个框体对应着的标签信息。
iscrowd存放着每个框体是否有重叠及重叠的程度。
将如上信息和image_id以及面积area转换成tensor格式,返回给调用函数。
2.1.4 __getitem__
    def __getitem__(self, idx):
        """
        Args:
            idx (int): Index

        Returns:
            tuple: (image, target) where target is the image segmentation.
        """
        img = Image.open(self.images_path[idx]).convert('RGB')
        target = self.objects_bboxes[idx]
        masks = self.parse_mask(idx)
        target["masks"] = masks

        if self.transforms is not None:
            img, target = self.transforms(img, target)

        return img, target
根据索引拿到图片的图像和它的标注信息。
这里需要注意:target信息是不包含mask信息的,通过parse_mask方法获得mask信息(2.1.5节),将mask放入target字典当中。
如果self.transforms不为空,则将图片进行预处理/增强。
向上层调用返回图片以及target信息。
2.1.5parse_mask
    def parse_mask(self, idx: int):
        mask = self.masks[idx]
        c = mask.max()  # 有几个目标最大索引就等于几
        masks = []
        # 对每个目标的mask单独使用一个channel存放
        for i in range(1, c+1):
            masks.append(mask == i)
        masks = np.stack(masks, axis=0)
        return torch.as_tensor(masks, dtype=torch.uint8)
通过索引可以得到在初始化函数中读取到的mask信息,这里的mask只有一个通道,但是我们在训练Mask R-CNN的过程中我们期望的mask是对应每个目标都有一个单独的通道,因此我们用变量c获取有多少个目标,masks = i 就能获取每个目标的mask信息,最后进行一个拼接就好了。
最终我们的mask是个字典类型,每个元素对应一个目标(类别)的mask蒙版信息。


