插件安装
npm i three
项目引入
这里我随便找的VUE项目练习的
import * as THREE from "three";
大致介绍一下threejs的逻辑
一般我们用它是来搭建三维模型的,搭建三维模型就需要的三个要素 场景(scene) 渲染器(renderer) 和相机(camera)
场景简单理解就是唱戏的戏台子
渲染器就是把各种元素渲染在戏台子上
相机就简单了 就是你看戏的角度
搭建一个简单的项目
因为用的vue的框架练手的 所以这里用的是vue模板 (直接看完整代码请拉到最下面)
先弄一个空vue文件
<template>
    <div id="canva">

    </div>
</template>
<script>
import * as THREE from "three";

</script>

<style>

</style>
然后初始化canvas的三要素 场景(scene) 渲染器(renderer) 和相机(camera)
初始化之前 还需要设置一下canvas的宽高
init: function(){
    //设置canvas场景
    this.initCavasRen()
    //初始化场景
    this.initScene()
    //初始化相机
    this.initCamer()
    //初始化渲染器
    this.initRenderer()
},
initCavasRen: function(){
    this.model_container = document.getElementById("canva");
    this.model_container.style.height = window.innerHeight + "px";
    this.model_container.style.width = window.innerWidth + "px";
    this.height = this.model_container.clientHeight;
    this.width = this.model_container.clientWidth;
},
initScene: function(){
    this.scene = new THREE.Scene()
    //下面是设置场景的六个面  没素材的可以不设置
    // this.scene.background = new THREE.CubeTextureLoader()
    // .setPath( '../../static/textures/cube/skyboxsun25deg/' )
    // .load( [
    // 'px.jpg',
    // 'nx.jpg',
    // 'py.jpg',
    // 'ny.jpg',
    // 'pz.jpg',
    // 'nz.jpg'
    // ] );
},
initCamer: function(){
    this.camera = new THREE.PerspectiveCamera( 75, this.width / this.height, 0.1, 20000 );
    this.camera.position.set(100, 100, 200);
},
initRenderer: function(){
    this.renderer = new THREE.WebGLRenderer({
        antialias: true
    });
    this.renderer.setSize( this.width, this.height );
    this.model_container.appendChild( this.renderer.domElement );
    //阴影
    this.renderer.shadowMap.enabled = true;
    this.renderer.shadowMap.type = THREE.PCFSoftShadowMap;
    this.renderer.outputEncoding = THREE.sRGBEncoding;
    this.renderer.setSize(this.width, this.height);

    // 兼容高清屏幕

    this.renderer.setPixelRatio(window.devicePixelRatio);
},
render: function() {
    requestAnimationFrame( this.render );
    this.renderer.render( this.scene, this.camera );
},
最后在mounted里面调用init方法及render方法即可
mounted(){
    this.init()
    this.render()
}
如果步骤没问题的话,就可以看到一个黑色的canvas页面
可能有人会疑惑 这个render方法有啥用呢,你可以理解为页面上的canvas需要不断的更新渲染, 要不然许多动态效果你就看不到了
requestAnimationFrame 这个方法类似于定时器,但是比定时器要好用一点,大家可以百度学习一下
添加页面元素
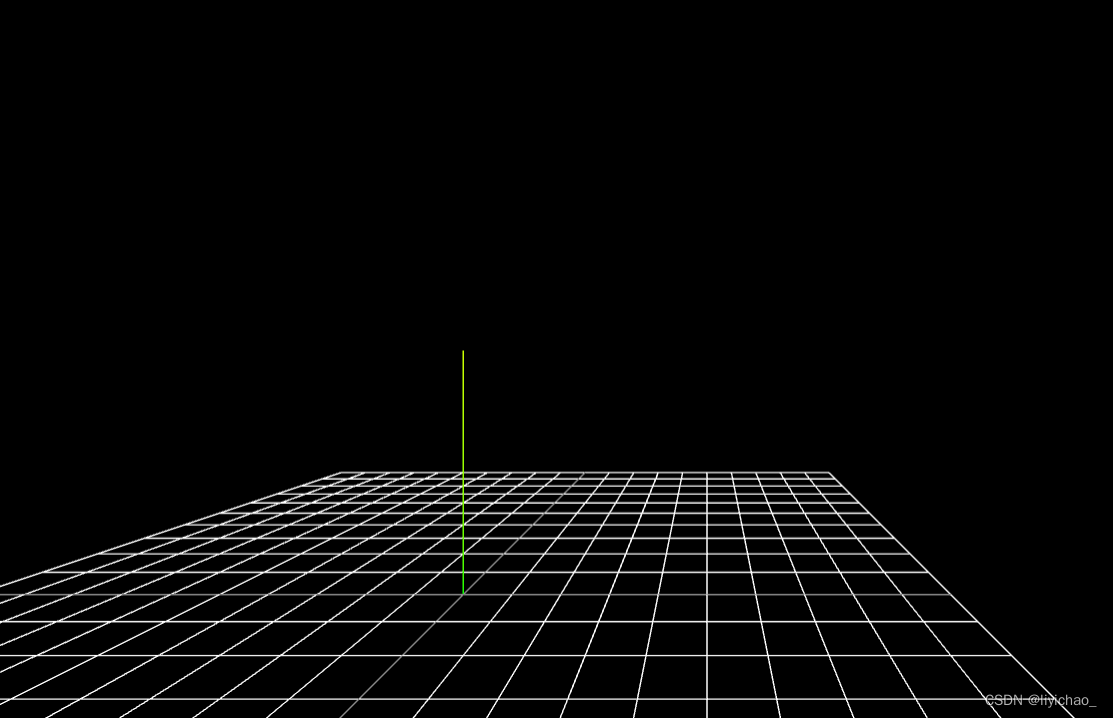
黑色的页面不好看 我们开始先添加一点辅助元素,把three.js里的空间坐标轴加上来 再添加一个网格当作地面
initHelper: function(){
        // 创建坐标轴对象
        var axes = new THREE.AxesHelper(100);
        //将坐标轴添加进场景
        this.scene.add(axes);
        // 网格辅助线
        let gridHelper = new THREE.GridHelper(400, 20, 0x444444, 0xffffff);
        this.scene.add(gridHelper);
    },
在init()方法里调用这个initHelper即可看到页面为下面这样
下一篇讲解 添加元素及控制视角旋转
最后附上完整代码
<template>
    <div id="canva">

    </div>
</template>

<script>
import * as THREE from 'three'
export default{
    methods:{
        init: function(){
            //设置canvas场景
            this.initCavasRen()
            //初始化场景
            this.initScene()
            //初始化相机
            this.initCamer()
            //初始化渲染器
            this.initRenderer()
            //辅助线
            this.initHelper()
        },
        initCavasRen: function(){
            this.model_container = document.getElementById("canva");
            this.model_container.style.height = window.innerHeight + "px";
            this.model_container.style.width = window.innerWidth + "px";
            this.height = this.model_container.clientHeight;
            this.width = this.model_container.clientWidth;
        },
        initScene: function(){
            this.scene = new THREE.Scene()
            //下面是设置场景的六个面  没素材的可以不设置
            // this.scene.background = new THREE.CubeTextureLoader()
            // .setPath( '../../static/textures/cube/skyboxsun25deg/' )
            // .load( [
            // 'px.jpg',
            // 'nx.jpg',
            // 'py.jpg',
            // 'ny.jpg',
            // 'pz.jpg',
            // 'nz.jpg'
            // ] );
        },
        initCamer: function(){
            this.camera = new THREE.PerspectiveCamera( 75, this.width / this.height, 0.1, 20000 );
            this.camera.position.set(100, 100, 200);
        },
        initRenderer: function(){
            this.renderer = new THREE.WebGLRenderer({
                antialias: true
            });
            this.renderer.setSize( this.width, this.height );
            this.model_container.appendChild( this.renderer.domElement );
            //阴影
            this.renderer.shadowMap.enabled = true;
            this.renderer.shadowMap.type = THREE.PCFSoftShadowMap;
            this.renderer.outputEncoding = THREE.sRGBEncoding;
            this.renderer.setSize(this.width, this.height);

            // 兼容高清屏幕

            this.renderer.setPixelRatio(window.devicePixelRatio);
        },
        initHelper: function(){
            // 创建坐标轴对象
            var axes = new THREE.AxesHelper(100);
            //将坐标轴添加进场景
            this.scene.add(axes);
            // 网格辅助线
            let gridHelper = new THREE.GridHelper(400, 20, 0x444444, 0xffffff);
            this.scene.add(gridHelper);
        },
        render: function() {
            requestAnimationFrame( this.render );
            this.renderer.render( this.scene, this.camera );
        },
    },
    mounted(){
        this.init()
        this.render()
    }
}
</script>

<style lang="less">

</style>
