目录
- 前言
- 正文
- 创建GameServer模块
- 修改配置
- 创建NettyClient连接到登录服
- 登录服修改
- 创建协议
- 游戏服注册到登录服
- 总结
前言
上一节我们使用自定义注解+反射简化了协议解包和逻辑处理分发流程。
那么到了这里登录服登录服的架构已经搭建的差不多了,一些比较简单的、并发量较低的游戏,希望使用单体服务器,其实就在这LoginServer的基础上继续开发即可。
但是一些需要能支撑高一些并发,并且希望做到能横向扩容的游戏,就需要用到分布式的思想来做。
笔者这边先简单地将其分成 登录服和游戏服。
登录服用于提供客户端信息入口,处理账号鉴权和协议转发的功能。
游戏服用于处理游戏业务的具体逻辑,可以设定不同的游戏服处理不同的功能。比如游戏服A用于跑主城地图的逻辑,游戏服B用于跑副本相关逻辑。
玩家连接到登录服(前面应该还有一层做负载均衡的nginx用来选择一个低负载的登录服),在登录服登录账号,选择一个角色,然后登录服分配一个游戏服将玩家后续协议转发到游戏服中进行处理。
这么做的好处在于,当游戏服的人数变多,一台机器无法支撑,可以随时在其他机器上创建更多的游戏服进程进行扩容。
而当一台服务器crash时,可以将玩家切换到另一台服务器上游玩。
而我们本节内容就是创建一个游戏服GameServer。
正文
首先思考一下GameServer启动需要做些什么。
- 需要与登录服连接以便接受协议转发
- 需要注册协议分发器ProtoDispatcher用于处理业务逻辑
那我们一步一步来。
创建GameServer模块
ctrl+alt+shift+s进入项目设置,选中Modules, 右键根模块创建一个gameServer子模块
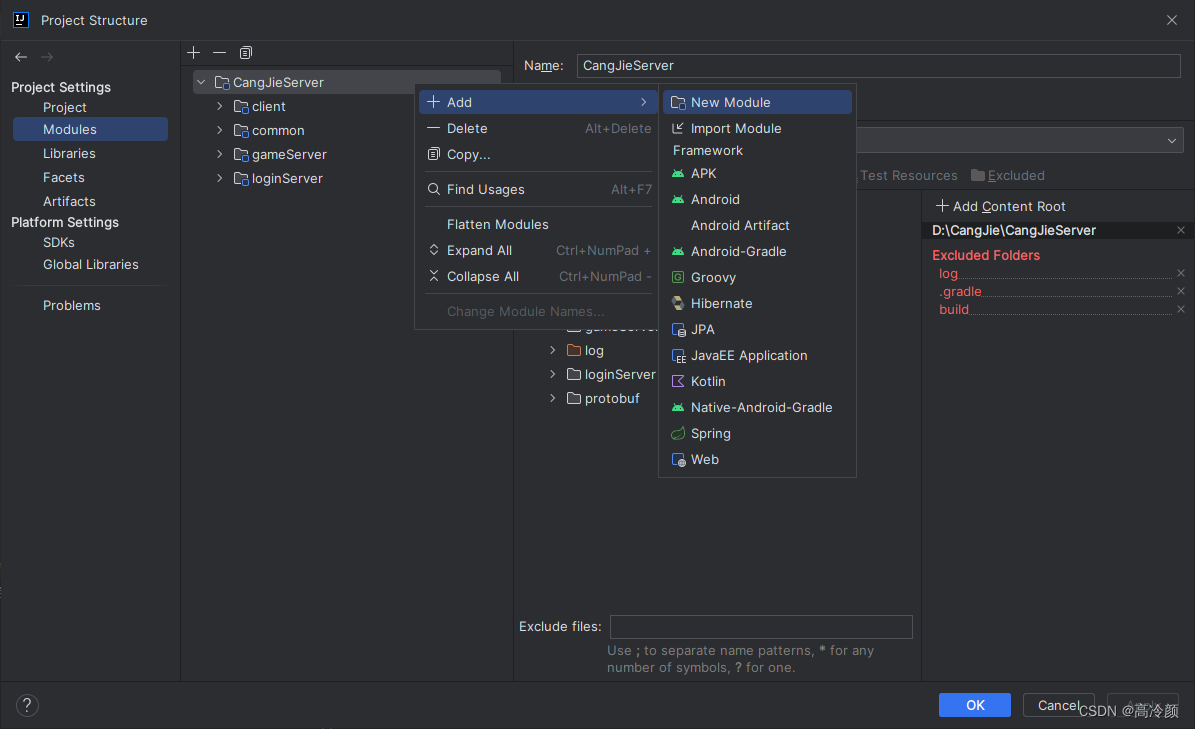
创建GameMain.java作为程序入口, 让其继承BaseMain,并启动Spring容器。
@Slf4j
@Component
public class GameMain extends BaseMain {
    public static void main(String[] args) {
        AnnotationConfigApplicationContext applicationContext = new AnnotationConfigApplicationContext(GameBeanConfig.class);
        applicationContext.start();

        GameMain gameMain = SpringUtils.getBean(GameMain.class);
        gameMain.init();

        System.exit(0);
    }

    @Override
    protected void handleBackGroundCmd(String cmd) {

    }

    @Override
    protected void initServer() {

    }
}
修改配置
现在将登录服的端口配置到common.conf中,注意现在登录服不仅要提供一个对外的端口,还需要一个对内部服务的端口。
# mongo相关
...
# redis相关
...
# 登录服对外host 可以配置多个用逗分隔
login.player_host=127.0.0.1:9999
# 登录服对内host
login.inner_host=127.0.0.1:8888
修改CommonConfig.java
@Getter
@Component
@PropertySource("classpath:common.conf")
public class CommonConfig {
    @Value("${mongodb.host}")
    String mongoHost;
    @Value("${mongodb.user}")
    String mongoUser;
    @Value("${mongodb.password}")
    String mongoPassword;
    @Value("${mongodb.login.db}")
    String loginDbName;

    @Value("${redis.host}")
    String redisHost;
    @Value("${redis.password}")
    String redisPassword;

    @Value("${login.player_host}")
    String loginPlayerHost;
    @Value("${login.inner_host}")
    String loginInnerHost;
}
创建NettyClient连接到登录服
还记得我们在做客户端测试代码时使用了NettyClient连接到LoginServer吗?
现在GameServer也需要做一样的事情,我们将代码抽出到common模块中以便复用。
package org.common.netty;

import ...

@Slf4j
@Component
public class NettyClient {

    /**
     * 连接多个服务
     * @param hostStr "127.0.0.1:8081,127.0.0.1:8082"
     */
    public HashMap<String, Channel> start(String hostStr, BaseNettyHandler nettyHandler) {
        HashMap<String, Channel> map = new HashMap<>();
        String[] hostArray = hostStr.split(",");
        if (hostArray.length == 0) {
            log.error("hostStr split error! hostStr = {}", hostStr);
            return map;
        }
        for (String host : hostArray) {
            String[] split = host.split(":");
            if (split.length != 2) {
                log.error("host list config error! host = {}", host);
                return map;
            }
            String ip = split[0];
            int port = Integer.parseInt(split[1]);
            Channel channel = start(ip, port, nettyHandler);
            map.put(host, channel);
        }
        return map;
    }

    /**
     * 连接单个服务
     */
    public Channel start(String host, int port, BaseNettyHandler nettyHandler) {
        Channel channel;
        final EventLoopGroup group = new NioEventLoopGroup();
        try {
            Bootstrap bootstrap = new Bootstrap();
            bootstrap.group(group);
            bootstrap.channel(NioSocketChannel.class);
            bootstrap.handler(new ChannelInitializer<SocketChannel>() {
                @Override
                protected void initChannel(SocketChannel ch) throws Exception {
                    ChannelPipeline pipeline = ch.pipeline();
                    NettyServer.pipelineConfig(pipeline);
                    // ----------  自定义消息处理器 -----------
                    if (nettyHandler != null) {
                        pipeline.addLast(nettyHandler);
                    }
                }
            });
            ChannelFuture future = bootstrap.connect(new InetSocketAddress(host, port)).sync();
            channel = future.channel();

        } catch (InterruptedException e) {
            throw new RuntimeException(e);
        }
        Runtime.getRuntime().addShutdownHook(new Thread(group::shutdownGracefully));

        log.info("Start NettyClient ok! host = {}, port = {}", host, port);
        return channel;
    }
}
在NettyClient.start时需要传入服务端地址,以及一个自定义的NettyHandler来做协议处理逻辑,我们创建一个GameToLoginNettyHandler.java,用于处理游戏服连接到登录服的逻辑处理。
package org.game.handler;

import ...

/**
 * GameServer连接登录服的NettyHandler
 * 主要做两件事
 * 1. 连接上登录服后主动推送本服务的信息进行注册
 * 2. 定时ping一下登录服
 */
@Slf4j
public class GameToLoginNettyHandler extends BaseNettyHandler {

    /**
     * 收到协议数据
     */
    @Override
    protected void channelRead0(ChannelHandlerContext ctx, byte[] msg) throws Exception {
        //TODO 转发到对应的Actor进行处理
    }
    /**
     * 建立连接
     */
    @Override
    public void channelActive(ChannelHandlerContext ctx) throws Exception {
        InetSocketAddress address = (InetSocketAddress) ctx.channel().remoteAddress();
        String ip = address.getAddress().getHostAddress();
        log.info("连接登录服—成功:ip = {}", ip);
    }
}
同时修改initServer,用于启动NettyClient
	protected void initServer() {
        CommonConfig commonConfig = SpringUtils.getBean(CommonConfig.class);
        // netty启动, 连接到登录服
        NettyClient nettyClient = SpringUtils.getBean(NettyClient.class);
        String loginInnerHost = commonConfig.getLoginInnerHost();
        nettyClient.start(loginInnerHost, new GameToLoginNettyHandler());
        //
    }
好,GameServer服务基本搭建完成。接下来我们修改LoginServer,使其开放一个用于内部服务连接的端口。
登录服修改
修改LoginBeanConfig,注册两个NettyServer的bean
@Slf4j
@Configuration
@ComponentScan(basePackages = {"org.login", "org.common"})
public class LoginBeanConfig {

    /**
     * 对外的netty服务
     */
    @Bean("playerNettyServer")
    NettyServer getPlayerNettyServer() {
        LoginNettyHandler handler = new LoginNettyHandler();
        return new NettyServer(handler);
    }

    /**
     * 对内的netty服务
     */
    @Bean("innerNettyServer")
    NettyServer getInnerNettyServer() {
        LoginToGameNettyHandler handler = new LoginToGameNettyHandler();
        return new NettyServer(handler);
    }
}
创建一个LoginToGameNettyHandler.java, 用于处理登录服与游戏服之间的信息交互
package org.login.handler;

import ...

/**
 * 游戏服netty事件处理
 */
@Slf4j
public class LoginToGameNettyHandler extends BaseNettyHandler {

    /**
     * 收到协议数据
     */
    @Override
    protected void channelRead0(ChannelHandlerContext ctx, byte[] msg) throws Exception {
    }

    /**
     * 建立连接
     */
    @Override
    public void channelActive(ChannelHandlerContext ctx) throws Exception {
        InetSocketAddress address = (InetSocketAddress) ctx.channel().remoteAddress();
        String ip = address.getAddress().getHostAddress();

        if (ctx.channel().isActive()) {
            log.info("内部服务创建连接—成功:ip = {}", ip);
        }
    }

}
修改initServer,增加启动对内的NettyServer
    @Override
    protected void initServer() {
        CommonConfig commonConfig = SpringUtils.getBean(CommonConfig.class);
        ...

        LoginConfig loginConfig = SpringUtils.getBean(LoginConfig.class);
        // 对内netty启动
        NettyServer innerNettyServer = SpringUtils.getBean("innerNettyServer");
        innerNettyServer.start(loginConfig.getInnerPort());

        // 对外netty启动
        NettyServer playerNettyServer = SpringUtils.getBean("playerNettyServer");
        playerNettyServer.start(loginConfig.getPlayerPort());

        log.info("LoginServer start!");
    }
那么登录服和游戏服都修改完毕,当你启动了LoginServer再启动GameServer,会发现控制台打印 内部服务创建连接 的字样,表示游戏服已经连接上了登录服。
但是这还不够,连接上了还需要将双方的信息交换,包括游戏服id,登录服id等。注册成功之后,该游戏服节点才能被标记为可用节点。
创建协议
我们创建一个新的proto文件,用于归纳内部服务之间的信息交互。
创建InnerServerMsg.proto
syntax = "proto3";

option java_outer_classname = "InnerServerMsg";
option java_package = "org.protobuf";
/**
内部服务之间的协议
 */

// 游戏服注册到登录服
message G2LRegister { // 游戏服注册到登录服,返回S2CPlayerRegister
    int32 serverId = 1; // 游戏服id
}
message L2GRegister {
    bool success = 1;   // 是否成功
    int32 serverId = 2;  // 登录服id
}

// 登录服转发到游戏服的客户端上行协议
message L2GClientUpMsg {
    int64 playerId = 1; // 玩家id
    bytes data = 2;     // 协议数据
}
这个协议由GameServer发起,将自己注册到登录服。然后登录服回包给游戏服,将登陆服的id回复给游戏服进行保存。
另外L2GClientUpMsg用于登陆服将玩家的协议转发到游戏服。
游戏服注册到登录服
我们修改GameToLoginNettyHandler使其在连接完成后发送注册协议到登陆服,同时增加L2GRegister的协议解析。
	/**
     * 收到协议数据
     */
    @Override
    protected void channelRead0(ChannelHandlerContext ctx, byte[] msg) throws Exception {
        //TODO 转发到对应的Actor进行处理
        Pack decode = PackCodec.decode(msg);
        int cmdId = decode.getCmdId();
        if (cmdId == ProtoEnumMsg.CMD.ID.GAME_SERVER_REGISTER_VALUE) {
            // login返回到登录服的协议
            InnerServerMsg.L2GRegister g2LRegister = InnerServerMsg.L2GRegister.parseFrom(decode.getData());
            int serverId = g2LRegister.getServerId();
            LoginServerManager loginServerManager = SpringUtils.getBean(LoginServerManager.class);
            loginServerManager.registerLoginServer(serverId, ctx.channel());
            log.info("登录服服注册,serverId={}", serverId);
            return;
        }
    }
	/**
     * 建立连接
     */
    @Override
    public void channelActive(ChannelHandlerContext ctx) throws Exception {
        InetSocketAddress address = (InetSocketAddress) ctx.channel().remoteAddress();
        String ip = address.getAddress().getHostAddress();
        log.info("连接登录服—成功:ip = {}", ip);
        //发送注册协议
        GameConfig gameConfig = SpringUtils.getBean(GameConfig.class);
        InnerServerMsg.G2LRegister.Builder builder = InnerServerMsg.G2LRegister.newBuilder();
        builder.setServerId(gameConfig.getServerId());
        Pack pack = new Pack(ProtoEnumMsg.CMD.ID.GAME_SERVER_REGISTER_VALUE, builder);
        ctx.writeAndFlush(PackCodec.encode(pack));
    }
创建LoginServerContext和LoginServerrManager,用来存放登陆服节点的数据。
package org.game.obj;

import io.netty.channel.Channel;

public class LoginServerContext {
    private final int serverId;

    private Channel channel;

    public LoginServerContext(int serverId, Channel channel) {
        this.serverId = serverId;
        this.channel = channel;
    }

    public int getServerId() {
        return serverId;
    }

    public Channel getChannel() {
        return channel;
    }

    public void setChannel(Channel channel) {
        this.channel = channel;
    }
}
package org.game;

import ...
@Slf4j
@Component
public class LoginServerManager {

    private Map<Integer, LoginServerContext> loginServerContextMap = new HashMap<>();

    public void registerLoginServer(int serverId, Channel channel) {
        if (loginServerContextMap.containsKey(serverId)) {
            log.error("游戏服节点已经注册 serverId = {}", serverId);
            return;
        }
        loginServerContextMap.put(serverId, new LoginServerContext(serverId, channel));
    }
}
接下来修改LoginToGameNettyHandler,当收到注册协议时,保存游戏服信息并回包。
	/**
     * 收到协议数据
     */
    @Override
    protected void channelRead0(ChannelHandlerContext ctx, byte[] msg) throws Exception {
        Pack decode = PackCodec.decode(msg);
        int cmdId = decode.getCmdId();
        if (cmdId == ProtoEnumMsg.CMD.ID.GAME_SERVER_REGISTER_VALUE) {
            InnerServerMsg.G2LRegister g2LRegister = InnerServerMsg.G2LRegister.parseFrom(decode.getData());
            int serverId = g2LRegister.getServerId();
            log.info("游戏服注册,serverId={}", serverId);
            GameServerManger gameServerManger = SpringUtils.getBean(GameServerManger.class);
            gameServerManger.registerGameServer(serverId, ctx.channel());
            LoginConfig loginConfig = SpringUtils.getBean(LoginConfig.class);
            InnerServerMsg.L2GRegister.Builder builder = InnerServerMsg.L2GRegister.newBuilder();
            builder.setSuccess(true);
            builder.setServerId(loginConfig.getServerId());
            Pack pack = new Pack(cmdId, builder);
            ctx.writeAndFlush(PackCodec.encode(pack));
        }
    }
我们创建一个GameServerContext和GameServerManager用来存放游戏服节点的数据。
/**
 * 游戏服节点的信息
 */
public class GameServerContext {
    /**
     * 服务id
     */
    private final int serverId;

    /**
     * 信息通道
     */
    private final Channel channel;

    public GameServerContext(int serverId, Channel channel) {
        this.serverId = serverId;
        this.channel = channel;
    }

    public int getServerId() {
        return serverId;
    }

    public Channel getChannel() {
        return channel;
    }
}
/**
 * 游戏服管理器
 */
@Slf4j
@Component
public class GameServerManger {

    private Map<Integer, GameServerContext> gameServerContextMap = new HashMap<>();

    public void registerGameServer(int serverId, Channel channel) {
        if (gameServerContextMap.containsKey(serverId)) {
            log.error("游戏服节点已经注册 serverId = {}", serverId);
            return;
        }
        gameServerContextMap.put(serverId, new GameServerContext(serverId, channel));
    }

    public int gameServerNum() {
        return gameServerContextMap.size();
    }

    /**
     * 随机一个游戏服节点
     */
    public GameServerContext randomGameServer() {
        return RandomUtils.selectOne(gameServerContextMap.values());
    }
}
一个很简单的缓存管理器,里面就放一个HashMap用来存放游戏服Id=>GameServerContext。
总结
上面的代码逻辑懒得看的话我在这里做一次总结。
- 游戏服在连接上登录服时发送自己的id到登录服。
- 登录服收到游戏服注册协议,将游戏服的id缓存起来纳入管理用于协议转发。
- 登录服回包告诉游戏服自己的服务器id。
- 游戏服记录登录服id并纳入管理,用于通过登录服给客户端回包。
这一节的逻辑比较简单,没有纳入新的技术点。基本都是使用好我们之前开发好的功能进行代码复用。比如BaseMain、NettyClient、NettyServer。在平时的开发过程中遇到需要多次使用的代码块,可以积极抽象,减少重复代码的产出。
下一节我们会对LoginServer的账号登录流程进行优化,并开发角色的创建与登录。
基本的思路是这样:一个账号可以有多个角色,在登录账号后返回角色列表给客户端,并且为该账号分配一个游戏服节点,客户端选择一个角色进行创建登录,角色创建登录的协议将由登录服转发到游戏服进行处理。
