import numpy as np
import cv2
import colorsys
from PIL import Image, ImageDraw, ImageFont


def puttext_cn(img, text, pt, color=(255,0,0), size=16):
    if (isinstance(img, np.ndarray)):  # 判断是否OpenCV图片类型
        img = Image.fromarray(cv2.cvtColor(img, cv2.COLOR_BGR2RGB))
    draw = ImageDraw.Draw(img)
    # 字体的格式
    fontStyle = ImageFont.truetype("simhei.ttf", size, encoding="utf-8")
    # 绘制文本
    draw.text(pt, text, color, font=fontStyle)
    # 转换回OpenCV格式
    return cv2.cvtColor(np.asarray(img), cv2.COLOR_RGB2BGR)


def plot_results1(image_path, bboxes_list, class_names_list):
    img = cv2.imread(image_path)
    for i in range(len(bboxes_list)):
        bbox = bboxes_list[i]
        left, top, right, bottom = bbox[0], bbox[1], bbox[2], bbox[3]
        class_name = class_names_list[i]
        class_index = class_names_list.index(class_name)
        # cv2.rectangle(img, pt1, pt2, color, thickness, lineType, shift )
        # 参数表示依次为:(图片,长方形框左上角坐标, 长方形框右下角坐标,字体颜色,字体粗细)
        cv2.rectangle(img, (int(left),int(top)), (int(right),int(bottom)),  colors[int(class_index)], thickness=2)
        label = class_name
        # cv2.getTextSize() 计算文本字符串的宽度和高度
        # text 输入文字字符串; fontFace 要使用的字体;
        # fontScale 字体比例因子,用来被特定字体的基本大小相乘;
        # thickness 用于渲染文本的线的粗细;
        labelSize, baseLine = cv2.getTextSize(label, cv2.FONT_HERSHEY_SIMPLEX, 0.5, 1)
        top = max(top, labelSize[1])
        # cv2.putText(img, str(i), (123,456)), font, 2, (0,255,0), 3)
        # 各参数依次是:图片,添加的文字,左上角坐标,字体,字体大小,颜色,字体粗细
        cv2.putText(img, label, (int(left-10), int(top-10)), cv2.FONT_HERSHEY_SIMPLEX, 0.7, colors[int(class_index)], thickness=2)
    cv2.imwrite("./test/0322/1.jpg", img)


def plot_results2(image_path, bboxes_list, class_names_list):
    img = cv2.imread(image_path)
    for i in range(len(bboxes_list)):
        bbox = bboxes_list[i]
        left, top, right, bottom = bbox[0], bbox[1], bbox[2], bbox[3]
        class_name = class_names_list[i]
        class_index = class_names_list.index(class_name)
        # cv2.rectangle(img, pt1, pt2, color, thickness, lineType, shift )
        # 参数表示依次为:(图片,长方形框左上角坐标, 长方形框右下角坐标,字体颜色,字体粗细)
        cv2.rectangle(img, (int(left),int(top)), (int(right),int(bottom)),  colors[int(class_index)], thickness=2)
        label = class_name
        # cv2.getTextSize() 计算文本字符串的宽度和高度
        # text 输入文字字符串; fontFace 要使用的字体;
        # fontScale 字体比例因子,用来被特定字体的基本大小相乘;
        # thickness 用于渲染文本的线的粗细;
        labelSize_w, labelSize_h = cv2.getTextSize(label, cv2.FONT_HERSHEY_SIMPLEX, 0.75, 1)[0]
        cv2.rectangle(img, (int(left), int(top-labelSize_h)), (int(left+labelSize_w), int(top)), colors[int(class_index)], -1, cv2.LINE_AA)
        top = max(top, labelSize_h)
        # cv2.putText(img, str(i), (123,456)), font, 2, (0,255,0), 3)
        # 各参数依次是:图片,添加的文字,左上角坐标,字体,字体大小,颜色,字体粗细
        cv2.putText(img, label, (int(left), int(top)), cv2.FONT_HERSHEY_SIMPLEX, 0.75, (255, 255, 255), thickness=1, lineType=cv2.LINE_AA)
    cv2.imwrite("./test/0322/2.jpg", img)


def plot_results3(image_path, bboxes_list, class_names_list):
    img = cv2.imread(image_path)
    for i in range(len(bboxes_list)):
        bbox = bboxes_list[i]
        left, top, right, bottom = bbox[0], bbox[1], bbox[2], bbox[3]
        class_name = class_names_list[i]
        class_index = class_names_list.index(class_name)
        # cv2.rectangle(img, pt1, pt2, color, thickness, lineType, shift )
        # 参数表示依次为:(图片,长方形框左上角坐标, 长方形框右下角坐标,字体颜色,字体粗细)
        cv2.rectangle(img, (int(left),int(top)), (int(right),int(bottom)),  colors[int(class_index)], thickness=2)
        label = class_name
        # cv2.getTextSize() 计算文本字符串的宽度和高度
        # text 输入文字字符串; fontFace 要使用的字体;
        # fontScale 字体比例因子,用来被特定字体的基本大小相乘;
        # thickness 用于渲染文本的线的粗细;
        labelSize_w, labelSize_h = cv2.getTextSize(label, cv2.FONT_HERSHEY_SIMPLEX, 0.5, 1)[0]
        cv2.rectangle(img, (int(left), int(top-labelSize_h-5)), (int(left+labelSize_w), int(top-5)), (55,55,55), -1, cv2.LINE_AA)
        top = max(top, labelSize_h)
        # cv2.putText(img, str(i), (123,456)), font, 2, (0,255,0), 3)
        # 各参数依次是:图片,添加的文字,左上角坐标,字体,字体大小,颜色,字体粗细
        cv2.putText(img, label, (int(left), int(top-5)), cv2.FONT_HERSHEY_SIMPLEX, 0.5, (102,255,255), thickness=1, lineType=cv2.LINE_AA)
    cv2.imwrite("./test/0322/3.jpg", img)


def plot_results4(image_path, bboxes_list, class_names_list):
    img = cv2.imread(image_path)
    for i in range(len(bboxes_list)):
        bbox = bboxes_list[i]
        left, top, right, bottom = bbox[0], bbox[1], bbox[2], bbox[3]
        class_name = class_names_list[i]
        class_index = class_names_list.index(class_name)
        # cv2.rectangle(img, pt1, pt2, color, thickness, lineType, shift )
        # 参数表示依次为:(图片,长方形框左上角坐标, 长方形框右下角坐标,字体颜色,字体粗细)
        cv2.rectangle(img, (int(left),int(top)), (int(right),int(bottom)),  colors[int(class_index)], thickness=2)
        label = class_name
        # cv2.getTextSize() 计算文本字符串的宽度和高度
        # text 输入文字字符串; fontFace 要使用的字体;
        # fontScale 字体比例因子,用来被特定字体的基本大小相乘;
        # thickness 用于渲染文本的线的粗细;
        labelSize_w, labelSize_h = cv2.getTextSize(label, cv2.FONT_HERSHEY_SIMPLEX, 0.5, 1)[0]
        cv2.rectangle(img, (int(left), int(top-labelSize_h-5)), (int(left+labelSize_w*0.5), int(top-2)), (55,55,55), -1, cv2.LINE_AA)
        top = max(top, labelSize_h)
        # cv2.putText(img, str(i), (123,456)), font, 2, (0,255,0), 3)
        # 各参数依次是:图片,添加的文字,左上角坐标,字体,字体大小,颜色,字体粗细
        #cv2.putText(img, label, (int(left), int(top-5)), cv2.FONT_HERSHEY_SIMPLEX, 0.5, (102,255,255), thickness=1, lineType=cv2.LINE_AA)
        print(label, (int(left), int(top)))
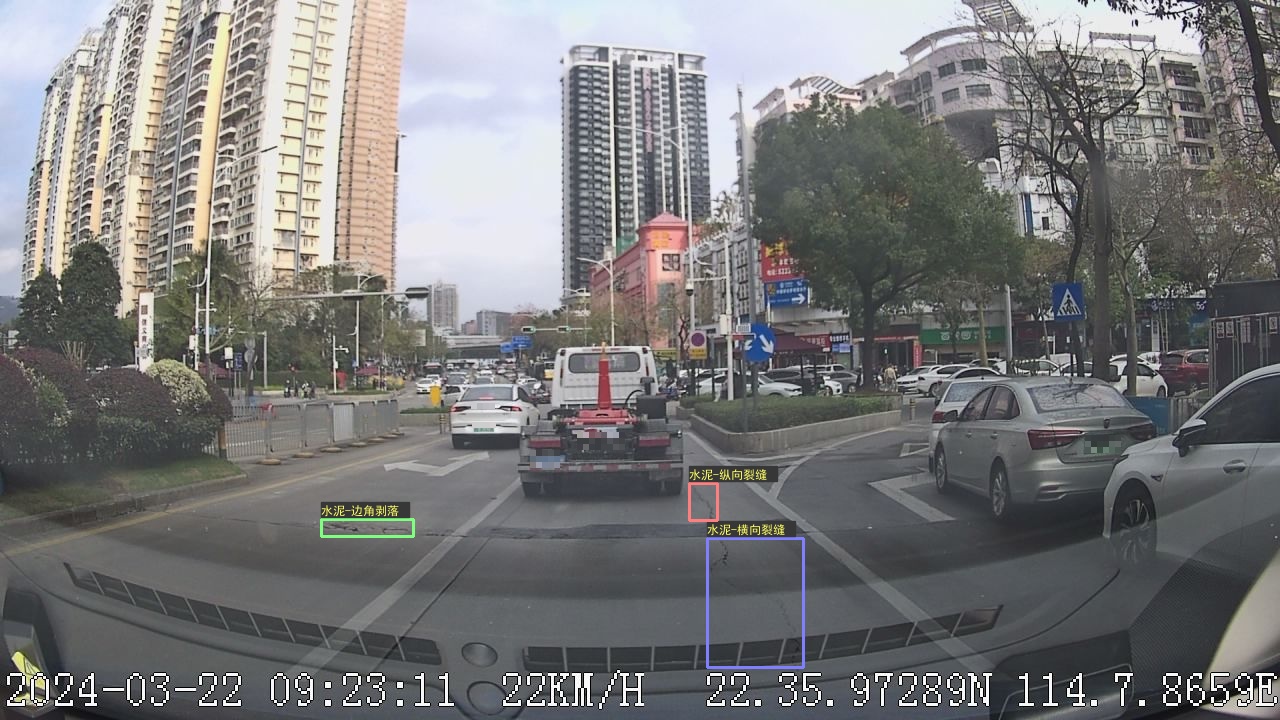
        img = puttext_cn(img, label, (int(left), int(top-15)), (255,255,102), size=12)

    cv2.imwrite("./test/0322/4.jpg", img)


if __name__ == "__main__":
    image_path = "./test/0322/032201.jpg"
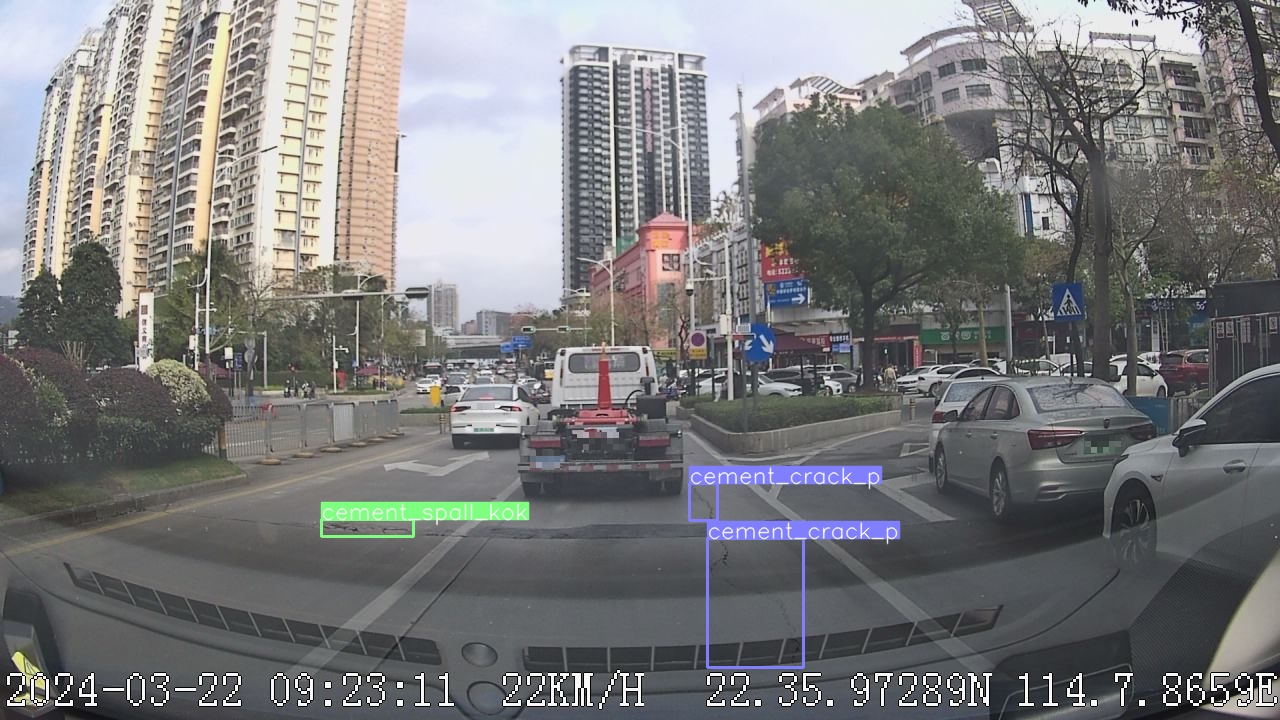
    bboxes_list = [[707,538,803,667], [321,519,413,536], [689,483,717,520]]
    class_names_list = ['cement_crack_p', 'cement_spall_kok', 'cement_crack_p']
    # class_names_list = ['水泥-横向裂缝', '水泥-边角剥落', '水泥-纵向裂缝']

    # 获得hsv格式的不同色度
    hsv_tuples = [(x/len(class_names_list), 0.5, 1.) for x in range(len(class_names_list))]
    # 获得RGB格式的不同颜色
    colors = list(map(lambda x: colorsys.hsv_to_rgb(*x), hsv_tuples))
    # 通过hsv格式来调整不同类别对应边框的色度
    colors = list(map(lambda x: (int(x[0] * 255), int(x[1] * 255), int(x[2] * 255)), colors))

    plot_results3(image_path, bboxes_list, class_names_list)








![每日一题 --- 977. 有序数组的平方[力扣][Go]](https://img-blog.csdnimg.cn/direct/cc73369402bb40f0ba52de6a070fb35a.png)
