实现流程: 自定义拦截器——注入拦截器——获取请求IP——对比IP是否一致——请求返回
文章背景: 接口添加IP白名单限制,只有规定的IP可以访问项目。
实现思路: 添加拦截器,拦截项目所有的请求,获取请求的网络IP,查询IP是否在白名单之中,白名单设置在数据库中,用一张表存储,若在表中有此IP则进行下一步,不在则进行请求拦截,返回到客户端。
实现方式: HandlerInterceptor+MySQL+Mybatis-plus
自定义拦截器,创建类并且实现HandlerInterceptor接口,即可成为拦截器。
HandlerInterceptor接口提供了三个方法,三个方法分别如下

自定义拦截器:实现HandlerInterceptor接口,重写preHandle方法,在preHandle添加获取IP的方法和IP检验业务。代码中涉及到的testEngineerService.getIp()方法在下边!!!
import com.alibaba.fastjson.JSON;
import com.lifel.service.TestEngineer.TestEngineerService;
import com.lifel.utils.ToolsResultEntity;
import lombok.extern.slf4j.Slf4j;
import org.springframework.beans.factory.annotation.Autowired;
import org.springframework.web.context.WebApplicationContext;
import org.springframework.web.context.support.WebApplicationContextUtils;
import org.springframework.web.servlet.HandlerInterceptor;

import javax.servlet.http.HttpServletRequest;
import javax.servlet.http.HttpServletResponse;
import java.io.IOException;
import java.io.PrintWriter;
import java.net.InetAddress;
import java.net.UnknownHostException;

/********************************************************************************
 **
 ** @date :2023/04/23
 ** @description :自定义拦截器 拦截ip
 *********************************************************************************/
@Slf4j
public class WhiteListIntercept implements HandlerInterceptor {

    @Autowired
    private TestEngineerService testEngineerService;

    @Override
    public boolean preHandle(HttpServletRequest request, HttpServletResponse response, Object handler) throws Exception {
        String ipAddress = null;
        try {
            ipAddress = request.getHeader("x-forwarded-for");
            if (ipAddress == null || ipAddress.length() == 0 || "unknown".equalsIgnoreCase(ipAddress)) {
                ipAddress = request.getHeader("Proxy-Client-IP");
            }
            if (ipAddress == null || ipAddress.length() == 0 || "unknown".equalsIgnoreCase(ipAddress)) {
                ipAddress = request.getHeader("WL-Proxy-Client-IP");
            }
            if (ipAddress == null || ipAddress.length() == 0 || "unknown".equalsIgnoreCase(ipAddress)) {
                ipAddress = request.getRemoteAddr();
                if (ipAddress.equals("127.0.0.1")) {
                    // 根据网卡取本机配置的IP
                    InetAddress inet = null;
                    try {
                        inet = InetAddress.getLocalHost();
                    } catch (UnknownHostException e) {
                        e.printStackTrace();
                    }
                    ipAddress = inet.getHostAddress();
                }
            }
            // 对于通过多个代理的情况,第一个IP为客户端真实IP,多个IP按照','分割
            if (ipAddress != null && ipAddress.length() > 15) {
                if (ipAddress.indexOf(",") > 0) {
                    ipAddress = ipAddress.substring(0, ipAddress.indexOf(","));
                }
            }
        } catch (Exception e) {
            ipAddress="";
        }
        log.info("机主的ip是"+ipAddress);
        WebApplicationContext cxt = WebApplicationContextUtils.getWebApplicationContext(request.getServletContext());
        if(cxt != null && cxt.getBean(TestEngineerService.class) != null &&testEngineerService == null) {
            testEngineerService =cxt.getBean(TestEngineerService.class);
        }
        if(testEngineerService.getIp(ipAddress)){
            return true;
        }else{
            returnJson(response, JSON.toJSONString(new ToolsResultEntity(1002, "ip不存在", null)));
            return false;
        }
    }

    /********************************************************************************
     **
     ** @date :2023/04/23
     ** @description :设置请求拦截返回参数
     *********************************************************************************/
    private void returnJson(HttpServletResponse response, String result) {
        PrintWriter writer = null;
        response.setCharacterEncoding("UTF-8");
        response.setContentType("text/html; charset=utf-8");
        try {
            writer = response.getWriter();
            writer.print(result);
        } catch (IOException e) {
        } finally {
            if (writer != null) {
                writer.close();
            }
        }
    }
}
注入拦截器:将拦截器注入到spring,交给spring管理
import org.springframework.context.annotation.Configuration;
import org.springframework.web.servlet.config.annotation.InterceptorRegistry;
import org.springframework.web.servlet.config.annotation.WebMvcConfigurer;

@Configuration
public class AdminWebConfig implements WebMvcConfigurer {

    /********************************************************************************
     **
     ** @date :2023/04/23
     ** @description :配置拦截器
     *********************************************************************************/
    @Override
    public void addInterceptors(InterceptorRegistry registry) {
//       下面这句代码相当于添加一个拦截器,添加的拦截器就是我们刚刚创建的
        registry.addInterceptor(new WhiteListIntercept())
//       addPathPatterns()配置我们要拦截哪些路径 addPathPatterns("/**")表示拦截所有请求,包括我们的静态资源
                .addPathPatterns("/**");
    }
}
创建Service和实现类
public interface TestEngineerService {

    /********************************************************************************
     *
     ** @date :2023/04/23
     ** @description :查询IP是否在白名单中
     *********************************************************************************/
    Boolean getIp(String name);

}
import com.baomidou.mybatisplus.core.conditions.query.QueryWrapper;
import com.lifel.entity.TestEngineer.WhiteIp;
import com.lifel.mapper.TestEngineer.WhiteIpMapper;
import com.lifel.service.TestEngineer.TestEngineerService;
import org.springframework.stereotype.Service;

import javax.annotation.Resource;

@Service
public class TestEngineerServiceImpl implements TestEngineerService {

    @Resource
    private WhiteIpMapper whiteIpMapper;

    /********************************************************************************
     **
     ** @date :2023/04/23
     ** @description :查询IP是否在数据库中保存
     *********************************************************************************/
    @Override
    public Boolean getIp(String name) {
        try {
            //查询表中是否有此IP,并且状态是打开的状态
            WhiteIp whiteIp = whiteIpMapper.selectOne(new QueryWrapper<WhiteIp>().eq("name", name).eq("state", "open"));
            if(whiteIp==null){
                return false;
            }else{
                return true;
            }
        }catch (Exception e){
            return false;
        }
    }
}
测试代码,创建Controller,调用方法进行测试
import io.swagger.annotations.Api;
import io.swagger.annotations.ApiOperation;
import org.springframework.web.bind.annotation.PostMapping;
import org.springframework.web.bind.annotation.RequestMapping;
import org.springframework.web.bind.annotation.RestController;

@RestController
@RequestMapping(value = "/api")
@Api(value = "测试类", tags = "测试类")
public class TestEngineerController {

    @GetMapping("/test")
    @ApiOperation(value = "测试IP白名单是否生效")
    public String test() {
        return "ok";
    }
}
查看我们的IP地址,保存到数据库中,以保证只有我们自己的IP才能访问项目接口

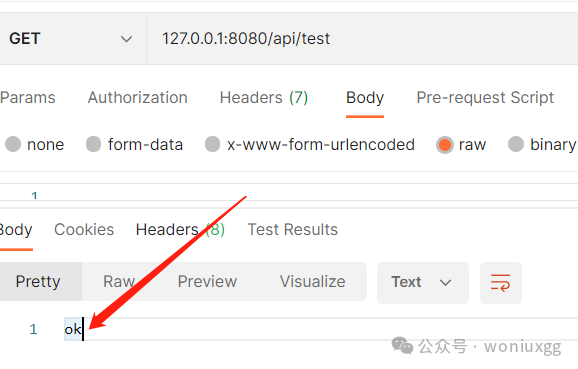
表中保存我们正确的IP,启动项目访问测试方法,请求结果正常返回!!!
表中保存一个错误的IP,启动项目访问测试方法,请求拦截提示IP不存在!!!
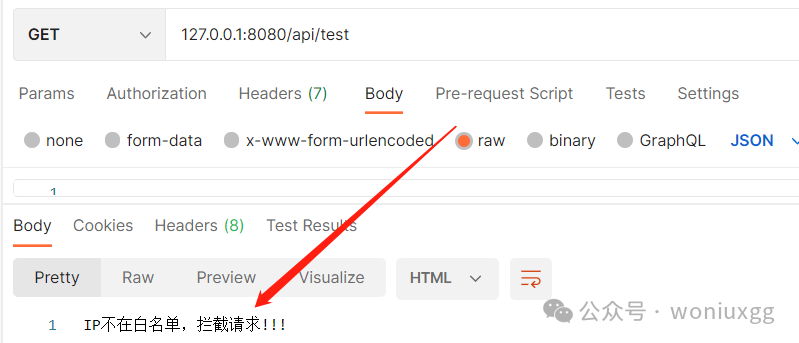
“注意:测试的时候不能写localhost,必须是127.0.0.1:8080,127.0.0.1获取的才是我们本地的IP,localhost获取的为0:0:0:0:0:0:0:1
文章目的:保护我们的系统,避免被恶意攻击!本篇文章到此结束!!!
最后说一句(求关注!别白嫖!)
如果这篇文章对您有所帮助,或者有所启发的话,求一键三连:点赞、转发、在看。
关注公众号:woniuxgg,在公众号中回复:笔记 就可以获得蜗牛为你精心准备的java实战语雀笔记,回复面试、开发手册、有超赞的粉丝福利!

