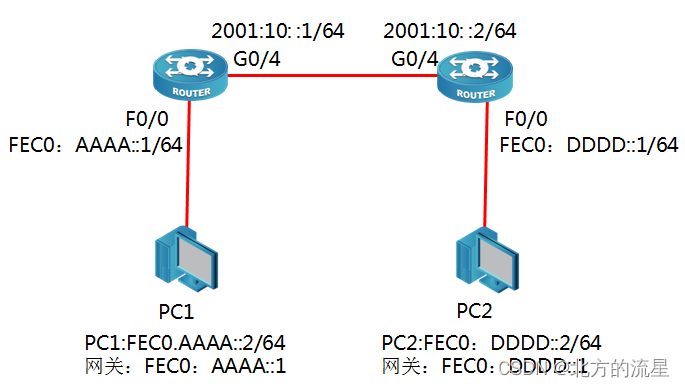
实验拓扑图如下所示
配置步骤:
步骤1:配置R1接口
R1_config#ipv6 unicast-routing //启用IPv6路由
R1_config#in g0/4
R1_config-_g0/4#ipv6 address 2001:10::1/64 //手工配置IPv6地址
R1_config-_g0/4#no shutdown
R1_config#in f0/0
R1_config_f0/0#ipv6 address fec0:aaaa::1/64 // f0/0接口配置IPv6私有地址
验证:
R1#show ipv6 interfaces brief
FastEthernet 0/0 is Up, line protocol is up
FE80::2E0:FFF:FE26:17D1
FEC0:AAAA::1
GigaFastEthernet0/4 is Up, line protocol is up
2001:10::1
FE80:6::2E0:FFF:FE26:17D2
步骤2:配置R2接口
R2_config#ipv6 unicast-routing
R2_config#int g0/4
R2_config_g0/4#ipv6 address 2001:10::2/64
R2_config_g0/4#no shutdown
R2_config_g0/4#int f0/0
R2_config-_f0/0#ipv6 address fec0:dddd::1/64 // f0/0接口配置IPv6私有地址
验证:
R2#show ipv6 interfaces brief
FastEthernet 0/0 is Up, line protocol is up
FE80:4:2E0:FFF:FE26:17C1
FEC0:AAAA::1
GigaFastEthernet0/4 is Up, line protocol is up
2001:10::2
FE80:6::2E0:FFF:FE26:17C2
步骤3:配置静态路由
R1_config#ipv6 route fec0:dddd::/64 2001:10::2 //配置IPv6静态路由
R2_config#ipv6 route fec0:aaaa::/64 2001:10::1
上述静态路由也可以用默认路由代替,效果一样。
R1_config#ipv6 route ::/0 2001:10::2 //配置默认路由 ,
R2_config#ipv6 route ::/0 2001:10::1 //配置默认路由
验证:查看R1路由表
R1#show ipv6 route
C 2001:10::/64[1]
is directly connected, C,GigaEthernet0/4
C 2001:10::1/128[1]
is directly connected, L,GigaEthernet0/4
C fe80::/10[1]
is directly connected, L,Null0
C fe80::/64[1]
is directly connected, C,FastEthernet0/0
C fe80::2e0:fff:fe26:17d1/128[1]
is directly connected, L,FastEthernet0/0
C fe80::/64[1]
is directly connected, C,GigaEthernet0/4
C fe80::2e0:fff:fe26:17d2/128[1]
is directly connected, L,GigaEthernet0/4
C fec0:aaaa::/64[1]
is directly connected, C,FastEthernet0/0
C fec0:aaaa::1/128[1]
is directly connected, L,FastEthernet0/0
S fec0:dddd::/64[1]
is directly connected, GigaEthernet0/4
C ff00::/8[1]
is directly connected, L,Null0
R2路由器IPv6地址表
R2#show ipv6 route
C 2001:10::/64[1]
is directly connected, C,GigaEthernet0/4
C 2001:10::2/128[1]
is directly connected, L,GigaEthernet0/4
C fe80::/10[1]
is directly connected, L,Null0
C fe80::/64[1]
is directly connected, C,GigaEthernet0/4
C fe80::2e0:fff:fe26:17c2/128[1]
is directly connected, L,GigaEthernet0/4
S fec0:aaaa::/64[1]
is directly connected, GigaEthernet0/4
C ff00::/8[1]
is directly connected, L,Null0
步骤4:PC机地址设置
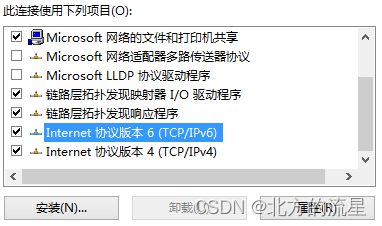
打开PC机的“网络连接”,右键点击“属性”,打开的“属性”窗口中选择Internet协议版本6
在IPv6地址属性页面中,配置PC机的IPv6地址信息

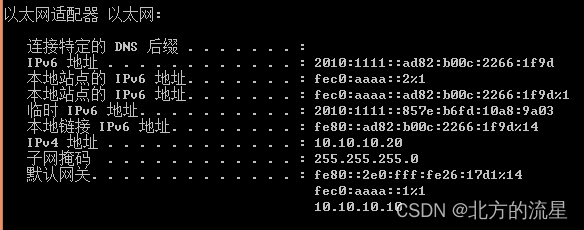
配置完成后,可以在CMD命令行下使用ipconfig命令(Windows 7系统)查看配置的IPv6地址
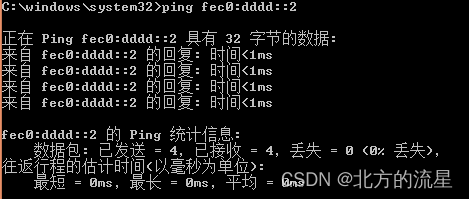
步骤5:测试连通性
PC0可以和PC1是否三层可达
