一、调试用到的汇编代码
为了方便, Makefile 会创建.asm 文件,可以通过它来定位究竟是哪个指令导致了 bug。
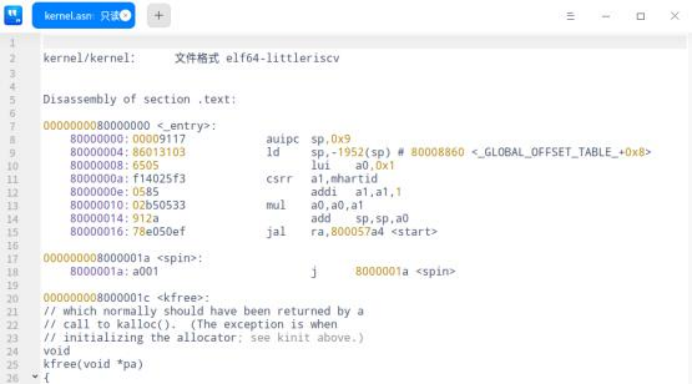
可以看到, kernel 从 80000000 地址处开始执行,第二列为相应指令(如 auipc) 的 16 进制表示(如 00009117)。
二、 过程流程图
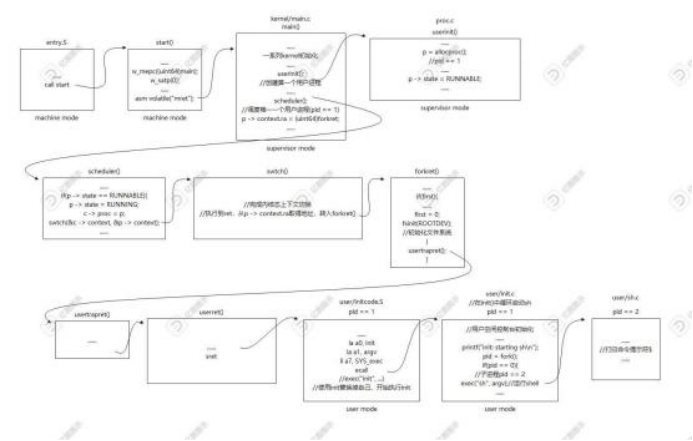
对 xv6 的启动过程绘制了流程图:
三、详细过程分析
·不带 gdb 运行 xv6
$ make qemu
这里会编译文件,然后调用 QEMU。
这里本质上是通过 C 语言来模拟仿真 RISC-V 处理器(一块直接连接硬件设备的主 板)。
1.开始调试
调试这一过程需要两个窗口:执行窗口和调试窗口。
·在执行窗口中输入# make CPUS=1 qemu -gdb
为了方便调试,我们把 CPU 设置为 1,而不是默认的 4(qemu 模拟的 riscv 是 4 核 的) 。 在单核或者单线程场景下,单个断点就可以停止整个程序的运行。
·在调试窗口中输入# gdb-multiarch
2._entry
当 risc-v 计算机上电时,它自身初始化,并运行一个引导加载器(存储在 ROM
中)。引导加载器装载 xv6 的内核到内存的 0x8000000 开始的存储空间中(kernel.ld 文 件)。之所以将内核放在 0x80000000 而不是 0x0,是因为地址范围 0x0:0x80000000 包 含 I/O 设备。
然后在 machine mode 下, CPU 从 kernel/entry.s 的_entry(kernel/entry.s:6) 处 开始执行 xv6 。risc-v 启动时 paging 硬件是禁用的:虚拟地址直接映射到物理地址, 无内存隔离性。
_entry 处的指令为 CPU 设置了栈,这样 xv6 就可以运行 C 代码。
· 输入(gdb) layout split,从这个视图可以看出 gdb 要执行的下一条指令是什么。 ·在_entry 处下断点:(gdb) b _entry
·查看 0x80000000 处的反汇编代码:(gdb) x/6i 0x80000000
·然后继续执行:(gdb) c,发现线程 1 运行到_entry 处停了下来
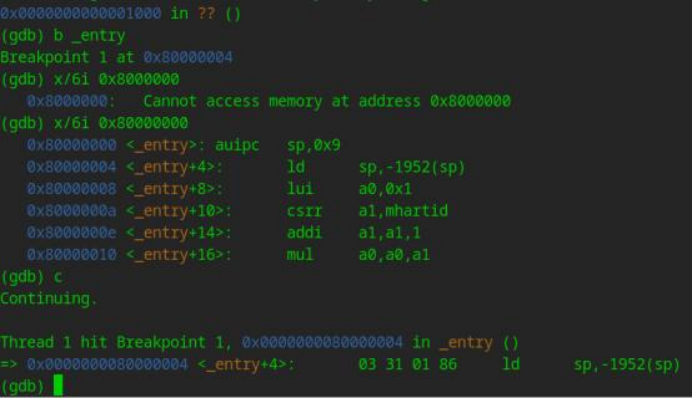
kernel/entry.S 的源码:
# qemu -kernel loads the kernel at 0x80000000
# and causes each CPU to jump there.
# kernel.ld causes the following code to
# be placed at 0x80000000.
.section .text
.global _entry
_entry:
# set up a stack for C.
# stack0 is declared in start.c,
# with a 4096-byte stack per CPU.
# sp = stack0 + (hartid * 4096)(每个 CPU 对应的栈起始地址)
la sp, stack0(把 stack0 的地址读到 sp 寄存器中)
li a0, 1024*4(把 4096 这个立即数读到 a0 寄存器中)
csrr a1, mhartid(把当前 CPU 的 ID 读到 a1 寄存器中)
addi a1, a1, 1
mul a0, a0, a1
add sp, sp, a0
# jump to start() in start.c
call start(如果 start 函数返回(一般不会出现)那么进入死循环)
spin:
j spin
3._entry -> start() -> main()
_entry 调用 start(),start()调用 kernel main.c,xv6 进入 supervisor mode。
为了进入 supervisor mode,risc-v 提供指令 mret 。This instruction is most often
used to return from a previous call from supervisor mode to machine mode. start isn’t returning from such a call, and instead sets things up as if there had been one: it sets
the previous privilege mode to supervisor in the register mstatus, it sets the return address to main by writing main’s address into the register mepc, disables virtual address translation in supervisor mode by writing 0 into the page-table register
satp, and delegates all interrupts and exceptions to supervisor mode.
kernel/start.c 的源码 :
#include "types.h"
#include "param.h"
#include "memlayout.h"
#include "riscv.h"
#include "defs.h"
void main();
void timerinit();
// entry.S needs one stack per CPU.
__attribute__ ((aligned (16))) char stack0[4096 * NCPU];(stack0 要求 16bit 对齐)
// a scratch area per CPU for machine-mode timer interrupts.
uint64 timer_scratch[NCPU][5];(定义了共享变量, 即每个 CPU 的暂存区用于 machine -mode 定时 器中断,它是和 timer 驱动之间传递数据用的)
// assembly code in kernelvec.S for machine -mode timer interrupt.
extern void timervec();(声明了 timer 中断处理函数,在接下来的 timer 初始化函数中被用到)
// entry.S jumps here in machine mode on stack0.
void
start()
{
// set M Previous Privilege mode to Supervisor, for mret.
unsigned long x = r_mstatus();
x &= ~MSTATUS_MPP_MASK;
x |= MSTATUS_MPP_S;
w_mstatus(x);
// set M Exception Program Counter to main, for mret.
// requires gcc -mcmodel=medany
w_mepc((uint64)main);(设置了汇编指令 mret 后 PC 指针跳转的函数,也就是 main 函数)
// disable paging for now.
w_satp(0);(这行代码暂时关闭了分页功能, 即直接使用物理地址)
// delegate all interrupts and exceptions to supervisor mode.
w_medeleg(0xffff);
w_mideleg(0xffff);
w_sie(r_sie() | SIE_SEIE | SIE_STIE | SIE_SSIE);
// configure Physical Memory Protection to give supervisor mode
// access to all of physical memory.
w_pmpaddr0(0x3fffffffffffffull);
w_pmpcfg0(0xf);
// ask for clock interrupts.
timerinit();(clock 的初始化)
// keep each CPU's hartid in itstp register, for cpuid().
(将 CPU 的 ID 值保存在寄存器 tp 中)
int id = r_mhartid();
w_tp(id);
// switch to supervisor mode and jump to main().
asm volatile("mret");
}
// set up to receive timer interrupts in machine mode,
// which arrive at timervec in kernelvec.S,
// which turns them into software interrupts for
// devintr() in trap.c.
(clock 时钟驱动的初始化函数)
void
timerinit()
{
// each CPU has a separate source of timer interrupts.
int id = r_mhartid();(读出 CPU 的 ID)
// ask the CLINT for a timer interrupt.
(设置中断时间间隔)
int interval = 1000000; // cycles; about 1/10th second in qemu.
*(uint64*)CLINT_MTIMECMP(id) = *(uint64*)CLINT_MTIME + interval;
// prepare information in scratch[] for timervec.
// scratch[0..2] : space for timervec to save registers.
// scratch[3] : address of CLINT MTIMECMP register.
// scratch[4] : desired interval (in cycles) between timer interrupts.
(利用刚才在文件开头声明的 timer_scratch 变量, 把刚才的 CPU 的 ID 和设置的中断间隔设置到 scratch 寄存器中, 以供 clock 驱动使用)
uint64 *scratch = &timer_scratch[id][0];
scratch[3] = CLINT_MTIMECMP(id);
scratch[4] = interval;
w_mscratch((uint64)scratch);
// set the machine-mode trap handler.
w_mtvec((uint64)timervec);
// enable machine-mode interrupts.
w_mstatus(r_mstatus() | MSTATUS_MIE);
// enable machine-mode timer interrupts.
w_mie(r_mie() | MIE_MTIE);
}
start 函数调用 mret,跳转到 main 函数。
kernel/main.c 的源码 :
#include "types.h"
#include "param.h"
#include "memlayout.h"
#include "riscv.h"
#include "defs.h"
volatile static int started = 0;
// start() jumps here in supervisor mode on all CPUs.
void
main()
{
if(cpuid() == 0){(判断当前的 CPU 的 ID 是否为主 CPU 。如果是主 CPU ,则执行一系列的初始化 操作。)
consoleinit();(控制台初始化)
printfinit();(打印模块初始化)
printf("\n");
printf("xv6 kernel is booting\n");
printf("\n");
kinit(); // physical page allocator(页表分配器)
kvminit(); // create kernel page table
kvminithart(); // turn on paging(打开分页机制)
procinit(); // process table
trapinit(); // trap vectors
trapinithart(); // install kernel trap vector
plicinit(); // set up interrupt controller
plicinithart(); // ask PLIC(中断控制器 Platform Level Interrupt Controller) for device interrupts binit(); // buffer cache
iinit(); // inode table(磁盘节点的初始化)
fileinit(); // file table
virtio_disk_init(); // emulated hard disk
userinit(); // first user process(创建第一个用户进程,第一个进程执行一个小程序 user/initcode.S ,该程序通过调用 exec 系统调用重新进入内核)
__sync_synchronize();(gcc 提供的原子操作,保证内存访问的操作都是原子操作) started = 1;(设置初始化完成的标志)
} else {(如果不是主 CPU ,首先循环等待主 CPU 初始化完成)
while(started == 0)
;
__sync_synchronize();
printf("hart %d starting\n", cpuid());
kvminithart();
trapinithart();
plicinithart(); }
// turn on paging
// install kernel trap vector
// ask PLIC for device interrupts
scheduler();
}
在 main()中,第 16 -18 行会输出”\n ” ”xv6 kernel is booting\n” “\n ”
·输入(gdb) u 18 使程序运行到第 18 行,并查看执行窗口。
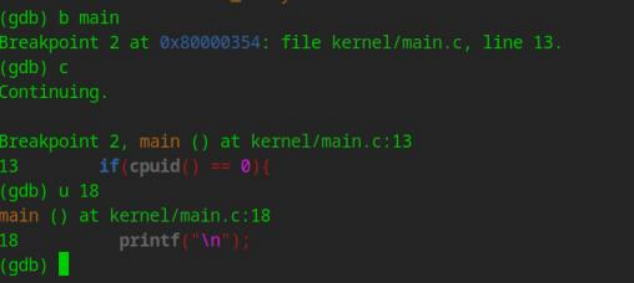
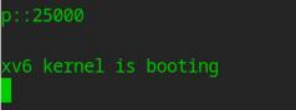
4. main() -> kvminit ()
输入(gdb) n,继续运行;
运行到 kvminithart()时,在执行终端按下“CTRL-a”释放后按“c”,回到 qemu,输入 “ info mem” 查看当前页表信息(底层页表的信息,不是原始页表!)


此时系统还未启动分页机制
5. main() -> kvminithart()
执行 kvminithart() ,页表始址寄存器 satp 指向内核页表
以 16 进制显示页表始址寄存器 satp 的值:(gdb) p/x $satp,里面存放的是内核页表的 块号


查看内核页表信息:
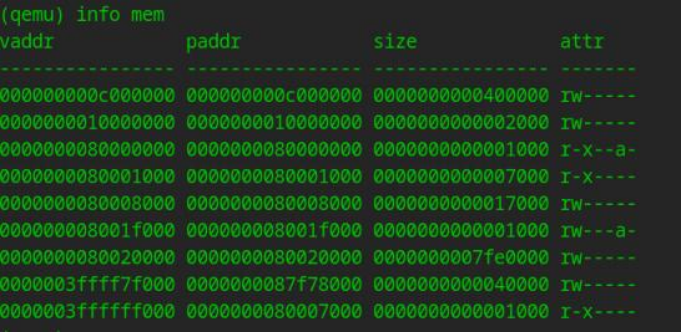
6.mian() -> userinit()
main(kernel/main.c)初始化设备和子系统后,通过调用 userinit(kernel/proc:212)创 建第一个进程。

进入函数(gdb) s

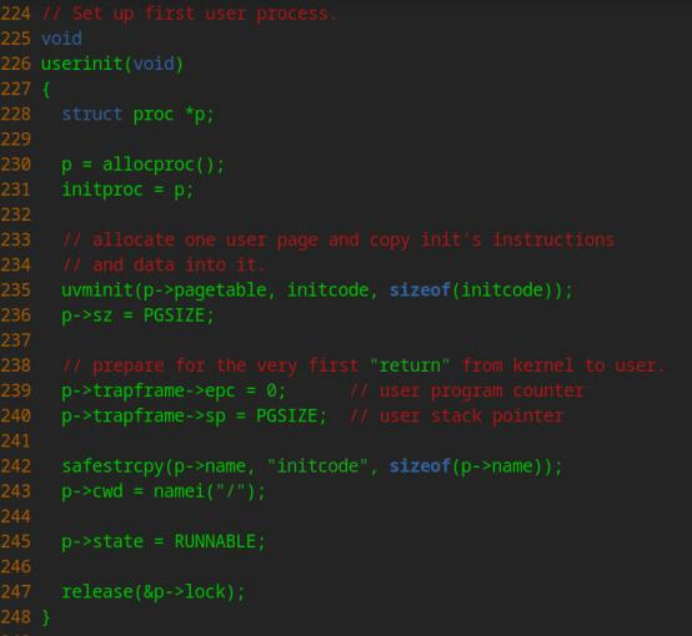
第 230 行:新创建的进程在内核态第一次被调度
第 239 行:1#进程用户态返回地址(用户程序计数器)
执行到 247 行,完成第一个用户进程 initcode 的建立,显示它的 pid、状态和进程页表 首地址。
此时 1#进程还未被调度,系统处于内核态。
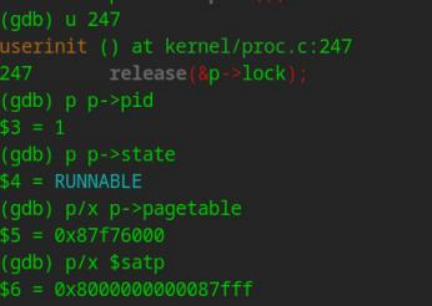
页表始址寄存器的内容,即内核页表块号未发生变化。
7.main() -> scheduler()
(gdb) n ,userinit( )结束,返回到 main()。
随后执行到 scheduler(),(gdb) s 进入函数。
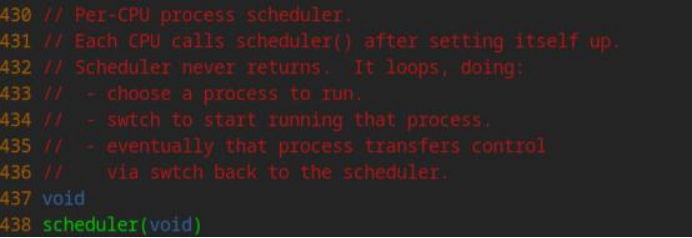
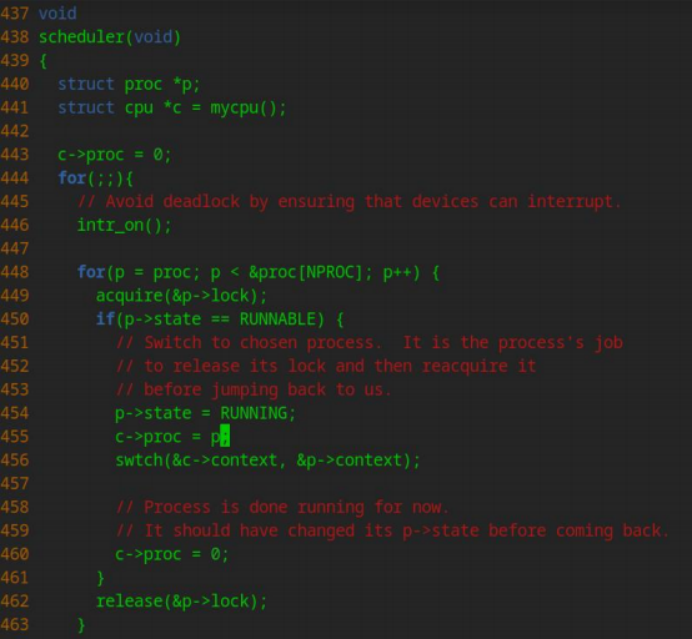
(gdb) u 455,选中 1#进程,查看进程 pid 和进程状态
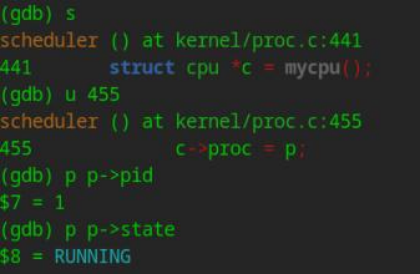
6. scheduler() ->swtch() ->forkret()->usertrapret() ->userret()
进入 userret()汇编函数后, (gdb) b *0x3ffffff10e
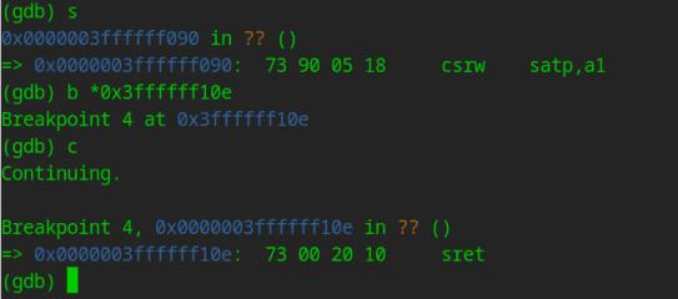
sret 指令使权限由内核态降至用户态
9.userret() -> initcode.S
第一个进程执行一个汇编(risc-v)小程序, initcode.S(user/initcode.s:1) (通过调 用 exec system call 重入 kernel)。exec 用新程序替换当前进程的内存和寄存器。 一旦 内核完成 exec ,它返回到用户空间。
在虚拟地址 0x0 处设置断点,执行到 user/initcode.S 的入口,查看 satp 寄存器的 值。
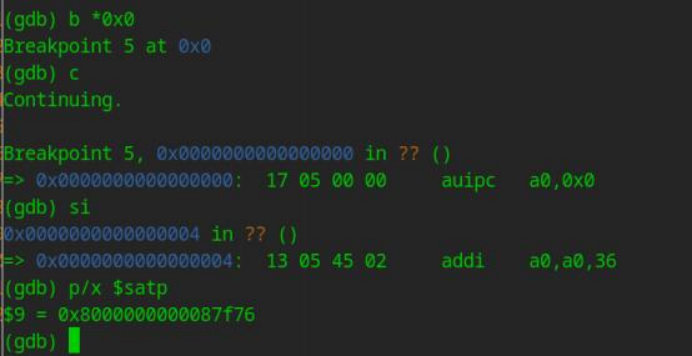
打印 1#进程 initcode 的页表

10. initcode.S -> init()
init(user/init.c:15)创建一个新控制台设备文件(如果需要) ,然后作为文件描述符 0 、1 、2 打开它。然后在 console 启动一个 shell,系统启动。
继续执行, exec 加载 user/init,使用 1#进程的 PCB — proc[1]建立 init 进程映像, 释放 initcode 的页表和内存。
(gdb) c ,执行到 1#进程 init 的入口 0x0,查看此时寄存器 satp 的值。
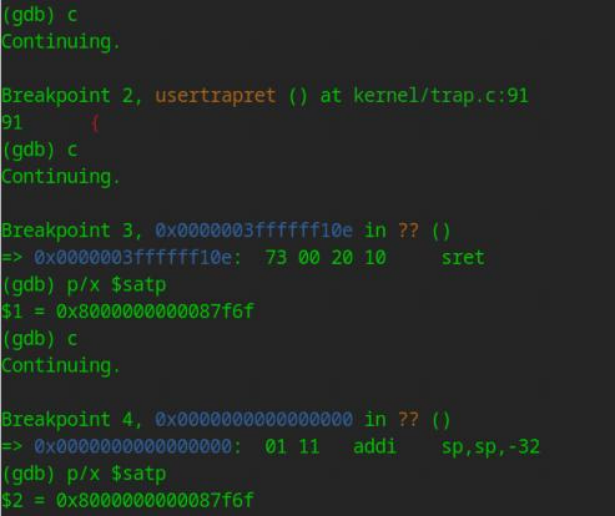

11.init() -> fork()
清空所有断点后,在 init 进程中 fork 处设置断点,进入内核态,执行 fork 系统调用: 创建 2#进程。
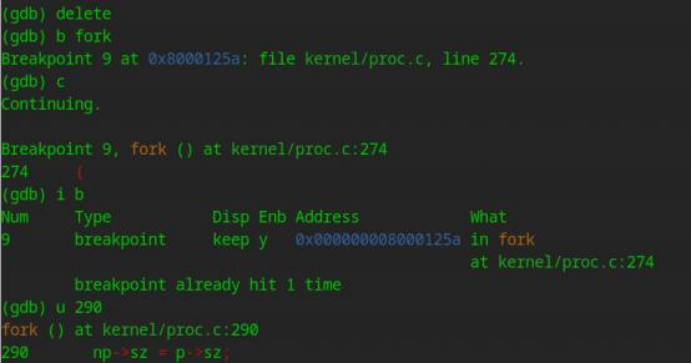
查看 init 进程 pid,子进程 pid,init 的根页表始址,子进程的根页表始址。

12.init() -> sh()
在*0xc6 处设置断点(查看 init.asm 文件,发现 c6 处为 exec( “sh” , argv);语句执行地 址),接着执行到 init 的 34 行(fork 后回到用户态, sh.c 还未执行)

查看 2#进程根页表的块号:

13. sh()
(gdb) c ,执行 exec( “sh” , argv),启动 shell。系统启动完成!

![]()
至此,操作系统就有了 init 进程(pid=1)和 shell 进程(pid=2)两个进程,操作系统也 就这样启动了。 init 进程是 shell 进程的守护进程,当 shell 进程挂掉后, init 进程会重 新 fork 、exec 出一个新的 shell 进程。
14.启动成功,显示信息
系统启动后,按下 Ctrl-p 显示系统中用户进程基本信息

第一列为进程 pid,第二列为进程状态,第三列为进程名称
四、参考文献及链接:
[1]xv6 系统启动代码分析(MIT 6.S081 FALL 2020)_#define entry_start 0x80000000-CSDN博客
[2] Russ Cox, Frans Kaashoek, Robert Morris, xv6: A simple, Unix -like teaching operating system, 2020.
[3]mit6.s081 - xv6启动过程-CSDN博客
[4]6.S081 Lab00 xv6启动过程(从代码出发,了解操作系统启动过程)_cpus=1-CSDN博客
