名人说:莫道桑榆晚,为霞尚满天。——刘禹锡(刘梦得,诗豪)
创作者:Code_流苏(CSDN)(一个喜欢古诗词和编程的Coder😊)目录
- 六、MySQL
- 1、MySQL-概述和引入
- ①MySQL是什么?
- ②它有哪些特点?
- ③应用场景
- ④优势
- ⑤安装
- 2、MySQL-数据库管理
- ①MySQL指令
- ②常用数据类型
- ③数据行操作
- 3、MySQL-常见SQL擦破自拍和Python案例
- ①常用操作
- ②案例:Flask + 前端 + MySQL整合
- 4、综合案例
- ①概览
- ②数据库设置
- ③Flask后端代码
- ④HTML和CSS
- ⑤JavaScript和jQuery
六、MySQL
-
Python相关:基础、函数、数据类型、面向、模块
-
前端开发:HTML、CSS、JavaScript、jQuery。【静态页面】
-
Java + 前端 ; Python + 前端 ; Go + 前端 —>【动态页面】
那什么是静态页面,什么是动态页面呢?
- 静态页面,页面固定,一直保持一个模样
- 动态页面,页面上的数据可以实时修改和展示。
在建网站时,关于静态和动态需要注意些什么?
- 默认编写的是静态效果
- 动态:需要用到web框架的功能
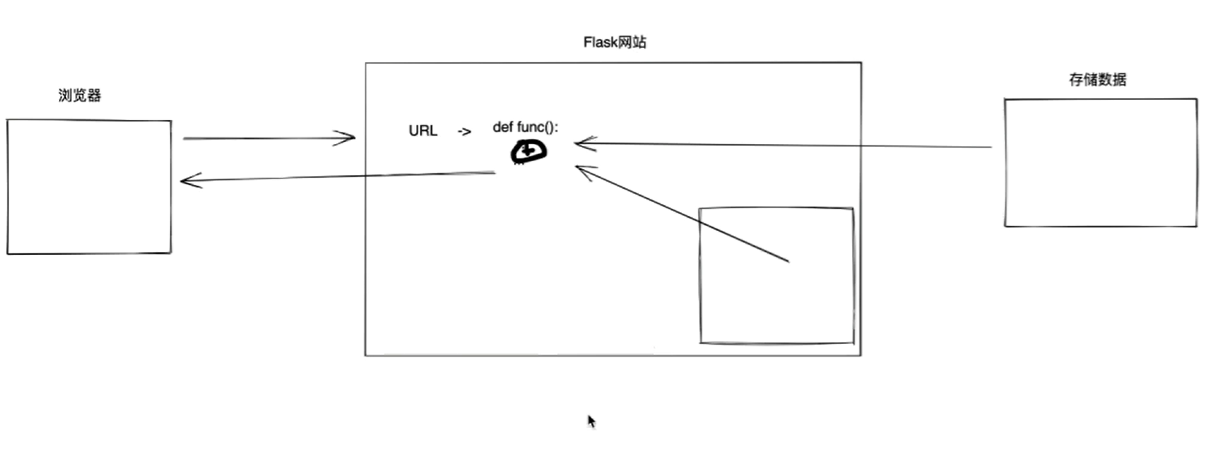
通过前面的学习,我们已经学会了如何去构建静态页面,为了后面能够更好地过渡到动态页面,我们接下来一起学习MySQL,它能帮助我们存储和管理数据,完成前后端数据上的衔接。
那对于目前的我们来看,都有什么能做数据的存储呢?
- txt文件
- excel文件
- 专业的软件:数据库管理系统。
MySQL(*) / Oracle / SQL server / DB2 / Access…
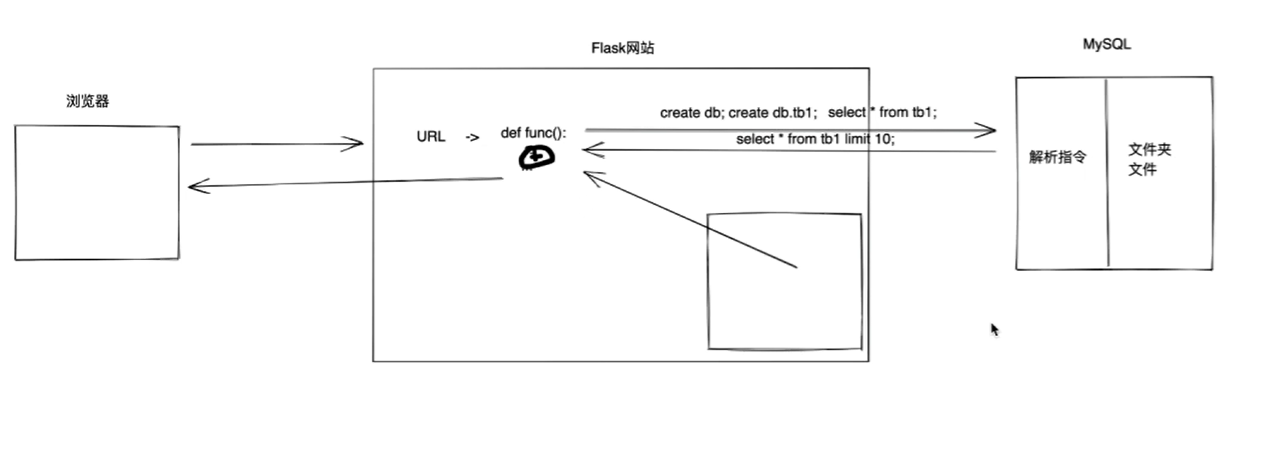
1、MySQL-概述和引入
①MySQL是什么?
MySQL 是一个广泛使用的关系型数据库管理系统 (RDBMS),它以其高性能、可靠性、简易性和开源许可证而闻名。由瑞典的 MySQL AB 公司于 1995 年开发,并于 2008 年被 Sun Microsystems 收购,随后在 2010 年 Oracle Corporation 收购了 Sun Microsystems,MySQL 也成为了 Oracle 的一部分。

②它有哪些特点?
- 开源性:开源,你可以免费使用它,并且可以查看和修改源代码以适应你的特定需求。
- 性能:快速高效,能够处理大量的数据操作和并发连接。
- 易用性:提供了简单的 SQL 语法和多种语言的接口,包括 PHP、Python、Java 和 C++ 等。
- 可靠性:提供了强大的数据保护功能,包括复制、备份和恢复等。
- 灵活性:支持多种存储引擎,每种引擎都有其优势,可以根据应用需求选择最适合的存储引擎。
③应用场景
MySQL 被广泛应用于各种在线应用程序,特别是那些需要数据库存储的 Web 应用程序,如内容管理系统、电子商务网站和论坛。除此之外,它也被用在许多大型网站和应用程序,如 Facebook、YouTube等。
④优势
MySQL 与其他流行的关系型数据库系统(如 PostgreSQL、Microsoft SQL Server 和 Oracle Database)相比,通常被认为更易于管理和成本效益更高,尤其是对于小到中型应用程序。然而,对于需要高级功能(如高级分析和数据仓库功能)的大型企业级应用,其他数据库系统可能更合适。
⑤安装
关于MySQL的安装可以看我之前写的文章或自行寻找文章、视频安装即可。
-
MySQL安装与配置
MySQL 8.0.31 最新版详细安装教程(下载+安装+配置+登录测试)
-
MySQL的启动与关闭
-
指令(*)
-
Python第三方模块,帮助我们发送指令并获取MySQL返回的结果。
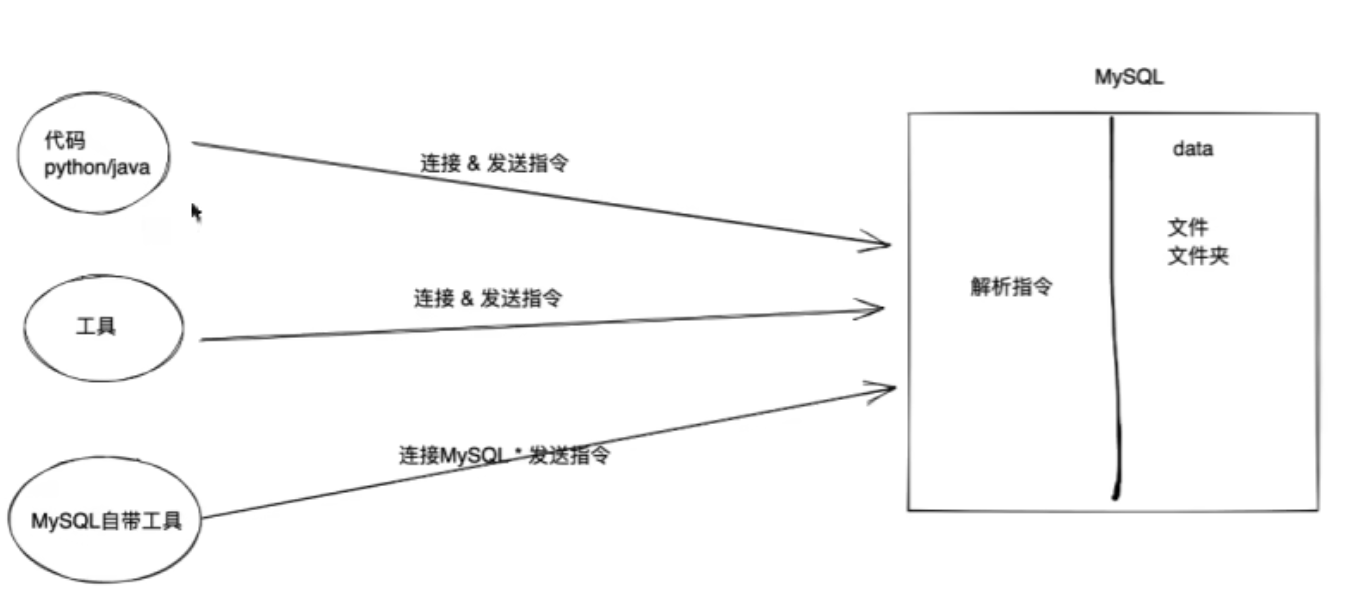
连接测试
#登录连接
mysql -u root -p
汇总命令
#设置密码
mysql> set password = password('123456');
#查看数据库
mysql> show database;
#退出
mysql> exit;
mysql -u root -p
输入密码
mysql> exit;
如果你忘记了MySQL的密码,该怎么办?
默认情况下,启动MySQL时,需要用户输入账户名、密码。

修改MySQL配置,重新启动MySQL(无账号模式)
mysql -u root -p
重新设置密码
退出

再重新修改MySQL配置文件,重新启动MySQL(需要账号的模式)
	mysql -u root -p
	输入新密码登录
接下来,我们的重点是学会使用MySQL管理和操作数据:
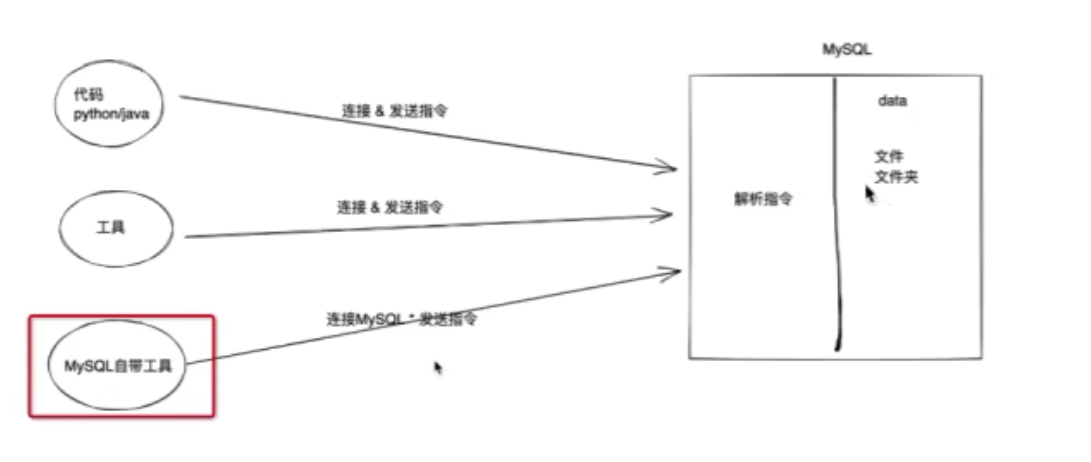
2、MySQL-数据库管理
①MySQL指令
在MySQL和我们平时认知不同的概念。
| MySQL | 认知 |
|---|---|
| 数据库 | 文件夹 |
| 数据表 | 文件(Excel文件) |
1️⃣数据库管理(文件夹)
1.查看已有的数据库(文件夹)
show databases;
2.创建数据库(文件夹)
create database 数据库名字;
create database 数据库名字 DEFAULT CHARSET UTF8 COLLATE
utf8_general_Ci;
create database henan DEFAULT CHARSET UTF8 COLLATE
utf8_general_Ci;
3.删除数据库(文件夹)
drop database henan;
4.进入数据库(进入文件夹)
use henan;
5.查看文件夹下所有的数据表(文件)
show tables;
2️⃣数据表的管理(文件)
1.进入数据库(文件夹)
use 数据库名;
2.查看当前数据库下的所有表(文件)
show tables;
3.创建表(文件)
create table 表名{
	列名 类型,
	列名 类型,
	列名 类型
}default charset=utf-8;

create table tb1(id int,name varchar(16),age int) default
charset=utf8;
create table tb1(
    id int,
    name varchar(16),
    age int
) default charset=utf8;
create table tb1(
    id int,
    name varchar(16) not null, -- 不允许为空
    age int null,  			   -- 允许为空(默认)
) default charset=utf8;
create table tb1(
    id int,
    name varchar(16) ,
    age int default 3,   		-- 插入数据时,age列的值默认为3
) default charset=utf8;
在 MySQL 中,主键(Primary Key)是一个或多个字段的组合,用于唯一标识表中的每一条记录。它是数据库表的一个非常重要的概念,确保数据的完整性和唯一性。每个表只能有一个主键,主键列的值必须唯一,不允许为空(NULL)。
例如:身份证号、学号、工号等等
create table tb1(
	id int primary key, 		-- 主键(不允许为空,也不允许重复)
	name varchar(16),
	age int
)default charset=utf8;
create table tb1(
	id int auto_increment primary key, -- 内部维护,自增
	name varchar(16),
	age int
)default charset = utf8;
一般情况下,我们在创建表时都会这样来写【标准写法】:
CREATE TABLE tb1 (
    id INT NOT NULL AUTO_INCREMENT PRIMARY KEY,
    name VARCHAR(16),
    age INT
) DEFAULT CHARSET=utf8;
#desc 表名 会显示表的结构信息
mysql> desc tb1;
+-------+-------------+------+-----+---------+----------------+
| Field | Type        | Null | Key | Default | Extra          |
+-------+-------------+------+-----+---------+----------------+
| id    | int         | NO   | PRI | NULL    | auto_increment |
| name  | varchar(16) | YES  |     | NULL    |                |
| age   | int         | YES  |     | NULL    |                |
+-------+-------------+------+-----+---------+----------------+
3 rows in set (0.01 sec)
4.删除表
drop table 表名;
②常用数据类型
1.tinyint
有符号,取值范围 -128 ~ 127(有正有负)
无符号,取值范围 0 ~ 255(只有正)【默认】
create table tb3(
	id int not null auto_increment primary key,
	age tinyint  -- 有符号:取值范围 -128 ~ 127
)default charset=utf8;
create table tb3(
	id int not null auto_increment primary key,
    age tinyint unsigned -- 无符号
)default charset=utf8;
2.int
int			 有符号
int unsigned 无符号
3.bigint
bigint			 有符号
bigint unsigned  无符号
练习题:
#创建表
create table tb2(
	id bigint not null auto_increment primary key,
    salary int,
    age tinyint
)default charset=utf8;

#插入数据
insert into tb2(salary,age) values(10000,18);
insert into tb2(salary,age) values(20000,28);
insert into tb2(salary,age) values(30000,38),(40000,40);

#查看表中的数据
select * from tb2;

+----+--------+------+
| id | salary | age  |
+----+--------+------+
|  1 |  10000 |   18 |
|  2 |  20000 |   28 |
|  3 |  30000 |   38 |
|  4 |  40000 |   40 |
+----+--------+------+
4 rows in set (0.00 sec)
4.float
5.double
6.decimal
在MySQL中,decimal是一种精确的数值数据类型,用于存储带有固定小数点的数字。这种类型特别适用于需要高度数值精确度的应用,比如财务计算。decimal数据类型允许你指定总体数字的宽度(即整数位数加上小数位数)以及小数点后的位数。其语法格式通常为decimal(M, D),其中:
M(精度)表示数字的总位数(整数部分和小数部分的总和)。D(标度)表示小数点后的位数。
例如,decimal(5,2)类型的列可以存储最大为999.99的数值,5表示数字的总位数,而2表示小数点后的位数。如果尝试存储超出指定精度的值,MySQL会对该值进行四舍五入或截断,具体行为取决于数据库的配置。
decimal类型特别重要的一点是,不同于float或double类型的浮点数,decimal在存储和计算时能够提供精确的数值,避免了浮点数计算中可能出现的舍入误差。使得decimal类型非常适合需要精确计算的场合,如金融、会计和其他需要精确小数处理的领域。
准确的小数值,m是数字总个数(负号不算),d时小数点后个数。m最大值为65,d最大值为30。

例如:
create table tb3(
	id int not null primary key auto_increment,
    salary decimal(8,2)
)default charset=utf8;

insert into tb3(salary) values(1.28);
insert into tb3(salary) values(5.289);
insert into tb3(salary) values(5.282);
insert into tb3(salary) values(121312.11);
insert into tb3(salary) values(12131212.11);
7.char,速度快。
# 定长字符串,字符串长度最多可容纳255个字符。
char(11),固定用11个字符串进行存储,哪怕真是没有11个字符,也会按照11存储。

create table tb4(
	id int not null primary key auto_increment,
	mobile char(11)
)default charset=utf8;

insert into tb4(mobile) values("151");
insert into tb4(mobile) values("15131255555");
8.varchar,节省空间。
#变长字符串,字符串长度根据编码来确定。
varchar(11),真实数据有多长就按多长进行存储。

create table tb5(
	id int not null primary key auto_increment,
	mobile varchar(11)
)default charset=utf8;

insert into tb5(mobile) values("151");
insert into tb5(mobile) values("15131255555");
9.text
#text数据类型用于保存变长的大字符串。

#一般情况下,长文本会用text类型。例如:文章、新闻等

create table tb6(
	id int not null primary key auto_increment,
    title varchar(128),
    content text
)default charset=utf8;
10.datetime
在MySQL中,DATETIME是一种日期和时间的数据类型,用于存储日期和时间值。这种数据类型能够存储从公元1000年1月1日到公元9999年12月31日之间的日期,以及这段日期内的时间,时间精确到秒。DATETIME类型的格式通常为YYYY-MM-DD HH:MM:SS,其中:
YYYY表示年份,MM表示月份,DD表示日期,HH表示小时(24小时制),MM表示分钟,SS表示秒。
例如,2024-03-05 12:45:30就是一个有效的DATETIME值,表示2024年3月5日,下午12点45分30秒。
DATETIME类型不包含时区信息,所以在存储和检索时,它会按照服务器的本地时区来处理。如果你的应用在多个时区之间操作,可能需要在应用层面处理时区转换。
YYYY-MM-DD HH:MM:SS (2024-1-1 22:08:59)
11.date
在MySQL中,DATE是一个用于存储日期值的数据类型,仅包含年、月、日信息,不包含时间或时区信息。DATE类型的值的格式为YYYY-MM-DD,其中:
YYYY表示年份,MM表示月份,DD表示日。
这种数据类型可以存储的日期范围从公元1000年1月1日到公元9999年12月31日。
例如,2024-03-05是一个有效的DATE值,表示2024年3月5日。
YYYY-MM-DD (2024-01-01)
练习题:用户表
create table tb7(
	id int not null primary key auto_increment,
    name varchar(64) not null,
    password char(64) not null,
    email char(64) not null,
    age tinyint,
    salary decimal(10,2),
    ctime datetime
)default charset=utf8;

insert into tb7(name,password,email,age,salary,ctime) values("张三","123456","xxx@163.com",19,1000.20,"2024-1-1 11:11:10");

insert into tb7(name,password,email,age,salary,ctime) values("李四","123456","xxx@163.com",19,1000.20,"2024-1-1 11:11:10");

insert into tb7(name,password,email,age,salary,ctime) values("王五","123456","xxx@163.com",19,1000.20,"2024-1-1 11:11:10");

mysql> select * from tb7;
+----+------+----------+-------------+------+---------+---------------------+
| id | name | password | email       | age  | salary  | ctime               |
+----+------+----------+-------------+------+---------+---------------------+
|  1 | 张三 | 123456   | xxx@163.com |   19 | 1000.20 | 2024-01-01 11:11:10 |
|  2 | 李四 | 123456   | xxx@163.com |   19 | 1000.20 | 2024-01-01 11:11:10 |
|  3 | 王五 | 123456   | xxx@163.com |   19 | 1000.20 | 2024-01-01 11:11:10 |
+----+------+----------+-------------+------+---------+---------------------+
3 rows in set (0.00 sec)
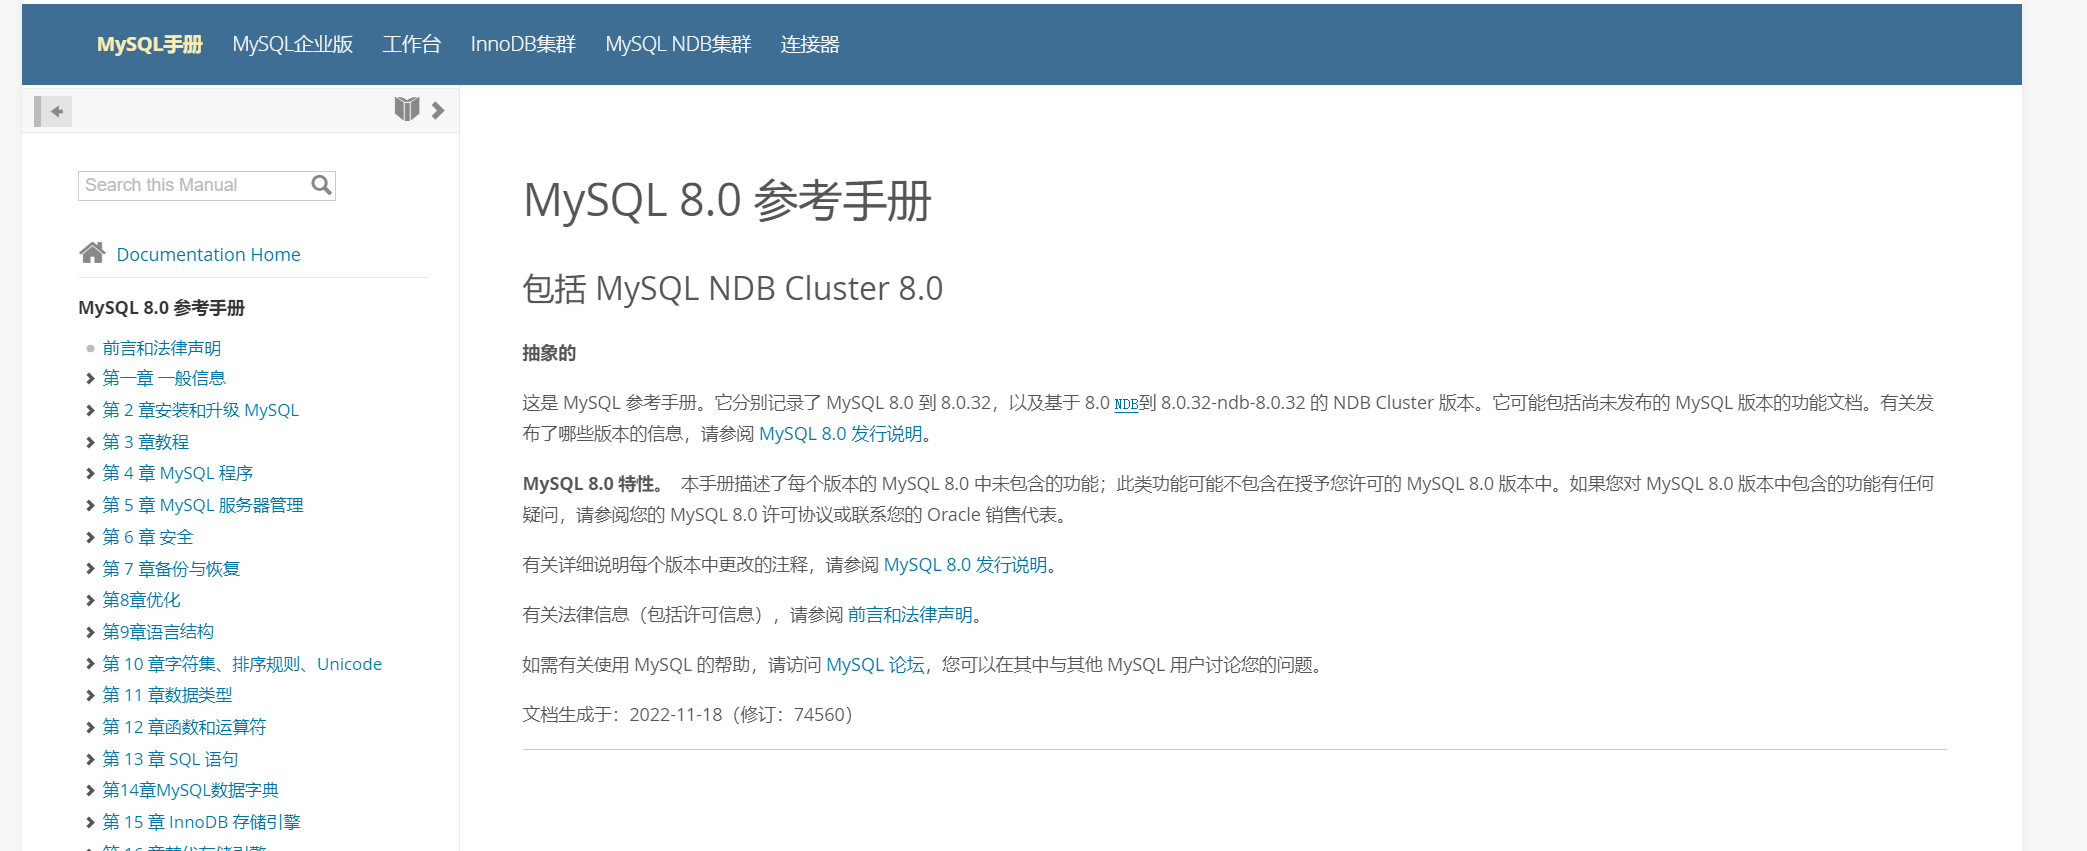
MySQL文档:https://mysql.net.cn/doc/refman/8.0/en/
平时开发系统时,一般情况下:
- 创建数据库
- 创建表结构
都是需要提前通过上述命令创建。
③数据行操作
1.新增数据
insert into 表名(列名,列名) values(值,值);
insert into 表名(列名,列名) values(值,值),(值,值),(值,值),(值,值);
2.删除数据
delete from 表名;
delete from 表名 where 条件;
delete from tb7;
delete from tb7 where id = 2;
delete from tb7 where id = 4 and name="王五";
delete from tb7 where id = 4 or name="王五";
delete from tb7 where id > 4;
delete from tb7 where id >= 4;
delete from tb7 where id != 4;
delete from tb7 where id in (1,5);
3.修改数据
update 表名 set 列=值;
update 表名 set 列=值,列=值;
update 表名 set 列=值 where 条件;
update tb7 set password="哈哈哈";
update tb7 set email="哈哈哈" where id>5;
update tb7 set age=age+10 where id>2;
4.查询数据
select * from 表名;
select 列名,列名 from 表名;

select 列名,列名 from 表名 where 条件;
select * from tb7;
select id,name from tb7;
select id,name from tb7 where id>10;
select id,name from tb7 where name="xx" and password="xx";
小结
我们平时开发系统时,一般情况下:
- 创建数据库
- 创建表结构
都是需要提前通过工具+命令创建。
但是,表中的数据一般情况下都是通过程序来实现增删改查。
案例:员工管理
-
使用MySQL内置工具(命令)
- 创建数据库:unicom
- 数据一张表:admin
表名:admin
列:
id,整型,自增,主键。
username 字符串 不为空,
password 字符串 不为空,
mobile 字符串 不为空,
create table admin(
     id int auto_increment primary key,
     username varchar(16) not null,
     password varchar(16) not null,
     mobile char(11) not null
)default charset=utf8;
- Python代码实现
- 添加用户
- 删除用户
- 查看用户
- 更新用户信息
创建表结构
create database unicom default charset utf8 collate utf8_general_ci;

use unicom;
create table admin(
     id int auto_increment primary key,
     username varchar(16) not null,
     password varchar(64) not null,
     mobile char(11) not null
)default charset=utf8;
3、MySQL-常见SQL擦破自拍和Python案例
使用python操作MySQL
用python代码连接MySQL并发送指令。
pip install pymysql
①常用操作
1️⃣创建数据库
# -*- coding: utf-8 -*-
# @Time : 2024-03-04 22:30
import pymysql
from pymysql import cursors

#1.连接MySQL
conn = pymysql.connect(host="127.0.0.1",port=3306,user='root',passwd="123456",charset='utf8',database='unicom')
cursor = conn.cursor(cursor=pymysql.cursors.DictCursor)

#2.发送指令
conn.commit()

#3.关闭
cursor.close()
conn.close()
第二种写法:
# -*- coding: utf-8 -*-
# @Time : 2024-03-04 22:30
import pymysql
from pymysql import cursors

#1.连接MySQL
conn = pymysql.connect(host="127.0.0.1",port=3306,user='root',passwd="123456",charset='utf8',database='unicom')
cursor = conn.cursor(cursor=pymysql.cursors.DictCursor)

#2.发送指令(不要用字符串格式化去做SQL的拼接,因为存在安全隐患 SQL注入)
sql = "insert into admin(username,password,mobile) values(%s,%s,%s)"
cursor.execute(sql,["张三","121","1112121112"])
conn.commit()

#3.关闭
cursor.close()
conn.close()
2️⃣查询数据
# -*- coding: utf-8 -*-
# @Time : 2024-03-05 0:07
import pymysql
from pymysql import cursors

# 1.连接MySQL
conn = pymysql.connect(host="127.0.0.1", port=3306, user='root', passwd="123456", charset='utf8', database='unicom')
cursor = conn.cursor(cursor=pymysql.cursors.DictCursor)

# 2.执行查询的指令
cursor.execute("select * from admin")
data_list = cursor.fetchall()
print(data_list)

# 3.关闭连接
cursor.close()
conn.close()

# -*- coding: utf-8 -*-
# @Time : 2024-03-05 0:07
import pymysql
from pymysql import cursors

# 1.连接MySQL
conn = pymysql.connect(host="127.0.0.1", port=3306, user='root', passwd="123456", charset='utf8', database='unicom')
cursor = conn.cursor(cursor=pymysql.cursors.DictCursor)

# 2.执行查询的指令
cursor.execute("select * from admin where id>%s",[2,])
#获取符合条件的所有数据,得到的是[字典,字典,...]
data_list = cursor.fetchall()
for row_dict in data_list:
    print(data_list)

# 3.关闭连接
cursor.close()
conn.close()

# -*- coding: utf-8 -*-
# @Time : 2024-03-05 0:07
import pymysql
from pymysql import cursors

# 1.连接MySQL
conn = pymysql.connect(host="127.0.0.1", port=3306, user='root', passwd="123456", charset='utf8', database='unicom')
cursor = conn.cursor(cursor=pymysql.cursors.DictCursor)

# 2.执行查询的指令
cursor.execute("select * from admin where id>%s",[2,])

#获取符合条件的第一条数据,得到的是字典
res = cursor.fetchone()
print(res)

# 3.关闭连接
cursor.close()
conn.close()

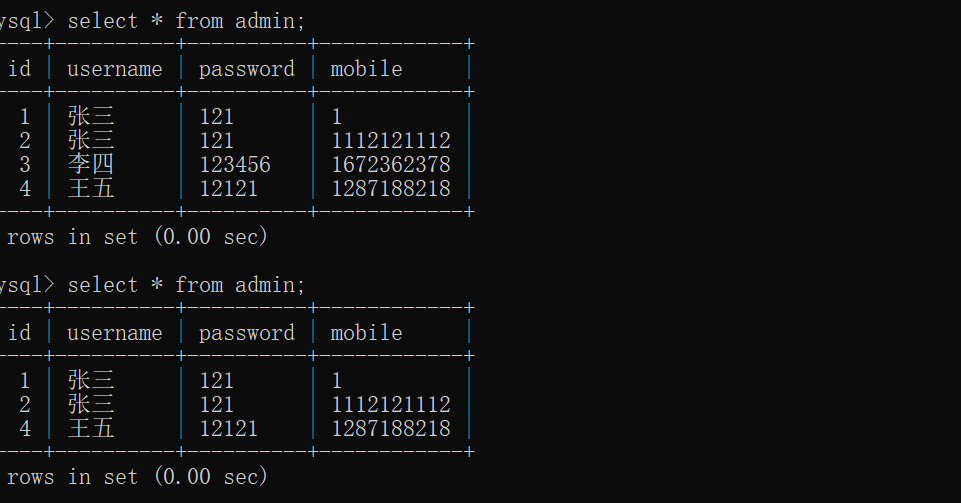
3️⃣删除数据
# -*- coding: utf-8 -*-
# @Time : 2024-03-05 0:17
import pymysql
from pymysql import cursors

# 1.连接MySQL
conn = pymysql.connect(host="127.0.0.1", port=3306, user='root', passwd="123456", charset='utf8', database='unicom')
cursor = conn.cursor(cursor=pymysql.cursors.DictCursor)

# 2.执行查询的指令
cursor.execute("delete from admin where id=%s",[3,])
conn.commit()


# 3.关闭连接
cursor.close()
conn.close()
4️⃣修改数据
# -*- coding: utf-8 -*-
# @Time : 2024-03-05 0:21
import pymysql
from pymysql import cursors

# 1.连接MySQL
conn = pymysql.connect(host="127.0.0.1", port=3306, user='root', passwd="123456", charset='utf8', database='unicom')
cursor = conn.cursor(cursor=pymysql.cursors.DictCursor)

# 2.执行查询的指令
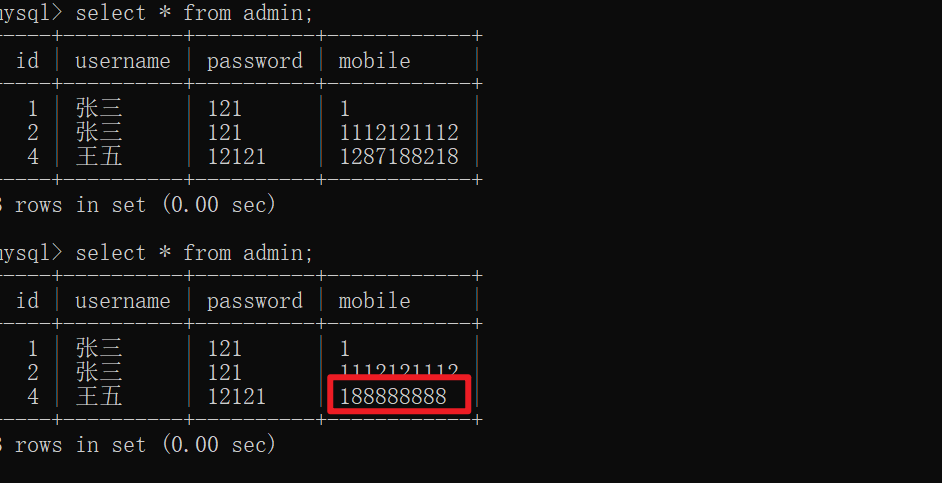
cursor.execute("update admin set mobile=%s where id=%s",["188888888",4,])
conn.commit()


# 3.关闭连接
cursor.close()
conn.close()
注意:
- 在进行新增、删除、修改时,一定要记得commit,不然数据库没有数据。
conn.commit()
-
在查询时,不需要commit,要执行fetchall/fetchone
在处理数据库查询时,
fetchall和fetchone函数是两种常用的方法来从数据库中检索数据。它们通常与SQL查询执行后返回的结果对象一起使用。这里是一个简单的概述:-
fetchone()方法: 它检索结果集的下一行,并将该行作为序列或
None返回。如果没有更多的行可用,则返回None。这个方法适合于你只期望返回单行数据的场景,例如根据主键查询一条记录。 -
fetchall()方法: 它检索所有(剩余的)行并返回一个序列。如果没有更多的行可用,则返回一个空序列。这个方法适合于当你需要处理查询结果中的多行数据时。
两种方法的选择取决于具体需求。如果只需要从查询结果中获取一条记录,
fetchone()是一个更合适的选择,因为它只会加载一行数据到内存中。而当你需要处理查询结果中的多条数据时,fetchall()会更加适用,但要注意这可能会导致大量数据被加载到内存中,尤其是当结果集非常大时。 -
#第一条数据 字典 无数据时为空列表
v1 = cursor.fetchone()

#所有数据 列表套字典 无数据时是None
v1 = cursor.fetchall()
- 对于SQL语句不要用Python的字符串格式化进行拼接(会被SQL注入),一定要用execute+参数
cursor.execute(".%s..... %s",["xxx","yyy"])
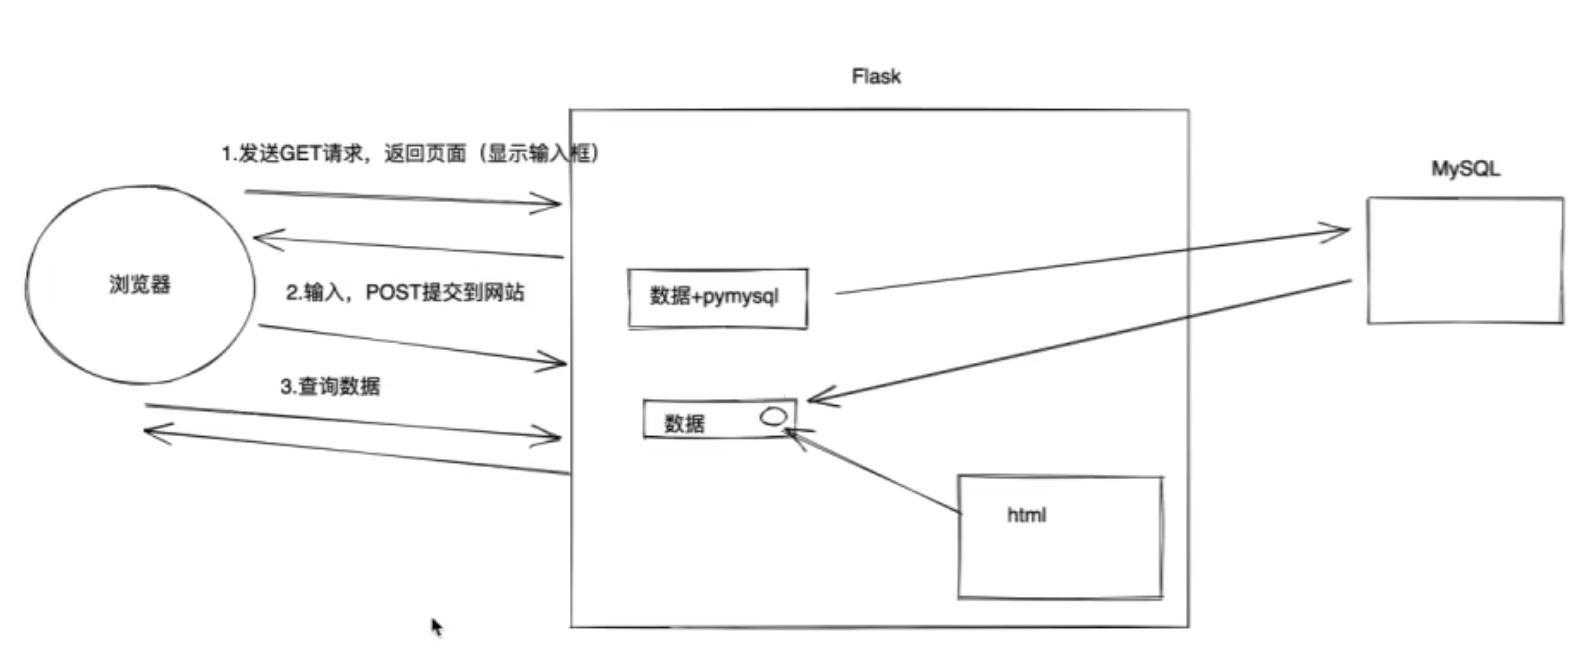
②案例:Flask + 前端 + MySQL整合
# -*- coding: utf-8 -*-
# @Time : 2024-03-05 14:44
from flask import Flask, render_template, request
import pymysql
from pymysql import cursors

app = Flask(__name__)


@app.route("/add/user",methods=["GET","POST"])
def add_user():
    if request.method == "GET":
        return render_template("add_user.html")
    print(request.form)

    username = request.form.get("user")
    password = request.form.get("user")
    mobile = request.form.get("mobile")

    # #1.连接MySQL
    # conn = pymysql.connect(host="127.0.0.1",port=3306,user='root',passwd="123456",charset='utf8',database='unicom')
    # cursor = conn.cursor(cursor=pymysql.cursors.DictCursor)
    # #2.执行SQL
    # sql = "insert into admin(username,pwd,mobile) value(%s,%s,%s)"
    # cursor.execute(sql,["王五","121","143223412"])
    #
    # conn.commit()
    # #3.关闭连接
    # cursor.close()
    # conn.close()

    return "数据提交成功!"

@app.route("/show/user",methods=["GET","POST"])
def show_user():
    # 1.连接MySQL
    conn = pymysql.connect(host="127.0.0.1", port=3306, user='root', passwd="123456", charset='utf8', database='unicom')
    cursor = conn.cursor(cursor=pymysql.cursors.DictCursor)

    # 2.执行查询的指令
    sql = "select * from admin"
    cursor.execute(sql)
    # 获取符合条件的第一条数据
    data_list = cursor.fetchall()

    # 3.关闭连接
    cursor.close()
    conn.close()

    print(data_list)

    return render_template('show_user.html',data_list=data_list)


if __name__ == '__main__':
    app.run()
使用Bootstap样式之前:

使用BootStrap样式之后:
<!DOCTYPE html>
<html lang="en">
<head>
    <meta charset="UTF-8">
    <title>Title</title>
    <link rel="stylesheet" href="/static/plugins/bootstrap-3.4.1/css/bootstrap.css">
</head>
<body>
<div class="container">
    <h1>用户列表</h1>
    <table class="table table-bordered">
        <thead>
        <tr>
            <th>ID</th>
            <th>姓名</th>
            <th>密码</th>
            <th>手机号</th>
        </tr>
        </thead>
        <tbody>
        {% for item in data_list %}
        <tr>
            <td>{{item.id}}</td>
            <td>{{item.username}}</td>
            <td>{{item.password}}</td>
            <td>{{item.mobile}}</td>
        </tr>
        {% endfor %}
        </tbody>
    </table>
</div>
</body>
</html>

4、综合案例
综合案例:简单的“博客管理系统”
①概览
功能需求:
- 显示博文列表
- 创建新博文
- 查看博文详细内容
技术栈:
- 前端: HTML, CSS (利用Bootstrap), JavaScript (使用jQuery)
- 后端: Flask (Python)
- 数据库: MySQL
②数据库设置
首先,你需要在MySQL中创建一个数据库并设置一个表用于存储博文信息。
CREATE DATABASE blog_db;
USE blog_db;

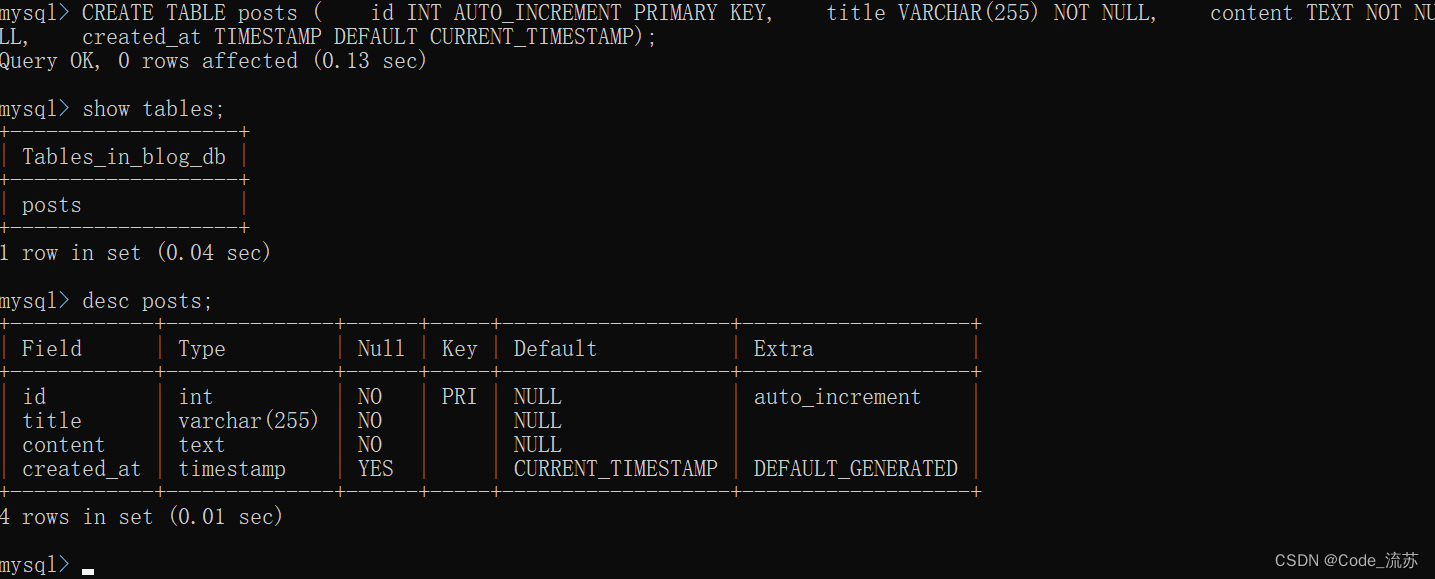
之后在blog_db数据库中创建posts表格:
CREATE TABLE posts (
    id INT AUTO_INCREMENT PRIMARY KEY,
    title VARCHAR(255) NOT NULL,
    content TEXT NOT NULL,
    created_at TIMESTAMP DEFAULT CURRENT_TIMESTAMP
);
③Flask后端代码
在开始之前,确保你已经安装了所有必要的Python包,包括flask和flask_sqlalchemy,以及pymysql。
然后,设置Flask来处理前端的请求并与数据库交互。
注意:记得替换Flask应用中数据库连接字符串中的
username和password为你自己的MySQL用户名和密码。
from flask import Flask, request, jsonify, render_template
from flask_sqlalchemy import SQLAlchemy
import os

app = Flask(__name__)
app.config['SQLALCHEMY_DATABASE_URI'] = 'mysql+pymysql://username:password@localhost/blog_db'
app.config['SQLALCHEMY_TRACK_MODIFICATIONS'] = False
db = SQLAlchemy(app)

class Post(db.Model):
    id = db.Column(db.Integer, primary_key=True)
    title = db.Column(db.String(255), nullable=False)
    content = db.Column(db.Text, nullable=False)
    created_at = db.Column(db.DateTime, server_default=db.func.now())

@app.route('/')
def index():
    posts = Post.query.all()
    return render_template('index.html', posts=posts)

@app.route('/post/<int:post_id>')
def post(post_id):
    post = Post.query.get_or_404(post_id)
    return render_template('post.html', post=post)

@app.route('/create', methods=['POST'])
def create_post():
    title = request.form['title']
    content = request.form['content']
    post = Post(title=title, content=content)
    db.session.add(post)
    db.session.commit()
    return jsonify({'message': 'Post created successfully'}), 201

if __name__ == '__main__':
    with app.app_context():
        db.create_all()
    app.run(debug=True)
④HTML和CSS
你需要为应用程序创建基础的HTML模板,并使用Bootstrap来美化它。
index.html (显示博文列表和创建新博文的表单)
<!DOCTYPE html>
<html lang="en">
<head>
    <meta charset="UTF-8">
    <meta name="viewport" content="width=device-width, initial-scale=1.0">
    <title>Blog</title>
    <link href="../static/plugins/bootstrap-3.4.1/css/bootstrap.min.css" rel="stylesheet">
    <style>
        .post {
            border-bottom: 1px solid #eee;
            padding-bottom: 20px;
            margin-bottom: 20px;
        }

        .navbar-custom {
            background-color: #333;
            color: #fff;
        }

        footer {
            background-color: #333;
            color: #fff;
            padding: 10px 0;
            text-align: center;
        }

        html, body {
            height: 100%;
            margin: 0;
        }

        body {
            display: flex;
            flex-direction: column;
        }

        .container {
            flex: 1;
        }

        footer {
            background-color: #333;
            color: #fff;
            padding: 10px 0;
            text-align: center;
        }

    </style>
</head>
<body>
<nav class="navbar navbar-inverse navbar-custom">
    <div class="container-fluid">
        <div class="navbar-header">
            <a class="navbar-brand" href="#">My Blog</a>
        </div>
        <ul class="nav navbar-nav">
            <li class="active"><a href="#">Home</a></li>
            <li><a href="#">About</a></li>
            <li><a href="#">Contact</a></li>
        </ul>
    </div>
</nav>
<div class="container">
    <h1>Blog Posts</h1>
    <div id="posts">
        {% for post in posts %}
        <div class="post">
            <h2><a href="/post/{{ post.id }}">{{ post.title }}</a></h2>
            <p>{{ post.content[:150] }}...</p>
        </div>
        {% endfor %}
    </div>
    <h2>Create a Post</h2>
    <form id="createPost">
        <div class="mb-3">
            <label for="title" class="form-label">Title</label>
            <input type="text" class="form-control" id="title" name="title" placeholder="Enter title">
        </div>
        <div class="mb-3">
            <label for="content" class="form-label">Content</label>
            <textarea class="form-control" id="content" name="content" rows="3"
                      placeholder="Write your post content here..."></textarea>
        </div>
        <button type="submit" class="btn btn-primary">Submit</button>
    </form>
</div>
<footer>
    <div class="container">
        <p>© 2024 流苏的Blog. All rights reserved.</p>
    </div>
</footer>
<script src="../static/js/jquery.min.js"></script>
<script src="script.js"></script>
</body>
</html>
post.html (查看博文详细内容)
<!DOCTYPE html>
<html lang="en">
<head>
    <meta charset="UTF-8">
    <meta name="viewport" content="width=device-width, initial-scale=1.0">
    <title>Blog Post</title>
    <link href="https://cdn.jsdelivr.net/npm/bootstrap@5.1.0/dist/css/bootstrap.min.css" rel="stylesheet">
</head>
<body>
    <div class="container">
        <h1>{{ post.title }}</h1>
        <p>{{ post.content }}</p>
        <a href="/" class="btn btn-primary">Go Back</a>
    </div>
</body>
</html>
⑤JavaScript和jQuery
接下来,你需要使用JavaScript和jQuery来处理前端的表单提交,异步地发送数据到后端而不需要刷新页面。
script.js
$(document).ready(function() {
    $('#createPost').submit(function(e) {
        e.preventDefault();

        var title = $('#title').val();
        var content = $('#content').val();

        $.ajax({
            type: "POST",
            url: "/create",
            data: {title: title, content: content},
            success: function(response) {
                alert('Post created successfully!');
                window.location.reload();
            },
            error: function(response) {
                alert('Failed to create post.');
            }
        });
    });
});
这段代码监听表单的submit事件。当表单提交时,它会阻止默认的提交行为,收集表单中的数据,然后使用$.ajax向后端发送一个POST请求。请求成功后,它会提示用户并刷新页面以显示新的博文。
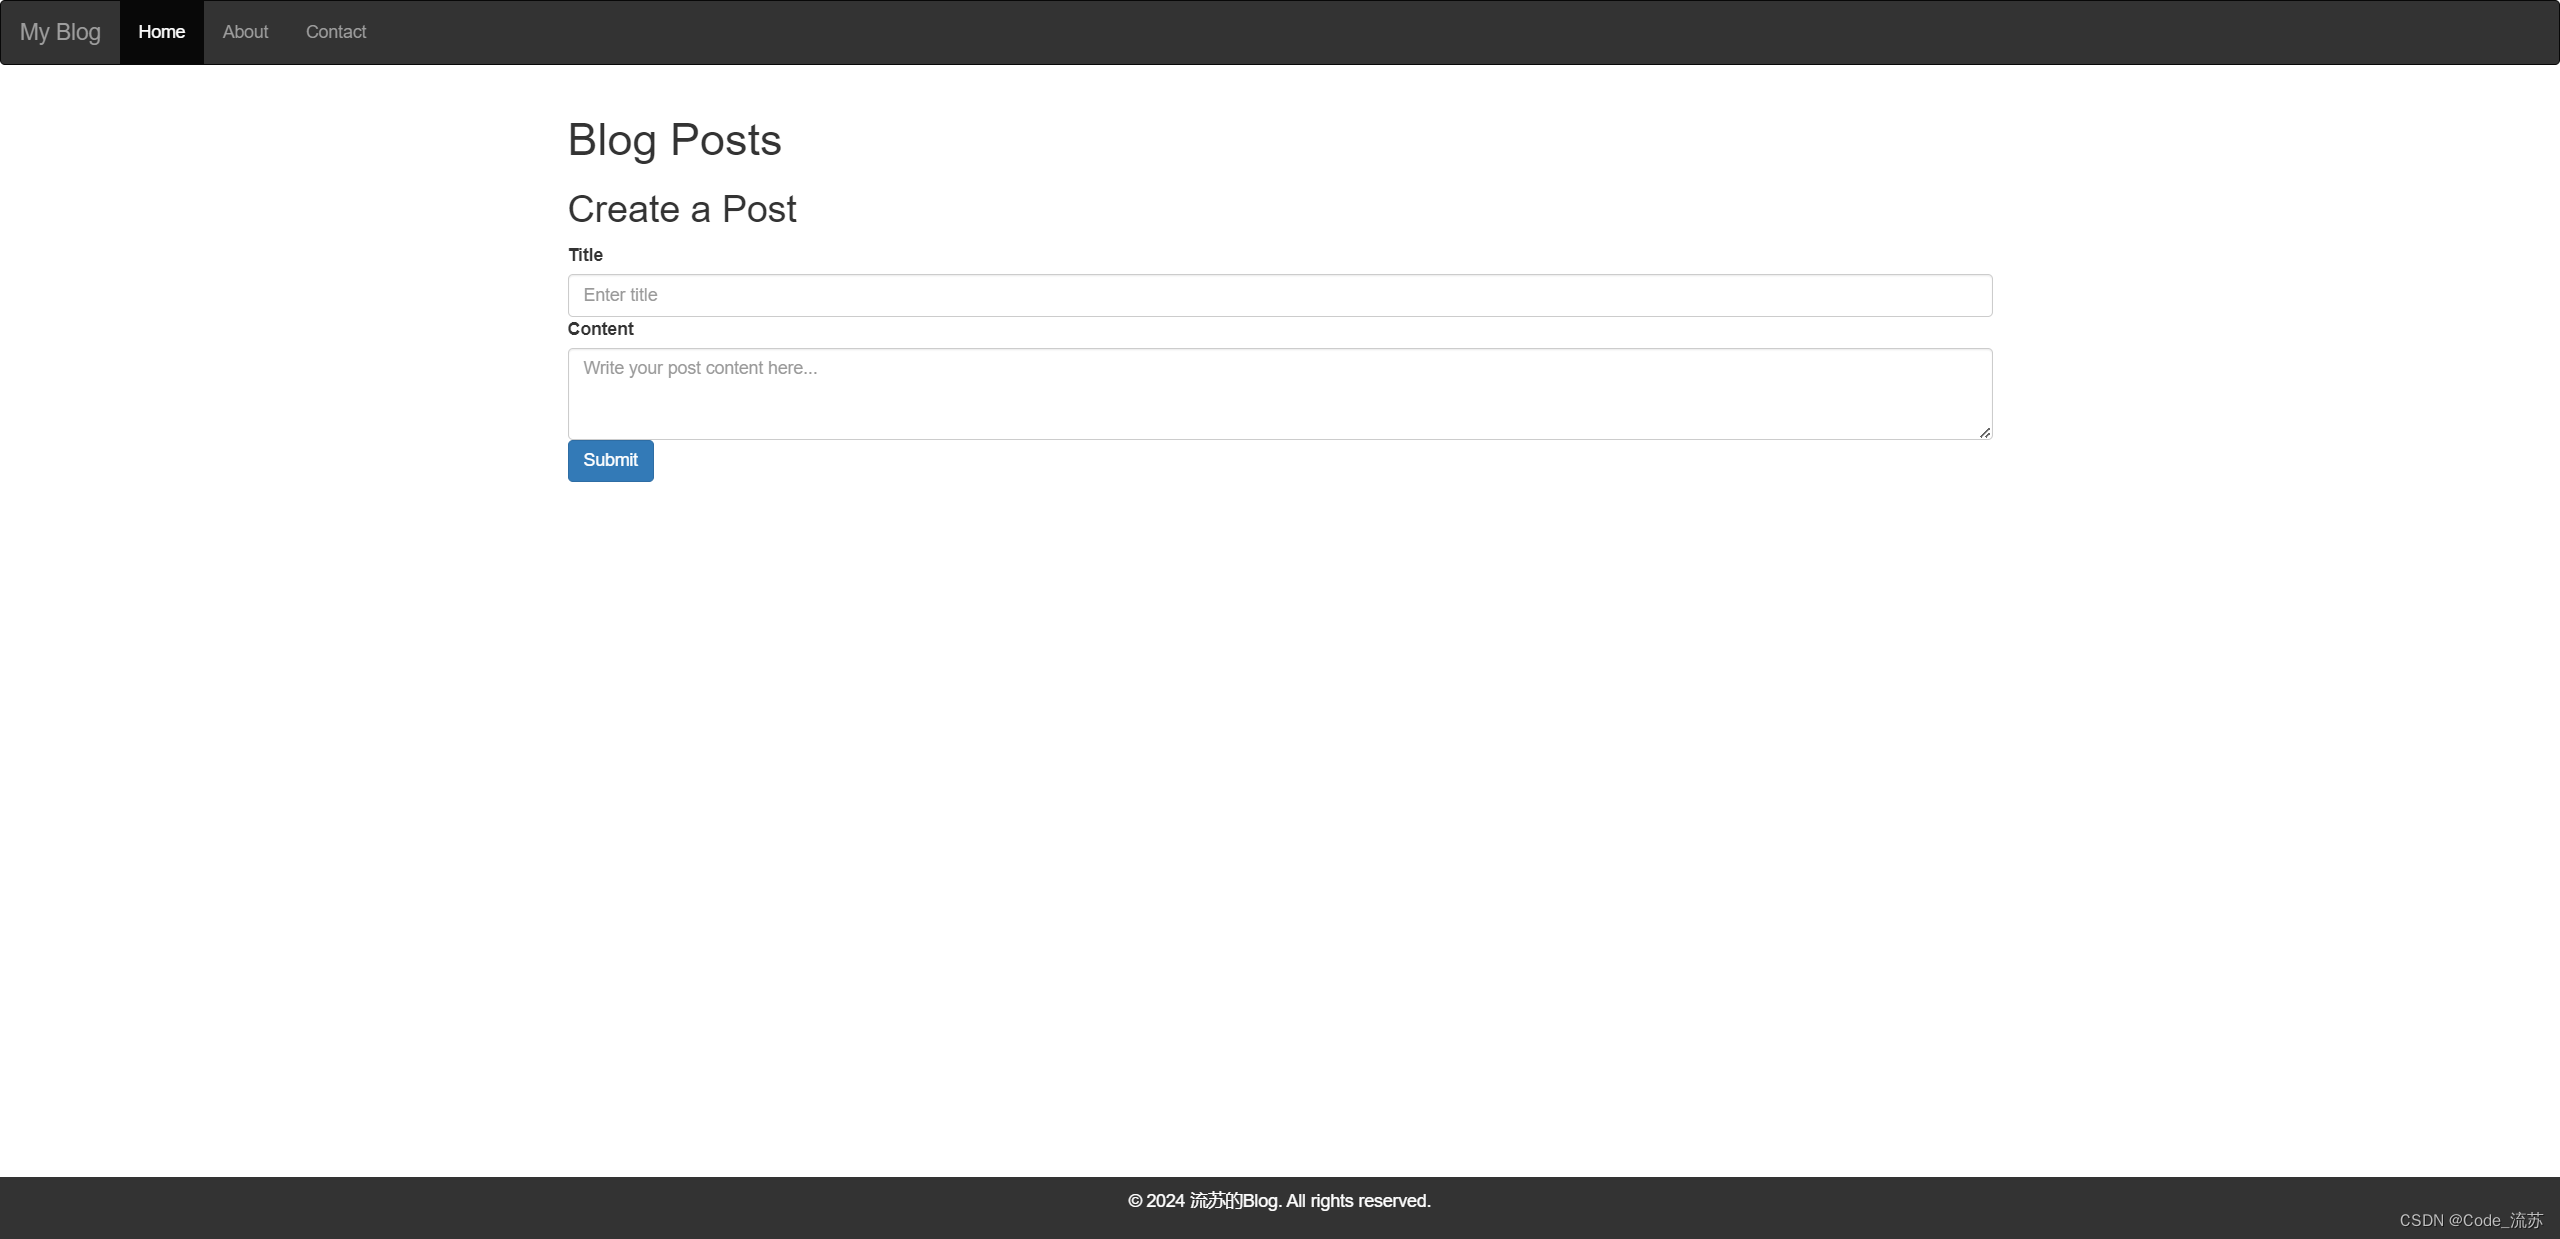
这个示例涵盖了使用HTML、CSS、JavaScript、Bootstrap、jQuery、Flask以及MySQL创建一个简单的博客管理系统的基本步骤。以上代码只大概写出了一个框架,你可能需要进一步调整和改进代码,比如增加用户认证、博文编辑和删除功能,以及改善前端界面和用户体验。
很感谢你能看到这里,如有相关疑问,还请下方评论留言。
Code_流苏(CSDN)(一个喜欢古诗词和编程的Coder😊)
如果对大家有帮助的话,希望大家能多多点赞+关注!这样我的动力会更足!





![BUUCTF-MISC-[GUET-CTF2019]soul sipse1](https://img-blog.csdnimg.cn/direct/aec076e7092e40d5ba769c95c2186337.png)

