1.目标
A. 能够知道setState()更新数据是异步的
B. 能够知道JSX语法的转化过程
C. 能够说出React组件的更新机制
D. 能够对组件进行性能优化
E. 能够说出虚拟DOM和Diff算法
2.目录
A. setState()的说明
B. JSX语法的转化过程
C. 组件更新机制
D. 组件性能优化
E. 虚拟DOM和Diff算法
3.setState()的说明
3.1 更新数据
A. setState() 是异步更新数据的
B. 注意:使用该语法时,后面的setState()不能依赖于前面的setState()
C. 可以多次调用setState(),只会触发一次重新渲染
1setState.js
import React from "react";

class App31 extends React.Component {
  state = {
    count: 0,
  };
  handleClick = () => {
    //异步更新操作
    this.setState({
      count: this.state.count + 1,
    });
    console.log("count1:" + this.state.count);
    this.setState({
      count: this.state.count + 1,
    });
    console.log("count2:" + this.state.count);
  };
  render() {
    //数据更新了就会调用一次render
    //但是,如果数据变化一样的,render只调用一次
    console.log("render");
    return (
      <div>
        <h1>计数器:{this.state.count}</h1>
        <button onClick={this.handleClick}>点击</button>
      </div>
    );
  }
}

export default App31;
index,js
import App31 from "./1setState";
ReactDOM.createRoot(document.getElementById("root")).render(<App31></App31>);
3.2 推荐语法
A. 推荐:使用setState((state,props)=>{})语法
B. 参数state:表示最新的state
C. 参数props:表示最新的props
import React from "react";

class App31 extends React.Component {
  state = {
    count: 1,
  };
  handleClick = () => {
    // //异步更新操作
    // this.setState({
    //   count: this.state.count + 1,
    // });
    // console.log("count1:" + this.state.count);
    // this.setState({
    //   count: this.state.count + 1,
    // });
    // console.log("count2:" + this.state.count);

    //推荐语法
    //注意:这种语法也是异步更新state的,但是会记录最新的state的数据,所以在页面显示为3
    this.setState((state, props) => {
      console.log("state1:", state, "props1:", props);
      return {
        count: state.count + 1,
      };
    });
    console.log("count:", this.state.count); // 1

    this.setState((state, props) => {
      console.log("state2:", state, "props2:", props);
      return {
        count: state.count + 1,
      };
    });
    console.log("count:", this.state.count); // 1
  };
  render() {
    //数据更新了就会调用一次render
    //但是,如果数据变化一样的,render只调用一次
    console.log("render");
    return (
      <div>
        <h1>计数器:{this.state.count}</h1>
        <button onClick={this.handleClick}>点击</button>
      </div>
    );
  }
}

export default App31;
3.3 第二个参数
A. 场景:在状态更新(页面完成重新渲染)后立即执行某个操作
B. 语法:setState(update [,callback])
import React from "react";

class App31 extends React.Component {
  state = {
    count: 1,
  };
  handleClick = () => {
    // //异步更新操作
    // this.setState({
    //   count: this.state.count + 1,
    // });
    // console.log("count1:" + this.state.count);
    // this.setState({
    //   count: this.state.count + 1,
    // });
    // console.log("count2:" + this.state.count);
    //推荐语法
    //注意:这种语法也是异步更新state的,但是会记录最新的state的数据,所以在页面显示为3
    // this.setState((state, props) => {
    //   console.log("state1:", state, "props1:", props);
    //   return {
    //     count: state.count + 1,
    //   };
    // });
    // console.log("count:", this.state.count); // 1
    // this.setState((state, props) => {
    //   console.log("state2:", state, "props2:", props);
    //   return {
    //     count: state.count + 1,
    //   };
    // });
    // console.log("count:", this.state.count); // 1

    // 第二个参数,在状态更新(页面完成重新渲染)后立即执行某个操作
    this.setState(
      (state, props) => {
        return {
          count: state.count + 1,
        };
      },
      () => {
        console.log("状态更新完成,当前count值:", this.state.count);
      }
    );
  };
  render() {
    //数据更新了就会调用一次render
    //但是,如果数据变化一样的,render只调用一次
    console.log("render");
    return (
      <div>
        <h1>计数器:{this.state.count}</h1>
        <button onClick={this.handleClick}>点击</button>
      </div>
    );
  }
}

export default App31;
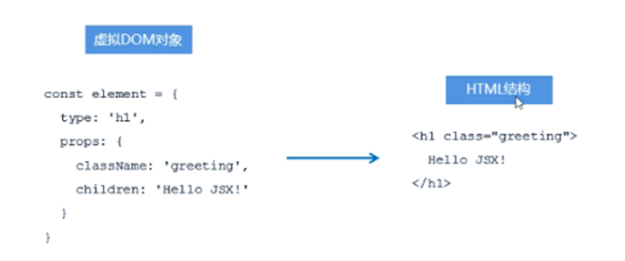
4.JSX语法的转化过程
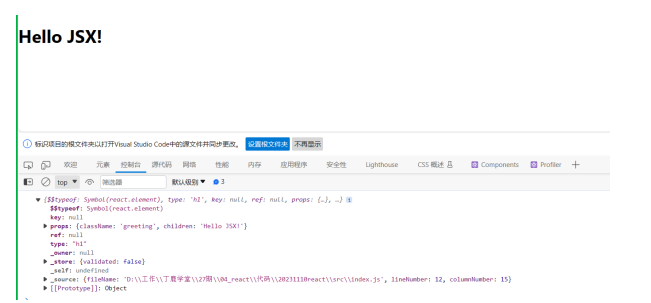
A. JSX仅仅是createElement()方法的语法糖(简化语法)
B. JSX语法被@babel/preset-react插件编译为createElement()方法
C. React元素:是一个对象,用来描述你希望的屏幕上看到的内容

const element=<h1 className='greeting'>Hello JSX!</h1>
// const element1=React.createElement('h1',{
// className:'greeting'
// },'Hello JSX!!!')
console.log(element);
// console.log(element1);
ReactDOM.render(element,document.getElementById('root'))
效果图:
5.组件更新机制
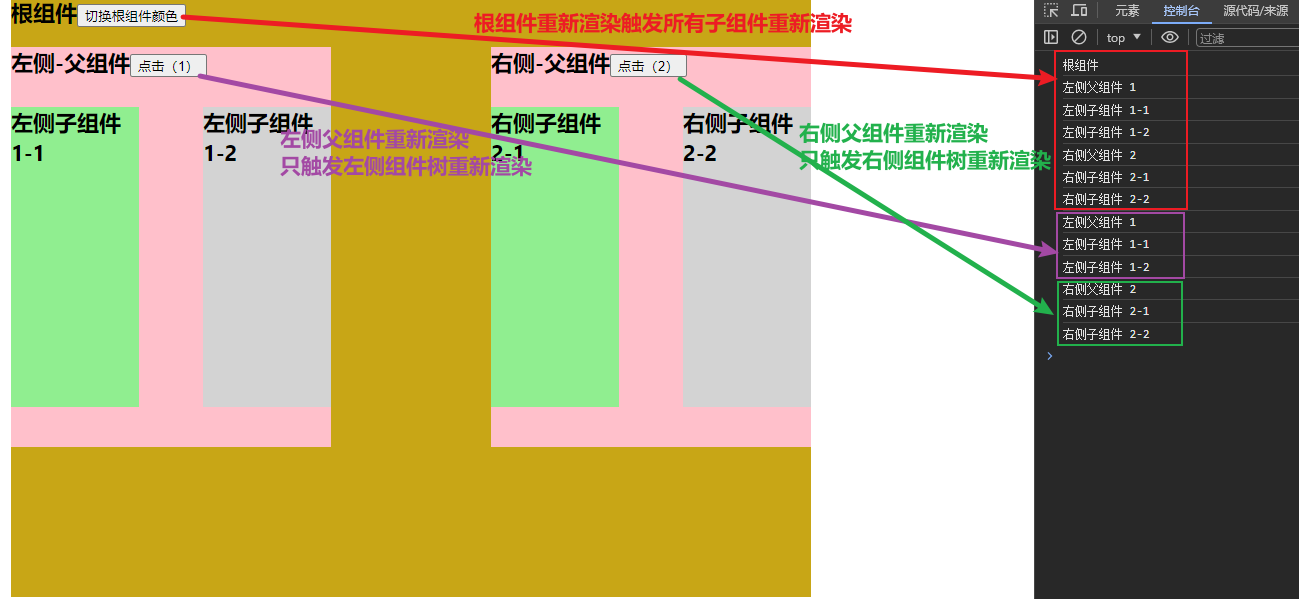
A. setState()的两个作用:1.修改state 2.更新组件(UI)
B. 过程:父组件重新渲染时,也会重新渲染子组件。但只会渲染当前组件子树(当前组件及其所有子组件)
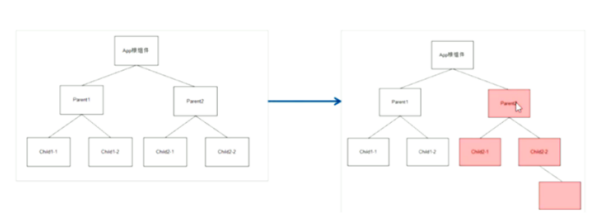
首次加载时渲染
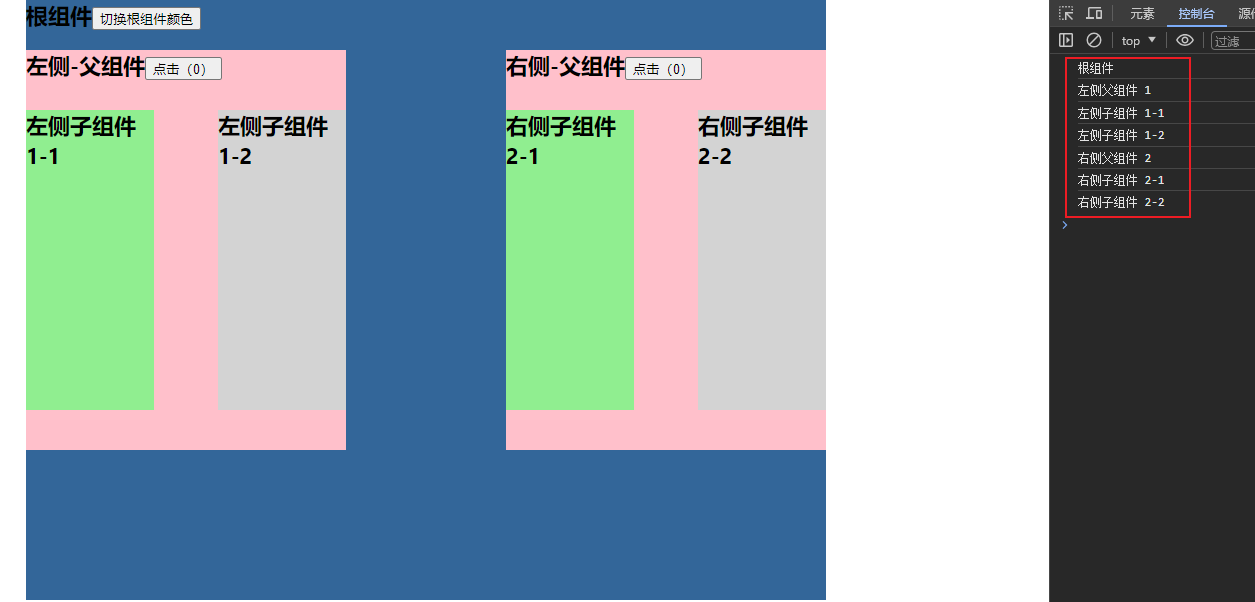
点击根组件会触发所有组件,点击左侧父组件1时会触发局部更新,只更新当前组件与子组件,不会触发父组件
2comUpdate.js
import React from "react";
import ReactDOM from "react-dom/client";
import "./comUpdate.css";

class App50 extends React.Component {
  state = {
    bgColor: "#369",
  };
  getBgColor = () => {
    return Math.floor(Math.random() * 256);
  };
  toggleBgColor = () => {
    this.setState({
      bgColor: `rgb(${this.getBgColor()},${this.getBgColor()},${this.getBgColor()})`,
    });
  };
  render() {
    console.log("根组件");
    return (
      <div
        className="rootParent"
        style={{ backgroundColor: this.state.bgColor }}
      >
        根组件
        <button onClick={this.toggleBgColor}>切换根组件颜色</button>
        <div className="app-wrapper">
          <Parent1></Parent1>
          <Parent2></Parent2>
        </div>
      </div>
    );
  }
}
// 左边
class Parent1 extends React.Component {
  state = {
    count: 0,
  };
  handleClick = (state) => {
    this.setState((state) => {
      return {
        count: state.count + 1,
      };
    });
  };
  render() {
    console.log("左侧父组件 1");
    return (
      <div className="Parent1">
        <span>左侧-父组件</span>
        <button onClick={this.handleClick}>点击({this.state.count})</button>
        <div className="parentWrapper1">
          <Child1></Child1>
          <Child2></Child2>
        </div>
      </div>
    );
  }
}
class Child1 extends React.Component {
  render() {
    console.log("左侧子组件 1-1");
    return <div className="child1">左侧子组件1-1</div>;
  }
}
class Child2 extends React.Component {
  render() {
    console.log("左侧子组件 1-2");
    return <div className="child2">左侧子组件1-2</div>;
  }
}

// 右边
class Parent2 extends React.Component {
  state = {
    count: 0,
  };
  handleClick = (state) => {
    this.setState((state) => {
      return {
        count: state.count + 2,
      };
    });
  };
  render() {
    console.log("右侧父组件 2");
    return (
      <div className="Parent1">
        <span>右侧-父组件</span>
        <button onClick={this.handleClick}>点击({this.state.count})</button>
        <div className="parentWrapper1">
          <Child3></Child3>
          <Child4></Child4>
        </div>
      </div>
    );
  }
}
class Child3 extends React.Component {
  render() {
    console.log("右侧子组件 2-1");
    return <div className="child1">右侧子组件2-1</div>;
  }
}
class Child4 extends React.Component {
  render() {
    console.log("右侧子组件 2-2");
    return <div className="child2">右侧子组件2-2</div>;
  }
}
export default App50;
index.js
import App50 from "./2comUpdate";
ReactDOM.createRoot(document.getElementById("root")).render(<App50></App50>);
comUpdate.css
.rootParent {
  width: 800px;
  height: 600px;
  margin: 0 auto;
  font-weight: 700;
  font-size: 22px;
}

.app-wrapper {
  display: flex;
  justify-content: space-between;
  margin-top: 20px;
}

.Parent1 {
  width: 40%;
  height: 400px;
  background-color: pink;
}

.parentWrapper1 {
  display: flex;
  justify-content: space-between;
  margin-top: 30px;
}

.child1 {
  width: 40%;
  height: 300px;
  background-color: lightgreen;
}

.child2 {
  width: 40%;
  height: 300px;
  background-color: lightgrey;
}

.Parent2 {
  width: 40%;
  height: 400px;
  background-color: salmon;
}
6.组件性能优化
6.1 减轻state
A. 减轻state:只存储跟组件渲染相关的数据(比如:count/列表数据/loading等)
B. 注意:不用做渲染的数据不要放在state中,比如定时器id等
C. 对于这种需要在多个方法中用到的数据,应该放在this中
6.2 避免不要的重新渲染
A. 组件更新机制:父组件更新会引起子组件也被更新,这种思路很清晰
B. 问题:子组件没有任何变化时也会重新渲染
C. 如何避免不必要的重新渲染吗?
D. 解决方案:使用钩子函数shouldComponentUpdate(nextProps,nextState)
E. 作用:通过返回值决定该组件是否重新渲染,返回true表示重新渲染,false表示不重新渲染
F. 触发时机:更新阶段的钩子函数,组件重新渲染前执行(shouldComponentUpdate->render)
3performanceOptimize.js
import React from "react";

class App62 extends React.Component {
  state = {
    count: 0,
  };
  handleClick = () => {
    this.setState((state) => {
      return {
        count: state.count + 1,
      };
    });
  };
  //钩子函数
  shouldComponentUpdate(nextProps, nextState) {
    //返回false,阻止组件重新渲染
    // return false;
    //最新的状态
    console.log("最新的state:", nextState);
    //更新前的状态
    console.log("this.state:", this.state);
    return true;
  }
  render() {
    console.log("组件更新了");
    return (
      <div>
        <h1>count:{this.state.count}</h1>
        <button onClick={this.handleClick}>点击</button>
      </div>
    );
  }
}

export default App62;
index.js
import App62 from "./3performanceOptimize";
ReactDOM.createRoot(document.getElementById("root")).render(<App62></App62>);
6.2.1 案例:随机数(nextState)
4App621Random.js
import React from "react";

class App621Random extends React.Component {
  state = {
    number: 0,
  };
  getRandom = () => {
    this.setState((state) => {
      return {
        number: Math.floor(Math.random() * 3),
      };
    });
  };
  //因为两次生成的随机数可能相同,如果相同,此时,不需要重新渲染
  shouldComponentUpdate(nextProps, nextState) {
    if (nextState.number === this.state.number) {
      return false;
    }
    return true;
  }
  render() {
    console.log("触发渲染");
    return (
      <div>
        <h1>随机数:{this.state.number}</h1>
        <button onClick={this.getRandom}>获取随机数</button>
      </div>
    );
  }
}

export default App621Random;
index.js
import App621Random from "./4App621Random";
ReactDOM.createRoot(document.getElementById("root")).render(
  <App621Random></App621Random>
);
6.2.2 案例:随机数(NextProps)
4App621Random.js
import React from "react";

class App621Random extends React.Component {
  state = {
    number: 0,
  };
  getRandom = () => {
    this.setState((state) => {
      return {
        number: Math.floor(Math.random() * 3),
      };
    });
  };
  //因为两次生成的随机数可能相同,如果相同,此时,不需要重新渲染
  // shouldComponentUpdate(nextProps, nextState) {
  //   if (nextState.number === this.state.number) {
  //     return false;
  //   }
  //   return true;
  // }
  render() {
    console.log("触发父组件的render");
    return (
      <div>
        {/* <h1>随机数:{this.state.number}</h1> */}
        <ChildNumber number={this.state.number}></ChildNumber>
        <button onClick={this.getRandom}>获取随机数</button>
      </div>
    );
  }
}
class ChildNumber extends React.Component {
  shouldComponentUpdate(nextProps, nextState) {
    console.log("最新props:", nextProps, ",当前props:", this.props);
    return nextProps.number !== this.props.number;
  }
  render() {
    console.log("子组件中的render");
    return <h1>子组件的随机数:{this.props.number}</h1>;
  }
}

export default App621Random;
index.js
import App621Random from "./4App621Random";
ReactDOM.createRoot(document.getElementById("root")).render(
  <App621Random></App621Random>
);
6.3 纯组件
A. 纯组件:PureComponent与React.Component功能相似
B. 区别:PureComponent内部自动实现了shouldComponentUpdate钩子,无需手动比较
C. 原理:纯组件内部通过对比前后两次props和state的值,来决定是否重新渲染组件
5pure.js
import React from "react";

class PureApp extends React.PureComponent {
  state = {
    number: 0,
  };
  getRandom = () => {
    this.setState((state) => {
      return {
        number: Math.floor(Math.random() * 2),
      };
    });
  };
  render() {
    console.log("父组件render");
    return (
      <div>
        <h1>父组件随机数:{this.state.number}</h1>
        <ChildPure number={this.state.number}></ChildPure>
        <button onClick={this.getRandom}>获取随机数</button>
      </div>
    );
  }
}

class ChildPure extends React.PureComponent {
  render() {
    console.log("子组件render");
    return <h1>子组件随机数:{this.props.number}</h1>;
  }
}
export default PureApp;
index.js
import PureApp from "./5pure";
ReactDOM.createRoot(document.getElementById("root")).render(
  <PureApp></PureApp>
);
6.3.1 浅层对比
A. 说明:纯组件内部的对比是shallow compare(浅层对比)
B. 对于值类型来说:比较两个值是否相同(直接赋值即可,没有坑)
C.对于引用类型来说:只比较对象的引用(地址)是否相同
D.注意:state或props中属性值为引用类型时,应该创建新数据,不要直接修改数据!
shallow.js
import React from "react";

class ShallowRandom extends React.PureComponent {
  state = {
    obj: {
      number: 0,
    },
  };
  getRandom = () => {
    // 错误演示:直接修改原始对象中属性的值
    // const newObj = this.state.obj;
    // newObj.number = Math.floor(Math.random() * 2);
    // this.setState((state) => {
    //   return {
    //     obj: newObj,
    //   };
    // });

    //正确做法:创建新对象
    const newObj = { ...this.state.obj, number: Math.floor(Math.random() * 2) };
    this.setState(() => {
      return {
        obj: newObj,
      };
    });
  };
  render() {
    console.log("父组件render");
    return (
      <div>
        <h1>父组件随机数的值:{this.state.obj.number}</h1>
        <ChildRandom number={this.state.obj.number}></ChildRandom>
        <button onClick={this.getRandom}>重新生成随机数</button>
      </div>
    );
  }
}

class ChildRandom extends React.PureComponent {
  render() {
    console.log("子组件render");
    return <h1>子组件随机数:{this.props.number}</h1>;
  }
}

export default ShallowRandom;
import ShallowRandom from "./6shallow";
ReactDOM.createRoot(document.getElementById("root")).render(
  <ShallowRandom></ShallowRandom>
);
7.虚拟DOM和DIFF算法
A. React更新视图的思路是:只是state变化就重新渲染视图
B. 特点:思路非常清晰
C. 问题:组件中只有一个DOM元素需要更新时,也得把整个组件的内容重新渲染到页面中?不是
D. 理想状态:部分更新,只更新变化的地方
E. 问题:React是如何做到部分更新的?虚拟DOM配合Diff算法
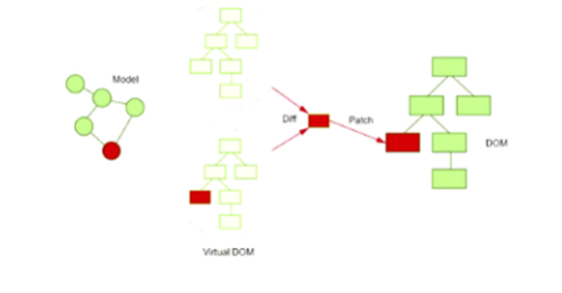
F. 虚拟DOM:本质上就是一个JS对象,用来描述你希望在屏幕上看到的内容(UI)
7.1 执行过程
A. 初次渲染时,React会根据初始state(Model),创建一个虚拟DOM对象(树)。
B. 根据虚拟DOM生成真正的DOM,渲染到页面中
C. 当数据变化后(setState()),重新根据新的数据,创建新的虚拟DOM对象(树)
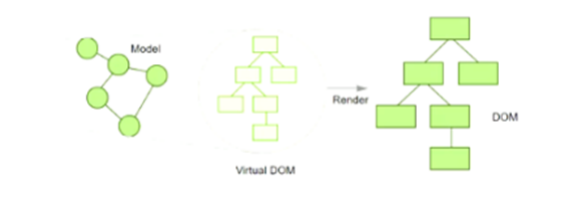
A. 与上一次得到的虚拟DOM对象,使用Diff算法对比(找不同),得到需要更新的内容
B. 最终,React只将变化的内容更新(patch)到DOM中,重新渲染到页面
7.2 代码演示
A. 组件render()调用后,根据状态和JSX结构生成虚拟DOM对象
B. 示例中,只更新P元素的文本节点内容
7.vdom.js
import React from "react";

class Vdom extends React.PureComponent {
  state = {
    number: 0,
  };
  getRandom = () => {
    this.setState(() => {
      return {
        number: Math.floor(Math.random() * 3),
      };
    });
  };
  render() {
    return (
      <div>
        <h1>随机数</h1>
        <h1>{this.state.number}</h1>
        <button onClick={this.getRandom}>重新生成</button>
      </div>
    );
  }
}

export default Vdom;
index.js
import Vdom from "./7vdom";
ReactDOM.createRoot(document.getElementById("root")).render(<Vdom></Vdom>);
8.总结
A. 工作角度:应用第一,原理第二
B. 原理有助于更好的理解React的自身运行机制
C. SetState()异步更新数据
D. 父组件更新导致子组件更新,纯组件提升性能
E. 思路清晰简单为前提,虚拟DOM和Diff保效率
F. 虚拟DOM->state+JSX
G. 虚拟DOM的真正价值从来都不是性能
H. 虚拟DOM使react脱离了浏览器的束缚







![[Flutter]TextButton自定义样式](https://img-blog.csdnimg.cn/direct/9be4fa5a7ede494d8ccf28542ddc61e8.png)
