文章目录
- 1. redux 介绍
- 2. redux 工作流程
- 3. redux 的使用
- 4. redux 完整结构补充
- 5. redux的 异步action
- 6. react-redux库 与 redux库
- 7. react-redux库的 实战
- 8. react-redux的connect 最精简写法
- 9. react-redux的 Provider组件作用
- 10. react-redux 整合UI组件 和 容器组件
- 11. redux的 combineReducers方法
- 12. 纯函数
- 13. redux 开发者工具
1. redux 介绍
redux是一个专门用于做状态管理的JS库(不是react 插件库)。
可以用在react、angular、Vue等项目中,但基本与React配合使用。
作用:集中式管理react应用中多个组件共享的状态。
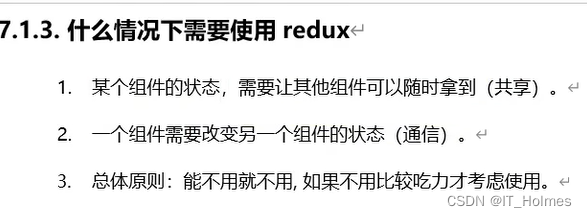
什么情况下,使用redux?
- React的state状态存到了redux中。
2. redux 工作流程
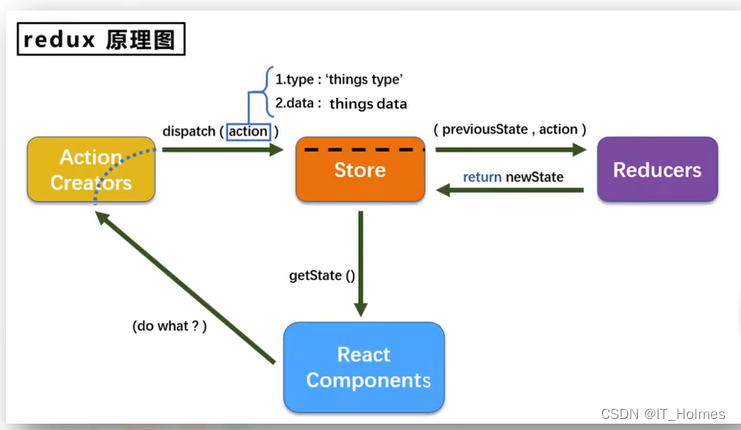
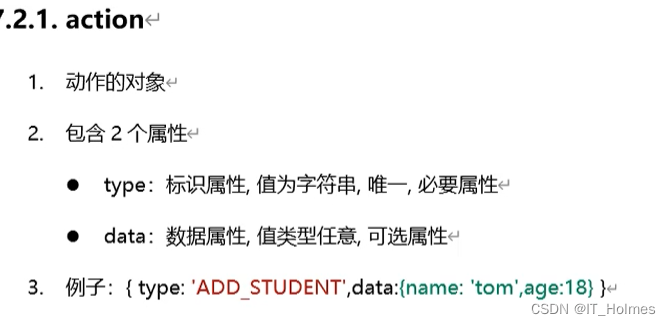
redux的三个核心概念:
action动作的对象。
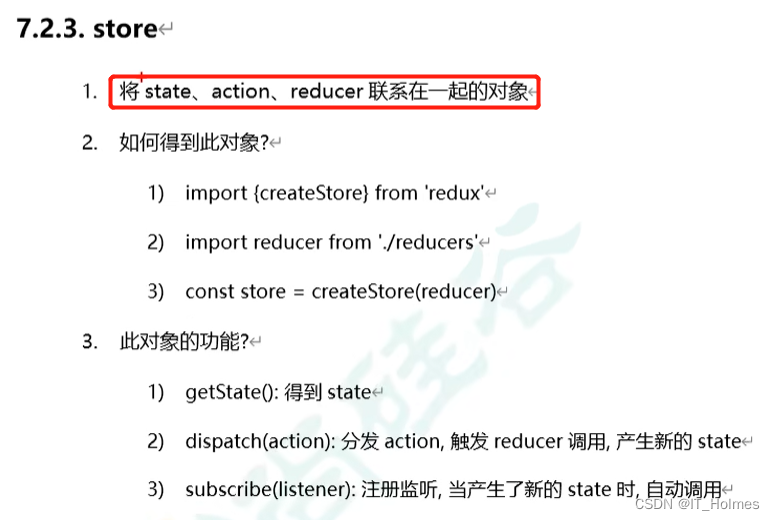
Store将state、action、reducer联系在一起。
reducers负责加工处理state状态里面的数据逻辑等。

3. redux 的使用
1. 安装redux:
yarn add redux
或者
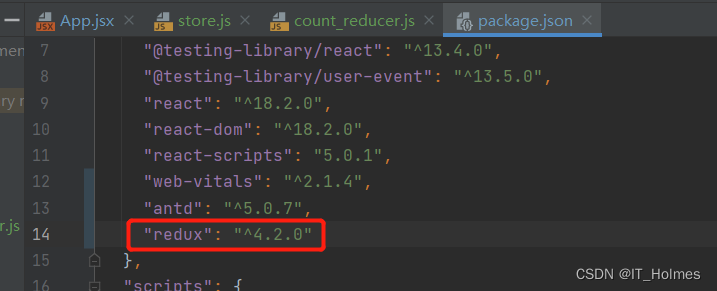
2. 创建store.js文件 和 reducer.js文件。
store.js如下:
/**
 * 该文件专门用于暴露一个store对象,整个应用只有一个store对象。
 */
// 引入createStore, 专门用于创建redux种最为核心的store对象
import {createStore} from 'redux'
// 引入为Count组件服务器的Reducer
import countReducer from './count_reducer'
// 暴露一个store
export default createStore(countReducer)
count_reducer.js如下:
/**
 *  1. 该文件是用于创建一个为Count组件服务的reducer,reducer的本质就是一个函数。
 *  2. reducer函数会接到两个参数,分别为:之前的状态(preState)和 动作对象(action)
 */
const initState = 0
export default function countReducer(preState = initState,action){
    const {type,data} = action
    switch (type){
        case 'increment':
            return preState + data
        case 'decrement':
            return preState - data
        default:
            return preState
    }
}
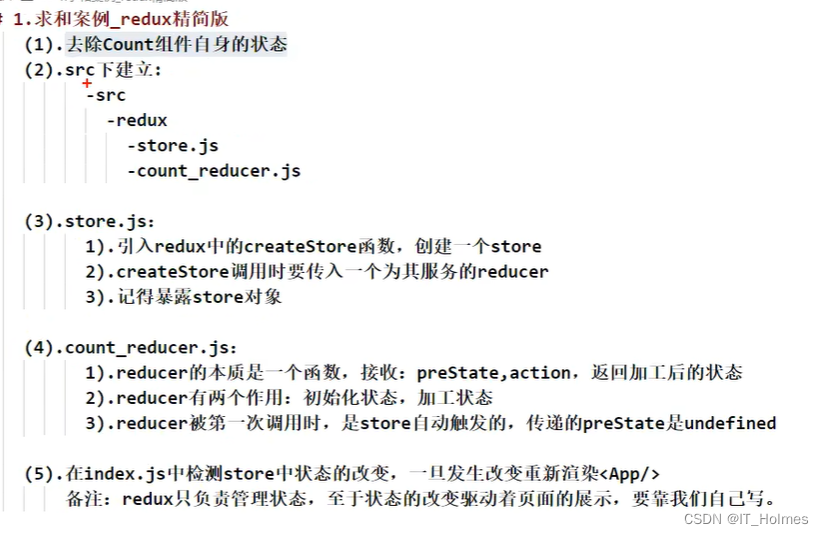
3. 解决store状态修改后页面没有进行修改的问题。
- 解决方式1:在componentDidMount钩子中进行监听。
import React, {Component} from 'react';
// 引用store,用于redux中保存的状态
import store from '../../redux/store.js'
// 标题
import { Typography,Button,Select } from 'antd';
const { Title } = Typography;
class Index extends Component {
selectNumber = 1
// fixme 通过此处进行监听。使用subscribe触发页面的刷新
componentDidMount() {
// fixme 检测redux 中状态的变化,只要变化,就调用render
store.subscribe(()=>{
// 触发页面刷新
this.setState({})
})
}
increment = ()=>{
const value = this.selectNumber
// dispatch方法:推送消息。
store.dispatch({
type:'increment',
data:value * 1
})
}
decrement = ()=>{
const value = this.selectNumber
const {count} = this.state
store.dispatch({
type:'decrement',
data:value * 1
})
}
incrementIfOdd = ()=>{
const value = this.selectNumber
const {count} = this.state
console.log(value,count)
if (count % 2 !== 0){
this.setState({count:count + value * 1})
}
}
incrementAsync = ()=>{
const value = this.selectNumber
const {count} = this.state
console.log(value,count)
setTimeout(()=>{
this.setState({count:count + value * 1})
},500)
}
// 下拉选择框事件
handleChange = (value) => {
console.log(`selected ${value}`);
this.selectNumber = value
}
render() {
return (
<div>
<Title level={2}>当前求和为:{store.getState()}</Title>
<Select
defaultValue="1"
style={{
width: 120,
}}
onChange={this.handleChange}
options={[
{
value: '1',
label: '1',
},
{
value: '2',
label: '2',
},
{
value: '3',
label: '3',
},
]}
/>
<Button type="primary" shape="circle" onClick={this.increment}>
+
</Button>
<Button type="primary" shape="circle" onClick={this.decrement}>
-
</Button>
<Button type="primary" onClick={this.incrementIfOdd}>
当前求和为奇数再加
</Button>
<Button type="primary" onClick={this.incrementAsync}>
异步加
</Button>
</div>
);
}
}
export default Index;
- 解决方式2:在入口文件index.js中进行配置。
import React from 'react'
import ReactDOM from 'react-dom'
// fixme 在入口文件index.js中引入store
import store from './redux/store'

import App from './App'

ReactDOM.render(<App/>,document.getElementById("root"))

// 使用subscribe触发页面的刷新
store.subscribe(()=>{
    ReactDOM.render(<App/>,document.getElementById("root"))
    // 因为,有dom的diff算法,因此就算重新渲染了App组件也没事。
})
总结:
4. redux 完整结构补充
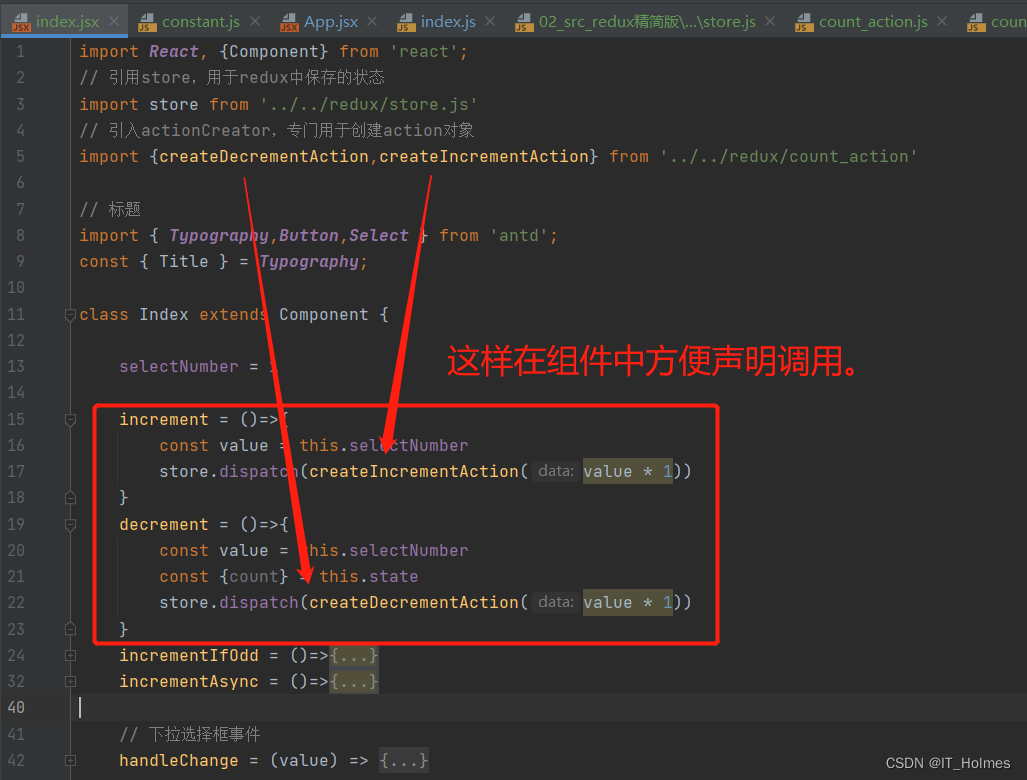
除了store.js 、reducer.js,还应该有action.js 和 constant.js两个文件来方便管理操作。
action.js如下:
/**
 * 该文件专门为Count组件生成action对象。
 */

import {INCREMENT,DECREMENT} from './constant'

// 简化写法:(函数返回值可以用()括号进行包裹对象来返回对象。)
export const createIncrementAction = (data) => ({type:INCREMENT,data})
export const createDecrementAction = (data) => ({type:DECREMENT,data})
constant.js如下:
/**
 * 该模块是用于定义action对象中type类型的常量值。
 * 目的只有一个:便于管理的同时防止程序员单词写错。
 */
export const INCREMENT = 'increment'
export const DECREMENT = 'decrement'
5. redux的 异步action
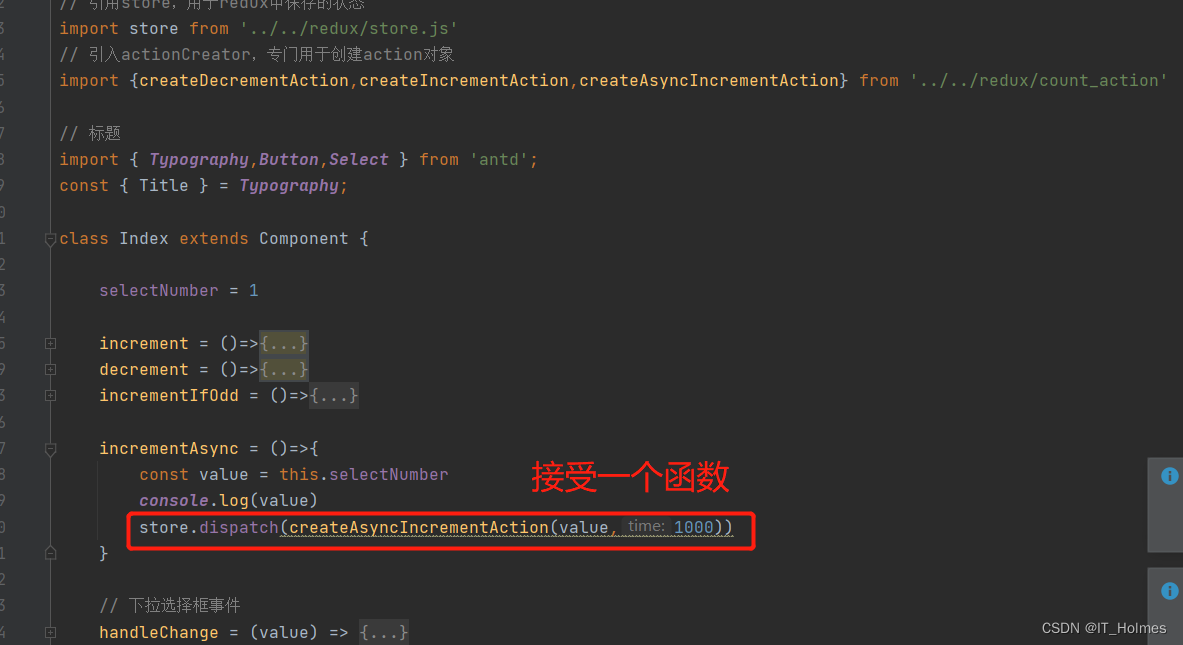
redux的action有两种返回结果方式:
- 返回Object对象的叫做同步的action。
- 返回fucntion函数的叫做异步的action。
前提 安装 redux-thunk 插件:
yarn add redux-thunk
引入redux-thunk,用于支持异步action。
action.js文件:
/**
 * 该文件专门为Count组件生成action对象。
 */

import {INCREMENT,DECREMENT} from './constant'

// 简化写法:(函数返回值可以用()括号进行包裹对象来返回对象。)
// fixme 返回对象是同步action
export const createIncrementAction = (data) => ({type:INCREMENT,data})
export const createDecrementAction = (data) => ({type:DECREMENT,data})

// fixme 返回函数是异步action
export const createAsyncIncrementAction = (data,time) => {
    // store会传递一个dispatch参数,其实就是对应了store的dispatch函数。
    return (dispatch) => {
        setTimeout(()=>{
            console.log(data)
            // 一般异步action中会调用同步的action。
            dispatch(createIncrementAction(data))
        },time)
    }
}
总结:

6. react-redux库 与 redux库
redux是其他人开发的一款方便集中式管理状态的插件库。redux可以用到vue,react等其他项目中。
facebook也出了一版类似redux的插件工具,react-redux库。
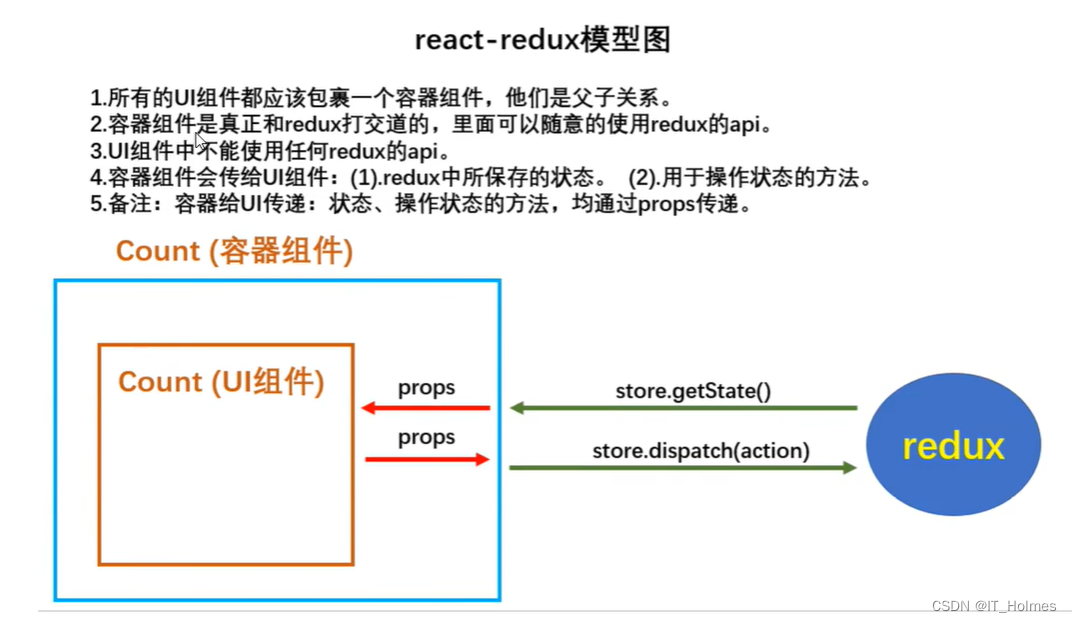
UI组件 通过 父容器组件 进行操作redux。
7. react-redux库的 实战
首先,安装react-redux库。
yarn add react-redux
或者
"react-redux": "^8.0.5",
原本redux的配置文件如下:
/**
 * 该文件专门用于暴露一个store对象,整个应用只有一个store对象。
 */
// 引入createStore, 专门用于创建redux种最为核心的store对象
import {createStore,applyMiddleware} from 'redux'
// 引入为Count组件服务器的Reducer
import countReducer from './count_reducer'
// 引入redux-thunk,用于支持异步action
import thunk from 'redux-thunk'
// 暴露一个store fixme 使用applyMiddleware添加插件。
export default createStore(countReducer,applyMiddleware(thunk))
action.js文件:专门用来配置action操作的。
/**
 * 该文件专门为Count组件生成action对象。
 */

import {INCREMENT,DECREMENT} from './constant'

// 简化写法:(函数返回值可以用()括号进行包裹对象来返回对象。)
// fixme 返回对象是同步action
export const createIncrementAction = (data) => ({type:INCREMENT,data})
export const createDecrementAction = (data) => ({type:DECREMENT,data})

// fixme 返回函数是异步action
export const createAsyncIncrementAction = (data,time) => {
    // store会传递一个dispatch参数,其实就是对应了store的dispatch函数。
    return (dispatch) => {
        setTimeout(()=>{
            console.log(data)
            // 一般异步action中会调用同步的action。
            dispatch(createIncrementAction(data))
        },time)
    }
}
constant.js文件:方便管理名称。
/**
 * 该模块是用于定义action对象中type类型的常量值。
 * 目的只有一个:便于管理的同时防止程序员单词写错。
 */
export const INCREMENT = 'increment'
export const DECREMENT = 'decrement'
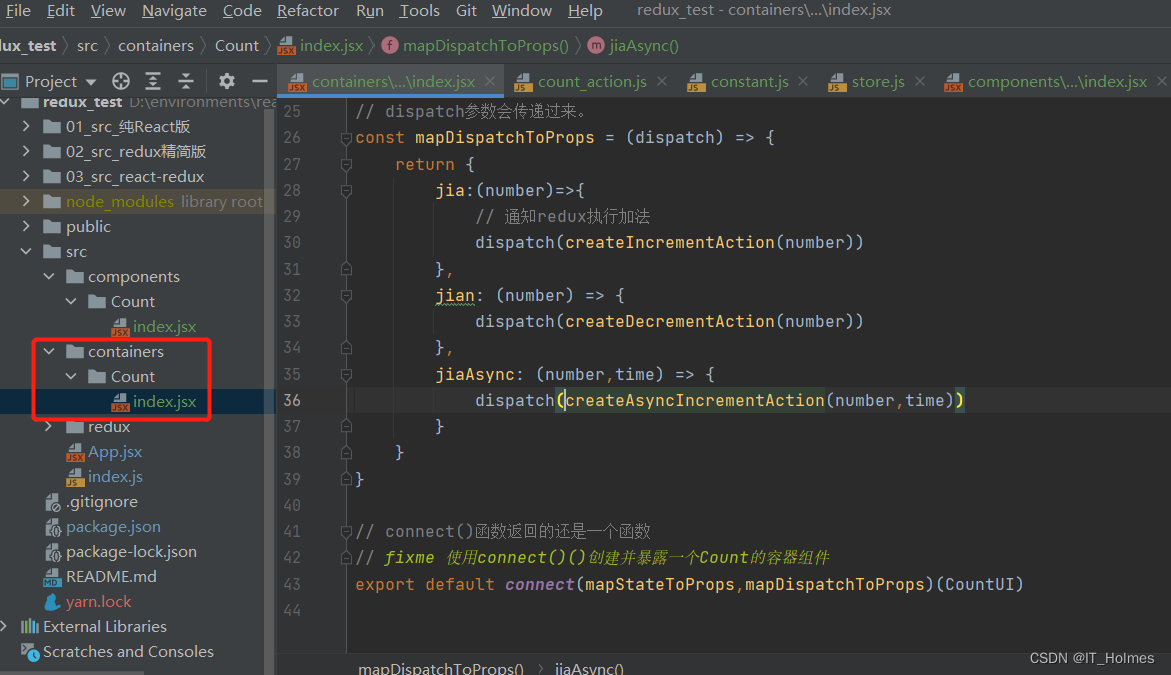
容器组件配置:
// 引入Count的UI组件
import CountUI from '../../components/Count'
// 引入connect用于连接UI组件与redux
import {connect} from 'react-redux'
// 引入固定写法
import {createIncrementAction,createDecrementAction,createAsyncIncrementAction} from '../../redux/count_action'

/**
 *  1. mapStateToProps函数返回的是一个对象
 *  2. mapStateToProps函数返回的对象中的key就作为传递给UI组件props的key,value就作为传递给UI组件props的value -- 状态
 *  3. mapStateToProps用于传递状态
 */
// state:就是store中的状态
const mapStateToProps = (state) => {
    // 返回值为对象
    return {
        count:state
    }
}
/**
 *  1. mapDispatchToProps函数返回的是一个对象
 *  2. mapDispatchToProps函数返回的对象中的key就作为传递给UI组件props的key,value就作为传递给UI组件props的value -- 操作状态的方法
 *  3. mapDispatchToProps用于传递操作状态的方法
 */
// dispatch参数会传递过来。
const mapDispatchToProps = (dispatch) => {
    return {
        jia:(number)=>{
            // 通知redux执行加法
            dispatch(createIncrementAction(number))
        },
        jian: (number) => {
            dispatch(createDecrementAction(number))
        },
        jiaAsync: (number,time) => {
            dispatch(createAsyncIncrementAction(number,time))
        }
    }
}

// connect()函数返回的还是一个函数
// fixme 使用connect()()创建并暴露一个Count的容器组件
export default connect(mapStateToProps,mapDispatchToProps)(CountUI)
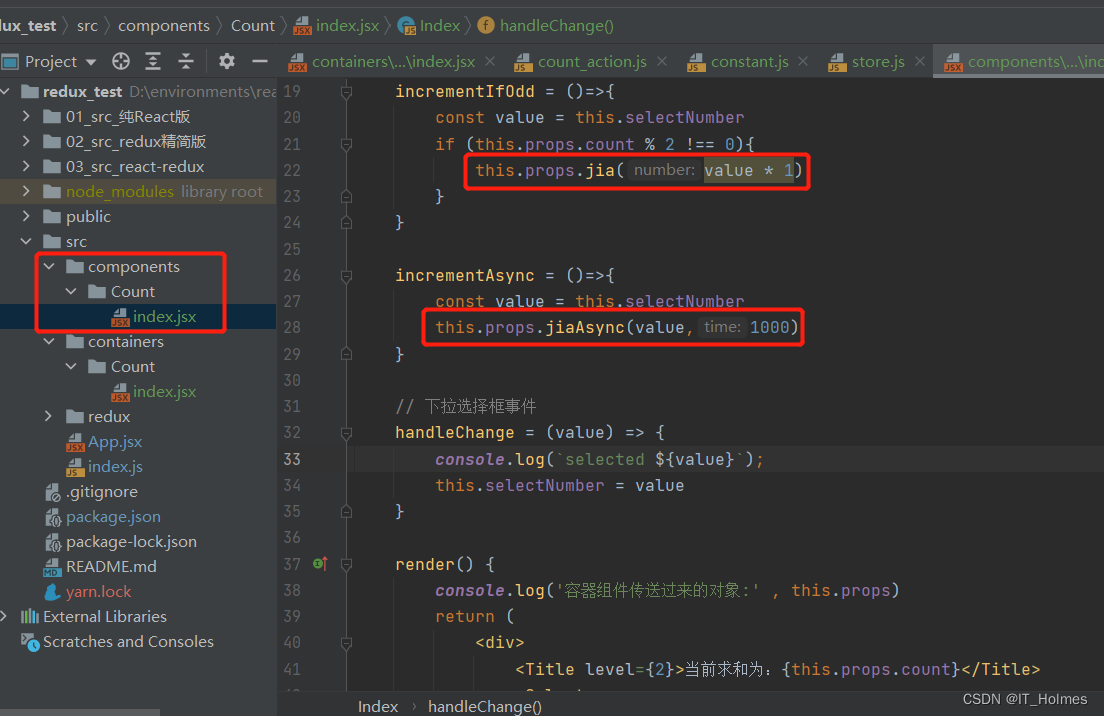
正常组件:
import React, {Component} from 'react';
// 标题
import { Typography,Button,Select } from 'antd';
const { Title } = Typography;
class Index extends Component {
selectNumber = 1
increment = ()=>{
const value = this.selectNumber * 1
this.props.jia(value)
}
decrement = ()=>{
const value = this.selectNumber
this.props.jian(value)
}
incrementIfOdd = ()=>{
const value = this.selectNumber
if (this.props.count % 2 !== 0){
this.props.jia(value * 1)
}
}
incrementAsync = ()=>{
const value = this.selectNumber
this.props.jiaAsync(value,1000)
}
// 下拉选择框事件
handleChange = (value) => {
console.log(`selected ${value}`);
this.selectNumber = value
}
render() {
console.log('容器组件传送过来的对象:' , this.props)
return (
<div>
<Title level={2}>当前求和为:{this.props.count}</Title>
<Select
defaultValue="1"
style={{
width: 120,
}}
onChange={this.handleChange}
options={[
{
value: '1',
label: '1',
},
{
value: '2',
label: '2',
},
{
value: '3',
label: '3',
},
]}
/>
<Button type="primary" shape="circle" onClick={this.increment}>
+
</Button>
<Button type="primary" shape="circle" onClick={this.decrement}>
-
</Button>
<Button type="primary" onClick={this.incrementIfOdd}>
当前求和为奇数再加
</Button>
<Button type="primary" onClick={this.incrementAsync}>
异步加
</Button>
</div>
);
}
}
export default Index;
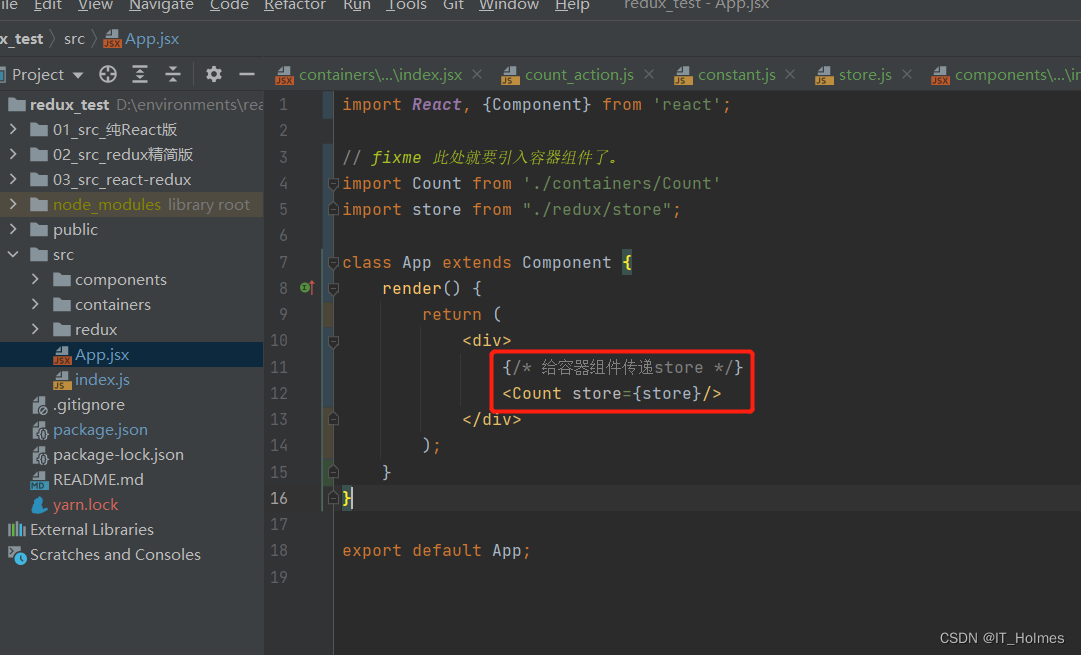
App组件还需要给容器引入store:
import React, {Component} from 'react';

// fixme 此处就要引入容器组件了。
import Count from './containers/Count'
import store from "./redux/store";

class App extends Component {
    render() {
        return (
            <div>
                {/* 给容器组件传递store */}
                <Count store={store}/>
            </div>
        );
    }
}

export default App;
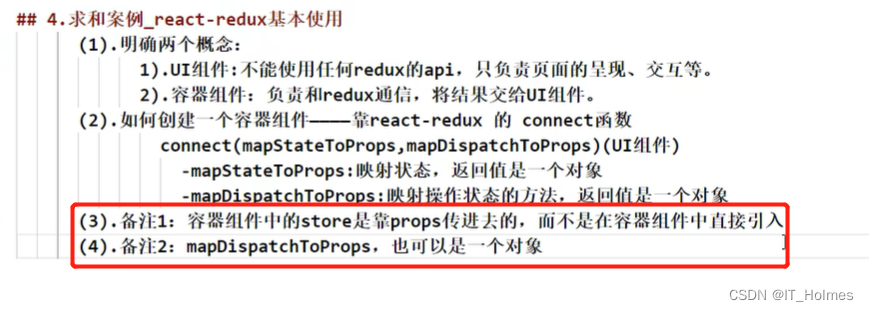
总结:

8. react-redux的connect 最精简写法
mapDispatchToProps最精简写法: 传入对象,赋予的是action函数并且没有调用dispatch,React会自动调用dispatch。这算是api层次的一个优化。
// 引入Count的UI组件
import CountUI from '../../components/Count'
// 引入connect用于连接UI组件与redux
import {connect} from 'react-redux'
// 引入固定写法
import {createIncrementAction,createDecrementAction,createAsyncIncrementAction} from '../../redux/count_action'

// 编码精简操作
export default connect(
    // fixme mapStateToProps写法:(映射状态)

    state => ({count:state}),
    // fixme mapDispatchToProps一般写法:(映射操作状态的方法)
    // dispatch => ({
    //     jia:number => dispatch(createIncrementAction(number)),
    //     jian: number => dispatch(createDecrementAction(number)),
    //     jiaAsync: (number,time) => dispatch(createAsyncIncrementAction(number,time))
    // })

    // fixme mapDispatchToProps最精简写法: 虽然传入的都是函数,并且没有调用dispatch,React会自动调用dispatch
    // 这算是api层次上的精简。
    {
        jia:createIncrementAction,
        jian:createDecrementAction,
        jiaAsync:createAsyncIncrementAction
    }
)(CountUI)
总结:
9. react-redux的 Provider组件作用
react-redux使用之后,就不用再添加个监听redux的操作了。
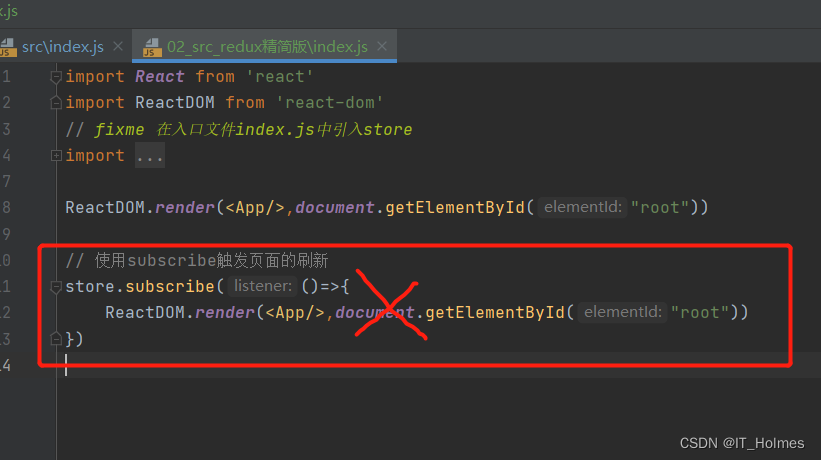
Provider组件作用:就是可以包裹App组件,App下的容器组件自动引入了store。
import React from 'react'
import ReactDOM from 'react-dom'
import App from './App'

// 引入store 和 react-redux和Provider:
import store from './redux/store'
import {Provider} from 'react-redux'


// 通过Provider组件引入store就不用一个个再引入了。
ReactDOM.render(
    <Provider store={store}>
        <App/>
    </Provider>
    , document.getElementById("root"))
10. react-redux 整合UI组件 和 容器组件
因为,目前是一个UI组件对应了一个容器组件,如果有多个UI组件就有多个容器组件,所以很复杂。
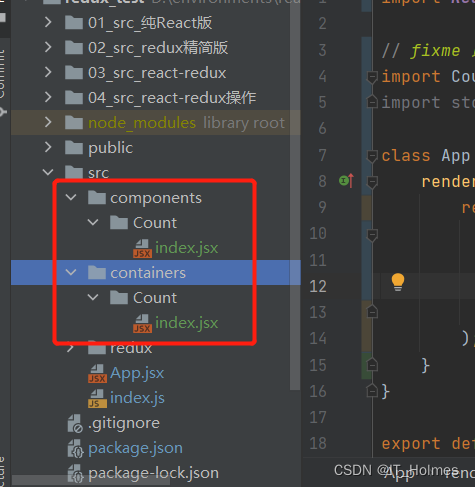
为了解决上面问题,可以将容器组件和UI组件融合为一个组件直接进行操作:
import React, {Component} from 'react';
// 引入connect用于连接UI组件与redux
import {connect} from 'react-redux'
// 引入固定写法
import {createIncrementAction, createDecrementAction, createAsyncIncrementAction} from '../../redux/count_action'
// 标题
import {Typography, Button, Select} from 'antd';
const {Title} = Typography;
// 定义UI组件
class Count extends Component {
selectNumber = 1
increment = () => {
const value = this.selectNumber * 1
this.props.jia(value)
}
decrement = () => {
const value = this.selectNumber
this.props.jian(value)
}
incrementIfOdd = () => {
const value = this.selectNumber
if (this.props.count % 2 !== 0) {
this.props.jia(value * 1)
}
}
incrementAsync = () => {
const value = this.selectNumber
this.props.jiaAsync(value, 1000)
}
// 下拉选择框事件
handleChange = (value) => {
console.log(`selected ${value}`);
this.selectNumber = value
}
render() {
console.log('容器组件传送过来的对象:', this.props)
return (
<div>
<Title level={2}>当前求和为:{this.props.count}</Title>
<Select
defaultValue="1"
style={{
width: 120,
}}
onChange={this.handleChange}
options={[
{
value: '1',
label: '1',
},
{
value: '2',
label: '2',
},
{
value: '3',
label: '3',
},
]}
/>
<Button type="primary" shape="circle" onClick={this.increment}>
+
</Button>
<Button type="primary" shape="circle" onClick={this.decrement}>
-
</Button>
<Button type="primary" onClick={this.incrementIfOdd}>
当前求和为奇数再加
</Button>
<Button type="primary" onClick={this.incrementAsync}>
异步加
</Button>
</div>
);
}
}
// 编码精简操作
export default connect(
// fixme mapStateToProps写法:(映射状态)
state => ({count: state}),
// fixme mapDispatchToProps一般写法:(映射操作状态的方法)
// dispatch => ({
// jia:number => dispatch(createIncrementAction(number)),
// jian: number => dispatch(createDecrementAction(number)),
// jiaAsync: (number,time) => dispatch(createAsyncIncrementAction(number,time))
// })
// fixme mapDispatchToProps最精简写法: 虽然传入的都是函数,并且没有调用dispatch,React会自动调用dispatch
// 这算是api层次上的精简。
{
jia: createIncrementAction,
jian: createDecrementAction,
jiaAsync: createAsyncIncrementAction
}
)(Count)
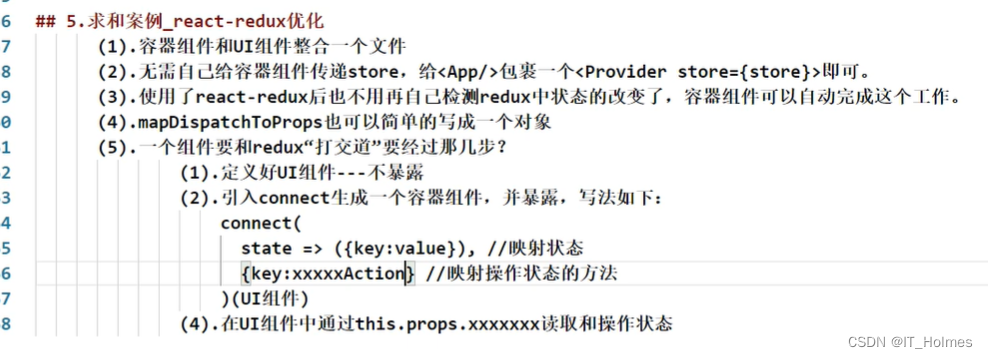
优化总结:
11. redux的 combineReducers方法
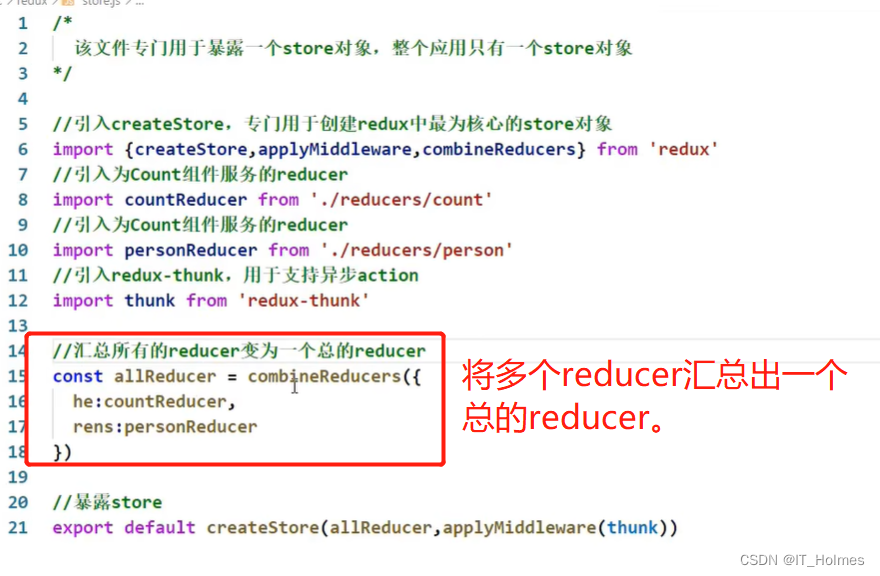
使用redux的combineReducers方法来汇总reducer。

12. 纯函数
为什么不用push,unshift之类的函数方法:
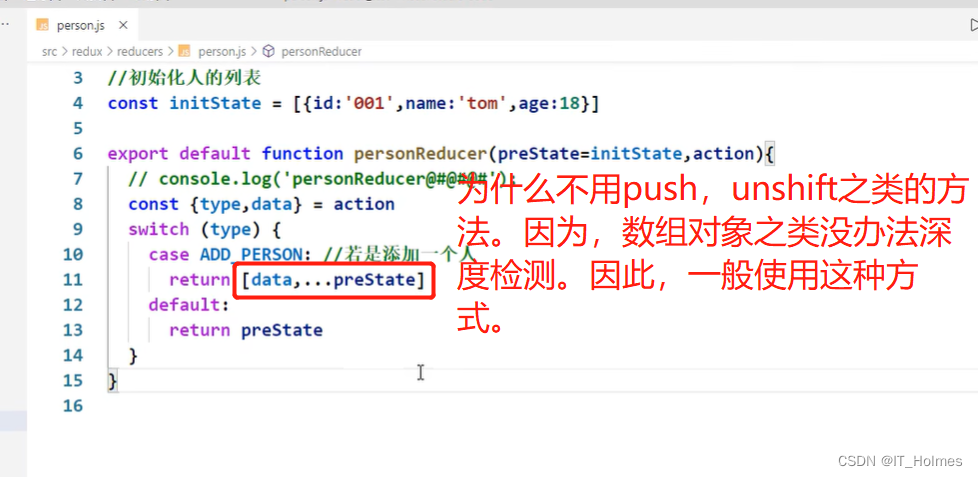
纯函数:
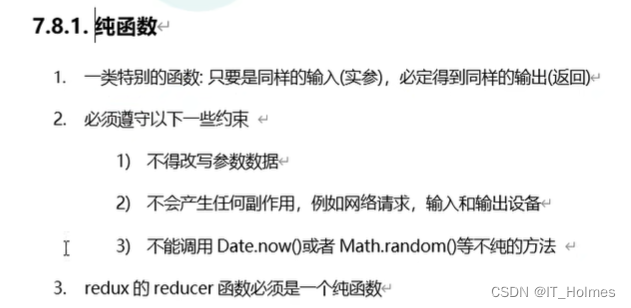
- 定义:就是一个函数的返回结果只依赖于它的参数,并且在执行过程中没有副作用,我们就把这个函数叫做纯函数。
- 不会发起网络请求,不会调用输入和输出设备。不能调用Date.now()、Math.random()方法等不纯的函数方法。
- redux的reducer函数必须是一个纯函数。
13. redux 开发者工具
redux DevTools开发者工具:

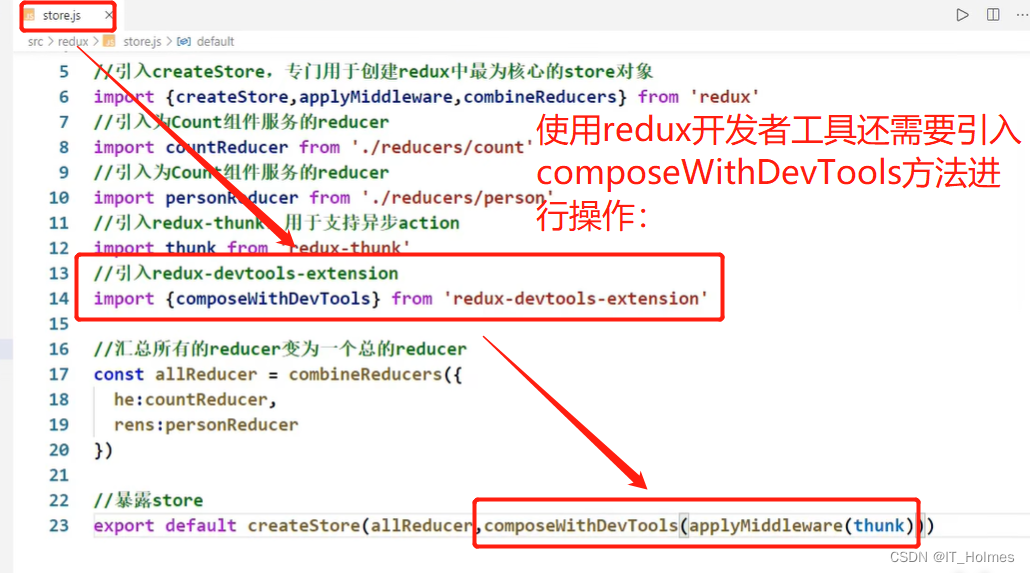
还要引入redux-devtools-extension中的composeWithDevTools方法:






![leetcode 1658. 将 x 减到 0 的最小操作数[python3 双指针实现与思路整理]](https://img-blog.csdnimg.cn/img_convert/877761c9beb16319adb1468ae697b54d.png)

