文章目录
- 前言
- 平移
- 图示
- 代码示例
- 缩放
- 图示
- 代码示例
- 旋转
- 公式推导
- 代码示例
- 总结
前言
在webgl中将图形进行平移、旋转、缩放的操作称为变换或仿射变换,图形的仿射变换涉及到顶点位置的修改,通过顶点着色器是比较直接的方式。本文通过着色器实现对webgl图形的仿射变换。
平移
图示
当对图形进行平移时,只要逐顶点的对每个坐标分量进行平移即可,如下图所示。
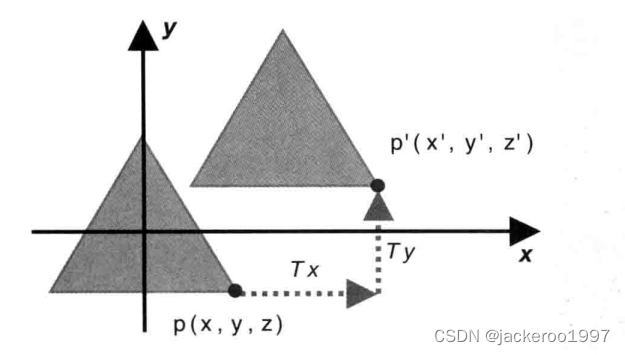
一旦理解这一点,操作起来就很简单了,将齐次坐标的对应偏移量Tx和Ty加在顶点坐标的对应分量上,重新赋值给gl_Position即可,这里每帧都让顶点着色器的位置发生变化,并在动画中执行,实现一个简易的运动效果。
代码示例
    let canvas = document.getElementById('canvas');

    // 获取webgl绘图上下文
    const gl = canvas.getContext('webgl');
    if (!gl) {
      throw new Error('WebGL not supported');
    }

    canvas.width = 500;
    canvas.height = 500;
    gl.viewport(0, 0, canvas.width, canvas.height)

    const vertex = `
			attribute vec4 aPosition;
      attribute float aTranslate;
			void main() {
				gl_Position = vec4(aPosition.x + aTranslate, aPosition.y + 0.5 * aTranslate, aPosition.z, 1.0);
				gl_PointSize = 10.0;
			}
		`
    const fragment = `
			precision highp float;
			// uniform vec4 uColor;
			void main(){
				gl_FragColor =vec4(1.0,0.0,0.0,1.0);
			}
		`

    // 创建program
    const program = initShader(gl, vertex, fragment)
    // 获取attribute变量的数据存储位置
    const aPosition = gl.getAttribLocation(program, 'aPosition');
    const aTranslate = gl.getAttribLocation(program, 'aTranslate');
    // 创建缓冲区对象
    const buffer = gl.createBuffer();
    // 绑定缓冲区对象
    gl.bindBuffer(gl.ARRAY_BUFFER, buffer);
    // 传入的数据
    const vertices = new Float32Array([
      -0.7, -0.5,
      -0.9, -0.7,
      -0.5, -0.7
    ])
    // 开辟空间并写入数据
    gl.bufferData(gl.ARRAY_BUFFER, vertices, gl.STATIC_DRAW)
    // 缓冲区对象分配给attribute变量
    gl.vertexAttribPointer(aPosition, 2, gl.FLOAT, false, 0, 0)
    // 开启attribue缓冲区变量
    gl.enableVertexAttribArray(aPosition)

    let translate = 0

    function animate() {
      console.log('requestAnimationFrame')
      translate += 0.005;
      if (translate > 1) {
        translate = 0
      }
      gl.vertexAttrib1f(aTranslate, translate)

      // 开始绘制
      gl.drawArrays(gl.POINTS, 0, 1)
      requestAnimationFrame(() => animate())
    }

    animate()

缩放
图示
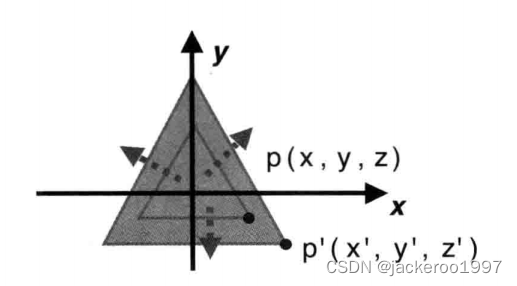
缩放的原理也很简单,顶点着色器的x和y分量都乘以一个缩放系数即可
代码示例
    const vertex = `
			attribute vec4 aPosition;
      attribute float aTranslate;
			void main() {
				gl_Position = vec4(aPosition.x * aTranslate, aPosition.y  * aTranslate, aPosition.z, 1.0);
				gl_PointSize = 10.0;
			}
		`
    ···
    ···
    const vertices = new Float32Array([
      -0.2, 0.0,
      -0.4, -0.2,
      -0.0, -0.2
    ])
   ···
    let translate = 0
    function animate() {
      console.log('requestAnimationFrame')
      translate += 0.005;
      if (translate > 1) {
        translate = 0
      }
      gl.vertexAttrib1f(aTranslate, translate)

      // 开始绘制
      gl.drawArrays(gl.TRIANGLES, 0, 3)
      requestAnimationFrame(() => animate())
    }

    animate()

旋转
旋转是一个复杂的平移,为了描述旋转动作,需要指定以下三点:
- 旋转轴
- 旋转方向
- 旋转角度
公式推导
假设原本齐次坐标系上一点P的坐标是(x,y,z),经逆时针旋转角度β后移动至P’(x’, y’, z’),如下:
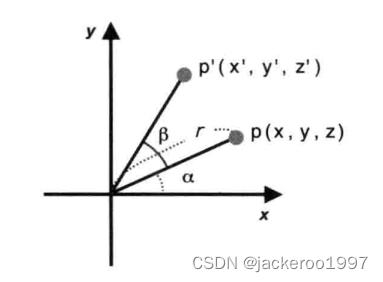
r表示原点到旋转前的P的距离,α是X轴旋转到P的角度。则P的坐标可以表示为:
- x = r * cos α
- y = r * sin α
P’的坐标可表示为:
- x’ = r * cos (α + β)
- y’ = r * sin (α + β)
将P’展开得:
- x’ = r * ( cos α * cos β - sin α * sin β )
- y’ = r * ( sin α * cos β + cos α * sin β )
最后将P坐标代入上式可得P’与P的对应关系
- x’ = x * cos β - y * sin β
- y’ = x * sin β + y * cos β
- z’ =z
代码示例
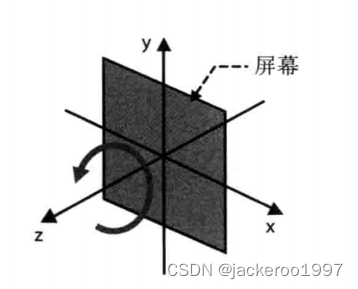
为了让绕z轴效果显得更加清晰,我们把三角形的一个顶点放在原点位置并绕Z轴进行旋转操作。
    const vertex = `
			attribute vec4 aPosition;
      attribute float deg;
			void main() {
				gl_Position.x = aPosition.x * cos(deg) -  aPosition.y * sin(deg);
        gl_Position.y = aPosition.x * sin(deg) +  aPosition.y * cos(deg);
        gl_Position = vec4(gl_Position.x, gl_Position.y, gl_Position.z, 1.0);
				gl_PointSize = 10.0;
			}
		`
    ···
    ···
    const vertices = new Float32Array([
      -0.0, 0.0,
      -0.2, -0.2,
      0.2, -0.2
    ])
   ···
    let translate = 0
    function animate() {
      console.log('requestAnimationFrame')
      translate += 0.01;
      gl.vertexAttrib1f(deg, translate)

      // 开始绘制
      gl.drawArrays(gl.TRIANGLES, 0, 3)
      requestAnimationFrame(() => animate())
    }

    animate()

总结
webgl通过操作顶点着色器实现图形的平移,缩放,旋转操作,在接下来将介绍通过转换矩阵来实现这部分功能。




![leetcode 1658. 将 x 减到 0 的最小操作数[python3 双指针实现与思路整理]](https://img-blog.csdnimg.cn/img_convert/877761c9beb16319adb1468ae697b54d.png)

